
實時通訊 socketio nio 總結
阿新 • • 發佈:2019-02-03
公司要求多一個實時通訊的功能
解決思路如下
架構圖:
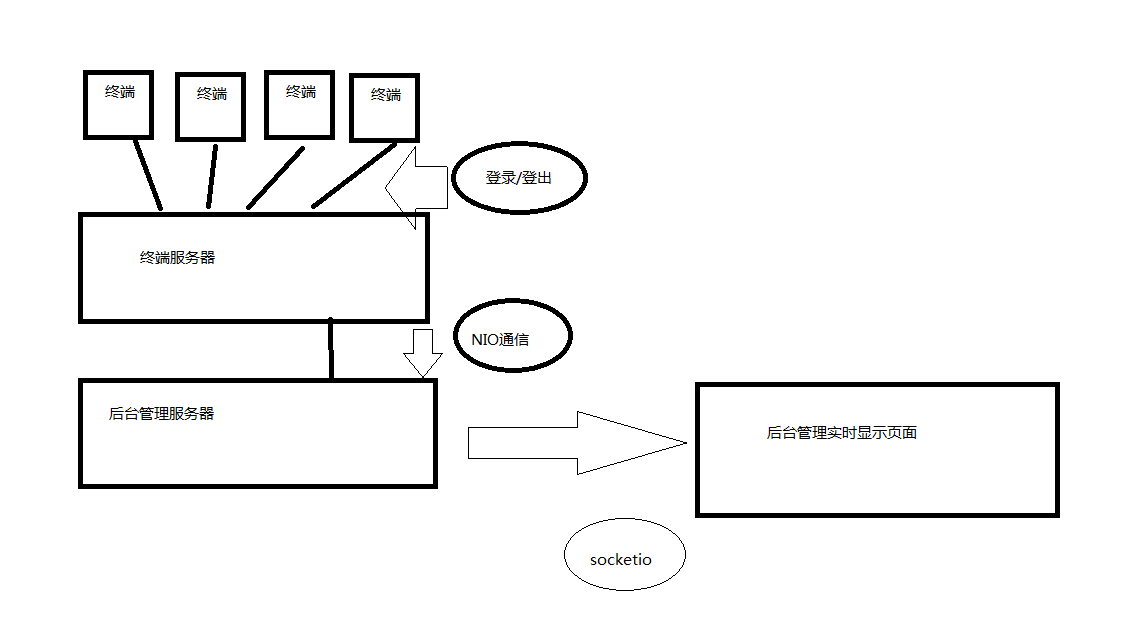
後臺管理頁面實時顯示線上的終端情況
終端伺服器和後臺伺服器之間用NIO通訊
當有終端登入登出,後臺管理伺服器(服務端)接收終端伺服器(客戶端) 介面請求
後臺管理伺服器(服務的)傳送資訊給實時監控頁面(客戶端)
附上程式碼:
終端的客戶端
public class EmployeeSocketClient {
static SocketChannel sc =null;
final static InetSocketAddress address = new InetSocketAddress(
"127.0.0.1", 8085);
ByteBuffer buffer = ByteBuffer.allocate(1024);
static {
try {
//這裡搞個單例好像也行 後臺管理伺服器NIO伺服器程式碼:
public class EmployeeSocketServer implements InitializingBean {//spring載入完類的構造方法之後,就會執行afterPropertiesSet方法
private Selector selector;
private ByteBuffer buffer = ByteBuffer.allocate(1024);
@Value("${socket_server_port}")//springboot配置引數,如果不用InitializingBean 注入不進來 後臺管理伺服器socketio伺服器程式碼:
public class EmployeeCurrentTimeInfo implements InitializingBean{

	@Value("${socketio_ip}")
	private String socketioIp;
	@Value("${socketio_port}")
	private String socketioPort;
	@Value("${socketio_delay}")
	private String socketioDelay;


	@Autowired
	private EmployeeService employeeService ;
	// 用於儲存所有客戶端

	public static List<SocketIOClient> clients = new ArrayList<SocketIOClient>();
	public SocketIOServer server ;

	public void init() throws InterruptedException {
		Configuration configuration = new Configuration();

		if(socketioIp == null || "".equals(socketioIp)){
			socketioIp = "localhost";
		}
		if(socketioPort == null || "".equals(socketioPort)){
			socketioPort = "8032";
		}
		if(socketioDelay == null || "".equals(socketioDelay)){
			socketioDelay = "3000";
		}
		configuration.setHostname(socketioIp);// 設定主機名
		configuration.setPort(Integer.valueOf(socketioPort));// 設定監聽的埠號
		server = new SocketIOServer(configuration);// 根據配置建立伺服器物件

		server.addConnectListener(new ConnectListener() {// 新增客戶端連線監聽器
			@Override
			public void onConnect(SocketIOClient client) {
				clients.add(client);// 儲存客戶端
			}
		});
		server.addDisconnectListener(new DisconnectListener() {
			//方式重新整理頁面時候會導致list裡有多個無效的客戶端,當銷燬時,從list裡刪除,保證每次先銷燬再加入
			@Override
			public void onDisconnect(SocketIOClient client) {
				clients.remove(client);
			}
		});
		server.start();
		System.out.println("server started");


		// 預留,三秒一重新整理功能
//		ScheduledExecutorService executorService = Executors.newSingleThreadScheduledExecutor();

//		executorService.scheduleWithFixedDelay(new Runnable() {
//			@Override
//			public void run() {
//				Random random = new Random();
//				for (SocketIOClient client : clients) {
//					client.sendEvent("pushpoint", new Point(
//							random.nextInt(100), random.nextInt(100)));// 每隔一秒推送一次
//					// System.out.println(p.x +"____"+p.y);
//				}
//			}
//		}, 1000, Integer.valueOf(socketioDelay), TimeUnit.MILLISECONDS);
//
//
//		// 防止同步併發問題,需要保留
//		Object object = new Object();
//		synchronized (object) {
//			object.wait();
//		}
	}

	@Override
	public void afterPropertiesSet() throws Exception {
		init();

	}

}
實時監控頁面:
<!DOCTYPE html>
<html>
<head>
    <title>netty-socketio測試</title>
    <meta http-equiv="Content-Type" content="text/html;charset=UTF-8"/>
    <!-- 自己去下載 -->
    <script src="js/socket.io/socket.io.js"></script>
    <script src="js/moment.min.js"></script>
    <script src="js/jquery-1.7.2.min.js"></script>
    <script>
        $(function(){
            var socket =  io.connect('http://192.168.1.122:8032');
            //監聽名為pushpoint的事件,這與服務端推送的那個事件名稱必須一致
            socket.on("pushpoint", function(data){

                $('#x').text(data.x);
                $('#y').text(data.y);
            });
        });

    </script>
</head>

<body>

<div id="display" style="height:50px;background-color:grey;">
    x=<span id="x">0</span>, y=<span id="y">0</span>
</div>

</body>

</html>
剛開始準備做成股票監控系統那樣,3-3.5秒重新整理一次資訊,但發現實際業務沒有那麼複雜,就把實時重新整理給註釋掉了
socketio有2種方式,一種是上面寫到的伺服器自動傳送請求的,另一種是客戶端傳送請求,伺服器響應的方式。
以上2種方式結合使用,可以實現分頁效果:
例如頁面要顯示的資料由10頁,每頁10個,但是當終端狀態改變時頁面客戶端不會自動傳送請求,則需要在頁面客戶端第一次請求時附帶分頁預設值,當頁面客戶端傳送分頁請求時,改變預設值,並作為入參去查詢資料庫。千萬不要快取所有的資料在前段自己來做分頁處理,那樣好蠢。