
Android Studio打包混淆帶資源的SDK
最近要實現一個把自己的整個應用打包成SDK接入到合作公司的應用中,剛開始是想採用外掛(如360的DroidPlugin,原理解析連結:分析DroidPlugin,深入理解外掛化框架)的形式來做,這樣的話很方便,只要提供一個apk就行了。但是問題來了,一個完整的應用裡面接入了很多第三方平臺的功能,在外掛app中執行的話有些第三方服務啟動不了,如極光推送。因此只能放棄這種便捷途徑。
我們知道就算應用再大隻要把應用程式碼與資源拷貝到呼叫工程中一起編譯的方法是絕對可行的,只是這種方法看起來有點low而且繁瑣麻煩;經過查詢資料決定採用jar包+apk的方式來實現,這樣我們中只要提供jar+apk+jniLib(如果有)給呼叫方即可。
在Android應用中我們是可以訪問zip檔案(如apk)或者目錄中的資源的,這裡我們先了解一下一個apk檔案的結構,用好壓開啟一個apk檔案,如下圖:
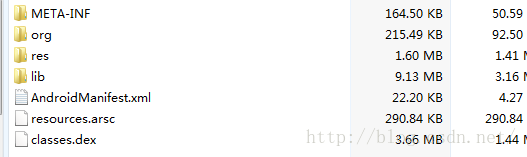
圖1
圖1中dex檔案表示的是程式碼,resources.arsc中儲存了R檔案中Id與資源的對應資訊,因此在製作資源apk時可以用好壓把除了resources.arsc、AndroidMainifest.xml(包含SDK版本資訊)、res和META-INF(包含簽名信息,用於安全校驗)之外的檔案全刪除以減輕apk大小。
那麼在製作好資源apk後如何在jar中使用其中的資源呢,在類AssetManager通過addAssetPath方法可以新增資源路徑,方法程式碼如下:
這些zip檔案和目錄可以作為資源路徑的前提是裡面必須包含resources.arsc檔案,要使用apk中的資源我們只需建立一個AssetManager物件呼叫addAssetPath新增apk路徑即可。/** * Add an additional set of assets to the asset manager. This can be * either a directory or ZIP file. Not for use by applications. Returns * the cookie of the added asset, or 0 on failure. * {@hide} */ public final int addAssetPath(String path) { synchronized (this) { int res = addAssetPathNative(path); makeStringBlocks(mStringBlocks); return res; } }
通過上面額介紹相信我們已經知道如何提取apk 中的資源了,那麼我們怎麼把整個jar所引用的資源重定向到資源apk上呢,這裡我們就得分析下Activity中Android的資源獲取流程,就拿設定Activity Layout來說,設定Activity佈局流程如下:
  public void setContentView(@LayoutRes int layoutResID) {
        <u>getWindow().setContentView(layoutResID);</u>
        initWindowDecorActionBar();
    }
getWindow()獲取的是Activity中mWindow變數,這個變數是在Activity的attach方法中賦值的其實就是PhoneWindow類物件,程式碼跳轉到的PhoneWindow的setContentView方法:
  @Override
    public void setContentView(int layoutResID) {
        // Note: FEATURE_CONTENT_TRANSITIONS may be set in the process of installing the window
        // decor, when theme attributes and the like are crystalized. Do not check the feature
        // before this happens.
        if (mContentParent == null) {
            installDecor();
        } else if (!hasFeature(FEATURE_CONTENT_TRANSITIONS)) {
            mContentParent.removeAllViews();
        }

        if (hasFeature(FEATURE_CONTENT_TRANSITIONS)) {
            final Scene newScene = Scene.getSceneForLayout(mContentParent, layoutResID,
                    getContext());
            transitionTo(newScene);
        } else {
            <u>mLayoutInflater.inflate(layoutResID, mContentParent);</u>
        }
        mContentParent.requestApplyInsets();
        final Callback cb = getCallback();
        if (cb != null && !isDestroyed()) {
            cb.onContentChanged();
        }
} public View inflate(@LayoutRes int resource, @Nullable ViewGroup root, boolean attachToRoot) {
<u>final Resources res = getContext().getResources();</u>
if (DEBUG) {
Log.d(TAG, "INFLATING from resource: \"" + res.getResourceName(resource) + "\" ("
+ Integer.toHexString(resource) + ")");
}
final XmlResourceParser parser = res.getLayout(resource);
try {
return inflate(parser, root, attachToRoot);
} finally {
parser.close();
}
}public class BaseSDKActivity extends FragmentActivity {
public static final String TAG = "BaseSDKActivity";
private AssetManager assets;
private Resources customRes;
private Resources.Theme customTheme;
@Override
public Resources getResources() {
if(BuildConfig.IS_SDK) {
return makeResources();
}else{
return super.getResources();
}
}
@Override
public Resources.Theme getTheme() {
if(BuildConfig.IS_SDK) {
return makeResourcesTheme();
}else{
return super.getTheme();
}
}
@Override
public AssetManager getAssets() {
if(BuildConfig.IS_SDK) {
return makeAssetmanager();
}else{
return super.getAssets();
}
}
private Resources.Theme makeResourcesTheme(){
if (customTheme == null) {
customTheme = makeResources().newTheme();
customTheme.setTo(super.getTheme());
}
return customTheme;
}
private Resources makeResources(){
if (customRes == null) {
customRes = new Resources(makeAssetmanager(), super.getResources().getDisplayMetrics(), super.getResources().getConfiguration());
}
return customRes;
}
private AssetManager makeAssetmanager() {
if (assets == null) {
try {
assets = AssetManager.class.newInstance();
Method addAssetPathMethod = AssetManager.class.getDeclaredMethod("addAssetPath", String.class);
addAssetPathMethod.setAccessible(true);
addAssetPathMethod.invoke(assets, SmartBraApp.getApp().getBraResManager().getSDKResPath());//makeDir() + "/" + "sdk_bra.apk"
} catch (IllegalAccessException e) {
e.printStackTrace();
} catch (NoSuchMethodException e) {
e.printStackTrace();
} catch (InstantiationException e) {
e.printStackTrace();
} catch (InvocationTargetException e) {
e.printStackTrace();
}
}
return assets;
}
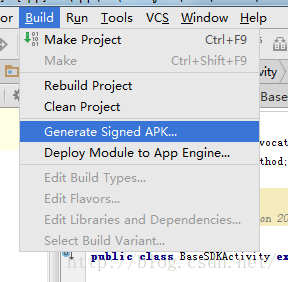
}接下來就是打包jar跟apk了,很多人都是用gradle命令打包的,但是我們要打包成的jar是要經過混淆的而且要把整個工程引用的jar包、遠端引用庫(類似jcenter中的庫),module以及module引用的jar包和遠端庫經過混淆並打包到一個jar包中,對於gradle指令不熟悉的話很頭疼,這些都不是問題,我發現一個很簡單的方法如下:
對工程打包簽名:
簽名完成後會得到output中生成apk在classes-proguard/release目錄下生成混淆後的jar包classes.jar(得在build.gradle中開啟混淆,沒開啟可能不會生成)
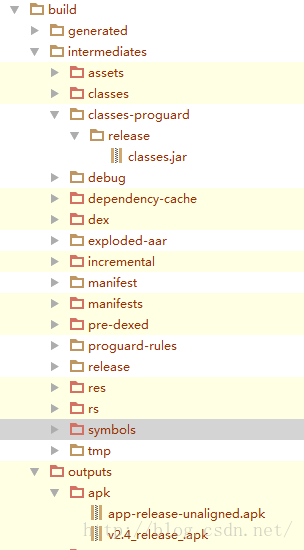
在classes-proguard/release/classes.jar中打包的是所有引用庫的程式碼,打包好後我們可以用好壓開啟classes.jar選擇性的刪除一些不行打包的程式碼,apk也是如此。
需要注意的是在jar中的Notification並不能使用apk中的資源,因為Notification是系統應用繪製的,post Notification到NotificationManager時,系統應用會根據發出post Notification的應用包名去獲取該應用的資源,這個過程不可控所以Notification用到的Icon要手動拷貝到呼叫工程固定名字用getIdentifier()方法獲取,如果用到so庫也要手動拷貝,到這裡就算完結了--