
用Python實現二叉樹、二叉樹非遞迴遍歷及繪製
前言
關於二叉樹的實現與遍歷,網上已經有很多文章了,包括C, C++以及JAVA等。鑑於python做為指令碼語言的簡潔性,這裡寫一篇小文章用python實現二叉樹,幫助一些對資料結構不太熟悉的人快速瞭解下二叉樹。本文主要通過python以非遞迴形式實現二叉樹構造、前序遍歷,中序遍歷,後序遍歷,層次遍歷以及求二叉樹的深度及葉子結點數。其他非遞迴形式的遍歷,想必大多人應該都很清楚,就不再宣告。如果你用C或者C++或者其他高階語言寫過二叉樹或者閱讀過相關方面程式碼,應該知道二叉樹的非遞迴遍歷避不開通過棧或者佇列實現。是的,python也一樣。但是python自帶的list功能很強大,即可以當stack 又可以當成queue。 這樣用python實現二叉樹就可以減少了對棧或者佇列的宣告及定義。
實現
二叉樹的結點的實現
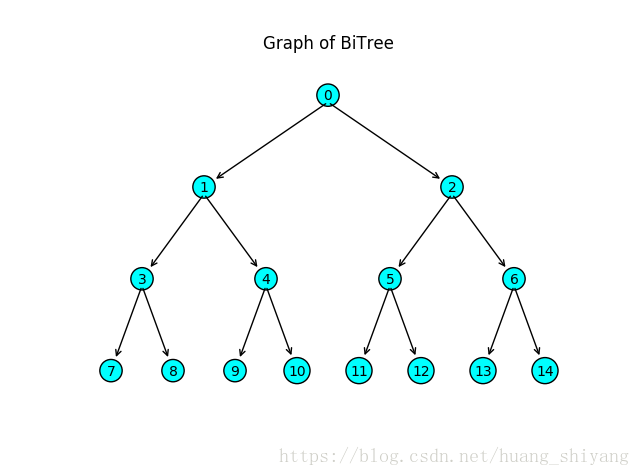
如上圖1的的二叉樹,要想實現二叉樹。首先應該先宣告一個二叉樹結點,包括它的元素及左右子結點,這個在C/C++也是一樣的。在python裡, 可以通過類宣告一個結點,如下:
class BiNode(object):
"""class BiNode provide interface to set up a BiTree Node and to interact"""
def __init__(self, element=None, left=None, right=None):
"""set up a node """ 上述的dict_form interface是將結點以python字典的形式呈現出來,方便後面將樹打包成字典。另外說明下由於python字典的特性,將字典當成一個樹結構來處理也是可以的。事實上,很多人是這樣做的。下圖測試展現了樹結點的實現:

二叉樹初始化
實現了二叉樹結點,接下來實現二叉樹.首先對二叉樹進行初始化,程式碼如下:
class BiTree:
    """class BiTree provide interface to set up a BiTree and to interact"""
    def __init__(self, tree_node=None):
        """set up BiTree from BiNode and empty BiTree when nothing is passed"""
        self.root = tree_node`
上面程式碼很簡單,就是對樹通過一個傳進來的結點進行初始化,如果引數為空則初始化為一個空樹。
順序構造二叉樹
那麼我如果想通過一個列表元素按順序實現樹的構造或者通過字典進行構造呢?
先說下用一個列表元素按順序構造。
假設現在已經存在一顆二叉樹,如下圖2
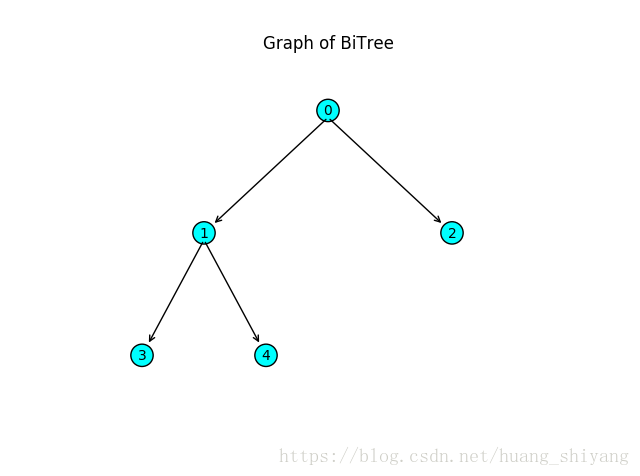
新新增的結點按順序做為結點2的左子結點(這裡不考慮像二叉查詢樹等的插入要求)。基本插入方法如下:
判斷根結點是否存在,如果不存在則插入根結點。否則從根結點開始,判斷左子結點是否存在,如果不存在插入, 如果左子結點存在判斷右結點,不存在插入。如果左右結點存在,再依次遍歷左右子結點的子結點,直到插入成功。
上述的方法類似於層次遍歷,體現了廣度搜索優先的思想。因此從程式碼實現上,很顯然需要一個佇列對子結點進行入隊與出隊。在python上這很簡單,一個list 就實現了,程式碼如下:
    def add_node_in_order(self, element):
        """add a node to existent BiTree in order"""
        node = BiNode(element)

        if self.root is None:
            self.root = node
        else:
            node_queue = list()
            node_queue.append(self.root)
            while len(node_queue):
                q_node = node_queue.pop(0)
                if q_node.left is None:
                    q_node.left = node
                    break
                elif q_node.right is None:
                    q_node.right = node
                    break
                else:
                    node_queue.append(q_node.left)
                    node_queue.append(q_node.right)

    def set_up_in_order(self, elements_list):
        """set up BiTree from lists of elements in order """
        for elements in elements_list:
            self.add_node_in_order(elements)
set_up_in_order()實現了通過列表對樹進行順序構造。
從字典初始化構造二叉樹
當然你會發現,用上述方法構造的二叉樹永遠都是完全二叉樹。實際情況下,我們需要初始化像圖3這樣的一棵不規則的二叉樹,怎麼辦?
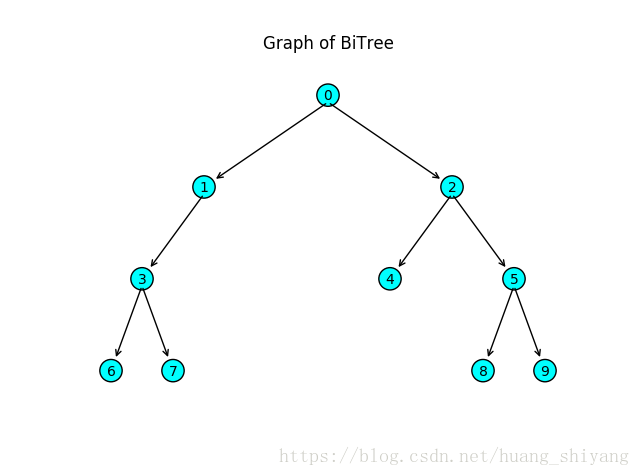
此時, 可以借住python的字典對樹進行構造,參考的node的dict_form,約定”element”的key_value是結點值,“left”,“right”的key_value也是一個字典代表左右子樹,如果為空則為None 。為方便書寫,對於一個結點除了element不能缺外, 左右子樹不存在時相應key可以缺失。同時對於葉結點,可以省略寫成相應的元素值而不用繼續構造一個字典。此時可以通過類似如下字典初始一棵二叉樹表示,如下:
dict_tree = {
    "element": 0,
    "left": {
        "element": 1,
        "left": {
            "element": 3,
            "left": 6,
            "right": 7,
        }
    },
    "right": {
        "element": 2,
        "left": 4,
        "right": {
            "element": 5,
            "left": 8,
            "right": 9,
        },
    },
}
上述字典表示的二叉樹即為圖3所示
通過字典進行初始樹,可以借用層次遍歷的思想實現樹的構造,本質上其實就是對樹進行一個非遞迴實現的拷貝,程式碼實現如下:
    def set_up_from_dict(self, dict_instance):
        """set up BiTree from a dict_form tree using level traverse, or call it copy """
        if not isinstance(dict_instance, dict):
            return None
        else:
            dict_queue = list()
            node_queue = list()
            node = BiNode(dict_instance["element"])
            self.root = node
            node_queue.append(node)
            dict_queue.append(dict_instance)
            while len(dict_queue):
                dict_in = dict_queue.pop(0)
                node = node_queue.pop(0)
                # in dict form, the leaf node might be irregular, like compressed to element type
                # Thus , all this case should be solved out respectively
                if isinstance(dict_in.get("left", None), (dict, int, float, str)):
                    if isinstance(dict_in.get("left", None), dict):
                        dict_queue.append(dict_in.get("left", None))
                        left_node = BiNode(dict_in.get("left", None)["element"])
                        node_queue.append(left_node)
                    else:
                        left_node = BiNode(dict_in.get("left", None))
                    node.left = left_node

                if isinstance(dict_in.get("right", None), (dict, int, float, str)):
                    if isinstance(dict_in.get("right", None), dict):
                        dict_queue.append(dict_in.get("right", None))
                        right_node = BiNode(dict_in.get("right", None)["element"])
                        node_queue.append(right_node)
                    else:
                        right_node = BiNode(dict_in.get("right", None))
                    node.right = right_node
將二叉樹打包成字典
往往我們也需要將一顆二叉樹用字典的形式表示出來, 其方法與從字典初始化一棵二叉樹一樣,程式碼實現如下:
    def pack_to_dict(self):
        """pack up BiTree to dict form using level traversal"""
        if self.root is None:
            return None
        else:
            node_queue = list()
            dict_queue = list()
            node_queue.append(self.root)
            dict_pack = self.root.dict_form()
            dict_queue.append(dict_pack)
            while len(node_queue):
                q_node = node_queue.pop(0)
                dict_get = dict_queue.pop(0)
                if q_node.left is not None:
                    node_queue.append(q_node.left)
                    dict_get["left"] = q_node.left.dict_form()
                    dict_queue.append(dict_get["left"])
                if q_node.right is not None:
                    node_queue.append(q_node.right)
                    dict_get["right"] = q_node.right.dict_form()
                    dict_queue.append(dict_get["right"])
        return dict_pack
求二叉樹的深度
求二叉樹的深度或者高度的非遞迴實現,本質上可以通過層次遍歷實現,方法如下:
1. 如果樹為空,返回0 。
2. 從根結點開始,將根結點拉入列。
3. 當列非空,記當前佇列元素數(上一層節點數)。將上層節點依次出隊,如果左右結點存在,依次入隊。直至上層節點出隊完成,深度加一。繼續第三步,直至佇列完全為空。
程式碼實現如下:
    def get_depth(self):
        """method of getting depth of BiTree"""
        if self.root is None:
            return 0
        else:
            node_queue = list()
            node_queue.append(self.root)
            depth = 0
            while len(node_queue):
                q_len = len(node_queue)
                while q_len:
                    q_node = node_queue.pop(0)
                    q_len = q_len - 1
                    if q_node.left is not None:
                        node_queue.append(q_node.left)
                    if q_node.right is not None:
                        node_queue.append(q_node.right)
                depth = depth + 1
            return depth
前序遍歷
二叉樹的前序,中序,後序稱體現的是深度優先搜尋的思想。
本質上它們的方法其實是一樣的。
先說前序遍歷, 方法如下:
1. 如果樹為空,返回None 。
2. 從根結點開始,如果當前結點左子樹存在,則列印結點,並將該結點入棧。讓當前結點指向左子樹,繼續步驟2直至當前結點左子樹不存在。
3. 將當結點打印出來,如果當前結點的右子樹存在,當前結點指向右子樹,繼續步驟2。否則進行步驟4.
4. 如果棧為空則遍歷結束。若非空,從棧裡面pop一個節點,從當前結點指向該結點的右子樹。如果右子樹存在繼續步驟2,不存在繼續步驟4直至結束。
以圖2為例,用N代表結點。
1.N0 ,N1依次列印,並且入棧。
2. 列印N3,
3. N3右子樹不存在,N1出棧,遍歷N1右子樹N4
4. N4的左子樹不存在,列印N4。N4右子樹不存在,N0出棧,指向其右子樹N2
5. N2的左子樹不存在,列印N2,判斷右子樹及棧空結束
程式碼實現如下:
    def pre_traversal(self):
        """method of traversing BiTree in pre-order"""
        if self.root is None:
            return None
        else:
            node_stack = list()
            output_list = list()
            node = self.root
            while node is not None or len(node_stack):
                # if node is None which means it comes from a leaf-node' right,
                # pop the stack and get it's right node.
                # continue the circulating like this
                if node is None:
                    node = node_stack.pop().right
                    continue
                #  save the front node and go next when left node exists
                while node.left is not None:
                    node_stack.append(node)
                    output_list.append(node.get_element())
                    node = node.left
                output_list.append(node.get_element())
                node = node.right
        return output_list
中序遍歷
中序遍歷的思想基本與前序遍歷一樣,只是最開始結點入棧時先不列印。只打印不存在左子樹的當前結點,然後再出棧遍歷右子樹前再打印出來,程式碼實現如下:
    def in_traversal(self):
        """method of traversing BiTree in in-order"""
        if self.root is None:
            return None
        else:
            node_stack = list()
            output_list = list()
            node = self.root
            while node is not None or len(node_stack):
                # if node is None which means it comes from a leaf-node' right,
                # pop the stack and get it's right node.
                # continue the circulating like this
                if node is None:
                    node = node_stack.pop()
                    # in in-order traversal, when pop up a node from stack , save it
                    output_list.append(node.get_element())
                    node = node.right
                    continue
                # go-next when left node exists
                while node.left is not None:
                    node_stack.append(node)
                    node = node.left
                # save the the last left node
                output_list.append(node.get_element())
                node = node.right
        return output_list
後序遍歷
後序遍歷的實現思想與前序、中序一樣。有兩種實現方式。
先說第一種,同中序遍歷,只是中序時從棧中pop出一個結點列印,並訪問當前結點的右子樹。 後序必須在訪問完右子樹完在,在列印該結點。因此可先
看棧頂點是否被訪問過,如果訪問過,即已經之前已經做了其右子樹的訪問因此可出棧,並列印,繼續訪問棧頂點。如果未訪問過,則對該點的訪問標記置為訪問,訪問該點右子樹。可以發現,相對於前序與中序,後序的思想是一致的,只是需要多一個儲存空間來表示結點狀態。python程式碼實現如下:
    def post_traversal1(self):
        """method of traversing BiTree in in-order"""
        if self.root is None:
            return None
        else:
            node_stack = list()
            output_list = list()
            node = self.root
            while node is not None or len(node_stack):
                # if node is None which means it comes from a leaf-node' right,
                # pop the stack and get it's right node.
                # continue the circulating like this
                if node is None:
                    visited = node_stack[-1]["visited"]
                    # in in-order traversal, when pop up a node from stack , save it
                    if visited:
                        output_list.append(node_stack[-1]["node"].get_element())
                        node_stack.pop(-1)
                    else:
                        node_stack[-1]["visited"] = True
                        node = node_stack[-1]["node"]
                        node = node.right
                    continue
                # go-next when left node exists
                while node.left is not None:
                    node_stack.append({"node": node, "visited": False})
                    node = node.left
                # save the the last left node
                output_list.append(node.get_element())
                node = node.right
        return output_list
另外,後續遍歷還有一種訪問方式。考慮到後續遍歷是先左子樹,再右子樹再到父結點, 倒過來看就是先父結點, 再右子樹再左子樹。 是不是很熟悉, 是的這種遍歷方式就是前序遍歷的映象試,除了改變左右子樹訪問順序連方式都沒變。 再將輸出的結果倒序輸出一遍就是後序遍歷。 同樣該方法也需要額外的空間存取輸出結果。python程式碼如下:
    def post_traversal2(self):
        """method of traversing BiTree in post-order"""
        if self.root is None:
            return None
        else:
            node_stack = list()
            output_list = list()
            node = self.root
            while node is not None or len(node_stack):
                # if node is None which means it comes from a leaf-node' left,
                # pop the stack and get it's left node.
                # continue the circulating like this
                if node is None:
                    node = node_stack.pop().left
                    continue
                while node.right is not None:
                    node_stack.append(node)
                    output_list.append(node.get_element())
                    node = node.right
                output_list.append(node.get_element())
                node = node.left
        return output_list[::-1]
求葉子節點
求葉子節點有兩種方法,一種是廣度搜索優先,即如果當前節點存在左右子樹將左右子樹入隊。如果當前節點不存在子樹,則該節點為葉節點。繼續出隊訪問下一個節點。直至佇列為空,這個方法留給讀者去實現。
另外一種方法是,用深度搜索優先。 採用前序遍歷,當判斷到一個結點不存在左右子樹時葉子結點數加一。程式碼實現如下:
    def get_leaf_num(self):
        """method of getting leaf numbers of BiTree"""
        if self.root is None:
            return 0
        else:
            node_stack = list()
            node = self.root
            leaf_numbers = 0
            # only node exists and stack is not empty that will do this circulation
            while node is not None or len(node_stack):
                if node is None:
                    """node is None then pop the stack and get the node.right"""
                    node = node_stack.pop().right
                    continue
                while node.left is not None:
                    node_stack.append(node)
                    node = node.left
                # if there is not  node.right, leaf_number add 1
                node = node.right
                if node is None:
                    leaf_numbers += 1
            return leaf_numbers
二叉樹的視覺化
到此, 除了樹的結點刪除(這個可以留給讀者去嘗試), 這裡已經基本完成二叉樹的構造及遍歷介面。 但你可能真正在意的是如何繪製一顆二叉樹。 接下來,本節將會通過python matplotlib.annotate繪製一顆二叉樹。
要繪製一棵二叉樹,首先需要對樹中的任意結點給出相應相對座標(axis_max: 1)。對於一棵已知樹, 已知深度 ,那麼可以設初始根結點座標為. (這個設定只是為了讓根結點儘量中間往上且不觸及axis)
假設已經知道父結點的座標, 當前層數(記根節點為第0層),則從上往下畫其左右子樹的座標表達如下:
左子樹:
右子樹:
對應程式碼實現如下:
def get_coord(coord_prt, depth_le, depth, child_type="left"):
    if child_type == "left":
        x_child = coord_prt[0] - 1 / (2 ** (depth_le + 1))
    elif child_type == "right":
        x_child = coord_prt[0] + 1 / (2 ** (depth_le + 1))
    else:
        raise Exception("No other child type")
    y_child = coord_prt[1] - 1 / depth
    return x_child, y_child
如果知道當前結點與父結點座標,即可以通過plt.annotate進行結點與箭標繪製,程式碼實現如下:
def plot_node(ax, node_text, center_point, parent_point):
    ax.annotate(node_text, xy=parent_point,  xycoords='axes fraction', xytext=center_point, textcoords='axes fraction',
                va="bottom", ha="center", bbox=NODE_STYLE, arrowprops=ARROW_ARGS)
已知樹深度, 當前結點及當前結點所在層數,則可以通過上述計算方式計算左右子樹的結點座標。 使用層次遍歷,即可遍歷繪製整棵樹。程式碼實現如下:
def view_in_graph(self):
"""use matplotlib.pypplot to help view the BiTree """
if self.root is None:
print("An Empty Tree, Nothing to plot")
else:
depth = self.get_depth()
ax = node_plot.draw_init()
coord0 = (1/2, 1 - 1/(2*depth))
node_queue = list()
coord_queue = list()
node_plot.plot_node(ax, str(self.root.get_element()), coord0, coord0)
node_queue.append(self.root)
coord_queue.append(coord0)
cur_level = 0
while len(node_queue):
q_len = len(node_queue)
while q_len:
q_node = node_queue.pop(0)
coord_prt = coord_queue.pop(0)
q_len = q_len - 1
if q_node.left is not None:
xc, yc = node_plot.get_coord(coord_prt, cur_level + 1, depth, "left")
element = str(q_node.left.get_element())
node_plot.plot_node(ax, element, (xc, yc), coord_prt)
node_queue.append(q_node.left)
coord_queue.append((xc, yc))
if q_node.right is not None:
xc, yc = node_plot.get_coord(coord_prt, cur_level + 1, depth, "right")
element = str(q_node.right.get_element())
node_plot.plot_node(ax, element, (xc, yc), coord_prt)
node_queue.append(q_node.right)
coord_queue.append((xc, yc))
cur_level += 1
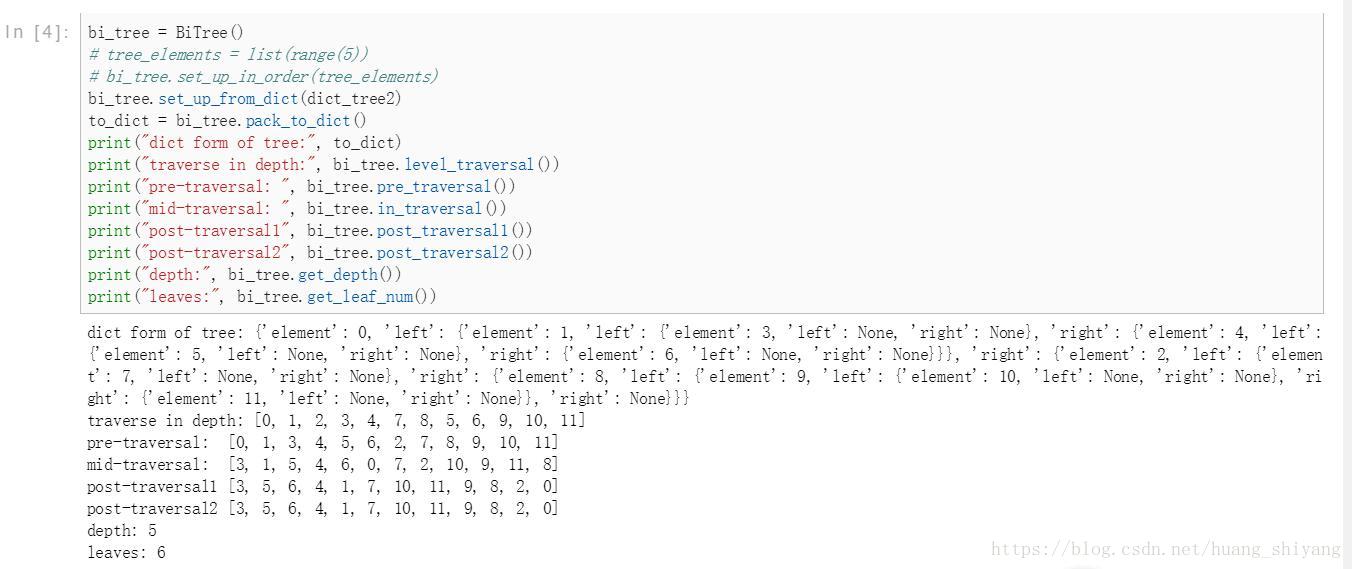
node_plot.show()最後, 可以對如下的一顆二叉樹進行測試:
dict_tree2 = {
    "element": 0,
    "left": {
        "element": 1,
        "left": 3,
        "right": {
            "element": 4,
            "left": 5,
            "right": 6,
        },
    },
    "right": {
        "element": 2,
        "left": 7,
        "right": {
            "element": 8,
            "left": {
                "element": 9,
                "left": 10,
                "right": 11,
            },
        },
    },
}
其繪製結果如下圖4:

遍歷及深度葉子數 ,輸出結果如下:
至此, 本文結。 Have fun reading , 需望此文可以幫助你瞭解二叉樹的結構
如有疑惑請通過郵件聯絡:[email protected]@foxmail.com
相關推薦
用Python實現二叉樹、二叉樹非遞迴遍歷及繪製
前言 關於二叉樹的實現與遍歷,網上已經有很多文章了,包括C, C++以及JAVA等。鑑於python做為指令碼語言的簡潔性,這裡寫一篇小文章用python實現二叉樹,幫助一些對資料結構不太熟悉的人快速瞭解下二叉樹。本文主要通過python以非遞迴形式實現二叉樹
遍歷二叉樹的各種操作(非遞迴遍歷)
先使用先序的方法建立一棵二叉樹,然後分別使用遞迴與非遞迴的方法實現前序、中序、後序遍歷二叉樹,並使用了兩種方法來進行層次遍歷二叉樹,一種方法就是使用STL中的queue,另外一種方法就是定義了一個數組佇列,分別使用了front和rear兩個陣列的下標來表示入隊與出隊,還有
遍歷二叉樹的各種操作(非遞迴遍歷) 轉載自:hackbuteer1 前輩
在網上看了很多的人寫的二叉樹的非遞迴的遍歷,但是能執行的正確的並不多。感謝hackbuteer1 前輩 寫出了這樣清晰和完美的程式碼。 特轉載和保存於此。 先使用先序的方法建立一棵二叉樹,然後分別使用遞迴與非遞迴的方法實現前序、
二叉樹的前序、中序、後序非遞迴遍歷 python實現
前言 python中二叉樹的定義: class TreeNode: def __init__(self, x): self.val = x self.left = None self.right =
二叉樹的前序,中序,後續,遞迴及非遞迴遍歷的python實現
在計算機科學裡,樹的遍歷(也稱為樹的搜尋)是圖的遍歷的一種,指的是按照某種規則,不重複地訪問某種樹的所有節點的過程。具體的訪問操作可能是檢查節點的值、更新節點的值等。不同的遍歷方式,其訪問節點的順序是不一樣的。 遍歷的種類 遍歷方式的命名,源於其訪問節點
利用棧結構實現二叉樹的非遞迴遍歷,求二叉樹深度、葉子節點數、兩個結點的最近公共祖先及二叉樹結點的最大距離
原文地址:http://blog.csdn.net/forbes_zhong/article/details/51227747 利用棧實現二叉樹的非遞迴遍歷,並求二叉樹的深度、葉子節點數、兩個節點的最近公共祖先以及二叉樹結點的最大距離,部分參考《劍指offer》這本書
二叉樹的前序、中序、後序的遞迴與非遞迴遍歷演算法實現
看程式碼一目瞭然。 C++程式碼: #include <iostream> #include <stack> #include <queue> using namespace std; //二叉樹節點 typedef
二叉樹的建立、遞迴,非遞迴遍歷
#include<bits/stdc++.h> using namespace std; typedef struct ListNode{ struct ListNode *Lchild, *Rchild; string str; ListNode():Lchild
二叉樹的非遞迴遍歷(先序、中序、後序和層序遍歷)
[前文] 二叉樹的非遞迴遍歷有 先序遍歷、中序遍歷 、後續遍歷 和 層序遍歷。 非遞迴演算法實現的基本思路:使用堆疊。而層序遍歷的實現:使用佇列。 如下圖所示的二叉樹: 前序遍歷順序為:ABCDE (先訪問根節點,然後先序遍歷其左子樹,最後先序遍歷
二叉樹的非遞迴遍歷---JAVA實現
二叉樹的遞迴遍歷方式是很簡單的,當需要用非遞迴的方式遍歷時,就需要藉助棧這種資料結構,以前序遍歷為例,其定義為先訪問根節點,再以前序方式訪問左子樹,再以前序遍歷方式訪問右子樹,這是個遞迴的定義。對於前序遍歷,最先訪問的是根,然後是根左邊的孩子,
使用java實現二叉樹的非遞迴遍歷
在前面的一片部落格中已經介紹了二叉樹遍歷的一些概念以及注意事項,如果有疑惑的可以回過頭看一看。 這裡我們主要討論的是使用非遞迴的演算法實現二叉樹的遍歷 前序遍歷: 思路: 1.使用一個棧來儲存元素,剛開始的時候將棧頂元素壓入棧 2.當棧不為空的時候做如下操作:彈
JAVA 先序、中序、後序、層序,遞迴非遞迴遍歷二叉樹
定義一個二叉樹 package com.niuke.binaryTree; public class binaryTree { int data; binaryTree left; binaryTree right; public binaryTree(int
二叉樹非遞迴遍歷Java實現
二叉樹的前序、中序和後序遍歷可以採用遞迴和非遞迴的方法實現,遞迴的方法邏輯簡單清晰,易於理解,但遞迴的方法需要使用額外的棧空間,執行效率較低。而非遞迴的方法則效率較高。 下面是相應的Java實現: 前序遍歷(非遞迴實現): public static void pre
二叉樹的非遞迴遍歷的實現
1.前言:當然了,這也是複習。因為資料結構要考試了,把之前的演算法拿出來敲一遍。 2.二叉樹的遍歷是一個基於二叉樹很重要的操作,應用也很多。我們知道遞迴是樹的特性,所以樹上的所有演算法幾乎都是基於遞迴做的。但是在一些嵌入式裝置中,系統棧不允許很深的遞迴。這時候就要把遞迴的演算法轉換為非遞迴演算法
二叉樹前序、中序、後序遞迴與非遞迴遍歷+層序遍歷(java)
前序遞迴遍歷演算法:訪問根結點-->遞迴遍歷根結點的左子樹-->遞迴遍歷根結點的右子樹 中序遞迴遍歷演算法:遞迴遍歷根結點的左子樹-->訪問根結點-->遞迴遍歷根結點的右子樹 後序遞迴遍歷演算法:遞迴遍歷根結
Java實現二叉樹後序非遞迴遍歷(好理解)
//不明白的大家可以一起討論!歡迎留言! /** * public class Node { public int data; //樹結點標號 public Node lchild;
C++實現二叉樹的遞迴遍歷與非遞迴遍歷
基本上所有關於二叉樹的操作都是基於二叉樹的遍歷演算法來實現的,因此在這裡講一下二叉樹的遍歷演算法,其中包括遞迴與非遞迴演算法,在演算法中用輸出節點資料來代替對節點的操作。 首先給出這樣一棵數: 1、前序遍歷 所謂前序遍歷就是先對節點資料進行處理,然後才
二叉樹非遞迴遍歷c++實現
三種遍歷演算法均採用棧來實現 1.前序遍歷:先訪問根節點,再訪問左子樹,最後訪問右子樹 先將根節點進棧,棧不空時迴圈:{出棧tmp,訪問tmp,若其右子樹節點不空則將tmp的右孩子節點進棧,若其左孩子節點不空則將tmp的左孩子節點進棧。} 2.中序遍歷演算法:左中右 從根節
二叉樹基本演算法,遞迴非遞迴遍歷以及求高度、寬度等
二叉樹基本演算法,遍歷以及求高度、寬度等路徑 轉自Powered by: C++部落格 Copyright © 天一程 //二叉樹的相關演算法,《資料結構習題與解析》7.3 //演算法 49個,程式碼量1200+ ,時間9小時 #include<
C++實現二叉樹的遞迴與非遞迴遍歷
#include<iostream> #include<stdlib.h> #include<stack> #include<queue> using namespace std; typedef char ElemType; //二叉樹的二叉連結串列結構,