windows下搭建Nginx+Tomcat+Https
最近專案需要使用https,架構上使用了 Nginx +tomcat 叢集,找了網上一些別人的方法,經過多次失敗,終於搭建成功。特記錄一下,供以後再次使用及他人使用參考。
由於我是在本地做測試,所以通過Openssl自己生成證書,正式專案使用需要向管理機構申請正式的證書。首先我們安裝生成證書的Openssl軟體。
步驟:
1. 安裝Openssl
下載完成後,進行安裝,我安裝在了 C:\wnmp\OpenSSL-Win64資料夾中。
2. 安裝ActivePerl (此軟體目的為了解析pl檔案,部分系統不安裝也可以實現本教程的功能,安裝該軟體目的為了學習perl。)。
3. 配置環境變數
在環境變數中新增環境變數
變數名: OPENSSL_HOME 變數值:C:\wnmp\OpenSSL-Win64\bin; (變數值為openssl安裝位置)
在path變數結尾新增如下 : %OPENSSL_HOME%;
4. 生成證書
(1) 首先在 nginx安裝目錄中建立ssl資料夾用於存放證書。比如我的檔案目錄為 C:\wnmp\nginx\ssl
以管理員身份進入命令列模式,進入ssl資料夾。 命令為: cd c:/wnmp/nginx/ssl
(2) 建立私鑰
在命令列中執行命令: openssl genrsa -des3 -out lee.key 1024

輸入密碼後,再次重複輸入確認密碼。記住此密碼,後面會用到。
(3)建立csr證書
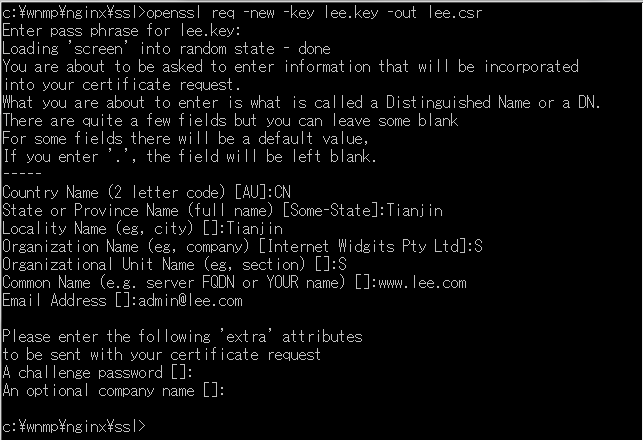
在命令列中執行命令: openssl req -new -key lee.key -out lee.csr (key檔案為剛才生成的檔案,lee為自定義檔名)

如上圖所示,執行上述命令後,需要輸入資訊。輸入的資訊中最重要的為 Common Name,這裡輸入的域名即為我們要使用https訪問的域名。
以上步驟完成後,ssl資料夾內出現兩個檔案:
(4)去除密碼。
在載入SSL支援的Nginx並使用上述私鑰時除去必須的口令,否則會在啟動nginx的時候需要輸入密碼。
複製lee.key並重命名為lee.key.org
可以使用此命令列,也可以使用滑鼠操作 copy lee.key lee.key.org
去除口令,在命令列中執行此命令: openssl rsa -in lee.key.org -out lee.key (lee為自定義檔名)
如下圖所示,此命令需要輸入剛才設定的密碼。

(5)生成crt證書
在命令列中執行此命令: openssl x509 -req -days 365 -in lee.csr -signkey lee.key -out lee.crt (lee為自定義檔名)

證書生成完畢,ssl資料夾中一共生成如下4個檔案,我們需要使用到的是lee.crt和lee.key。

5. 修改位於nginx安裝目錄下的conf目錄的nginx.conf檔案
# HTTPS server
    #
    #server {
    #    listen       443 ssl;
    #    server_name  localhost;


    #    ssl_certificate      cert.pem;
    #    ssl_certificate_key  cert.key;


    #    ssl_session_cache    shared:SSL:1m;
    #    ssl_session_timeout  5m;


    #    ssl_ciphers  HIGH:!aNULL:!MD5;
    #    ssl_prefer_server_ciphers  on;


    #    location / {
    #        root   html;
    #        index  index.html index.htm;
    #    }
    #}
修改為:
    upstream www.test.com{
		server www.test.com:8080;
		server www.test.com:8088;
	}

    server {
	listen       80;
        server_name  www.test.com;

		 #為一個server{......}開啟ssl支援
		ssl                  on;


        ssl_certificate      ../ssl/lee.crt;
        ssl_certificate_key  ../ssl/lee.key;

        #ssl_session_cache    shared:SSL:1m;
        #ssl_session_timeout  5m;
	#ssl_protocols TLSv1 TLSv1.1 TLSv1.2;
        #ssl_ciphers ECDH:AESGCM:HIGH:!RC4:!DH:!MD5:!3DES:!aNULL:!eNULL;
        #ssl_prefer_server_ciphers  on;


	#讓http請求重定向到https請求
        #error_page 497  https://$host$uri?$args;


        location / {
            root   html;
            index  index.html index.htm;

	    proxy_pass http://www.test.com;

	    proxy_set_header       Host $host;
	    proxy_set_header  X-Real-IP  $remote_addr;
	    proxy_set_header  X-Forwarded-For $proxy_add_x_forwarded_for;
	    proxy_set_header X-Forwarded-Proto  $scheme;

	    proxy_connect_timeout       1;
	    proxy_read_timeout          1;
	    proxy_send_timeout          1;
        }
}由於此處在本地做實驗,我在C:\Windows\System32\drivers\etc的hosts.ics檔案添加了對映:127.0.0.1 www.jyfeng.com,將www.jyfeng.com當做域名。也可直接使用localhost,而不需在hosts檔案新增對映。但如果是伺服器正式使用,那麼需配置伺服器申請的域名。
6. 修改tomcat的conf目錄下的server.xml檔案
<Engine name="Catalina" defaultHost="localhost">
      <Realm className="org.apache.catalina.realm.LockOutRealm">
        <Realm className="org.apache.catalina.realm.UserDatabaseRealm"
               resourceName="UserDatabase"/>
      </Realm>

      <Host name="localhost"  appBase="webapps"
            unpackWARs="true" autoDeploy="true">
        <Valve className="org.apache.catalina.valves.AccessLogValve" directory="logs"
               prefix="localhost_access_log." suffix=".txt"
               pattern="%h %l %u %t "%r" %s %b" />
      </Host>
</Engine><Engine name="Catalina" defaultHost="localhost">
<Realm className="org.apache.catalina.realm.LockOutRealm">
<Realm className="org.apache.catalina.realm.UserDatabaseRealm"
resourceName="UserDatabase"/>
</Realm>
<Host name="localhost" appBase="webapps"
unpackWARs="true" autoDeploy="true">
<Valve className="org.apache.catalina.valves.AccessLogValve" directory="logs"
prefix="localhost_access_log." suffix=".txt"
pattern="%h %l %u %t "%r" %s %b" />
<Valve className="org.apache.catalina.valves.RemoteIpValve"
remoteIpHeader="X-Forwarded-For"
protocolHeader="X-Forwarded-Proto"
protocolHeaderHttpsValue="https"/>
</Host>
</Engine>解析:
https配置:在server標籤裡配置以下資訊
listen       80;
server_name  www.test.com;

 #為一個server{......}開啟ssl支援
ssl                  on;

ssl_certificate      ../ssl/lee.crt;
ssl_certificate_key ../ssl/lee.key;這裡我將lee.crt和lee.key放在nginx安裝目錄下,也可放其它位置並使用絕對路徑訪問。
負載均衡配置:在http標籤裡配置以下資訊
upstream www.test.com{
    server www.test.com:8080;
    server www.test.com:8088;
}本地配置了埠分別為8080、8088的兩個tomcat,以上配置會讓nginx將www.test.com的請求輪詢轉發到兩臺tomcat上。注意,upstream後邊的www.test.com要跟proxy_pass的http:www.test.com一致。假如proxy_pass為http:localhost,那麼upstream為localhost。
如果tomcat 和nginx 雙方沒有配置X-Forwarded-Proto tomcat就不能正確區分實際使用者是http 還是https,導致tomcat 裡配置的靜態資源被認為是http而被瀏覽器攔截,request.getScheme()總是 http,而不是實際的http或https。所以需要給nginx跟tomcat分別做一下配置:
nginx配置:在location標籤裡配置以下資訊
proxy_set_header       Host $host;
proxy_set_header  X-Real-IP  $remote_addr;
proxy_set_header  X-Forwarded-For $proxy_add_x_forwarded_for;
proxy_set_header X-Forwarded-Proto  $scheme;
tomcat配置:配置server.xml的Engine模組下host標籤新增一個value
<Valve className="org.apache.catalina.valves.RemoteIpValve"
remoteIpHeader="X-Forwarded-For"
protocolHeader="X-Forwarded-Proto"
protocolHeaderHttpsValue="https"/>
在測試中發現一個問題,如果有一臺tomcat關閉了,那麼nginx仍然在轉發請求時,有部分請求會失敗。原因是nginx部分請求轉發到這個tomcat,但沒有響應,而nginx預設等待響應時間為60秒,過了等待響應時間沒有收到響應,才轉發給另一臺。所以這裡需要在nginx的conf檔案的location做如下配置:
proxy_connect_timeout       1;
proxy_read_timeout          1;
proxy_send_timeout          1;
這樣如果超過一秒未響應,會轉發給另一臺tomcat。但這樣假設一臺伺服器掛了,會有部分請求的響應時間增加一秒,體驗上有些不好。但目前能找到的解決辦法只有這個,不知為什麼nginx不會直接剔除這個tomcat,目前還沒找到原因,可能還需要其它配置,如有知道的道友,望不吝賜教。
參考:
https搭建: https://www.cnblogs.com/vincent-li666/p/5851463.html
Nginx SSL+tomcat叢集: http://blog.csdn.net/vfush/article/details/51086274
