
高德地圖元件在Android的應用以及Android與JavaScript的互動(一)
最近在慕課網學習了關於高德地圖元件的課程(其實就是一個廣告,內容和官網的API完全一樣),發現這個JavaScript API比Android API簡單方便多了,於是就打算放在Android APP上來實現,花了一點小功夫,但是最終還是實現了,後來打算擴充套件的時候遇到個問題:就是高德官網有一個座標拾取點(高德的座標和我們平時取的座標不一樣,可以將高德座標理解為中國的國標,直接獲取的座標是國際標準的座標),後來發現有html檔案直接實現了這個功能,於是就把這個html扒出來了,但是重點問題來了:如何將目標地點傳進來,如何將獲取到的座標傳出來?最後Android APP不用SDK就實現了位置標註、周邊搜尋、路線規劃等,具體如何實現呢?本文打算將我的思路分為四步給大家娓娓道來:
一、地圖元件API;
二、Android佈局程式碼;
三、java程式碼以及思路;
四、html程式碼以及思路
五、重頭戲——Android與JavaScript互動的實現。
今天暫時寫到這裡,明天將其餘幾條一下寫出來,歡迎大家留言評論,謝謝!

其餘的幾節暫時先欠著,把我寫的一個自定義TopBar的引用寫出來,大家先看看,明天不講(只貼程式碼)
先看自定義屬性檔案:
<?xml version="1.0" encoding="utf-8"?>
<resources>
<declare-styleable name = "TopBar">
<attr name = "title" 再看看java程式碼實現如何自定義:
package com.weixing.topbarlibrary;

import android.content.Context;
import android.content.res.TypedArray;
import android.graphics.drawable.Drawable;
import android.util.AttributeSet;
import android.util.TypedValue;
import android.view.Gravity;
import android.view.View;
import android.widget.Button;
import android.widget.RelativeLayout;
import android.widget.TextView;

public class TopBarView extends RelativeLayout{

    private Button leftButton,rightButton;
    private TextView tvTitle;
    private int leftColor;
    private Drawable leftBackGround;
    private String leftText;
    private int rightColor;
    private Drawable rightBackGround;
    private String rightText;
    private String title;
    private float titleTextSize;
    private int titleTextColor;
    private TopBarViewClickListener listener;

    public interface TopBarViewClickListener{
        public void leftButtonClickListener();
        public void rightButtonClickListener();
    }

    public TopBarView(Context context, AttributeSet attrs) {
        super(context, attrs);
        TypedArray ta = context.obtainStyledAttributes(attrs, R.styleable.TopBar);
        leftColor = ta.getColor(R.styleable.TopBar_leftColor, 0);
        leftBackGround = ta.getDrawable(R.styleable.TopBar_rightBackGround);
        leftText = ta.getString(R.styleable.TopBar_leftText);
        rightColor = ta.getColor(R.styleable.TopBar_rightColor, 0);
        rightBackGround = ta.getDrawable(R.styleable.TopBar_rightBackGround);
        rightText = ta.getString(R.styleable.TopBar_rightText);
        title = ta.getString(R.styleable.TopBar_title);
//      titleTextSize = ta.getDimensionPixelSize(R.styleable.TopBar_titleTextSize, (int) TypedValue.applyDimension(
//              TypedValue.COMPLEX_UNIT_SP, 16, getResources().getDisplayMetrics()));

        titleTextSize = ta.getDimension(R.styleable.TopBar_titleTextSize, 0);
        titleTextColor = ta.getColor(R.styleable.TopBar_titleTextColor, 0);
        ta.recycle();

        leftButton = new Button(context);
        leftButton.setText(leftText);
        leftButton.setBackground(leftBackGround);
        leftButton.setTextColor(leftColor);
        RelativeLayout.LayoutParams leftparams = new LayoutParams(LayoutParams.WRAP_CONTENT, LayoutParams.WRAP_CONTENT);
        leftparams.addRule(RelativeLayout.ALIGN_PARENT_LEFT,TRUE);
        addView(leftButton, leftparams);

        rightButton = new Button(context);
        rightButton.setText(rightText);
        rightButton.setBackground(rightBackGround);
        rightButton.setTextColor(rightColor);
        RelativeLayout.LayoutParams rightparams = new LayoutParams(LayoutParams.WRAP_CONTENT, LayoutParams.WRAP_CONTENT);
        rightparams.addRule(RelativeLayout.ALIGN_PARENT_RIGHT,TRUE);
        addView(rightButton, rightparams);
        tvTitle = new TextView(context);
        tvTitle.setText(title);
        tvTitle.setTextSize(titleTextSize);
        tvTitle.setTextColor(titleTextColor);
        RelativeLayout.LayoutParams titleparams = new LayoutParams(LayoutParams.WRAP_CONTENT, LayoutParams.MATCH_PARENT);
        titleparams.addRule(RelativeLayout.CENTER_IN_PARENT,TRUE);
        titleparams.addRule(Gravity.CENTER);
        addView(tvTitle, titleparams);
        leftButton.setOnClickListener(new OnClickListener() {

            @Override
            public void onClick(View v) {
                listener.leftButtonClickListener();

            }
        });
        rightButton.setOnClickListener(new OnClickListener() {

            @Override
            public void onClick(View v) {
                listener.rightButtonClickListener();

            }
        });
    }

    public void setTopBarViewClickListener(TopBarViewClickListener listener){
        this.listener = listener;
    }
}
這個程式碼還可以繼續延伸,我這個人比較懶,知道了這個思路就沒有動了,大家可以自行腦補,最後寫出xml佈局的引用程式碼:
<LinearLayout xmlns:android="http://schemas.android.com/apk/res/android"
    xmlns:tools="http://schemas.android.com/tools"
    xmlns:custom="http://schemas.android.com/apk/res/com.weixing.topbarlibrary"
    android:layout_width="match_parent"
    android:layout_height="match_parent"
    tools:context="com.weixing.topbarlibrary.MainActivity"
    android:orientation="vertical">


   <com.weixing.topbarlibrary.TopBarView
       android:id="@+id/TopBarView"
       android:layout_width="match_parent"
       android:layout_height="40dp"
       custom:title="我的高德地圖"
       custom:titleTextSize="10sp"
       custom:titleTextColor="#ffffff"
       custom:leftColor="#ffffff"
       custom:leftBackGround="#3579bd"
       custom:leftText="搜尋位置"
       custom:rightColor="#ffffff"
       custom:rightBackGround="#3579bd"
       custom:rightText="載入地圖"/>

</LinearLayout>
續:
昨天講的是高德地圖元件API,今天繼續講第二節Android APP實現高德地圖元件的佈局:
<LinearLayout xmlns:android="http://schemas.android.com/apk/res/android"
    xmlns:tools="http://schemas.android.com/tools"
    xmlns:custom="http://schemas.android.com/apk/res/com.weixing.topbarlibrary"
    android:layout_width="match_parent"
    android:layout_height="match_parent"
    tools:context="com.weixing.topbarlibrary.MainActivity"
    android:orientation="vertical">


   <com.weixing.topbarlibrary.TopBarView
       android:id="@+id/TopBarView"
       android:layout_width="match_parent"
       android:layout_height="40dp"
       custom:title="我的高德地圖"
       custom:titleTextSize="10sp"
       custom:titleTextColor="#ffffff"
       custom:leftColor="#ffffff"
       custom:leftBackGround="#3579bd"
       custom:leftText="搜尋位置"
       custom:rightColor="#ffffff"
       custom:rightBackGround="#3579bd"
       custom:rightText="載入地圖"/>

       <WebView
           android:id="@+id/wenbiew"
           android:layout_width="match_parent"
           android:layout_height="match_parent"
           />


</LinearLayout>
上面對於佈局就不再講了,接著我們看看第三節webview實現載入URL的java程式碼以及實現思路,
package com.weixing.topbarlibrary;

import com.weixing.topbarlibrary.TopBarView.TopBarViewClickListener;
import android.annotation.SuppressLint;
import android.app.Activity;
import android.content.Context;
import android.content.Intent;
import android.net.Uri;
import android.os.Bundle;
import android.os.Handler;
import android.text.Editable;
import android.view.Menu;
import android.view.MenuItem;
import android.view.View;
import android.view.View.OnClickListener;
import android.webkit.JavascriptInterface;
import android.webkit.WebChromeClient;
import android.webkit.WebSettings;
import android.webkit.WebStorage;
import android.webkit.WebView;
import android.webkit.WebViewClient;
import android.widget.Button;
import android.widget.EditText;
import android.widget.Toast;

public class MainActivity extends Activity{

    private static WebView webView;


    @Override
    protected void onCreate(Bundle savedInstanceState) {
        super.onCreate(savedInstanceState);
        setContentView(R.layout.activity_main);
        TopBarView topbar = (TopBarView) findViewById(R.id.TopBarView);
        webView = (WebView) findViewById(R.id.wenbiew);


        WebSettings webseting = webView.getSettings();

        topbar.setTopBarViewClickListener(new TopBarViewClickListener() {

            @Override
            public void rightButtonClickListener() {
                String url = "http://m.amap.com/navi/?start=116.403124,39.940693&dest=116.481488,39.990464&destName=阜通西&naviBy=car&key=035a7298cddc6488961e9cba167c71c3";
                webView.loadUrl(url);


            }

            @Override
            public void leftButtonClickListener() {

            }
        });


    }


}
程式碼的思路非常簡單,就是在onCreate()方法中給webview和TopBarView初始化,然後給TopBarView的左右按鈕註冊監聽事件,並讓其在點選右鍵時載入我們的URL,執行效果如圖:
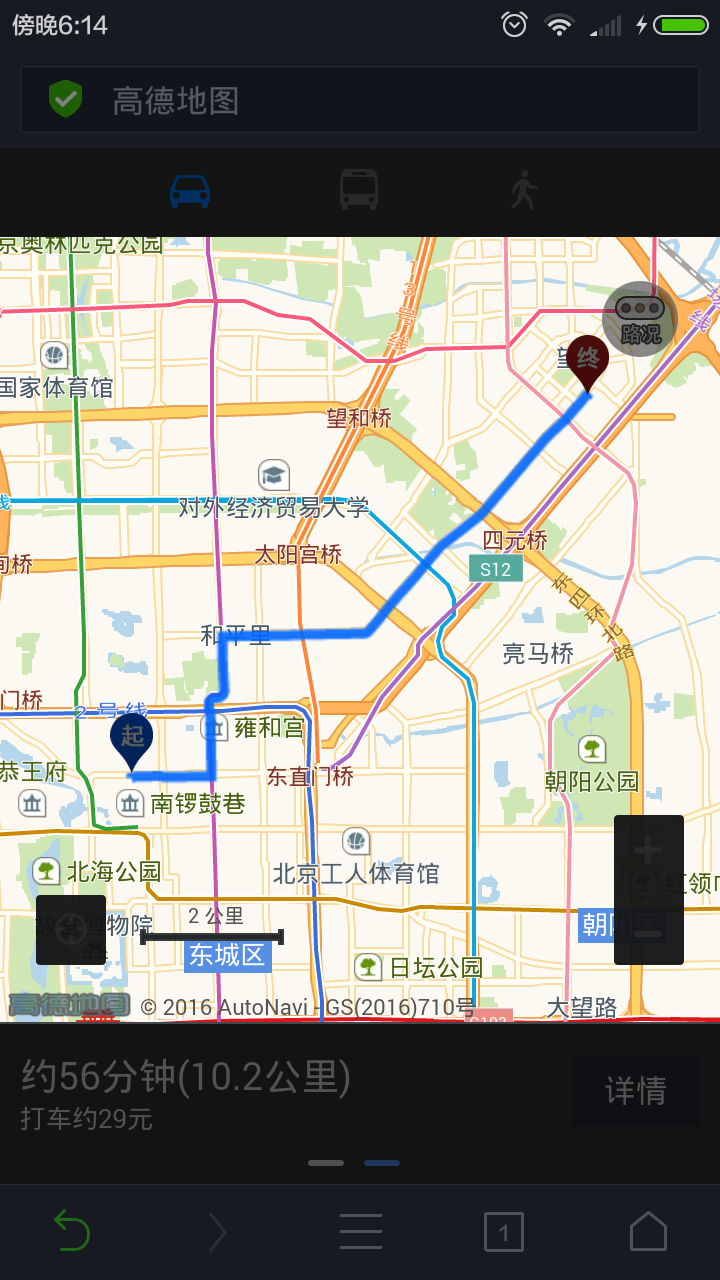
但是這裡是直接跳到瀏覽器裡面去了,並沒有在webview裡實現載入我們的目標URL,這裡加兩句程式碼就行了,如下:
@Override
            public void rightButtonClickListener() {
                WebSettings webseting = webView.getSettings();
                //非常重要,支援JavaScript
                webseting.setJavaScriptEnabled(true);
                String url = "http://m.amap.com/navi/?start=116.403124,39.940693&dest=116.481488,39.990464&destName=阜通西&naviBy=car&key=035a7298cddc6488961e9cba167c71c3";
                webView.loadUrl(url);在
                //設定在webview里加載,不跳轉到瀏覽器
                webView.setWebViewClient(new WebViewClient());

            }
再次執行,效果如下圖:

OK,現在我們對於地圖元件在Android APP上面能應用了,但是問題又來了,如何實現實現和客戶的互動呢?比如客戶要做位置標註,給你一個地址,你應該怎麼做呢?想一想?
這裡我直接說了,Android裡實現互動很容易,增加一個EditText控制元件使用者就可以輸入目標位置,但是這個位置的經緯度怎麼獲取呢?高德官網有一個網頁叫“高德座標拾取工具”(上面講了,我們不用SDK,而且GPS獲取的經緯度也是谷歌提供的,不是高德的國標,所以這裡直接忽略了),我們怎麼拾取這個座標呢?或許我們可以將高德官網的這個座標拾取工具扒出來,然後扒出JavaScript並做修改,這裡不用了,因為網上已經有實現的這種類似高德座標拾取工具的網頁,程式碼如下(原始碼出處)
<!DOCTYPE html>
<html>
<head>
<meta http-equiv="Content-Type" content="text/html; charset=utf-8" />
<title>高德座標拾取工具</title>
<link rel="stylesheet" type="text/css"
    href="css/demo.Default.css" />
<script  type="text/javascript"
    src="http://webapi.amap.com/maps?v=1.3&key=035a7298cddc6488961e9cba167c71c3"></script>
<script language="javascript">
var mapObj;
var marker = new Array();
var windowsArr = new Array();

//基本地圖載入
function mapInit() {
//  mapObj = new AMap.Map("iCenter");
    mapObj = new AMap.Map("iCenter",{
                  view: new AMap.View2D({//建立地圖二維視口
                           center: new AMap.LngLat(116.397428,39.90923),
                           zoom:14,
                           rotation:0
                  }),

                  lang:"zh_cn"//設定地圖語言型別,預設:中文簡體
        });
    var edit = document.getElementById("edit")

    //AMap.event.addListener(mapObj,'click',getLnglat);
}
function placeSearch() {
    var MSearch;
    mapObj.plugin(["AMap.PlaceSearch"], function() {
        MSearch = new AMap.PlaceSearch({ //構造地點查詢類
            pageSize:10,
            pageIndex:1,
            city:"021" //城市
        });
        AMap.event.addListener(MSearch, "complete", keywordSearch_CallBack);//返回地點查詢結果
        var searchName = document.all.searchText.value;//查詢關鍵字
        MSearch.search(searchName); //關鍵字查詢

    });
}
//新增marker&infowindow
function addmarker(i, d) {
    var lngX = d.location.getLng();
    var latY = d.location.getLat();
    var markerOption = {
        map:mapObj,
        icon:"http://webapi.amap.com/images/" + (i + 1) + ".png",
        position:new AMap.LngLat(lngX, latY)
    };

    var mar = new AMap.Marker(markerOption);
    marker.push(new AMap.LngLat(lngX, latY));

    var infoWindow = new AMap.InfoWindow({
        content:"<h3><font color=\"#00a6ac\">  " + (i + 1) + ". " + d.name + "</font></h3>" + TipContents(d.type, d.address, d.tel),
        size:new AMap.Size(300, 0),
        autoMove:true,
        offset:new AMap.Pixel(0,-30)
    });
    windowsArr.push(infoWindow);
    var aa = function (e) {infoWindow.open(mapObj, mar.getPosition());};
    AMap.event.addListener(mar, "click", aa);
    AMap.event.addListener(mar,'click',getLnglat);
}
//回撥函式
function keywordSearch_CallBack(data) {
    var resultStr = "";
    var poiArr = data.poiList.pois;
    var resultCount = poiArr.length;
    for (var i = 0; i < resultCount; i++) {
        resultStr += "<div id='divid" + (i + 1) + "' onclick='openMarkerTipById1(" + i + ",this)' onmouseout='onmouseout_MarkerStyle(" + (i + 1) + ",this)' style=\"font-size: 12px;cursor:pointer;padding:0px 0 4px 2px; border-bottom:1px solid #C1FFC1;\"><table><tr><td><img src=\"http://webapi.amap.com/images/" + (i + 1) + ".png\"></td>" + "<td><h3><font color=\"#00a6ac\">名稱: " + poiArr[i].name + "</font></h3>";
            resultStr += TipContents(poiArr[i].type, poiArr[i].address, poiArr[i].tel) + "</td></tr></table></div>";
            addmarker(i, poiArr[i]);
    }

    mapObj.setFitView();
    document.getElementById("result").innerHTML = resultStr;
    openMarkerTipById1(0,document.getElementById("divid1"));

}
function TipContents(type, address, tel) {  //窗體內容
    if (type == "" || type == "undefined" || type == null || type == " undefined" || typeof type == "undefined") {
        type = "暫無";
    }
    if (address == "" || address == "undefined" || address == null || address == " undefined" || typeof address == "undefined") {
        address = "暫無";
    }
    if (tel == "" || tel == "undefined" || tel == null || tel == " undefined" || typeof address == "tel") {
        tel = "暫無";
    }
    var str = "  地址:" + address + "<br />  電話:" + tel + " <br />  型別:" + type;
    return str;
}
function openMarkerTipById1(pointid, thiss) {  //根據id 開啟搜尋結果點tip
    thiss.style.background = '#CAE1FF';
    windowsArr[pointid].open(mapObj, marker[pointid]);

    //result中每個div觸發的事件
    document.getElementById("lngX").value = marker[pointid].getLng();
    document.getElementById("latY").value = marker[pointid].getLat();

}
function onmouseout_MarkerStyle(pointid, thiss) { //滑鼠移開後點樣式恢復
    thiss.style.background = "";
}
//滑鼠在地圖上點選,獲取經緯度座標
function getLnglat(e) {
    document.getElementById("lngX").value = e.lnglat.getLng();
    document.getElementById("latY").value = e.lnglat.getLat();
}

//關閉頁面
function CloseWind(){
    var lat = document.getElementById("lngX").value;
    var lon = document.getElementById("latY").value;
    opener.setValue(lat+","+lon);
    window.close();

}
</script>
<style type="text/css">
<!--

table{height:100%}
    html,body{height:100%;margin:0px;padding:0px}

.STYLE1 {color: #F3F3F3}
-->
</style>
</head>
<body onLoad="mapInit()">
    <table width="100%" border="0" cellspacing="0" cellpadding="0" >
    <tr>
    <td colspan="2" height="50"><br>
高德地圖:<input type="text" name="searchText" id="edit">
      <input type="button" value="查詢" onClick="placeSearch()" href=\"javascript:myjavascript.call('"+jsonObj.phone + "')\> 輸入位置資訊
        <br><br>地圖經緯度座標: X:<input type="text" id="lngX" name="lngX"/> Y:<input type="text" id="latY" name="latY"/>
        <input type="button" name="btn_Close" id="btn_Close" value="確定,並關閉頁面" onClick="CloseWind();" /> *選擇正確地點之後,請點選該按鈕
</td>
    </tr>
  <tr>
    <td width="70%" height="500"> <div  style="height:100%" id="iCenter"></div></td>
    <td valign="top" ><div class="demo_box">
        <div id="r_title" ><b>關鍵字查詢結果:</b></div>
        <div id="result" > </div>
    </div>
    <span class="STYLE1"></span></td>
  </tr>
</table>

</body>
</html>
執行效果如圖:
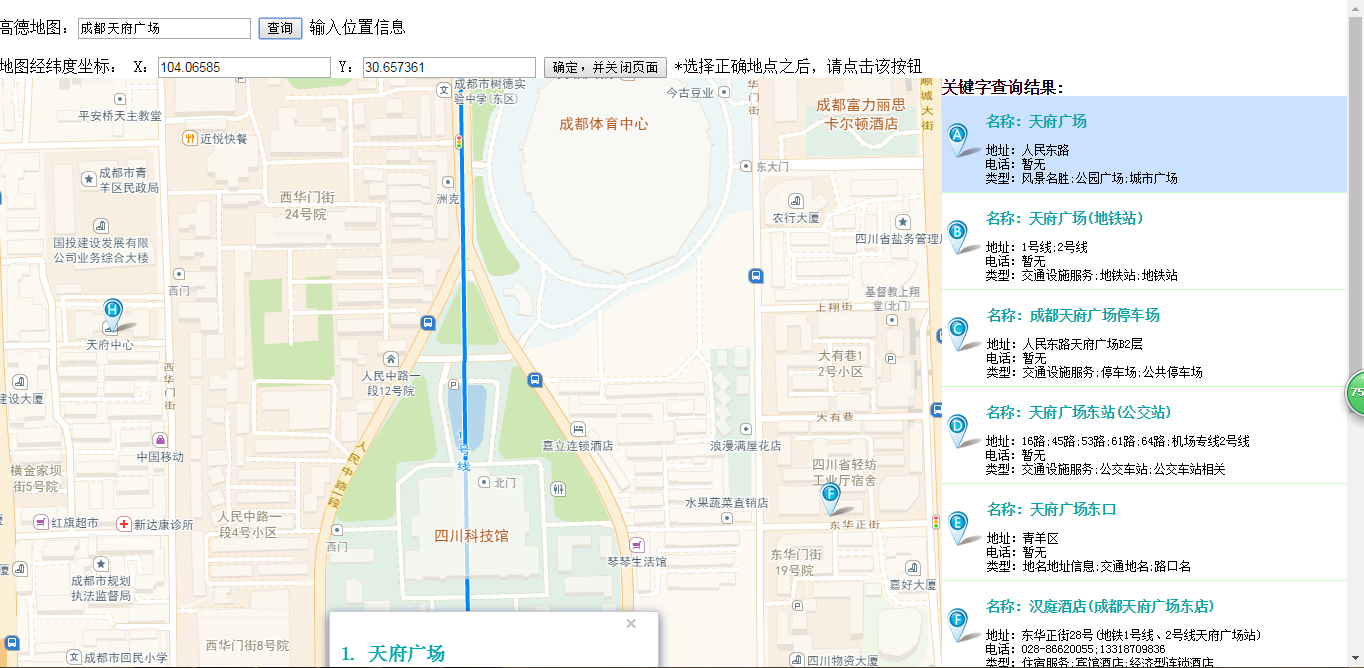
這裡還是講一下具體的實現邏輯,首先html如同java的main()方法一樣,他首先需要執行onLoad方法,文中程式碼onLoad=”mapInit()”,意思是將mapInit()定義為onLoad方法,這個方法裡做了唯一的一件事,就是將地圖例項化。
然後我們在點選查詢按鈕後執行了placeSearch()方法,文中程式碼onClick=”placeSearch()” 這個方法裡重點執行三件事:1是構造地點查詢類,2是將地點查詢結果加一個介面,三是將我們輸入的“天府廣場”作為關鍵字交給地點查詢類來查詢,然後查詢的結果我們到回撥函式來看看。
keywordSearch_CallBack(data),這裡重點是兩件事var resultCount = poiArr.length;
for (var i = 0; i < resultCount; i++) {
resultStr += "<div id='divid" + (i + 1) + "' onclick='openMarkerTipById1(" + i + ",this)' onmouseout='onmouseout_MarkerStyle(" + (i + 1) + ",this)' style=\"font-size: 12px;cursor:pointer;padding:0px 0 4px 2px; border-bottom:1px solid #C1FFC1;\"><table><tr><td><img src=\"http://webapi.amap.com/images/" + (i + 1) + ".png\"></td>" + "<td><h3><font color=\"#00a6ac\">名稱: " + poiArr[i].name + "</font></h3>";
resultStr += TipContents(poiArr[i].type, poiArr[i].address, poiArr[i].tel) + "</td></tr></table></div>";
addmarker(i, poiArr[i]);
}
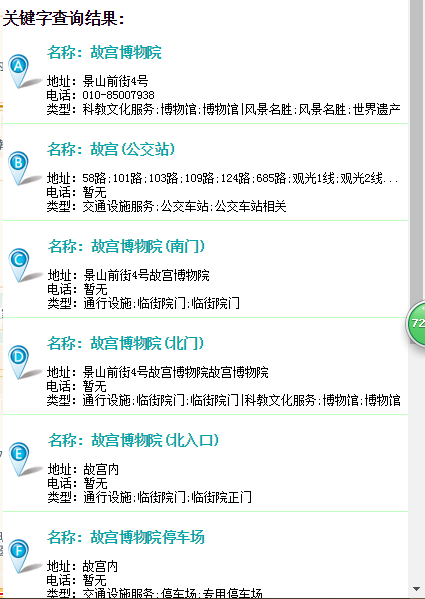
第一步是如上文將得到的查詢結果轉換成html格式的內容,然後第二步由這句程式碼document.getElementById(“result”).innerHTML = resultStr;將原來的內容替換了,這裡我們就看到了返回的文字列表了
接下來我們就來講一講最為困難,最為複雜的第五節,這裡有兩個難題:
一、我們如何將自己的目標地點傳遞給html網頁?
二、html網頁裡得到了經緯度,怎麼傳遞給Android?
這裡我需要先把Android的佈局做一個修改,讓客戶輸入目的地,程式碼如下:
<LinearLayout xmlns:android="http://schemas.android.com/apk/res/android"
    xmlns:tools="http://schemas.android.com/tools"
    xmlns:custom="http://schemas.android.com/apk/res/com.weixing.topbarlibrary"
    android:layout_width="match_parent"
    android:layout_height="match_parent"
    tools:context="com.weixing.topbarlibrary.MainActivity"
    android:orientation="vertical">

    <!-- 標題欄 -->
   <com.weixing.topbarlibrary.TopBarView
       android:id="@+id/TopBarView"
       android:layout_width="match_parent"
       android:layout_height="40dp"
       custom:title="我的高德地圖"
       custom:titleTextSize="10sp"
       custom:titleTextColor="#ffffff"
       custom:leftColor="#ffffff"
       custom:leftBackGround="#3579bd"
       custom:leftText="搜尋位置"
       custom:rightColor="#ffffff"
       custom:rightBackGround="#3579bd"
       custom:rightText="載入地圖"/>
   <!-- 客戶輸入控制元件,佈局是隱藏的,點選搜尋位置時開啟, -->
   <LinearLayout
       android:id="@+id/SearchPoint"
       android:layout_width="match_parent"
       android:layout_height="wrap_content"
       android:background="#135791"
       android:orientation="horizontal"
       android:visibility="gone">
        <!-- 輸入控制元件 -->
       <EditText
           android:id="@+id/SearchEdit"
           android:layout_width="0dip"
           android:layout_height="wrap_content"
           android:layout_weight="3"
           android:hint="如(瀋陽故宮)"
            />
        <!-- 確認輸入的控制元件   確認輸入將父類LinerLayout關閉-->
       <Button
           android:id="@+id/SearchSure"
           android:layout_width="0dip"
           android:layout_weight="1"
           android:layout_height="wrap_content"
           android:text="搜尋"/>
   </LinearLayout>
        <!-- 載入位置標註、路線規劃等URL的webview -->
       <WebView
           android:id="@+id/wenbiew"
           android:layout_width="match_parent"
           android:layout_height="match_parent"
           />
        <!-- 載入座標拾取工具URL的webview  可以用上面的webview,
        但是為了不讓客戶看見我們拾取座標的過程,所以單獨增加一個webview隱藏進行 -->
       <WebView
           android:id="@+id/WebViewPoint"
           android:layout_width="match_parent"
           android:layout_height="match_parent"
           android:visibility="gone"/>
</LinearLayout>
接下來我們需要實現的是讓html載入的時候把我們的目的地文字傳給它,它直接進行搜尋,這裡我們將載入這個html的webview多寫一行程式碼:
webviewPoint.addJavascriptInterface(new MyJavaScript(this, handler), “myjavascript”);
這裡有兩個引數,一個是構造了一個MyJavaScript類,這個類是負責與JavaScript互動的,然後我們命名了一個”myjavascript”,這個名稱是JavaScript調Android的用的名稱,後文會用到,這裡我們看看這個MyJavaScript類的java程式碼:
package com.weixing.topbarlibrary;

import java.util.MissingFormatArgumentException;

import android.app.Activity;
import android.content.Context;
import android.os.Handler;
import android.util.Log;
import android.webkit.JavascriptInterface;
import android.webkit.WebView;

public class MyJavaScript {
    private WebView webview;
    //使用一個handler來處理載入事件
    private Handler handler;
    private String PlaceName;

    public MyJavaScript(Context context,Handler handler){
        this.handler = handler;
        webview = (WebView) ((Activity)context).findViewById(R.id.WebViewPoint);

    }
    /*
     * java呼叫顯示網頁,非同步
     * 傳遞目標點 PlaceName
     */
    @JavascriptInterface
    public void show(){
      handler.post(new Runnable() {
        public void run() {
        //重要:url的生成,傳遞資料給網頁
            PlaceName = MainActivity.str;
            String url = "javascript:mapInit('" + PlaceName + "')";
           webview.loadUrl(url);
           Log.e("hhqy", "javascript:mapInit('" + PlaceName + "')");
        }
       });
    }

    /**
     * JS呼叫Android,傳回座標點
     * @param point
     */
    @JavascriptInterface
    public void call(final String point){
        handler.post(new Runnable() {
            public void run() {

                MainActivity.StartSearch(point);
                Log.e("hhqy", point);
            }
           });


    }

}
Android段準備好了之後我們就去JavaScript裡修改,讓他實現Android與JavaScript的互動,首先思路是這樣:
1、載入html,然後呼叫Android的方法,實現目的地的傳遞;
2、地圖例項化,開始搜尋目的地;
3、將目的地搜尋結果第一條的資料傳遞給Android,
4、Android按照高德地圖元件的要求拼寫URL,再次載入,實現整個webview的自定義位置標註
首先來講載入html,非常簡單,一句程式碼:
webviewPoint.loadUrl(“file:///android_asset/index.html”);然後html執行的方法不是自身的,這裡需要調Android提供的目的地,於是它的onLoad方法需要做一個更改: onLoad=”javascript:myjavascript.show()”意思就是JavaScript執行myjavascript.show()方法,
/*
     * java呼叫顯示網頁,非同步
     * 傳遞目標點 PlaceName
     */
    @JavascriptInterface
    public void show(){
      handler.post(new Runnable() {
        public void run() {
        //重要:url的生成,傳遞資料給網頁
            PlaceName = MainActivity.str;
            String url = "javascript:mapInit('" + PlaceName + "')";
           webview.loadUrl(url);
           Log.e("hhqy", "javascript:mapInit('" + PlaceName + "')");
        }
       });
} 這個方法裡將目的地作為引數傳遞給javascript:mapInit(),看清楚這裡是用主執行緒傳過來的handler來載入的,如果不用handler根本就載入不起來,會報一個異常,如圖:真機日誌較多,不確定這個異常,大神希望可以從原始碼角度來分享一下為什麼只有主執行緒才能載入這個webview
然後我們接下來看看mapInit()裡得到這個引數怎麼做呢?增加三行程式碼:var edit = document.getElementById(“edit”)
edit.value = PlaceName;
placeSearch();
我們將傳過來的引數給那個輸入框賦值,然後直接調用搜索按鈕的方法,就完成了第二步,接下來我們繼續實施第三步。
在html訪問網路拿到資料進行處理時,我們給他調一個監聽事件,因為返回結果的列表需要我們點選他才會把相應結果經緯度呈現在X、Y後面的輸入框,openMarkerTipById1(0,document.getElementById(“divid1”));這裡我們返回的是列表的第一個資料,既然調了這個事件,那麼我們到這個事件裡面去觀察一下它在做什麼?這裡做了三件事:把選擇項的背景色做了更改;將目標地點做了一個標記,然後將經緯度的值分別賦給對應的控制元件(或許控制元件這個稱呼不專業,但是用Android習慣了,大家也可以更好的理解),然後我們給它增加一個方法:myjavascript.call(‘”+marker[pointid].getLng()+”,”+marker[pointid].getLat() + “’);
這裡的myjavascript是我們之前的命名,後面的call方法就是將目標地的經度+”,”+維度作為一個引數傳給了Android,完成了第三步,最後我們來看看第四步是怎麼實現的?
/**
     * JS呼叫Android,傳回座標點
     * @param point
     */
    @JavascriptInterface
    public void call(final String point){
        handler.post(new Runnable() {
            public void run() {

                MainActivity.StartSearch(point);
                Log.e("hhqy", point);
            }
           });


    }
我們把這個引數在主執行緒傳給了裡的一個方法,這個方法又做了什麼啊?
public static void StartSearch(String PlacePoint){
//      webView.setVisibility(View.VISIBLE);
//      webviewPoint.setVisibility(View.GONE);

        String url = "http://m.amap.com/around/?locations="+PlacePoint+"&keywords=美食,KTV,地鐵站,公交站&defaultIndex=3&defaultView=&searchRadius=5000&key=035a7298cddc6488961e9cba167c71c3";
//      String url = "http://m.amap.com/around/?locations=121.429489,31.153304&keywords=美食,KTV,地鐵站,公交站&defaultIndex=3&defaultView=&searchRadius=5000&key=035a7298cddc6488961e9cba167c71c3";
        webView.loadUrl(url);
        webView.setWebViewClient(new WebViewClient());
    }
OK,大功告成了,不過網上也有很多關於Android與JavaScript的互動,大部分是JavaScript傳資料給Android基本上都是通過超連結,或者Android直接獲取某個內容控制元件的具體文字,但是我們這裡不觸控html網頁(其實它一直是隱藏的)也沒有用死迴圈一直等得到賦值了再拿回來,因為就我要的效果來看,它目前是最佳的!
大家可以繼續擴充套件,比如用TabHost繫結四個Activity實現地圖元件的四個用法,然後如法炮製的將關鍵字等元素新增進來,這裡只是拋磚引玉,大家可以做幾個嘗試!
最後請各位大神多多點評,如有繆處,請與斧正,謝謝!
原始碼點選這裡
最後,經過對地圖元件API的深入研究,發現”bug”:
地圖元件的位置標註功能生成的URL在webview載入顯示不完整,返回結果是key值不合法,但是用瀏覽器載入沒有任何問題該問題預計5月24日解決,詳情見部落格高德地圖元件在Android的應用以及Android與JavaScript的互動(二),敬請斧正!