多個Activity之間利用bundle傳遞數值
安卓中的Activity相當於vb,mfc中的窗體,在多個Activity之間傳遞資料是一個相當核心的功能。下面舉個例子來說明這個問題。
一、基本目標
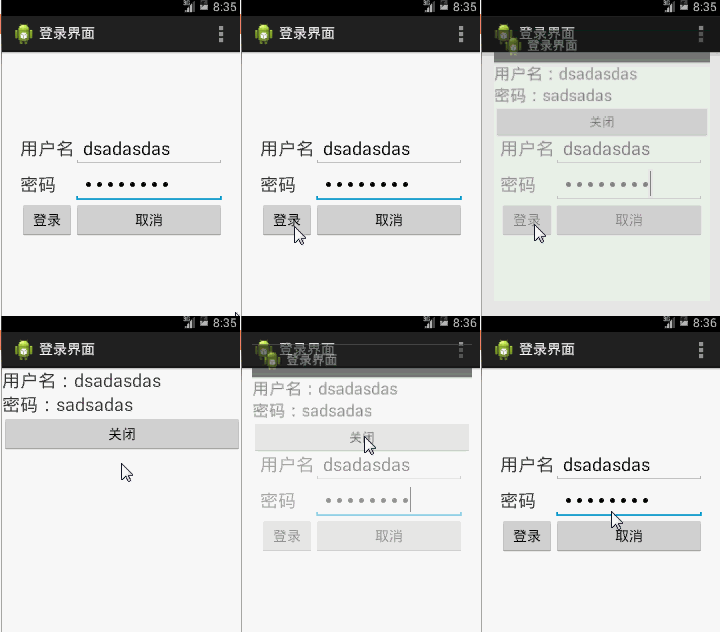
使用者在兩個輸入框中輸入使用者名稱、密碼之後,跳到另一個Activity當中,顯示其輸入的內容,
然後這兩個Activity能夠輕鬆跳轉。
二、製作過程
1、首先MainActivity的登入介面是沿用了《【Android】利用表格佈局,Android中xml檔案與java的交互制作登入介面》(點選開啟連結)的佈局,其佈局檔案activity_main.xml如下,一字未改:
<TableLayout xmlns:android="http://schemas.android.com/apk/res/android"
    android:layout_width="match_parent"
    android:layout_height="match_parent"
    android:gravity="center" >

    <!-- 第一行 -->

    <TableRow
        android:layout_width="match_parent"
        android:layout_height="wrap_content"
        android:gravity="center_horizontal" >

        <TextView
            android:layout_width="match_parent"
            android:layout_height="wrap_content"
            android:text="@string/textview1"
            android:textSize="24sp" />

        <EditText
            android:id="@+id/edittext1"
            android:layout_width="200dp"
            android:layout_height="wrap_content"
            android:inputType="text"
            android:textSize="24sp" />
    </TableRow>
    <!-- 第二行 -->

    <TableRow
        android:layout_width="match_parent"
        android:layout_height="wrap_content"
        android:gravity="center_horizontal" >

        <TextView
            android:layout_width="match_parent"
            android:layout_height="wrap_content"
            android:text="@string/textview2"
            android:textSize="24sp" />

        <EditText
            android:id="@+id/edittext2"
            android:layout_width="200dp"
            android:layout_height="wrap_content"
            android:inputType="textPassword"
            android:textSize="24sp" />
    </TableRow>
    <!-- 第三行 -->

    <TableRow
        android:layout_width="match_parent"
        android:layout_height="wrap_content"
        android:gravity="center_horizontal" >

        <Button
            android:id="@+id/button1"
            android:layout_width="match_parent"
            android:layout_height="wrap_content"
            android:text="@string/button1" />

        <Button
            android:id="@+id/button2"
            android:layout_width="match_parent"
            android:layout_height="wrap_content"
            android:text="@string/button2" />
    </TableRow>

</TableLayout>
然後在res/layout/string.xml,為新的Activity的按鈕宣告一個name為activity2_button1新的字串,值為“關閉”。一會兒賦予新的Activity中的button。
2、只是把其處理的Java檔案MainActivity.java的Button的Onclick處理方法修改了一下。<?xml version="1.0" encoding="utf-8"?> <resources> <string name="app_name">登入介面</string> <string name="action_settings">Settings</string> <string name="textview1">使用者名稱</string> <string name="textview2">密碼</string> <string name="button1">登入</string> <string name="button2">取消</string> <string name="activity2_button1">關閉</string> </resources>
這裡利用到Bundle去儲存要在多個Activity之間的變數,其相當於Map是由key-value對組成的東東。取出在MainActivity.java的兩個可編輯框的值,放進去Bundle中,注意取出來的東西必須先轉化為字串。
intent指明這個Bundle在哪裡傳遞,將要開啟的Activity是哪個。其中Activity2.java是一會兒我們要建立的Activity。
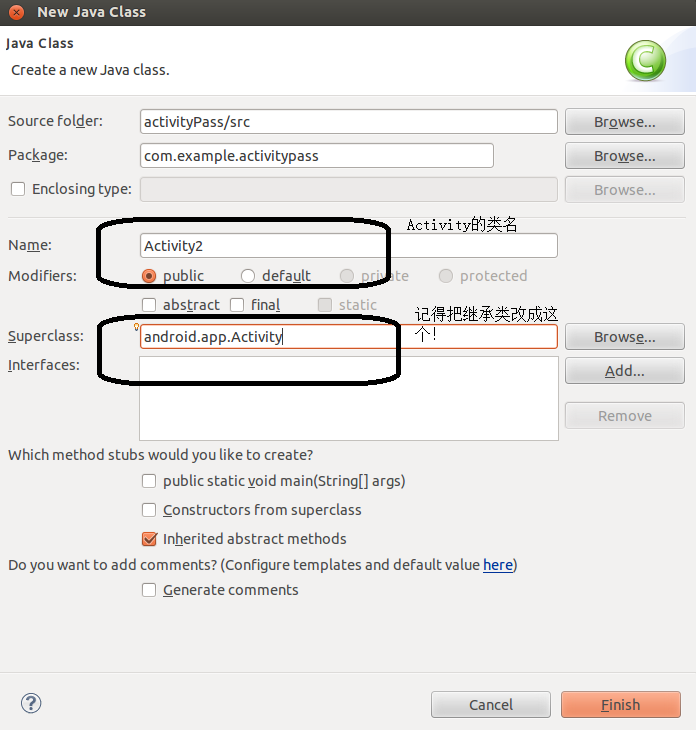
3、接著我們新建一個Activity,說白了,就是在com.example.xx(其中xx為工程名),這個包中新建一個繼承android.app.activity的Java檔案而已。右鍵com.example.xx新建一個class。這裡假設新的Activity名為Activity2.java。package com.example.activitypass; import android.os.Bundle; import android.app.Activity; import android.content.Intent; import android.view.Menu; import android.view.View; import android.view.View.OnClickListener; import android.widget.Button; import android.widget.EditText; public class MainActivity extends Activity { private Button button1; private Button button2; private EditText edittext1; private EditText edittext2; @Override protected void onCreate(Bundle savedInstanceState) { super.onCreate(savedInstanceState); setContentView(R.layout.activity_main); button1 = (Button) findViewById(R.id.button1); button2 = (Button) findViewById(R.id.button2); edittext1 = (EditText) findViewById(R.id.edittext1); edittext2 = (EditText) findViewById(R.id.edittext2); button1.setOnClickListener(new OnClickListener() {// 為button1新增點選事件 @Override public void onClick(View v) { String username = edittext1.getText().toString(); String password = edittext2.getText().toString(); Intent intent = new Intent(MainActivity.this, Activity2.class); Bundle bundle = new Bundle(); bundle.putCharSequence("username", username); bundle.putCharSequence("password", password); intent.putExtras(bundle); startActivity(intent); } }); button2.setOnClickListener(new OnClickListener() {// 為button2新增點選事件 @Override public void onClick(View v) { System.exit(0);// 退出程式 } }); } @Override public boolean onCreateOptionsMenu(Menu menu) { // Inflate the menu; this adds items to the action bar if it is present. getMenuInflater().inflate(R.menu.main, menu); return true; } }
4、一個Activity.java對應一個xml,因此,我們還需要在res/layout資料夾中,新建一個activity2.xml,在裡面用一個垂直的線性佈局,一直往下排,兩個指明id的Textview,一會兒在Activity.java中把Bundle的資料放到裡面,然後最後排上一個按鈕,用來關閉這個Activity。一會兒這個activity2.xml在Activity.java中利用setContentView(R.layout.xxx);這個方法去把這個xml與java關聯起來。
<?xml version="1.0" encoding="utf-8"?>
<LinearLayout xmlns:android="http://schemas.android.com/apk/res/android"
    android:layout_width="match_parent"
    android:layout_height="match_parent"
    android:orientation="vertical" >

    <TextView
        android:id="@+id/textView1"
        android:layout_width="match_parent"
        android:layout_height="wrap_content"
        android:textSize="24sp" />

    <TextView
        android:id="@+id/textView2"
        android:layout_width="match_parent"
        android:layout_height="wrap_content"
        android:textSize="24sp" />

    <Button
        android:id="@+id/button1"
        android:layout_width="match_parent"
        android:layout_height="wrap_content"
        android:text="@string/activity2_button1" />

</LinearLayout>宣告方法很簡單,用label指明這個Activity的標題,用name指明這個Activity的實現類。
<?xml version="1.0" encoding="utf-8"?>
<manifest xmlns:android="http://schemas.android.com/apk/res/android"
    package="com.example.activitypass"
    android:versionCode="1"
    android:versionName="1.0" >

    <uses-sdk
        android:minSdkVersion="8"
        android:targetSdkVersion="18" />

    <application
        android:allowBackup="true"
        android:icon="@drawable/ic_launcher"
        android:label="@string/app_name"
        android:theme="@style/AppTheme" >
        <activity
            android:name="com.example.activitypass.MainActivity"
            android:label="@string/app_name" >
            <intent-filter>
                <action android:name="android.intent.action.MAIN" />

                <category android:name="android.intent.category.LAUNCHER" />
            </intent-filter>
        </activity>

        <activity
            android:name="com.example.activitypass.Activity2"
            android:label="@string/app_name" >
        </activity>
    </application>

</manifest>關閉Activity則用finish()的方法。
package com.example.activitypass;

import android.app.Activity;
import android.content.Intent;
import android.os.Bundle;
import android.view.View;
import android.view.View.OnClickListener;
import android.widget.Button;
import android.widget.TextView;

public class Activity2 extends Activity {
	private TextView textView1;
	private TextView textView2;
	private Button button1;

	@Override
	protected void onCreate(Bundle savedInstanceState) {
		super.onCreate(savedInstanceState);
		setContentView(R.layout.activity2);
		Intent intent = getIntent();
		Bundle bundle = intent.getExtras();
		textView1 = (TextView) findViewById(R.id.textView1);
		textView2 = (TextView) findViewById(R.id.textView2);
		button1 = (Button) findViewById(R.id.button1);
		textView1.setText("使用者名稱:" + bundle.getString("username"));
		textView2.setText("密碼:" + bundle.getString("password"));
		button1.setOnClickListener(new OnClickListener() {// 為button1新增點選事件
			@Override
			public void onClick(View v) {
				finish();// 關閉此Activity
			}
		});
	}

}


