Android實現自定義帶文字和圖片的Button
阿新 • • 發佈:2019-02-06
專案中的需求往往十分怪異,例如在按鈕文字的左邊加一個圖示,這樣按鈕內部既有文字又有圖片,乍看之下Button和ImageView都沒法直接使用,若用LinearLayout對ImageView和Button組合佈局,這樣固然可行,但是佈局檔案會冗長許多
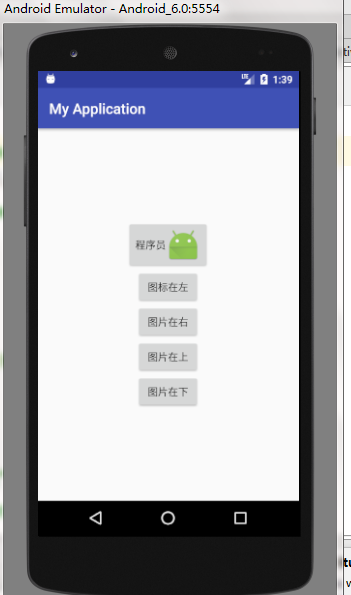
其實有一個既簡單又靈活的辦法,在文字周圍放置圖片,只使用Button就能實現,具體可在XML佈局檔案中設定一下5個屬性
drawableTop : 指定文字上方的圖形
drawableBottom : 指定文字下方的圖形
drawableLeft : 指定文字左邊的圖形
drawableRight : 指定文字右邊的圖形
drawablePadding : 指定圖形與文字的間距
示例:
<Button
android:id="@+id/btn_icon"
android:layout_width="wrap_content"
android:layout_height="wrap_content"
android:drawableLeft="@mipmap/ic_launcher"
android:text="程式設計師"/>
若在程式碼中實現,則課呼叫如下方法
setCompoundDrawables : 設定文本週圍圖形的位置,接受四個引數,可分別設定為左邊、上邊、右邊、下邊的圖形
setCompoundDrawablePadding : 設定圖形與文字的間距
下面的程式碼演示在按鈕中變換圖示位置的功能
XML佈局如下
<?xml version="1.0" encoding="utf-8"?>
<LinearLayout xmlns:android="http://schemas.android.com/apk/res/android"
    xmlns:app="http://schemas.android.com/apk/res-auto"
    xmlns:tools="http://schemas.android.com/tools"
    android:layout_width="match_parent"
    android:layout_height="match_parent"
    android:gravity="center"
    android:orientation="vertical"
    tools:context="sxpi.com.myapplication.MainActivity">

    <Button
        android:id="@+id/btn_icon"
        android:layout_width="wrap_content"
        android:layout_height="wrap_content"
        android:text="程式設計師" />

    <Button
        android:id="@+id/left"
        android:layout_width="wrap_content"
        android:layout_height="wrap_content"
        android:text="圖示在左" />

    <Button
        android:id="@+id/right"
        android:layout_width="wrap_content"
        android:layout_height="wrap_content"
        android:text="圖片在右" />

    <Button
        android:id="@+id/top"
        android:layout_width="wrap_content"
        android:layout_height="wrap_content"
        android:text="圖片在上" />

    <Button
        android:id="@+id/bottom"
        android:layout_width="wrap_content"
        android:layout_height="wrap_content"
        android:text="圖片在下" />
</LinearLayout>
程式如下
importandroid.graphics.drawable.Drawable;
import android.support.v7.app.AppCompatActivity;
import android.os.Bundle;
import android.view.View;
import android.widget.Button;
public class MainActivity extends AppCompatActivity implements View.OnClickListener{
    private Button btn_icon;
    private Drawable drawable;
    @Override
    protected void onCreate(Bundle savedInstanceState) {
        super.onCreate(savedInstanceState);
        setContentView(R.layout.activity_main);
        btn_icon=(Button)findViewById(R.id.btn_icon);
        drawable=getResources().getDrawable(R.mipmap.ic_launcher);
        //必須設定圖片大小,否則不顯示圖片
        drawable.setBounds(0,0,drawable.getMinimumWidth(),drawable.getMinimumHeight());
        findViewById(R.id.left).setOnClickListener(this);
        findViewById(R.id.right).setOnClickListener(this);
        findViewById(R.id.top).setOnClickListener(this);
        findViewById(R.id.bottom).setOnClickListener(this);
    }

    @Override
    public void onClick(View v) {
        if (v.getId()==R.id.left){
            btn_icon.setCompoundDrawables(drawable,null,null,null);
        }else if (v.getId()==R.id.top){
            btn_icon.setCompoundDrawables(null,drawable,null,null);
        }else if (v.getId()==R.id.right){
            btn_icon.setCompoundDrawables(null,null,drawable,null);
        }else if (v.getId()==R.id.bottom){
            btn_icon.setCompoundDrawables(null,null,null,drawable);
        }
    }
}


