
關於跳轉到系統介面,返回不了或者不儲存系統介面的辦法
前面內容轉載至(支援原創)0:http://blog.csdn.net/xxdddail/article/details/19537145
在Android開發時,有時因為需求,需要跳轉到系統的一些頁面,比如從UI中跳轉到系統設定項、WIFI設定等,那要如何返回到原來的Activity中呢?
我們可以通過WindowManager來實現。原理可以簡單的理解為在跳轉到系統的Activity中後,在該Activity的上方新增一個按鈕,然後對這個按鈕新增事件。
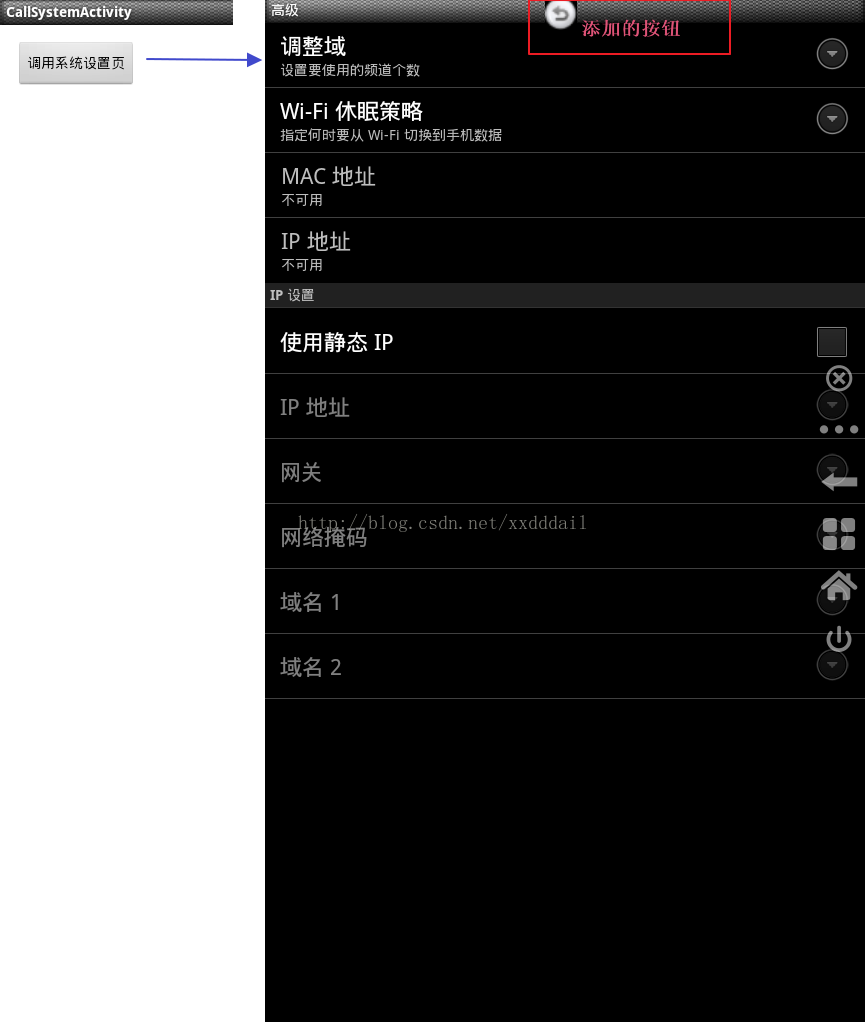
先看看效果圖
實現程式碼如下
CallSystemActivity.Java
-
package com.example.callsystemactivity;
- import android.app.Activity;
- import android.os.Bundle;
- import android.view.View;
- import android.view.View.OnClickListener;
- import android.widget.Button;
- publicclass MainActivity extends Activity {
- @Override
- protectedvoid onCreate(Bundle savedInstanceState) {
-
super.onCreate(savedInstanceState);
- setContentView(R.layout.activity_main);
- Init();
- }
- privatevoid Init()
- {
- Button callSystemSet_button=(Button)findViewById(R.id.CallSystemSet_button);
- callSystemSet_button.setOnClickListener(new OnClickListener() {
- @Override
-
publicvoid onClick(View v) {
- // TODO Auto-generated method stub
- WindowManagerSp windowManagerSp=new WindowManagerSp(MainActivity.this);
- windowManagerSp.AddBackButton();
- IntentSp.StartActivity(MainActivity.this, android.provider.Settings.ACTION_WIFI_IP_SETTINGS,false);
- }
- });
- }
- }
注:
1、需要在activity_main.xml中新增一個按鈕callSystemSet_button
2、WindowManager需要相應的許可權,所以需要在AndroidManifest.xml中新增許可權,如下
<uses-permission android:name="android.permission.SYSTEM_ALERT_WINDOW" />
<uses-permission android:name="android.permission.SYSTEM_OVERLAY_WINDOW" />
WindowManagerSp.java
- package com.example.callsystemactivity;
- import android.app.Activity;
- import android.content.Context;
- import android.view.Gravity;
- import android.view.View;
- import android.view.View.OnClickListener;
- import android.view.WindowManager;
- import android.widget.ImageView;
- publicclass WindowManagerSp {
- WindowManager _winManager = null;
- Activity _activity = null;
- Context _context = null;
- public WindowManagerSp(Activity activity) {
- if (activity == null) {
- return;
- }
- _activity = activity;
- _context = _activity.getBaseContext();
- _winManager = (WindowManager) _activity.getApplicationContext()
- .getSystemService(_activity.WINDOW_SERVICE);
- }
- publicvoid AddBackButton() {
- if (_winManager == null) {
- return;
- }
- WindowManager.LayoutParams layoutParams = new WindowManager.LayoutParams();
- layoutParams.gravity = Gravity.TOP | Gravity.LEFT;
- layoutParams.flags = WindowManager.LayoutParams.FLAG_NOT_TOUCH_MODAL
- | WindowManager.LayoutParams.FLAG_NOT_FOCUSABLE;
- layoutParams.type = WindowManager.LayoutParams.TYPE_SYSTEM_ALERT
- | WindowManager.LayoutParams.TYPE_SYSTEM_OVERLAY;
- // 以下width/height/x/y不一定是最合適的,需根據實現的頁面加以調整
- layoutParams.width = 32;
- layoutParams.height = 32;
- layoutParams.x = 280;
- layoutParams.y = 0;
- final ImageView backButton = new ImageView(_context);
- backButton.setBackgroundResource(R.drawable.back);// 請自行新增相應的背景圖片
- backButton.setOnClickListener(new OnClickListener() {
- @Override
- publicvoid onClick(View v) {
- IntentSp.RestartActivity(_activity, false);// 在另一個類中
- if (_winManager != null) {
- _winManager.removeView(backButton);
- }
- _winManager = null;
- }
- });
- _activity.finish();// 關閉activity,在返回時再次開啟
- _winManager.addView(backButton, layoutParams);
- }
- }
IntentSp.java
- package com.kitsp.contentsp;
- import android.app.Activity;
- import android.content.ComponentName;
- import android.content.Context;
- import android.content.Intent;
- import android.net.Uri;
- publicclass IntentSp {
- /**
- *
- * @param activity
- * @param isSaveActivityToHistory
- * true:save activity to history.System may back to the activity
- * when other activity finish. false:no save.
- */
- publicstaticvoid RestartActivity(Activity activity,
- boolean isSaveActivityToHistory) {
- if (activity == null) {
- return;
- }
- Intent intent = new Intent();
- String packageName = activity.getPackageName();
- String className = activity.getLocalClassName();
- String componentClassName = packageName + "." + className;
- if (className != null && className.split(".").length > 0) {
- componentClassName = className;
- }
- ComponentName componentName = new ComponentName(packageName,
- componentClassName);
- intent.setComponent(componentName);
- if (!isSaveActivityToHistory) {
- intent.addFlags(Intent.FLAG_ACTIVITY_NO_HISTORY);//新增該標誌後,讓activity不儲存
- }
- activity.startActivity(intent);
- activity.finish();
- return;
- }
- /**
- *
- * @param context
- * @param action
- * @param isSaveActivityToHistory
- * true:save activity to history.System may back to the activity
- * when other activity finish. false:no save.
- */
- publicstaticvoid StartActivity(Context context, String action,
- boolean isSaveActivityToHistory) {
- if (context == null || action == null) {
- return;
- }
- Intent intent = new Intent(action);
- if (!isSaveActivityToHistory) {
- intent.addFlags(Intent.FLAG_ACTIVITY_NO_HISTORY);
- }
- context.startActivity(intent);
- }
- }
intent.addFlags(Intent.FLAG_ACTIVITY_NO_HISTORY)是為了不讓系統的activity在開啟後一直存在,如果不這樣處理,在點硬返回鍵時,才不會返回到系統的activity中。因為由A應用開啟B應用的Activity,正常是無法從A中關閉B應用的Activity的,對於我們啟動系統的Activity也是一樣的道理。所以為了避免該問題,我們增加了flag,這樣啟動後的activity就不會儲存到activity的堆疊中,自然在點返回時,也就不會返回到該activity中了。
所以:如果不想儲存系統介面,跳轉時,記得加
intent.addFlags(Intent.FLAG_ACTIVITY_NO_HISTORY)
另外:在跳轉到系統介面時,如:亮度設定,還有彈出系統的dialog時,需要許可權,以及wifi設定等等,跳轉後,可以新增兩個按鈕,來手動的返回.新增後的
//wifi未連線
Intent wifiSettingsIntent = new Intent("android.settings.WIFI_SETTINGS");
wifiSettingsIntent.putExtra("extra_prefs_show_button_bar", true);
wifiSettingsIntent.putExtra("wifi_enable_next_on_connect", true);
startActivity(wifiSettingsIntent);
新增上面的內容即可
intent.addFlags(Intent.FLAG_ACTIVITY_NO_HISTORY)