動態計算UITableView中tableHeaderView的高度
阿新 • • 發佈:2019-02-07
開發的過程中,經常使用UITableView的tableHeaderView檢視,對於固定高度的tableHeaderView,我們使用非常簡單。建立一個自定義檢視,計算好固定高度即可。如果要動態更新tableHeaderView的高度,僅僅是將自定義的view進行計算高度,有時候我們會發現tableHeaderView高度還是原來的高度,沒有發生變化,在是顯示的內容變多之後,會有部分內容看不到。那麼一起來看看如何處理?
實現功能:
1)自定義一個UIView,包含兩個UILabel,使用SnapKit進行佈局
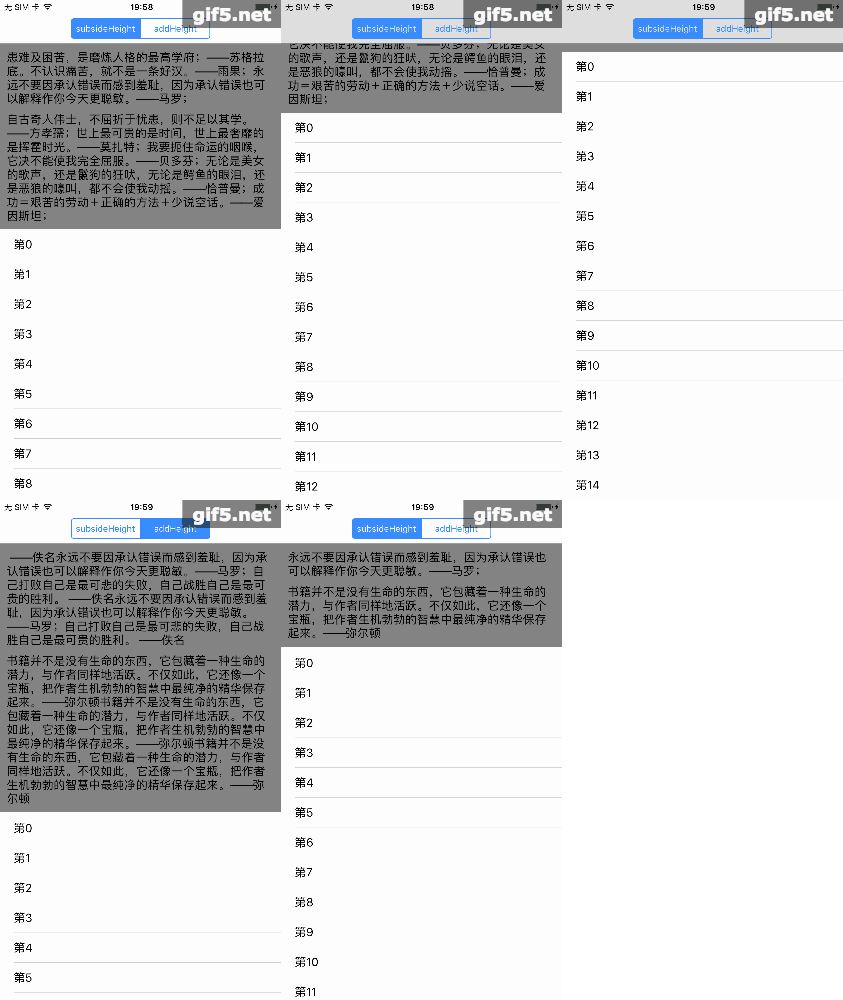
2) 預設動態計算內容高度,點選導航欄上的segmentControl進行增加和減少內容,進一步更新tableHeaderView的高度。
實現程式碼:
自定義檢視部分
上面程式碼非常簡單,添加了兩個label,並新增約束,注意第二個label,bottom的約束要進行設定,相對於父檢視的位置,不然得不到正確的高度。import UIKit import SnapKit class CustomHeaderView: UIView { lazy var content: UILabel = { let label = UILabel() label.numberOfLines = 0 return label }() lazy var info: UILabel = { let label = UILabel() label.numberOfLines = 0 return label }() override init(frame: CGRect) { super.init(frame: frame) setupUI() } required init?(coder aDecoder: NSCoder) { fatalError("init(coder:) has not been implemented") } func setupUI() { backgroundColor = UIColor.gray addSubview(content) addSubview(info) addConstraints() } func addConstraints() { content.snp.makeConstraints { (make) in make.left.right.top.equalToSuperview().inset(10) } info.snp.makeConstraints { (make) in make.left.right.equalTo(content) make.top.equalTo(content.snp.bottom).offset(10) make.bottom.equalToSuperview().offset(-10) } } }
接下來看ViewController部分
class ViewController: UIViewController {

    lazy var customView = CustomHeaderView()
    lazy var tableView: UITableView = {
        let table = UITableView()
        table.dataSource = self
        table.register(UITableViewCell.self, forCellReuseIdentifier: "cell")
        return table
    }()
    @IBOutlet var segment: UISegmentedControl?

    override func viewDidLoad() {
        super.viewDidLoad()
        addSubViews()
        setCustomViewContent()
        segment?.addTarget(self, action: #selector(tapSegemntControl(_:)), for: .valueChanged)
    }

    func addSubViews() {
        view.addSubview(tableView)
        tableView.snp.makeConstraints { (make) in
            make.left.right.top.bottom.equalToSuperview()
        }
        tableView.tableHeaderView = customView
        customView.snp.makeConstraints { (make) in
            make.top.equalToSuperview()
            make.left.right.equalTo(view) // 確定的寬度,高度由子檢視決定
        }
    }

    func setCustomViewContent() {
        customView.content.text = "患難及困苦,是磨鍊人格的最高學府;——蘇格拉底。不認識痛苦,就不是一條好漢。——雨果;永遠不要因承認錯誤而感到羞恥,因為承認錯誤也可以解釋作你今天更聰敏。——馬羅;"
        customView.info.text = "自古奇人偉士,不屈折於憂患,則不足以其學。——方孝孺;世上最可貴的是時間,世上最奢靡的是揮霍時光。——莫扎特;我要扼住命運的咽喉,它決不能使我完全屈服。——貝多芬;無論是美女的歌聲,還是鬣狗的狂吠,無論是鱷魚的眼淚,還是惡狼的嚎叫,都不會使我動搖。——恰普曼;成功=艱苦的勞動+正確的方法+少說空話。——愛因斯坦;"
    }

    override func viewDidLayoutSubviews() {
        super.viewDidLayoutSubviews()
        sizeHeaderToFit()
    }

    func sizeHeaderToFit() {
        let headerView = tableView.tableHeaderView!

        headerView.setNeedsLayout()
        // 立馬布局子檢視
        headerView.layoutIfNeeded()

        let height = headerView.systemLayoutSizeFitting(UILayoutFittingCompressedSize).height
        var frame = headerView.frame
        frame.size.height = height
        headerView.frame = frame

        // 重新設定tableHeaderView
        tableView.tableHeaderView = headerView
    }

    @objc func tapSegemntControl(_ segment: UISegmentedControl) {
        if segment.selectedSegmentIndex == 0 {
            customView.content.text = "永遠不要因承認錯誤而感到羞恥,因為承認錯誤也可以解釋作你今天更聰敏。——馬羅;"
            customView.info.text = "書籍並不是沒有生命的東西,它包藏著一種生命的潛力,與作者同樣地活躍。不僅如此,它還像一個寶瓶,把作者生機勃勃的智慧中最純淨的精華儲存起來。——彌爾頓"
        } else {
            customView.content.text = " ——佚名永遠不要因承認錯誤而感到羞恥,因為承認錯誤也可以解釋作你今天更聰敏。——馬羅;自己打敗自己是最可悲的失敗,自己戰勝自己是最可貴的勝利。 ——佚名永遠不要因承認錯誤而感到羞恥,因為承認錯誤也可以解釋作你今天更聰敏。——馬羅;自己打敗自己是最可悲的失敗,自己戰勝自己是最可貴的勝利。 ——佚名"
            customView.info.text = "書籍並不是沒有生命的東西,它包藏著一種生命的潛力,與作者同樣地活躍。不僅如此,它還像一個寶瓶,把作者生機勃勃的智慧中最純淨的精華儲存起來。——彌爾頓書籍並不是沒有生命的東西,它包藏著一種生命的潛力,與作者同樣地活躍。不僅如此,它還像一個寶瓶,把作者生機勃勃的智慧中最純淨的精華儲存起來。——彌爾頓書籍並不是沒有生命的東西,它包藏著一種生命的潛力,與作者同樣地活躍。不僅如此,它還像一個寶瓶,把作者生機勃勃的智慧中最純淨的精華儲存起來。——彌爾頓"
        }
        //tableView.beginUpdates()
        sizeHeaderToFit()
        //tableView.endUpdates()
    }
}
程式碼實現分析:
1)添加了tableView並設定了約束,然後把自定義檢視(customView)設定為tableHeaderView,並設定約束,對於customView我們需要設定確定的寬度,程式碼中是相對於view進行新增約束,而且沒有設定bottom,由子檢視實現父檢視的高度2)setCustomViewContent函式是為customView中的子檢視設定初始化內容
3)主要是在sizeHeaderToFit()函式,這裡面會對customView進行自動佈局計算其高度,並且重新賦值給tableHeaderView實現動態更新
4)tapSegemntControl函式實現內容替換,更新高度,可以看到註釋了tableView.beginUpdates()和tableView.beginUpdates(),這兩個方法可以根據高度的變化以動畫的方式進行移動
最後新增extension,實現協議
extension ViewController: UITableViewDataSource {
    func tableView(_ tableView: UITableView, numberOfRowsInSection section: Int) -> Int {
        return 15
    }
    func tableView(_ tableView: UITableView, cellForRowAt indexPath: IndexPath) -> UITableViewCell {
        let cell = tableView.dequeueReusableCell(withIdentifier: "cell", for: indexPath)
        cell.textLabel?.text = "第\(indexPath.row)"
        return cell
    }
}
實現效果:
參考:

