
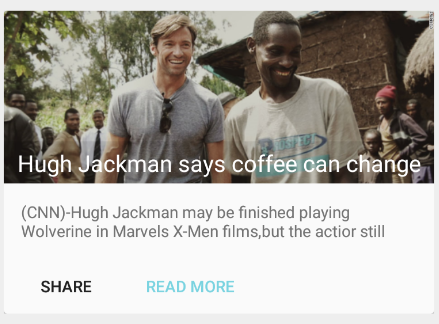
Material Design:利用RecyclerView CardView實現新聞卡片樣式
最終要實現的效果:
1,支援低版本
RecyclerView 和 CardView都是在Android 5.0中引入的,所以要想在低版本中使用,需要在build.gradle中新增:
dependencies {
    ...
    compile 'com.android.support:cardview-v7:22.2.0'
    compile 'com.android.support:recyclerview-v7:22.2.0'
}
2,CardView的使用
你可以簡單的認為它是一個使用了Material Desgin風格的FrameLayout,只不過比普通的FrameLayout多了圓角背景和陰影效果。所以它常用作ListView 或者 RecyclerView等檢視Item的佈局容器;
我們自然可以聯想到它的使用跟FrameLayout非常相似,只不多多了幾個用於控制圓角、陰影等自身特有的屬性:
建立:res/layout/news_item.xml
<?xml version="1.0" encoding="utf-8"?>
<RelativeLayout xmlns:android="http://schemas.android.com/apk/res/android"
xmlns:app="http://schemas.android.com/apk/res-auto"
android:layout_width="match_parent"
android:layout_height 我們注意到CardView裡面有三個屬性:
android:clickable="true"  //cardView是否可點選,預設是不可點選的
app:cardCornerRadius="3dp" //圓角
app:cardElevation="8dp" //陰影以上的佈局效果:
2,RecyclerView的使用
RecyclerView可以看做是升級版的ListView,它具有更高的可擴充套件性,同時可以實現水平和垂直佈局;之所以說是ListView的升級版,它解決了很多以前在使用ListView中不得不面對的問題:包括ListView的優化,動態刪除ListView Item等,它都對此都做了很好的封裝;
相比ListView,RecyclerView主要有以下特點:
- 介面卡中需要提供ViewHolder類:ListView中者不是必須的,但在RecyclerView是必須的
- 靈活的自定義Item佈局:ListView只能實現垂直的線性列布局,但RecyclerView可以通過RecyclerView.LayoutManager實現Item任何複雜的佈局
- 容易的Item動畫:RecyclerView.ItemAnimator用來處理Item動畫
- 資料來源:ListView可以通過ArrayAdapter CursorAdapter等直接提供資料來源,RecyclerView需要自定義資料來源
- Item項:ListView可以通過android:divider=”“等屬性控制Item項的顯示,RecyclerView可以通過RecyclerView.ItemDecoration來設定
- Item CLick Listener:ListView提供了AdapterView.OnItemClickListener來實現Item事件的監聽,RecyclerView沒有直接提供類似方法,需要自己實現;
2.1,使用RecyclerView佈局
<?xml version="1.0" encoding="utf-8"?>
<android.support.v7.widget.RecyclerView
        xmlns:android="http://schemas.android.com/apk/res/android"
        android:id="@+id/recyclerView"
        android:layout_width="match_parent"
        android:layout_height="match_parent">
</android.support.v7.widget.RecyclerView>
在Activity中:
RecyclerView recyclerView= (RecyclerView) findViewById(R.id.recyclerView);2.2,使用LayoutManager
不同於ListView,RecyclerView需要通過LayoutManager來管理和回收Item View,你可以通過繼承RecyclerView.LayoutManager實現自己的LayoutManager,也可以使用現有的LayoutManager:LinearLayoutManager GridLayoutManager StaggeredGridLayoutManager;
以LinearLayoutManager為例
LinearLayoutManager llm = new LinearLayoutManager(context);
recyclerView.setLayoutManager(llm);
2.3,定義資料類
這裡我們建立一個新聞類:我們這裡implements Serialzable是為了在Intent中能夠直接傳遞News物件;
News.java
public class News implements Serializable{
    //新聞標題,內容,圖片
    private String title;
    private String desc;
    private int photoId;

    /**
     * Constructs a new instance of {@code Object}.
     */
    public News(String name, String age, int photoId) {
        this.title=name;
        this.desc=age;
        this.photoId=photoId;
    }

    public void setDesc(String desc) {
        this.desc = desc;
    }

    public void setTitle(String title) {
        this.title = title;
    }

    public void setPhotoId(int photoId) {
        this.photoId = photoId;
    }

    public String getDesc() {
        return desc;
    }

    public int getPhotoId() {
        return photoId;
    }

    public String getTitle() {
        return title;
    }
}
2.4,自定義Adappter
這部分內容比較重要,如果對ListView自定義Adapter比較熟悉的話,也很容易看懂:相比而言RecyclerView Adapter中必須要實現ViewHolder類,然後需要覆寫幾個方法,唯一複雜的就是我在onBingViewHolder方法中為兩個按鈕和CardView實現了單擊事件,跳轉到新聞詳細頁面(NewsActivity)或者彈出分享;
RecyclerViewAdapter.java
public class RecyclerViewAdapter extends RecyclerView.Adapter<RecyclerViewAdapter.NewsViewHolder>{

    private List<News> newses;
    private Context context;

    public RecyclerViewAdapter(List<News> newses,Context context) {
        this.newses = newses;
        this.context=context;
    }


    //自定義ViewHolder類
    static class NewsViewHolder extends RecyclerView.ViewHolder{

        CardView cardView;
        ImageView news_photo;
        TextView news_title;
        TextView news_desc;
        Button share;
        Button readMore;

        public NewsViewHolder(final View itemView) {
            super(itemView);
            cardView= (CardView) itemView.findViewById(R.id.card_view);
            news_photo= (ImageView) itemView.findViewById(R.id.news_photo);
            news_title= (TextView) itemView.findViewById(R.id.news_title);
            news_desc= (TextView) itemView.findViewById(R.id.news_desc);
            share= (Button) itemView.findViewById(R.id.btn_share);
            readMore= (Button) itemView.findViewById(R.id.btn_more);
            //設定TextView背景為半透明
            news_title.setBackgroundColor(Color.argb(20, 0, 0, 0));

        }


    }
    @Override
    public RecyclerViewAdapter.NewsViewHolder onCreateViewHolder(ViewGroup viewGroup, int i) {
        View v= LayoutInflater.from(context).inflate(R.layout.news_item,viewGroup,false);
        NewsViewHolder nvh=new NewsViewHolder(v);
        return nvh;
    }

    @Override
    public void onBindViewHolder(RecyclerViewAdapter.NewsViewHolder personViewHolder, int i) {
        final int j=i;

        personViewHolder.news_photo.setImageResource(newses.get(i).getPhotoId());
        personViewHolder.news_title.setText(newses.get(i).getTitle());
        personViewHolder.news_desc.setText(newses.get(i).getDesc());

        //為btn_share btn_readMore cardView設定點選事件
        personViewHolder.cardView.setOnClickListener(new View.OnClickListener() {
            @Override
            public void onClick(View v) {
                Intent intent=new Intent(context,NewsActivity.class);
                intent.putExtra("News",newses.get(j));
                context.startActivity(intent);
            }
        });

        personViewHolder.share.setOnClickListener(new View.OnClickListener() {
            @Override
            public void onClick(View v) {
                Intent intent=new Intent(Intent.ACTION_SEND);
                intent.setType("text/plain");
                intent.putExtra(Intent.EXTRA_SUBJECT, "分享");
                intent.putExtra(Intent.EXTRA_TEXT, newses.get(j).getDesc());
                intent.setFlags(Intent.FLAG_ACTIVITY_NEW_TASK);
                context.startActivity(Intent.createChooser(intent, newses.get(j).getTitle()));
            }
        });

        personViewHolder.readMore.setOnClickListener(new View.OnClickListener() {
            @Override
            public void onClick(View v) {
                Intent intent=new Intent(context,NewsActivity.class);
                intent.putExtra("News",newses.get(j));
                context.startActivity(intent);
            }
        });


    }

    @Override
    public int getItemCount() {
        return newses.size();
    }
}
2.5,完成我們的Demo
關於RecyclerView和CardView的部分已經完成了,剩下的就是修修補補了,我們還需要建立NewsActivity用來顯示新聞詳細內容,佈局也使用CardView,
res/layout/activity_news.xml
<?xml version="1.0" encoding="utf-8"?>
<RelativeLayout xmlns:android="http://schemas.android.com/apk/res/android"
    xmlns:app="http://schemas.android.com/apk/res-auto"
    android:layout_width="match_parent"
    android:layout_height="match_parent"
    android:padding="20dp">
    <android.support.v7.widget.CardView
        android:id="@+id/card_view"
        android:layout_width="match_parent"
        android:layout_height="wrap_content"
        android:foreground="?android:attr/selectableItemBackground"
        android:clickable="true"
        app:cardCornerRadius="3dp"
        app:cardElevation="8dp">

        <RelativeLayout
            android:layout_width="match_parent"
            android:layout_height="wrap_content">
            <RelativeLayout
                android:id="@+id/news_header"
                android:layout_width="match_parent"
                android:layout_height="wrap_content"
                android:layout_alignParentTop="true"
                android:layout_alignParentLeft="true"
                android:layout_alignParentStart="true">
                <ImageView
                    android:id="@+id/news_info_photo"
                    android:scaleType="centerCrop"
                    android:layout_alignParentTop="true"
                    android:layout_width="match_parent"
                    android:layout_height="180dp"/>
                <TextView
                    android:id="@+id/news_info_title"
                    android:layout_alignParentLeft="true"
                    android:layout_below="@+id/news_info_photo"
                    android:textSize="20sp"
                    android:padding="5dp"
                    android:layout_width="match_parent"
                    android:layout_height="wrap_content"/>
            </RelativeLayout>

            <TextView
                android:id="@+id/news_info_desc"
                android:lineSpacingExtra="5dp"
                android:layout_below="@+id/news_header"
                android:layout_margin="15dp"
                android:layout_width="wrap_content"
                android:layout_height="wrap_content"/>
        </RelativeLayout>
    </android.support.v7.widget.CardView>
</RelativeLayout>
佈局效果:
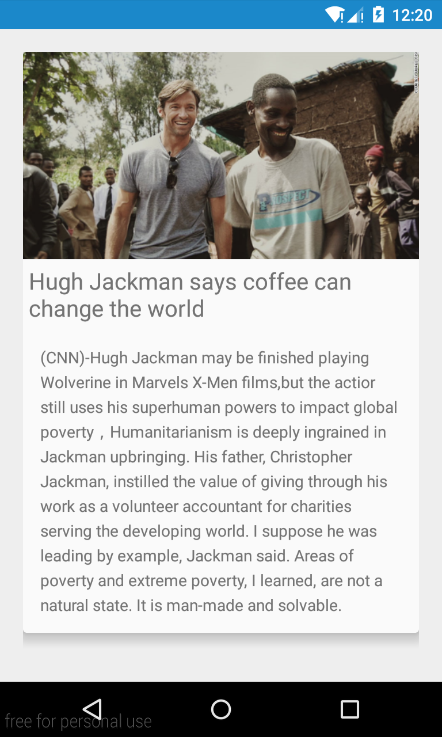
NewsActivity.java
public class NewsActivity extends AppCompatActivity {
    private ImageView newsPhoto;
    private TextView newsTitle;
    private TextView newsDesc;

    @Override
    protected void onCreate(Bundle savedInstanceState) {
        super.onCreate(savedInstanceState);
        setContentView(R.layout.activity_news);

        newsPhoto= (ImageView) findViewById(R.id.news_info_photo);
        newsTitle= (TextView) findViewById(R.id.news_info_title);
        newsDesc= (TextView) findViewById(R.id.news_info_desc);

        Intent intent=getIntent();

        News item= (News) intent.getSerializableExtra("News");
        newsPhoto.setImageResource(item.getPhotoId());
        newsTitle.setText(item.getTitle());
        newsDesc.setText(item.getDesc());

    }
}
MainActivity.java
public class MainActivity extends AppCompatActivity {

    private RecyclerView recyclerView;
    private List<News> newsList;
    private RecyclerViewAdapter adapter;

    @Override
    protected void onCreate(Bundle savedInstanceState) {
        super.onCreate(savedInstanceState);
        setContentView(R.layout.activity_main);

        LinearLayoutManager layoutManager=new LinearLayoutManager(this);


        recyclerView= (RecyclerView) findViewById(R.id.recyclerView);

        initPersonData();
        adapter=new RecyclerViewAdapter(newsList,MainActivity.this);

        recyclerView.setHasFixedSize(true);
        recyclerView.setLayoutManager(layoutManager);
        recyclerView.setAdapter(adapter);


    }

    private void initPersonData() {
        newsList =new ArrayList<>();
        //新增新聞
        newsList.add(new News(getString(R.string.news_one_title),getString(R.string.news_one_desc),R.mipmap.news_one));
        newsList.add(new News(getString(R.string.news_two_title),getString(R.string.news_two_desc),R.mipmap.news_two));
        newsList.add(new News(getString(R.string.news_three_title),getString(R.string.news_three_desc),R.mipmap.news_three));
        newsList.add(new News(getString(R.string.news_four_title),getString(R.string.news_four_desc),R.mipmap.news_four));
    }
}
注意到上面的新聞內容實在太長,所以我們使用R.string:
res/values/strings.xml
<resources>
    <string name="app_name">CardViewDemo</string>

    <string name="news_one_title">Dallas police HQ attack: Suspect believed killed during standoff</string>
    <string name="news_one_desc">and ows the dark van ramming the nose of a police car before retreating in reverse</string>

    <string name="news_two_title">Hugh Jackman says coffee can change the world</string>
    <string name="news_two_desc">(CNN)-Hugh Jackman may be finished playing Wolverine in Marvels X-Men films,but the actior still uses his superhuman powers to impact global poverty,Humanitarianism is deeply ingrained in Jackman upbringing. His father, Christopher Jackman, instilled the value of giving through his work as a volunteer accountant for charities serving the developing world.
    I suppose he was leading by example, Jackman said. Areas of poverty and extreme poverty, I learned, are not a natural state. It is man-made and solvable.</string>
    <string name="news_three_title">Australia in charge of second Test against West Indies in Jamaica</string>
    <string name="news_three_desc">Australia in charge of second Test against West Indies in Jamaica</string>
    <string name="news_four_title">Sweden royal wedding</string>
    <string name="news_four_desc">嘿~如果覺得這篇文章對您有幫助,希望你能點個贊,你可以通過訂閱微信公眾號:ITBird,或新浪微博:明桑Anroid 找到我,記得關注部落格哦</string>
</resources>Manifest.xml記得將NewsActivity新增進去:
<activity android:name=".NewsActivity"
            android:parentActivityName=".MainActivity"/>
總結:
限於篇幅,除了CardView和RecyclerView,其餘的部分講解的不太詳細,這部分不太熟悉的可以留言討論哈。RecyclerView理論上是可以完成ListView所有可以完成的,但程式碼比較複雜,所以二者的使用根據自己的具體情況而定,不過在Material Design下,資料集比較複雜時建議使用RecyclerView!
參考資料:
- 郵箱: <[email protected]>
微信公眾號: ITBird

相關推薦
Material Design:利用RecyclerView CardView實現新聞卡片樣式
最終要實現的效果: 1,支援低版本 RecyclerView 和 CardView都是在Android 5.0中引入的,所以要想在低版本中使用,需要在build.gradle中新增: dependencies { ...
Material Design 實戰 之第四彈 —— 卡片佈局以及靈動的標題欄(CardView & AppBarLayout)...
本模組共有六篇文章,參考郭神的《第一行程式碼》,對Material Design的學習做一個詳細的筆記,大家可以一起交流一下: Material Design 實戰 之第一彈——Toolbar(即本文) Material Design 實戰 之第二彈——滑動選
Material Design :原生TabLayout+viewpaper+fragment實現滑動效果
簡單實現 效果圖 步驟: 需求:TabLayout的簡單使用 確定佈局—找到控制元件–設定adapter– 1 initView() 2 initAdapter() 3 initTablayout() 4 initViewpager()
DL之BigGAN:利用BigGAN演算法實現超強炸天效果——畫風的確skr、skr、skr,太特麼的skr了
文章推薦Paper之BigGAN:ICLR 2019最新論文《LARGE SCALE GAN TRAINING FOR HIGH FIDELITY NATURAL IMAGE SYNTHESIS》論文研究中 本博主剛剛利用程式碼進行測試, 結果:的確吊(不)炸(可)天(思議)! PS:B
EL之Bagging:利用Bagging演算法實現迴歸預測(實數值評分預測)問題
EL之Bagging:利用Bagging演算法實現迴歸預測(實數值評分預測)問題 輸出結果 設計思路 核心思路 #4.1、當treeDepth=1,對圖進行視覺化 #(1)、定義numTreesMax、
c++:利用模板類實現氣泡排序
首先我們來明確函式模板與類模板的概念及其用法。 模板是一種對型別進行引數化的工具,通常有兩種形式------>函式模板和類模板。 函式模板針對僅引數型別不同的函式; 類模板針對僅資料成員和成員函式型別不同的類。 函式模板的格式: template &l
Java專案開發心得(一):利用Java技術實現查詢手機號碼歸屬地
鑑於最近專案涉及到查詢歸屬地的問題,今天在此做一下技術分享,如果有更好的建議,還請讀者大神指出。 迴歸正題,關於手機號碼歸屬地,想要查詢的無非是執行商、省份、市之類的資
漫談計算攝像學 (二):利用光場實現“先拍照後對焦”
在上一篇直觀理解光場中,談到了光場的基本概念、3D性質、實際應用中的採集辦法和插值求任意光線的辦法。這一篇繼續上一篇的基礎上給出利用光場實現“先拍照後聚焦”的原理和基本步驟。 對焦與光路 首先,什麼是對焦呢,我們先簡單回顧一下中學物理。 先看左圖,物體端的對焦面就是最上方的平面,從這個平面上的每一點發出的
Android Material Design風格基本使用(實現簡易新聞APP)
前言:Google推出Material Design已經很久了,我在很久之前就開始使用Material Design風格編寫APP,感覺還是挺好看的,風格比較統一。今天特意寫一個簡單的Demo來介紹一下Material Design(簡稱MD)的基本使用,由於Demo很簡單,
Material Design:TabLayout的使用
ase 現在 omv follow 滿足 script sta ont cti 轉:https://www.jianshu.com/p/9c072bc99ebe 谷歌在Material Design中推出TabLayout以替代開源庫PagerSlidingT
C++:利用靜態成員實現“單例模式”
在網上看了兩三天的網課,瞭解了一下C++,正好做作業遇到一個問題,解決之後覺得有必要寫到部落格裡,就發出來了。 問題是:如何實現“單例模式”,也就是說某個物件只能有一個例項。 思路: 1.需要一個
Go併發:利用sync.WaitGroup實現協程同步
經常看到有人會問如何等待主協程中建立的協程執行完畢之後再結束主協程,例如如下程式碼: package main import ( "fmt" ) func main() { go func() { fmt.Println
Android Material Design 進度條 自定義進度條樣式
Material Design 進度條 圓形進度條 建立 設定主題為 Theme.AppCompat.Light.NoActionBar 或 @android:style/Theme.Material.Light 修改顏色 新增indeter
Material Design 實戰 之 第六彈 —— 可摺疊式標題欄(CollapsingToolbarLayout) & 系統差異型的功能實現(充分利用系統狀態列空間)...
本模組共有六篇文章,參考郭神的《第一行程式碼》,對Material Design的學習做一個詳細的筆記,大家可以一起交流一下: Material Design 實戰 之第一彈——Toolbar(即本文) Material Design 實戰 之第二彈——滑動選
原創:PHP利用session,實現用戶登錄後回到點擊的頁面(本文以TP為例)
con gop query php代碼 自帶 ttr strpos 手機 roo 1、以下內容純屬原創,請謹慎選擇: ①目的:用戶登錄超時,session過期,點擊後跳轉到登錄頁,登錄成功再跳轉到鼠標點擊的頁面。 ②流程:用戶登錄---session過期---點擊跳
Material Design之CardView的使用
public show 預覽 eve pad -m 優雅 pub name 本文介紹CardView這個控件的使用,CardView繼承至FrameLayout類,是support-v7包下的一個類,使用時必須引入cardview依賴包。可在下載的sdk目錄中找到。。。
使用 DrawerLayout 實現 Material Design風格的側滑
mpat 內容 white eas str out top ica findview 先看效果吧! 效果一: Android 2.3 效果 Android 5.0 效果 效果二: Android 2.3 效果 Android 5.
轉:利用一個堆溢出漏洞實現VMware虛擬機逃逸
分片 知識 new code existing pop 選擇 ip地址 oot 轉:https://zhuanlan.zhihu.com/p/27733895?utm_source=tuicool&utm_medium=referral 利用一個堆溢出漏洞實現V
Java定時任務:利用java Timer類實現定時執行任務的功能
lpad 虛擬 觀察 exce 就是 set ring 構造 trac 一、概述 在java中實現定時執行任務的功能,主要用到兩個類,Timer和TimerTask類。其中Timer是用來在一個後臺線程按指定的計劃來執行指定的任務。 TimerTask一個抽象類,它的子類代
STM32應用實例十四:利用光敏二極管實現光度測量
src 變化 數據 adc 得出 設計軟件 es2017 開發 是我 最近我們在開發臭氧發生器時,需要監測生成的臭氧的濃度,於是想到使用光度計來測量。因為不同濃度的臭氧對管的吸收作用是不相同的,於是檢測光照強度的變化就可以得到相應的濃度數據。 1、硬件設計 此次光照度檢測我