【Bootstrap】——popover效果彈出框
Popover提供了一個擴充套件的檢視。小編使用到了Popover的兩種效果:
第一種:將滑鼠移入所新增效果的元素,出現Popover檢視,移出元素檢視隱藏;
第二種:單擊新增效果元素,展現Popover檢視,再次單擊隱藏檢視。
首先,如果要引用該外掛,需要引用popover.js,它依賴於工具提示外掛,大家可以直接引用bootstrap.js 或bootstrap.min.js即可,簡單給大家提供個下載網址:http://download.csdn.net/detail/qqhongliang/8372191
另外還需要新增jquery.min.js。
用法
Popover外掛根據需求生成內容和標記,一般把彈出框放在他們的觸發元素後面。
Popover效果中,有時候只需要提示簡單的一句話,有時候需要彈出豐富的使用內容。針對這兩種不同的需求,我們可以選擇不同的方式使用:
一.只需要提示簡單內容時,只需在元素中新增相應的“data-toggle="popover"”即可。
<a href="#" data-toggle="popover" title="我是標題" data-content="我是文字內容">
	我是Popover提示框!
</a> 二.通過JavaScript啟用彈出框
$(function () { $("[data-toggle='popover']").popover(); });屬性方法
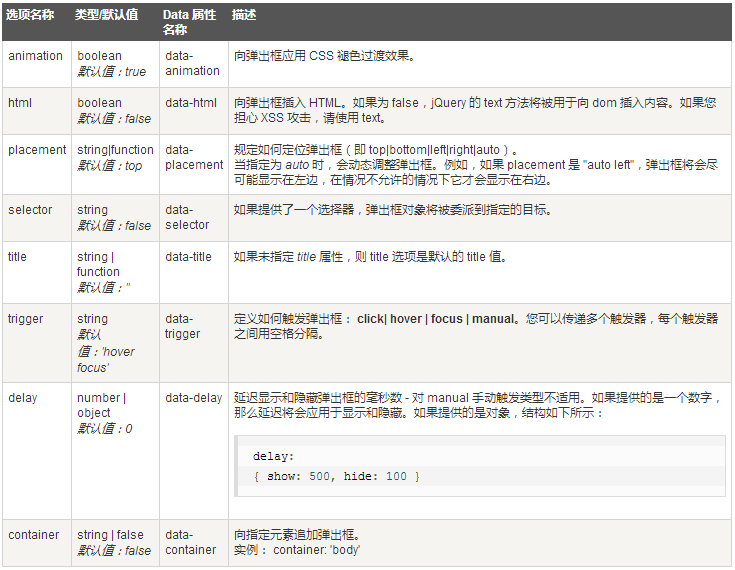
Popover中一些屬性是通過Bootstrap資料的API新增過通過JavaScript呼叫的,以下是它的一些屬性:
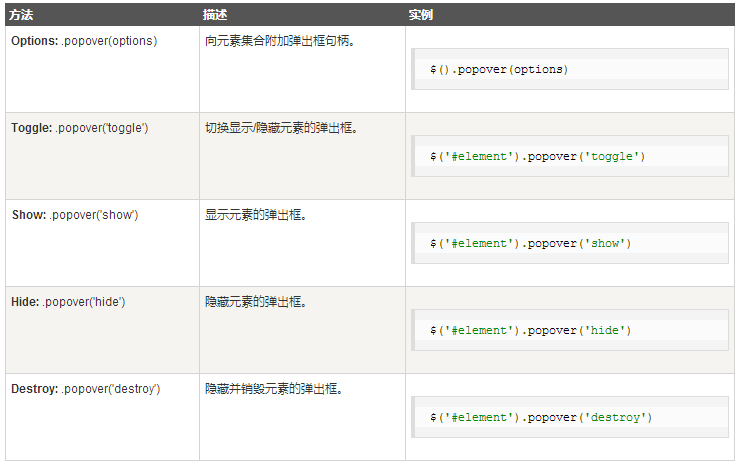
以下是彈出框Popover外掛中有用的方法:
例項
在進行所有的例項之前,小編已經對所需要的工具進行了引用,包括jquery.min.js、bootstrap.min.js,因為需要用到Bootstrap的樣式,小編還引用了bootstrap.min.css、dashboard.css和style.css。<script src="${pageContext.request.contextPath}/js/showmore.js"></script>
<script src="${pageContext.request.contextPath}/js/jquery.min.js"></script>
<script src="${pageContext.request.contextPath}/js/bootstrap.min.js"></script>
<link href="${pageContext.request.contextPath}/css/bootstrap.min.css" rel='stylesheet' type='text/css' media="all"/>
<link href="${pageContext.request.contextPath}/css/dashboard.css" rel="stylesheet">
<link href="${pageContext.request.contextPath}/css/style.css" rel='stylesheet' type='text/css' media="all"/>
滑鼠移入移出效果
小編所用Popover效果:已經添加了一張圖片,如果滑鼠移入圖片,則彈出框顯示,並可以對彈出框進行一系列的操作;如果滑鼠移出圖片或者彈出框,則彈出框隱藏。
例項一
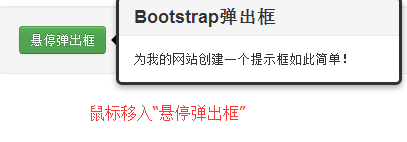
這是一個簡單的提示框,就是說不需要對彈出的提示框進行操作,僅僅是一個簡單的提示,就像某個元素說了一句話的效果:
首先看實現程式碼:
<html lang="en">
<head>
	<meta charset="utf-8">
	<meta name="description" content="This is an example to create Popover with Bootstrap.">

</head>
<body>

<div class="container">
	<div class="well">
		<a href="#" id="example" class="btn btn-success" rel="popover" data-content="為我的網站建立一個提示框如此簡單!" data-original-title="Bootstrap彈出框">懸停彈出框</a>
	</div>
</div>
<script>
$(function (){
	$("#example").popover();
});
</script>

</body>
</html>
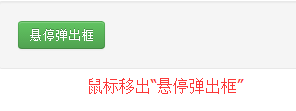
程式碼有了,那實現效果是什麼樣子的呢?請看下圖:
例項二
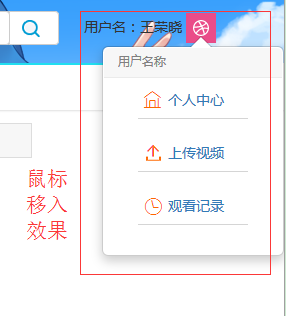
這次要介紹的就沒那麼簡單了,這個懸停彈出框的效果比第一個例項要複雜很多。彈出框彈出的效果是一樣的,不一樣的是彈出框的內容,這次的彈出框中不僅要有提示,還要有相應的資訊,連結等。小編所做的效果是在彈出框中添加了圖片,然後有相應的連結,在點選之後可以跳轉到不同的頁面。
程式碼展示:
<div style="font-size:14px;margin-top:10px;">
				<span>使用者名稱:王榮曉</span>
				<a id="topdaohang" target="_blank" ><img src="/dmsd-itoo-video-web/images/dribbble.png" alt="">
 				</a>
            <div class="header-top-right">
                    <script type="text/javascript">

                    $(function (){
                        var ulstring="<ul id='sss' style='width:150px;top: 50px;'>"
                            +"<a style='margin-left:-20px;'><img src='/dmsd-itoo-video-web/images/gerenzhongxin.png'>個人中心</a><br>"
                            +"<hr style='width:100%;border-top:1px solid #D5D5D5; margin-top: 2px;margin-left:-20px;'>"
                            +"<a href='/dmsd-itoo-video-web/upload/showPage' style='margin-left:-20px;'><img src='/dmsd-itoo-video-web/images/shangchuanshipin.png'>上傳視訊</a><br>"
                            +"<hr style='width:100%;border-top:1px solid #D5D5D5; margin-top: 2px;margin-left:-20px;'>"
                            +"<a href='/dmsd-itoo-video-web/historyRecord/historyRecordInfo' style='margin-left:-20px;'><img src='/dmsd-itoo-video-web/images/guankanjilu.png'>觀看記錄</a><br>"
                            +"<hr style='width:100%;border-top:1px solid #D5D5D5; margin-top: 2px;margin-left:-20px;'>"
                            +"</ul>";
                    	$("#topdaohang").popover({
                        	trigger:'manual',//manual 觸發方式
            	            placement : 'bottom',
            	            title:'<div style="text-align:left; color:gray; font-size:12px;">使用者名稱稱</div>',
            	            html: 'true',
            	            content : ulstring,  //這裡可以直接寫字串,也可以 是一個函式,該函式返回一個字串;
            	            animation: false
            	        }) .on("mouseenter", function () {
            	                    var _this = this;
            	                    $(this).popover("show");
            	                    $(this).siblings(".popover").on("mouseleave", function () {
            	                        $(_this).popover('hide');
            	                    });
            	                }).on("mouseleave", function () {
            	                    var _this = this;
            	                    setTimeout(function () {
            	                        if (!$(".popover:hover").length) {
            	                            $(_this).popover("hide")
            	                        }
            	                    }, 100);
            	                    });
                    });
                   </script>

            </div>
        </div>
執行樣式展示:
滑鼠點選效果例項
以上的兩個例項說的都是滑鼠移入移出的效果,接下來要介紹的是:用與例項二幾乎相同的方法,實現滑鼠的單擊效果。
例項三
實現滑鼠單擊效果,同第二種例項的內容相差不多,主要是將觸發方式從“manual”改為了“click”,然後將滑鼠的移動事件刪除。
具體實現程式碼如下:
<div style="float:left;margin-top:5px;font-size:14px;margin-left:3%;">
	                	學院
	                	<a id="colleaguedaohang" target="_blank" ><img src="/dmsd-itoo-video-web/images/colleaguedown.png" alt="">
		                </a>
</div>
<script type="text/javascript">
		$(function (){
	    	var colleaguestring="<ul id='sss' style='width: 220px;top: 40px;'>"
		         +"<a style='margin-left:-20px;'><img src='/dmsd-itoo-video-web/images/tv.png'/></a>"
		         +"<a id='09' href='javascript:void(0);' onclick='findVideoByCollege('物理與電子資訊學院')'>  物理與電子資訊學院</a>"
		         +"<hr style='width:100%;border-top:1px solid #D5D5D5; margin-top: 2px;margin-left:-20px;'>"
		         +"<a style='margin-left:-20px;'><img src='/dmsd-itoo-video-web/images/tv.png'/></a>"
		         +"<a id='13' href='javascript:void(0);' onclick='findVideoByCollege('建築工程學院')'>  建築工程學院</a>"
		         +"<hr style='width:100%;border-top:1px solid #D5D5D5; margin-top: 2px;margin-left:-20px;'>"
		         +"<a style='margin-left:-20px;'><img src='/dmsd-itoo-video-web/images/tv.png'/></a>"
		         +"<a id='07' href='javascript:void(0);' onclick='findVideoByCollege('教育學院')'>  教育學院</a>"
		         +"<hr style='width:100%;border-top:1px solid #D5D5D5; margin-top: 2px;margin-left:-20px;'>"
		         +"<a style='margin-left:-20px;'><img src='/dmsd-itoo-video-web/images/tv.png'/></a>"
		         +"<a id='01' href='javascript:void(0);' onclick='findVideoByCollege('文學院')'>  文學院</a>"
		         +"<hr style='width:100%;border-top:1px solid #D5D5D5; margin-top: 2px;margin-left:-20px;'>"
		         +"</ul>";
	    	$("#colleaguedaohang").popover({
            	trigger:'click',//manual 觸發方式
	            placement : 'bottom',
	          /*   title : '<div style="text-align:center; color:red; text-decoration:underline; font-size:14px;"> Muah ha ha</div>', */
	            title:'<div style="text-align:center; color:red; text-decoration:underline; font-size:14px;"> </div>',
	            html: 'true',
	            content : colleaguestring,  //這裡可以直接寫字串,也可以 是一個函式,該函式返回一個字串;
	            animation: false
	        })
        });
	</script>
兩段程式碼一對比,立馬就可以發現區別,僅僅是對兩個地方進行了修改,就可以用Botstrap得到我們想要的效果,並可以很容易的實現兩種效果的切換。
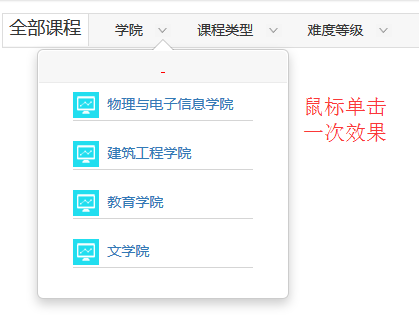
效果實現展示:
以上就是關於Bootstrap中Popover彈出框使用的例項介紹。
總結
通過對Bootstrap中Popover彈出框的使用,深深感受到的Bootstrap的強大效果。平時我們瀏覽網站時,這種效果有很多,這次親身體驗,縱然會有不一樣的收穫。通過對Popover的使用介紹和例項演練,也對其有了更深一層的瞭解。期待接下來對其深入的使用!

