
[Android]利用金山詞霸API實現英漢互譯APP
最近在做一個單詞本的專案實戰,其中涉及到一個功能,英漢互譯。在眾多翻譯API中查詢適合的API,發現金山詞霸API很適合完成這樣的一個功能。因為它包含發音、基本釋義、例句等功能。其他API相對簡單,沒有發現含有例句的資料。而且金山詞霸API的使用也是簡單到不行,只需要申請一個Key,就可以進行查詢了。
而我在使用這個API的時候遇到了很多困難,不過現在都已經完美解決。網上其他的文章對於該API的介紹和使用都非常模糊,不具體,所以,我決定自己寫一篇這樣的文章,來幫助更多初學者可以輕鬆入門。我可以保證,這篇文章講述的資訊是其他任何一篇文章都不能相比的。絕對的詳細具體。
一、金山詞霸API介紹
2、API申請流程:
(1)、首先前往金山詞霸API的網站。選擇詞霸查詞。
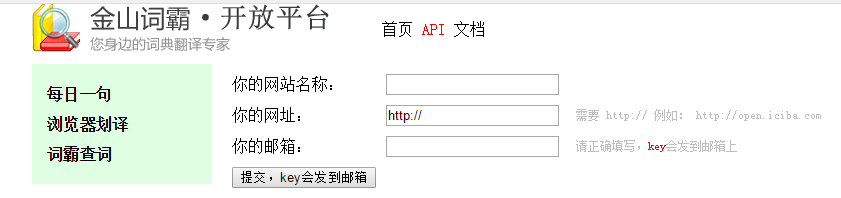
(2)、然後輸入網址名稱,網址和你的郵箱地址。其中,網址名稱和網址可以隨意填寫,我們只需要獲取到Key就可以了。例如:
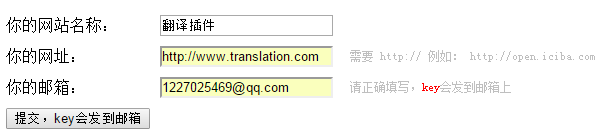
(3)點選提交按鈕,你所填寫的郵箱就會收到一個郵件通知,點開後就可以獲取到key了。

目前的使用是不限制次數的,後期可能會有所更改。
3、請求資料
在官網上,點選文件/查詞介面。
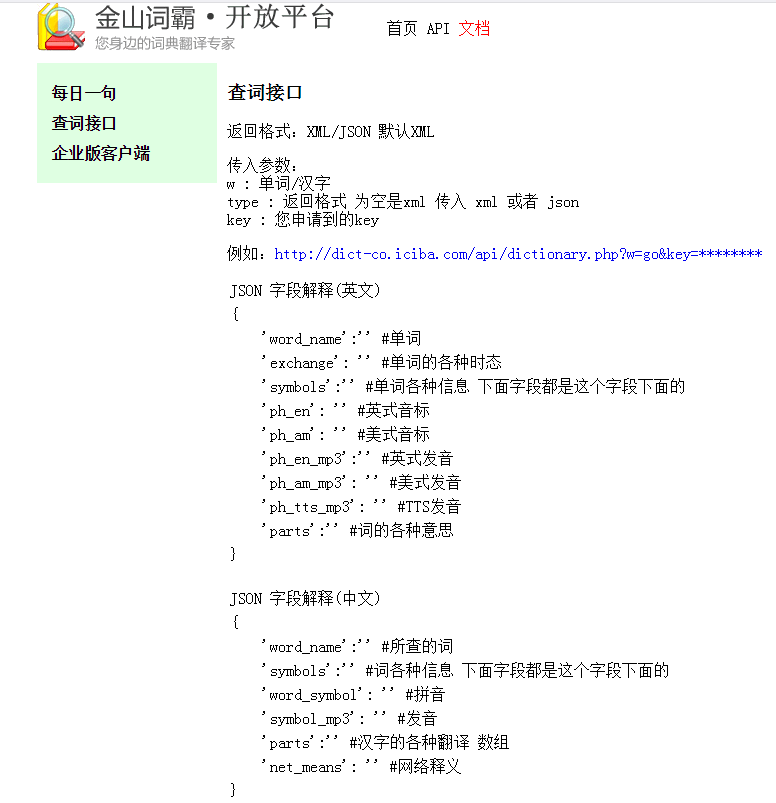
它的文件說明非常簡單,甚至初學者看了之後雲裡霧裡,不知道怎麼具體使用。這就要經過一番摸索了。我進行了很多嘗試,所以在這裡直接把經驗分享出來。
針對查詞介面:返回資料預設為xml格式,可以選擇json格式。但是json格式缺少例句功能,兩者都需要使用key。
請求json:http://dict-co.iciba.com/api/dictionary.php?w=good&type=json&key=XXX
請求xml:http://dict-co.iciba.com/api/dictionary.php?w=good&key=XXX
其中XXX就是你剛剛申請的key,複製上去就可以了。
針對每日一詞:每日一詞功能是金山詞霸API提供的一個非常人性化的介面,不需要使用key,直接訪問即可。本程式中不會使用到該功能,但是讀者可以在優化程式後新增這樣的一個人性化功能,下面介紹一個如何請求資料。它預設返回json格式,可以選擇xml格式,不需要使用key。
請求json:http://open.iciba.com/dsapi/?date=2018-03-09
請求xml:http://open.iciba.com/dsapi/?file=xml&date=2018-03-10
其中,date後的日期需要格式化為要求的格式,由於它返回的json格式資料非常簡單,解析起來相對於xml格式資料要容易的多,一般使用第一個請求就可以了。
4、檢視返回資料
返回資料按照剛才的請求網址,就可以進行訪問了。英譯漢以good為例,漢譯英以 好 為例。
(1)、查詞介面返回資料。英譯漢,查詢good。
①、json格式資料:
{
	"word_name": "good",
	"is_CRI": "1",
	"exchange": {
		"word_pl": ["goods"],
		"word_third": "",
		"word_past": "",
		"word_done": "",
		"word_ing": "",
		"word_er": ["better"],
		"word_est": ["best"]
	},
	"symbols": [{
		"ph_en": "g?d",
		"ph_am": "ɡ?d",
		"ph_other": "",
		"ph_en_mp3": "http:\/\/res.iciba.com\/resource\/amp3\/oxford\/0\/28\/a2\/28a24294fed307cf7e65361b8da4f6e5.mp3",
		"ph_am_mp3": "http:\/\/res.iciba.com\/resource\/amp3\/1\/0\/75\/5f\/755f85c2723bb39381c7379a604160d8.mp3",
		"ph_tts_mp3": "http:\/\/res-tts.iciba.com\/7\/5\/5\/755f85c2723bb39381c7379a604160d8.mp3",
		"parts": [{
			"part": "adj.",
			"means": ["好的", "優秀的", "有益的", "漂亮的,健全的"]
		}, {
			"part": "n.",
			"means": ["好處,利益", "善良", "善行", "好人"]
		}, {
			"part": "adv.",
			"means": ["同well"]
		}]
	}]
}
②、xml格式資料:
<?xml version="1.0" encoding="UTF-8"?>
<dict num="219" id="219" name="219">
    <key>good</key>
    <ps>g?d</ps>
    <pron>http://res.iciba.com/resource/amp3/oxford/0/28/a2/28a24294fed307cf7e65361b8da4f6e5.mp3</pron>
    <ps>ɡ?d</ps>
    <pron>http://res.iciba.com/resource/amp3/1/0/75/5f/755f85c2723bb39381c7379a604160d8.mp3</pron>
    <pos>adj.</pos>
    <acceptation>好的;優秀的;有益的;漂亮的,健全的;
</acceptation>
    <pos>n.</pos>
    <acceptation>好處,利益;善良;善行;好人;
</acceptation>
    <pos>adv.</pos>
    <acceptation>同well;
</acceptation>
    <sent>
        <orig>
Best is the superlative form of good and worst is the superlative form of bad.
</orig>
        <trans>
“best”是“good”的最高階形式,“worst” 是“bad”的最高階形式.
</trans>
    </sent>
    <sent>
        <orig>
Good has captured the essence of the runaway, but does not pursue its most disturbing consequences.
</orig>
        <trans>
Good抓住了這場失控的本質, 但沒有進一步追蹤這個事件最讓人擔憂的後果.
</trans>
    </sent>
    <sent>
        <orig>
The state of the stream is revealed by the bad, fail, eof, and good operations.
</orig>
        <trans>
流的狀態由bad 、 fail 、 eof 和good操作提示.
</trans>
    </sent>
    <sent>
        <orig>
Good Christian, good parent, good child, good wife, good husband.
</orig>
        <trans>
虔誠的基督徒, 慈愛的父母, 孝順的兒女, 賢良的妻子, 盡職的丈夫.
</trans>
    </sent>
    <sent>
        <orig>
Good habits nurture good characters; good characters mold good fates.
</orig>
        <trans>
好習慣育成好品格, 好品格塑造好命運.
</trans>
    </sent>
</dict>
可以清楚的看到xml格式資料比json資料多了例句資料,所以,在英譯漢的功能中我們優先選擇xml格式資料。
(2)、查詞介面返回資料。漢譯英,查詢“好”。
①、json格式資料:
{
	"word_id": "2143763",
	"word_name": "好",
	"symbols": [{
		"symbol_id": "2144972",
		"word_id": "2143763",
		"word_symbol": "hǎo",
		"symbol_mp3": "http:\/\/res.iciba.com\/hanyu\/zi\/19a73d32bf61c88bc4ed86c40f26bc9c.mp3",
		"parts": [{
			"part_name": "形",
			"means": [{
				"mean_id": "2465987",
				"part_id": "2148468",
				"word_mean": "good",
				"has_mean": "1",
				"split": 1
			}, {
				"mean_id": "2465988",
				"part_id": "2148468",
				"word_mean": "fine",
				"has_mean": "1",
				"split": 1
			}, {
				"mean_id": "2465989",
				"part_id": "2148468",
				"word_mean": "nice",
				"has_mean": "1",
				"split": 0
			}]
		}],
		"ph_am_mp3": "",
		"ph_en_mp3": "",
		"ph_tts_mp3": "",
		"ph_other": ""
	}, {
		"symbol_id": "2144973",
		"word_id": "2143763",
		"word_symbol": "hào",
		"symbol_mp3": "",
		"parts": [{
			"part_name": "動",
			"means": [{
				"mean_id": "2465990",
				"part_id": "2148469",
				"word_mean": "like",
				"has_mean": "1",
				"split": 1
			}, {
				"mean_id": "2465991",
				"part_id": "2148469",
				"word_mean": "love",
				"has_mean": "1",
				"split": 1
			}, {
				"mean_id": "2465992",
				"part_id": "2148469",
				"word_mean": "be fond of",
				"has_mean": "1",
				"split": 0
			}]
		}, {
			"part_name": "名",
			"means": [{
				"mean_id": "2465993",
				"part_id": "2148470",
				"word_mean": "a surname",
				"has_mean": "0",
				"split": 0
			}]
		}]
	}]
}
資料很長很複雜,不過不影響解析,因為有很多json資料解析的開源庫可以選擇,這裡先賣個關子,下面會具體介紹解析json格式資料的黑科技。
②、xml格式資料:
<?xml version="1.0" encoding="UTF-8"?>
<dict num="219" id="219" name="219">
    <key>好</key>
    <pos></pos>
    <acceptation>;;;
</acceptation>
    <pos></pos>
    <acceptation>;;;
</acceptation>
    <pos></pos>
    <acceptation>;
</acceptation>
    <sent>
        <orig>
That day, good clear blue light well through good good good far better abstruse!
</orig>
        <trans>
那時的天, 好清好亮好透好藍好高好遠好深邃!
</trans>
    </sent>
    <sent>
        <orig>
Good habits nurture good characters; good characters mold good fates.
</orig>
        <trans>
好習慣育成好品格, 好品格塑造好命運.
</trans>
    </sent>
    <sent>
        <orig>
It was a long , long week, and the strain was a heavy one.
</orig>
        <trans>
這個星期好長好長, 那根弦繃得好緊好緊.
</trans>
    </sent>
    <sent>
        <orig>
This country needs good farmers, good businessmen, good plumbers, good carpenters.
</orig>
        <trans>
這個國家需要好的農民, 好的商人, 好的管子工, 好的木匠.
</trans>
    </sent>
    <sent>
        <orig>
Over the past few years I have been saying , When Hong Kong succeeds, China will benefit.
</orig>
        <trans>
我多年來一直講[香港好,國家好;國家好, 香港更好].
</trans>
    </sent>
</dict>
可以看到xml格式資料的基本釋義非常少,甚至可以說沒有,但是有更豐富的例句資料,這是json資料所沒有的,所以,接下來的程式設計中,我們決定json和xml資料一起解析,即傳送兩次網路請求,使用json資料的基本釋義資料,使用xml資料的例句資料,這樣漢譯英的資料就完整了。
(3)、每日查詞介面返回的資料
①、json格式資料:
{
	"sid": "2899",
	"tts": "http:\/\/news.iciba.com\ / admin\ / tts\ / 2018 - 03 - 09 - day ",
	"content ": "Love is putting someone else 's needs before yours.",
	"note": "愛,就是把那個人的需要,看得比自己還重要。",
	"love": "2112",
	"translation": "詞霸小編:無論是親情還是愛情,不都是把對方的需要放置於自己之上?不管是何種性質的愛,亙久不變的便是無私,打心底的為對方著想,始終將其擺在第一位。",
	"picture": "http:\/\/cdn.iciba.com\/news\/word\/20180308.jpg",
	"picture2": "http:\/\/cdn.iciba.com\/news\/word\/big_20180308b.jpg",
	"caption": "詞霸每日一句",
	"dateline": "2018-03-09",
	"s_pv": "0",
	"sp_pv": "0",
	"tags": [{
		"id": null,
		"name": null
	}],
	"fenxiang_img": "http:\/\/cdn.iciba.com\/web\/news\/longweibo\/imag\/2018-03-09.jpg"
}
②、xml格式資料:
<?xml version="1.0" encoding="UTF-8"?>
<Document>
    <sid>2899</sid>
    <tts>http://news.iciba.com/admin/tts/2018-03-09-day</tts>
    <content>Love is putting someone else's needs before yours.</content>
    <note>愛,就是把那個人的需要,看得比自己還重要。</note>
    <love>2420</love>
    <translation>詞霸小編:無論是親情還是愛情,不都是把對方的需要放置於自己之上?不管是何種性質的愛,亙久不變的便是無私,打心底的為對方著想,始終將其擺在第一位。</translation>
    <picture>http://cdn.iciba.com/news/word/20180308.jpg</picture>
    <picture2>http://cdn.iciba.com/news/word/big_20180308b.jpg</picture2>
    <caption>詞霸每日一句</caption>
    <dateline>2018-03-09</dateline>
    <s_pv>0</s_pv>
    <sp_pv>0</sp_pv>
    <tagid></tagid>
    <tag></tag>
    <fenxiang_img>http://cdn.iciba.com/web/news/longweibo/imag/2018-03-09.jpg</fenxiang_img>
</Document>二、開始開發程式
資料準備充分之後就可以開始編寫程式了。當然,我們還需要進行一些準備工作。
1、開發工具準備
(1)、網路請求工具類
由於程式中會使用到網路請求功能,為了日後拓展,也就是為了程式的可擴充套件性增加,我們不能每次使用網路請求都寫一遍請求程式碼。這些東西都是可以封裝到工具類中的,使用的時候呼叫一下即可。這裡我推薦一個非常好用的開源庫OkHttp。
新建專案:TranslateAPP,所有預設,選擇空的活動。
使用OkHttp庫,我們需要新增庫依賴,使用Android Studio,在project模式下,編輯app/build.gradle檔案。在dependencies閉包中新增以下內容:
compile 'com.squareup.okhttp3:okhttp:3.10.0'然後在專案名下New→package,建立一個名為util的包。在該包下新建一個HttpUtil的類。
編寫以下程式碼:
import okhttp3.OkHttpClient;
import okhttp3.Request;

public class HttpUtil {

    /**
     * 使用OkHttp網路工具傳送網路請求
     * */
    public static void sendOkHttpRequest(String address,okhttp3.Callback callback){

        //建立OkHttpClient物件
        OkHttpClient client = new OkHttpClient();

        //建立Request物件,裝上地址
        Request request = new Request.Builder().url(address).build();

        //傳送請求,返回資料需要自己重寫回調方法
        client.newCall(request).enqueue(callback);

    }

}
使用時,呼叫請求方法,重寫回調函式即可,如:
HttpUtil.sendOkHttpRequest(url, new Callback() {
    @Override
    public void onFailure(@NonNull Call call, @NonNull IOException e) {
        //返回資料失敗時的處理邏輯
    }

    @Override
    public void onResponse(@NonNull Call call, @NonNull final Response response) throws IOException {
		//返回資料成功時的處理邏輯
    }
});
在接下來的程式中,你會看到它的具體使用方法。
(2)、建立javaBean、及解析工具介紹
解析json資料的時候需要使用到javaBean(實體類)嗎?當然是不一定的,不過我們決定使用更簡單的解析方式就需要使用到這樣的一個實體類。我們需要將上面介紹到的json資料的每一個屬性都設定到javaBean當中,可能面對這麼多屬性已經心生退意了,不過不用擔心,我們使用黑科技來解決。
①、使用Gson解析json資料
Gson解析json資料簡直簡單到了不能想象的地步,它將json資料字串格式化為對應的Bean物件,我們需要什麼資料,就去對應的實體類物件中get就可以了。是不是超級簡單。比起json的一段一段解析簡單的多。同樣,使用Gson需要新增Gson的庫依賴,在app/build.gradle檔案中新增以下依賴:
compile 'com.google.code.gson:gson:2.8.2'使用時只需要兩行程式碼:
Gson gson = new Gson();
Bean bean = gson.fromJson(dataString,Bean.class);
建立Gson物件,將翻譯介面返回的資料dataString對映為Bean類物件。是不是超級簡單。關於如何建立Bean,也很簡單,繼續使用黑科技。
②、使用GsonFormat外掛快速生成Json實體類
關於GsonFormat的安裝,只需要 File->Settings->Plugins—>查詢所需外掛—>Install即可。
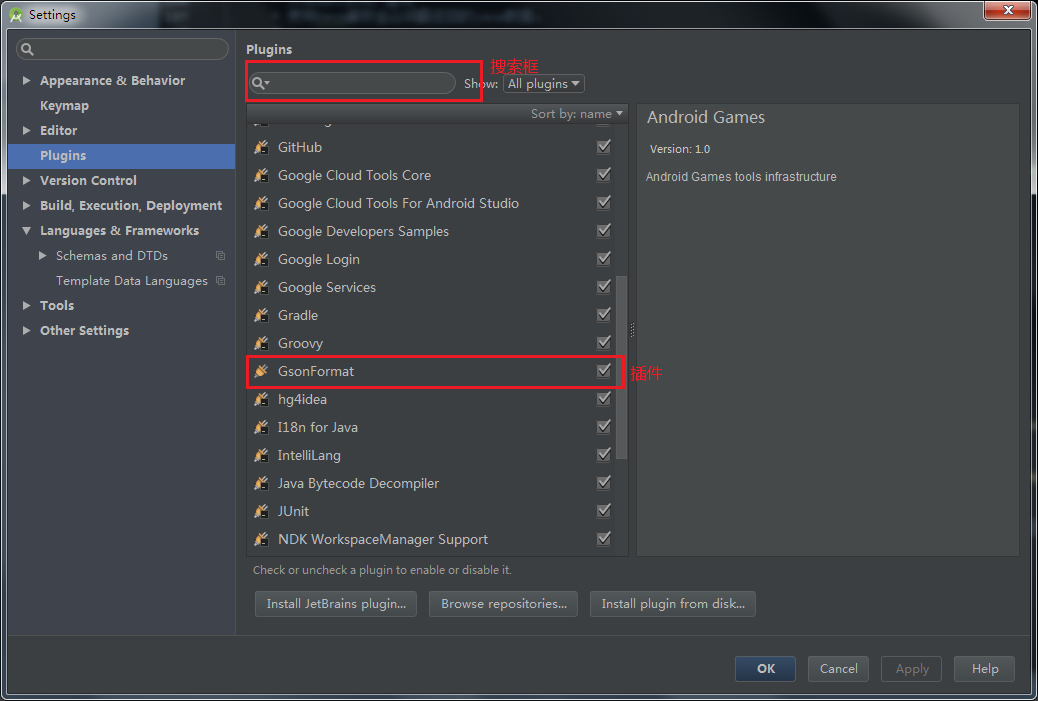
如圖所示,我已經安裝好了,你可以在搜尋框搜尋,然後安裝。
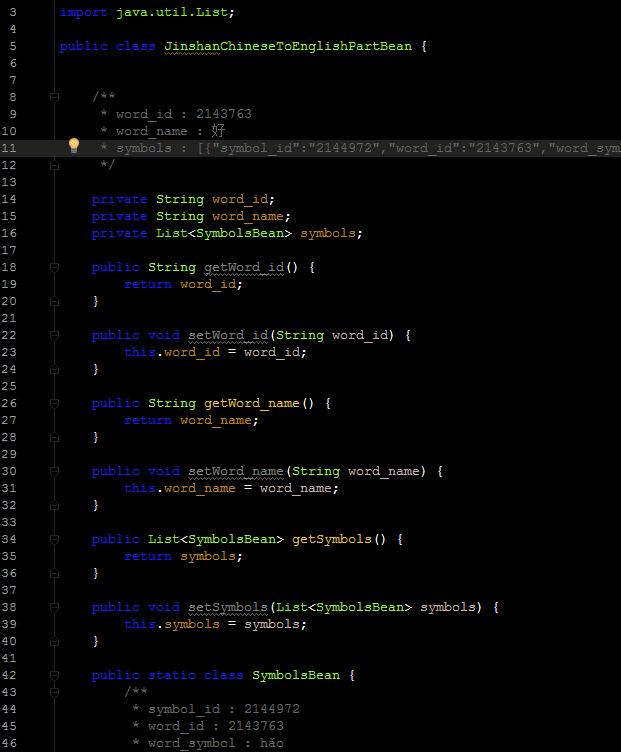
使用該外掛更簡單。我們在專案名下New→package,建立一個Gson包,用於存放使用Gson解析Json的Bean實體類。第一步,建立類,在包名上New一個類,類名為JinshanChineseToEnglishPartBean,因為英譯漢使用xml資料,漢譯英我們只是用到了json資料的一部分,所以叫這個名字,一眼看去就知道是什麼含義的名字。
第二步,開啟剛建立的類,按下Alt + Insert,選擇GsonFormat,在彈出的視窗中,複製進去漢譯英的json格式資料。這裡一定要保證json資料格式的正確,按照本文所給出的資料格式就一定是正確的,你也可以網上找到Json格式化校驗,進行格式確認。網址:http://www.bejson.com/。然後點選ok,格式錯誤的資料按下OK是沒有反應的,或者它會給你錯誤提示,讓你進行修改。格式正確後,點選ok會彈出引數選擇介面。
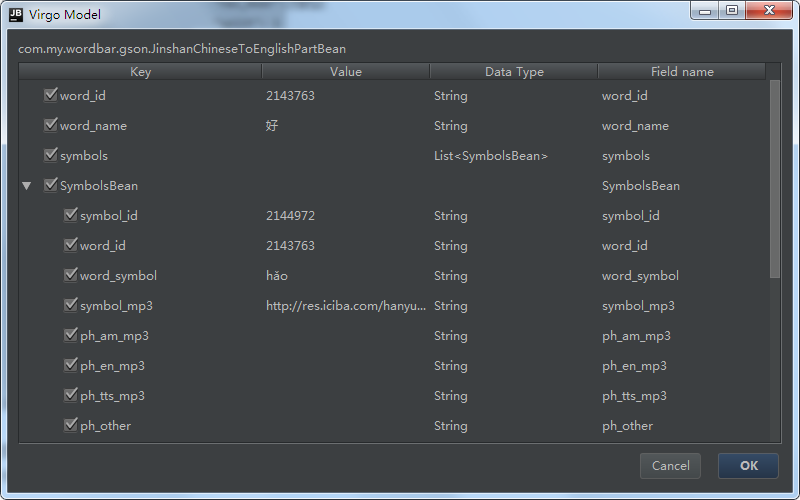
不需要進行修改,全部選擇點選ok即可。
這樣我們需要的Bean就建立好了,直接使用即可。
(3)、解析工具類
也是為了程式的可擴充套件性,這點很重要。同樣的,我們建立一個關於解析的工具類。因為不能每次使用到解析功能都編寫一次解析程式碼,那樣程式碼冗餘會非常嚴重,後期維護也非常困難。在util包下建立JinshanParseUtil工具類。編寫以下程式碼:
import android.content.SharedPreferences;
import android.util.Log;

import com.google.gson.Gson;
import com.my.wordbar.activity.MyApplication;
import com.my.wordbar.gson.JinshanChineseToEnglishPartBean;

import org.xmlpull.v1.XmlPullParser;
import org.xmlpull.v1.XmlPullParserFactory;

import java.io.StringReader;

import static android.content.Context.MODE_PRIVATE;

public class JinshanParseUtil {

    private final static String TAG = "金山解析工具";

    /**
     * 判斷一段字串是否是純英文
     * */
    public static boolean isEnglish(String content){

        if(content == null){                    //獲取內容為空則返回false
            return false;
        }

        content = content.replace(" ","");      //去掉內容中的空格

        return content.matches("^[a-zA-Z]*");   //判斷是否是全英文,是則返回true,反之返回false

    }

    /**
     * 英譯漢時使用。查詞
     * 使用pull方式解析金山詞霸返回的XML資料。
     * */
    public static void parseJinshanEnglishToChineseXMLWithPull(String result) {

        try {

            XmlPullParserFactory factory = XmlPullParserFactory.newInstance();
            XmlPullParser xmlPullParser = factory.newPullParser();
            xmlPullParser.setInput(new StringReader(result));
            int eventType = xmlPullParser.getEventType();

            String queryText = "";      //查詢文字
            String voiceText = "";      //發音資訊
            String voiceUrlText = "";   //發音地址資訊
            String meanText = "";       //基本釋義資訊
            String exampleText = "";    //例句資訊

            while (eventType != XmlPullParser.END_DOCUMENT) {
                String nodeName = xmlPullParser.getName();
                switch (eventType) {
                    //開始解析
                    case XmlPullParser.START_TAG: {
                        switch (nodeName) {
                            case "key":
                                queryText += xmlPullParser.nextText();
                                break;
                            case "ps":
                                voiceText += xmlPullParser.nextText() + "|";
                                break;
                            case "pron":
                                voiceUrlText += xmlPullParser.nextText() + "|";
                                break;
                            case "pos":
                                meanText += xmlPullParser.nextText() + "  ";
                                break;
                            case "acceptation":
                                meanText += xmlPullParser.nextText();
                                break;
                            case "orig":
                                exampleText += xmlPullParser.nextText();
                                exampleText = exampleText.substring(0,exampleText.length()-1);
                                break;
                            case "trans":
                                exampleText += xmlPullParser.nextText();
                                break;
                            default:
                                break;
                        }
                    }
                    default:
                        break;
                }
                eventType = xmlPullParser.next();
            }

            String[] voiceArray = voiceText.split("\\|");
            String[] voiceUrlArray = voiceUrlText.split("\\|");

            meanText = meanText.substring(0,meanText.length()-1);
            exampleText = exampleText.substring(1,exampleText.length());

            //建立SharedPreferences.Editor物件,指定檔名為
            SharedPreferences.Editor editor = MyApplication.getContext().getSharedPreferences("JinshanEnglishToChinese",MODE_PRIVATE).edit();

            editor.clear();

            editor.putString("queryText",queryText);
            editor.putString("voiceEnText","["+voiceArray[0]+"]");
            editor.putString("voiceEnUrlText",voiceUrlArray[0]);
            editor.putString("voiceAmText","["+voiceArray[1]+"]");
            editor.putString("voiceAmUrlText",voiceUrlArray[1]);
            editor.putString("meanText",meanText);
            editor.putString("exampleText",exampleText);

            editor.apply();

        } catch (Exception e) {
            e.printStackTrace();
            Log.d(TAG, "解析過程中出錯!!!");
        }

    }

    /**
     * 漢譯英時使用。查詞
     * 使用Gson解析金山詞霸返回的json資料。
     *
     * ====這裡只是解析了查詢的文字、拼音、發音地址、基本釋義。例句部分由XMl資料解析完成。====
     *
     * */
    public static void parseJinshanChineseToEnglishJSONWithGson(String result) {

        try {
            Gson gson = new Gson();
            JinshanChineseToEnglishPartBean translate = gson.fromJson(result, JinshanChineseToEnglishPartBean.class);

            String queryText;      //查詢文字
            String voiceText = "";      //拼音
            String voiceUrlText = "";   //拼音的發音
            String meanText = "";       //詞性及含義

            queryText = translate.getWord_name();

            for (JinshanChineseToEnglishPartBean.SymbolsBean voiceMsg : translate.getSymbols()){
                voiceText += voiceMsg.getWord_symbol()+" , ";
                voiceUrlText += voiceMsg.getSymbol_mp3();
                for(JinshanChineseToEnglishPartBean.SymbolsBean.PartsBean meanMsg : voiceMsg.getParts()){
                    meanText += meanMsg.getPart_name()+": ";
                    for(JinshanChineseToEnglishPartBean.SymbolsBean.PartsBean.MeansBean mean :meanMsg.getMeans()){
                        meanText += mean.getWord_mean() + "; ";
                    }
                    meanText = meanText.substring(0,meanText.length()-2);
                    meanText += "\n";
                }
            }

            meanText = meanText.substring(0,meanText.length()-1);

            voiceText = voiceText.substring(0,voiceText.length()-3);

            if(voiceText.equals("")){
                voiceText = "空";
            }

//            if(voiceText.trim().equals(",")){
//                voiceText = "空";
//            }
            if(voiceUrlText.equals("")){
                voiceUrlText = "空";
            }
            if(meanText.charAt(0) == ':'){
                meanText = meanText.substring(2,meanText.length());
            }

            //建立SharedPreferences.Editor物件,指定檔名為
            SharedPreferences.Editor editor = MyApplication.getContext().getSharedPreferences("JinshanChineseToEnglishBaseMean",MODE_PRIVATE).edit();

            editor.clear();

            editor.putString("queryText",queryText);
            editor.putString("voiceText",voiceText);
            editor.putString("voiceUrlText",voiceUrlText);
            editor.putString("meanText",meanText);

            editor.apply();

        } catch (Exception e) {
            e.printStackTrace();
            Log.d(TAG, "解析過程中出錯!!!");
        }

    }

    /**
     * 漢譯英時使用,查詞
     * 使用Pull方式解析金山詞霸返回的XML資料。
     *
     * ====這裡只解析了例句,其他相關釋義由json資料解析完成====
     *
     * */
    public static String parseJinshanChineseToEnglishXMLWithPull(String result) {

        String exampleText = "";    //例句資訊
        try {

            XmlPullParserFactory factory = XmlPullParserFactory.newInstance();
            XmlPullParser xmlPullParser = factory.newPullParser();
            xmlPullParser.setInput(new StringReader(result));
            int eventType = xmlPullParser.getEventType();

            while (eventType != XmlPullParser.END_DOCUMENT) {
                String nodeName = xmlPullParser.getName();
                switch (eventType) {
                    //開始解析
                    case XmlPullParser.START_TAG: {
                        switch (nodeName) {
                            case "orig":
                                exampleText += xmlPullParser.nextText();
                                exampleText = exampleText.substring(0,exampleText.length()-1);
                                break;
                            case "trans":
                                exampleText += xmlPullParser.nextText();
                                break;
                            default:
                                break;
                        }
                    }
                    default:
                        break;
                }
                eventType = xmlPullParser.next();
            }
        } catch (Exception e) {
            e.printStackTrace();
            Log.d(TAG, "解析過程中出錯!!!");
        }

        exampleText = exampleText.substring(1,exampleText.length());

        return exampleText;

    }

    /**
     * 每日一句,解析json資料方法。
     * */
    public static String parseJinshanEverydayEnglishJSONWithGson(String result){

        return result;
    }

}
在本程式中,將返回的資料通過工具類進行解析,然後儲存到對應的SharedPreferences檔案中,這一種輕型的儲存檔案,通過鍵值對儲存,通過對應資料型別的put方法儲存,然後可以通過對應資料型別的get方法以鍵名的方式取出對應值。解析過程比較繁瑣,如果你對這方面不是很明白,希望你可以多多理解上面的程式碼。XML檔案我是使用的Pull方式進行解析。在Java7及以上的版本可以使用switch的方式讀取對應標籤,相對於傳統的if/else的方式讀取,效率要高出很多。在解析過程中我也加入了很多細節的處理,多數都是利用取子串的方式將多餘的符號去除。再就是判斷是否為空,為其賦值預設的“空”值。由於解析部分很多,我不能一一說明,但是希望你能看懂,我在解析上也花費了相當長的時間。遇見了太多的問題。如果你真的不懂,在介紹金山詞霸API時,有我的郵箱地址,你可以通過它聯絡我,我會解答你的疑問。當然我相信高手是不會看這篇文章的,僅針對初學者。
工具最後還有一個空方法,是解析每日一句的,這個功能要完成其實非常簡單。我沒有寫,你可以在日後補充。
另外,工具類中使用到了全域性獲取Context的方法。因為工具類不依賴活動,所以獲取上下文的話這是一種很常用的方法。首先在專案下新建一個MyApplication類。並新增以下程式碼:
import android.app.Application;
import android.content.Context;

public class MyApplication extends Application {

    private static Context context;

    @Override
    public void onCreate() {
        super.onCreate();
        context = getApplicationContext();
    }

    public static Context getContext(){
        return context;
    }

}
還需要修改AndroidManifest.xml檔案。
<application
    android:name="com.my.translateapp.MyApplication"

	...

</application>
一定要是完整的包名,使用時,只需要使用:
MyApplication.getContext()2、正式編寫程式
所有東西都準備就緒就可以正式編寫了。
(1)編寫佈局,修改activity_main檔案中的程式碼:
<?xml version="1.0" encoding="utf-8"?>
<android.support.design.widget.CoordinatorLayout
    xmlns:android="http://schemas.android.com/apk/res/android"
    xmlns:app="http://schemas.android.com/apk/res-auto"
    xmlns:tools="http://schemas.android.com/tools"
    android:layout_width="match_parent"
    android:layout_height="match_parent"
    android:fitsSystemWindows="true">

    <android.support.design.widget.AppBarLayout
        android:layout_width="match_parent"
        android:layout_height="wrap_content"
        android:orientation="vertical">

        <android.support.v7.widget.Toolbar
            android:id="@+id/toolbar"
            android:layout_width="match_parent"
            android:layout_height="?attr/actionBarSize"
            android:background="?attr/colorPrimary"
            android:theme="@style/ThemeOverlay.AppCompat.Dark.ActionBar"
            app:popupTheme="@style/ThemeOverlay.AppCompat.Light" >

            <TextView
                android:layout_width="wrap_content"
                android:layout_height="wrap_content"
                android:gravity="center"
                android:text="@string/translate_bar_name"
                android:layout_centerInParent="true"
                android:layout_gravity="center"
                android:textColor="@android:color/white"
                android:textSize="20sp"/>

        </android.support.v7.widget.Toolbar>

    </android.support.design.widget.AppBarLayout>

    <!-- 內容區 -->

    <LinearLayout
        android:layout_width="match_parent"
        android:layout_height="match_parent"
        android:layout_margin="10dp"
        android:focusable="true"
        android:focusableInTouchMode="true"
        android:orientation="vertical"
        app:layout_behavior="@string/appbar_scrolling_view_behavior">

        <!--android:layout_margin="@dimen/translate_et_margin"-->

        <EditText
            android:id="@+id/et_translate"
            android:layout_width="match_parent"
            android:layout_height="@dimen/translate_et_height"
            android:background="@drawable/translate_shape_et_bg"
            android:gravity="top"
            android:hint="@string/translate_et_hint"
            android:textColorHint="@color/translate_et_hint"
            android:textColorLink="@android:color/black"
            android:textCursorDrawable="@drawable/translate_shape_et_cursor"
            app:layout_behavior="@string/appbar_scrolling_view_behavior" />

        <android.support.constraint.ConstraintLayout
            android:layout_width="match_parent"
            android:layout_height="wrap_content"
            android:layout_marginTop="5dp">

            <!--<TextView-->
                <!--android:id="@+id/translate_tv_chinese"-->
                <!--android:layout_width="wrap_content"-->
                <!--android:layout_height="wrap_content"-->
                <!--android:layout_marginLeft="2dp"-->
                <!--android:text="@string/language_chinese"-->
                <!--android:textColor="@color/text_color_black"-->
                <!--android:textSize="16sp"-->
                <!--app:layout_constraintBaseline_toBaselineOf="@+id/translate_tv_english"-->
                <!--app:layout_constraintLeft_toLeftOf="parent"-->
                <!--android:layout_marginStart="2dp" />-->

            <!--<!– translate_btn_change –>-->
            <!--<ImageButton-->
                <!--android:id="@+id/translate_image_btn_change"-->
                <!--android:layout_width="35dp"-->
                <!--android:layout_height="35dp"-->
                <!--android:layout_marginLeft="8dp"-->
                <!--android:background="@color/white"-->
                <!--android:padding="4dp"-->
                <!--android:scaleType="fitXY"-->
                <!--android:src="@drawable/translate_btn_change"-->
                <!--app:layout_constraintLeft_toRightOf="@+id/translate_tv_chinese"-->
                <!--app:layout_constraintTop_toTopOf="parent"-->
                <!--app:layout_constraintBottom_toBottomOf="parent"-->
                <!--app:layout_constraintVertical_bias="0.0"-->
                <!--android:layout_marginStart="8dp" />-->

            <!--<TextView-->
                <!--android:id="@+id/translate_tv_english"-->
                <!--android:layout_width="wrap_content"-->
                <!--android:layout_height="0dp"-->
                <!--android:text="@string/language_english"-->
                <!--android:textSize="16sp"-->
                <!--android:textColor="@color/text_color_black"-->
                <!--app:layout_constraintTop_toTopOf="parent"-->
                <!--android:layout_marginTop="8dp"-->
                <!--app:layout_constraintLeft_toRightOf="@+id/translate_image_btn_change"-->
                <!--android:layout_marginLeft="8dp"-->
                <!--app:layout_constraintBottom_toBottomOf="parent"-->
                <!--android:layout_marginBottom="8dp"-->
                <!--app:layout_constraintVertical_bias="0.0"-->
                <!--android:layout_marginStart="8dp" />-->

            <Button
                android:id="@+id/btn_translate"
                android:layout_width="0dp"
                android:layout_height="wrap_content"
                android:background="@drawable/button_selector"
                android:minHeight="0dp"
                android:minWidth="0dp"
                android:text="@string/translate_btn_text"
                android:textSize="15sp"
                style="?android:attr/borderlessButtonStyle"
                android:layout_marginRight="0dp"
                app:layout_constraintRight_toRightOf="parent"
                android:layout_marginLeft="0dp"
                app:layout_constraintLeft_toLeftOf="parent"
                app:layout_constraintTop_toTopOf="parent"
                android:layout_marginTop="0dp"
                app:layout_constraintBottom_toBottomOf="parent"
                android:layout_marginBottom="0dp" />

        </android.support.constraint.ConstraintLayout>

        <View
            android:layout_width="match_parent"
            android:layout_height="@dimen/cut_line"
            android:layout_marginBottom="0dp"
            android:layout_marginTop="5dp"
            android:background="@color/translate_line_color" />

        <ScrollView
            android:layout_width="match_parent"
            android:layout_height="match_parent">

            <LinearLayout
                android:layout_width="match_parent"
                android:layout_height="wrap_content"
                android:layout_margin="2dp"
                android:orientation="vertical">

                <LinearLayout
                    android:layout_width="match_parent"
                    android:layout_height="wrap_content"
                    android:orientation="horizontal">

                    <TextView
                        android:layout_width="wrap_content"
                        android:layout_height="wrap_content"
                        android:layout_marginTop="3dp"
                        android:text="@string/text_query"
                        android:textColor="@color/text_color_black"
                        android:textSize="15sp" />

                    <TextView
                        android:id="@+id/query"
                        android:layout_width="wrap_content"
                        android:layout_height="wrap_content"
                        android:layout_marginTop="3dp"
                        android:text="@string/text_null" />

                </LinearLayout>

                <include
                    layout="@layout/cut_line"/>

                <TextView
                    android:layout_width="wrap_content"
                    android:layout_height="wrap_content"
                    android:layout_marginTop="3dp"
                    android:text="@string/voice_msg"
                    android:textColor="@color/text_color_black"
                    android:textSize="15sp" />

                <TextView
                    android:id="@+id/voice_msg"
                    android:layout_width="wrap_content"
                    android:layout_height="wrap_content"
                    android:layout_marginTop="5dp"
                    android:text="@string/text_null" />

                <include
                    layout="@layout/cut_line"/>

                <TextView
                    android:layout_width="wrap_content"
                    android:layout_height="wrap_content"
                    android:layout_marginTop="3dp"
                    android:text="@string/base_mean"
                    android:textColor="@color/text_color_black"
                    android:textSize="15sp" />

                <TextView
                    android:id="@+id/base_mean"
                    android:layout_width="wrap_content"
                    android:layout_height="wrap_content"
                    android:layout_marginTop="5dp"
                    android:text="@string/text_null" />

                <include
                    layout="@layout/cut_line"/>

                <TextView
                    android:layout_width="wrap_content"
                    android:layout_height="wrap_content"
                    android:layout_marginTop="5dp"
                    android:text="@string/related_examples"
                    android:textColor="@color/text_color_black"
                    android:textSize="15sp" />

                <TextView
                    android:id="@+id/related_examples"
                    android:layout_width="wrap_content"
                    android:layout_height="wrap_content"
                    android:layout_marginTop="3dp"
                    android:text="@string/text_test" />

            </LinearLayout>

        </ScrollView>

    </LinearLayout>

</android.support.design.widget.CoordinatorLayout>
這裡使用了Material Design的設計風格,使用AppBarLayout巢狀Toolbar,並使用CoordinatorLayout佈局。如果你對這方面很陌生,可以參考我的文章:Material Design設計語言的基本使用方法,這裡仍然後具體介紹如何使用,首先去掉系統自帶的標題欄。開啟res/values/styles.xml檔案。修改為以下程式碼:
<!-- Base application theme. -->
<style name="AppTheme" parent="Theme.AppCompat.Light.NoActionBar">

    <!-- Customize your theme here. -->
    <item name="colorPrimary">@color/colorPrimary</item>
    <item name="colorPrimaryDark">@color/colorPrimaryDark</item>
    <item name="colorAccent">@color/colorAccent</item>

</style>
然後在MainActivity程式碼中新增以下程式碼,即可使用Toolbar。
protected void onCreate(Bundle savedInstanceState) {
    super.onCreate(savedInstanceState);
    setContentView(R.layout.activity_main);

    Toolbar toolbar = (Toolbar) this.findViewById(R.id.toolbar);
    setSupportActionBar(toolbar);       //使用Toolbar

    ActionBar actionBar = getSupportActionBar();  //獲取ActionBar例項,具體實現由Toolbar完成
    if (actionBar != null) {
        actionBar.setDisplayHomeAsUpEnabled(true);          //顯示導航按鈕設定為true
    }

}另外,佈局中涉及到的文字,都在res/values/strings.xml檔案中定義了。
<resources>
    <string name="app_name">翻譯</string>

    <!-- 通用 -->
    <string name="text_query">查詢:</string>
    <string name="voice_msg">發音資訊:</string>
    <string name="base_mean">基本釋義:</string>
    <string name="related_examples">相關例句:</string>
    <string name="text_null">Hello World</string>
    <string name="text_test">1 1 1\n2 2 2\n3 3 3\n4 4 4\n5 5 5\n6 6 6\n7 7 7\n8 8 8\n9 9 9\n10 10 10\n11 11 11\n12 12 12\n13 13 13\n14 14 14\n15 15 15\n16 16 16\n17 17 17\n18 18 18\n19 19 19\n20 20 20\n21 21 21\n</string>

    <!-- 翻譯介面標題欄按鈕名稱 -->
    <string name="translate_action_add">加入單詞本</string>
    <!-- 翻譯介面標題欄名稱 -->
    <string name="translate_bar_name">翻譯</string>
    <!-- 翻譯介面編輯框內 hint 顯示文字 -->
    <string name="translate_et_hint">請輸入翻譯內容</string>
    <!-- 翻譯介面 翻譯按鈕 顯示的文字 -->
    <string name="translate_btn_text">翻    譯</string>

</resources>
佈局介面中還涉及到了自定義控制元件,這部分也不是特別難,但是需要一定的時間消化,如果實在不懂就先複製著用,網上有很多這方面的使用方法。首先是編輯框的定義。在drawable下新建一個translate_shape_et_bg.xml檔案,設定編輯框的形狀、顏色、圓角、描邊等。編輯如下內容:
<?xml version="1.0" encoding="utf-8"?>
<!-- android:shape指定形狀型別,預設為rectangle -->
<shape xmlns:android="http://schemas.android.com/apk/res/android"
    android:shape="rectangle">
    <!-- solid指定形狀的填充色,只有android:color一個屬性 -->
    <!--<solid android:color="#FAFAFA" />-->
    <solid android:color="@color/white" />
    <!-- padding設定內容區域離邊界的間距 -->
    <padding
        android:bottom="@dimen/translate_shape_et_bg_padding"
        android:left="@dimen/translate_shape_et_bg_padding"
        android:right="@dimen/translate_shape_et_bg_padding"
        android:top="@dimen/translate_shape_et_bg_padding" />
    <!-- corners設定圓角,只適用於rectangle -->
    <corners android:radius="5dp" />
    <!-- stroke設定描邊 -->
    <stroke
        android:width="1dp"
        android:color="@android:color/darker_gray"
        />
</shape>
drawable下新建一個translate_shape_et_cursor.xml檔案,設定游標顏色。
<?xml version="1.0" encoding="utf-8"?>
<shape xmlns:android="http://schemas.android.com/apk/res/android" android:shape="rectangle">
    <size android:width="1dp" />
    <solid android:color="@color/et_cursor_black"  />
</shape>
drawable下新建一個button_selector.xml檔案,設定按鈕形狀、顏色、填充色、點選效果等。
<?xml version="1.0" encoding="utf-8"?>
<selector xmlns:android="http://schemas.android.com/apk/res/android">
    <item android:state_pressed="false">
        <shape xmlns:android="http://schemas.android.com/apk/res/android"
            android:shape="rectangle">
            <!-- solid指定形狀的填充色,只有android:color一個屬性 -->
            <!--<solid android:color="#FAFAFA" />-->
            <solid android:color="@color/button_normal_color" />

            <!-- padding設定內容區域離邊界的間距 -->
            <padding
                android:bottom="@dimen/shape_btn_padding"
                android:left="@dimen/shape_btn_padding"
                android:right="@dimen/shape_btn_padding"
                android:top="@dimen/shape_btn_padding" />
            <!-- corners設定圓角,只適用於rectangle -->
            <corners android:radius="3dp" />
            <!-- stroke設定描邊 -->
            <stroke
                android:width="1dp"
                android:color="@color/green"
                />
        </shape>
    </item>
    <item android:state_pressed="true">
        <shape xmlns:android="http://schemas.android.com/apk/res/android"
            android:shape="rectangle">
            <!-- solid指定形狀的填充色,只有android:color一個屬性 -->
            <!--<solid android:color="#FAFAFA" />-->
            <solid android:color="@color/button_selected_color" />

            <!-- padding設定內容區域離邊界的間距 -->
            <padding
                android:bottom="@dimen/shape_btn_padding"
                android:left="@dimen/shape_btn_padding"
                android:right="@dimen/shape_btn_padding"
                android:top="@dimen/shape_btn_padding" />
            <!-- corners設定圓角,只適用於rectangle -->
            <corners android:radius="3dp" />
            <!-- stroke設定描邊 -->
            <stroke
                android:width="1dp"
                android:color="@color/green"
                />
        </shape>
    </item>
</selector>
上面的檔案都使用到了res/values/dimens.xml和res/values/colors.xml中的內容。
dimens.xml檔案內容:
<resources>
    <!-- Default screen margins, per the Android Design guidelines. -->
    <dimen name="activity_horizontal_margin">16dp</dimen>
    <dimen name="activity_vertical_margin">16dp</dimen>

    <!-- 翻譯介面編輯框內,內容與邊框的邊距 -->
    <dimen name="translate_shape_et_bg_padding">8dp</dimen>
    <!-- 翻譯介面編輯框與父佈局的距離 -->
    <dimen name="translate_et_margin">8dp</dimen>
    <!-- 翻譯介面編輯框高度 -->
    <dimen name="translate_et_height">120dp</dimen>
    <!-- 翻譯介面自定義翻譯按鈕內容與邊框的距離 -->
    <dimen name="shape_btn_padding">5dp</dimen>

    <!-- 分割線高度 -->
    <dimen name="cut_line">0.5dp</dimen>

</resources>
colors.xml檔案中的內容:
<?xml version="1.0" encoding="utf-8"?>
<resources>
    <color name="colorPrimary">#ff3300</color>
    <color name="colorPrimaryDark">#303F9F</color>
    <color name="colorAccent">#ff4081</color>
    <color name="black">#000000</color>
    <color name="white">#FFFFFF</color>
    <color name="green">#009933</color>
    <color name="color_fab">#009933</color>
    <color name="translate_et_hint">#708090</color>
    <color name="translate_et_background">#F0F0F0</color>
    <color name="text_color_black">#000000</color>
    <color name="et_cursor_black">#000000</color>
    <color name="translate_btn_color">#FFFFFF</color>
    <color name="translate_line_color">#d7d7d7</color>

    <color name="button_selected_color">#708090</color>
    <color name="button_normal_color">#FFFFFF</color>

</resources>
由於涉及的內容比較多,初學者理解起來又非常困難,我推薦不是很懂的把佈局檔案中使用到的這些引用都刪除,僅僅使用系統提供的控制元件進行設定。對於上面的內容,想學習的,我可以提供一個學習的網址,分別關於shape的使用(自定義形狀)、按鈕點選效果的設定。
看一下我們設定的介面效果:
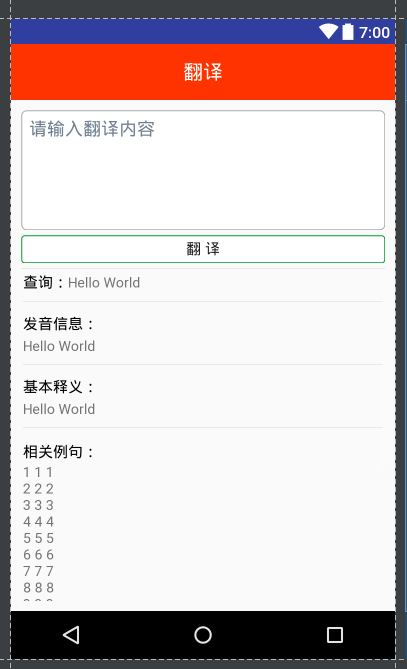
基本就是這樣,如果是對於自定義控制元件不理解的,還是上面說到的,推薦使用預設控制元件進行設定,把所有涉及到的drawbale下的檔案都放棄使用。
3、編輯主介面執行邏輯程式碼
編輯MainActivity的程式碼如下所示:
public class MainActivity extends BaseActivity implements View.OnClickListener {

    private static final String TAG = "MainActivity";

    @Override
    protected void onCreate(Bundle savedInstanceState) {
        super.onCreate(savedInstanceState);
        setContentView(R.layout.activity_main);

        Toolbar toolbar = (Toolbar) this.findViewById(R.id.toolbar);
        setSupportActionBar(toolbar);       //使用Toolbar

        ActionBar actionBar = getSupportActionBar();  //獲取ActionBar例項,具體實現由Toolbar完成
        if (actionBar != null) {
            actionBar.setDisplayHomeAsUpEnabled(true);          //顯示導航按鈕設定為true
        }

        Button translation = (Button) findViewById(R.id.btn_translate);

        translation.setOnClickListener(this);

    }

    @Override
    public void onClick(View v) {
        try {

            EditText editText = (EditText) findViewById(R.id.et_translate);

            String word = editText.getText().toString();       //查詢文字

            //金山每日一詞網址,預設json,使用中
            //String url = "http://open.iciba.com/dsapi/?date=2018-03-09";
            //金山每日一詞網址,可選xml,file=xml&  未使用
            //String url = "http://open.iciba.com/dsapi/?file=xml&date=2018-03-10";

            //金山查詞網址,預設xml,使用中
            final String urlxml = "http://dict-co.iciba.com/api/dictionary.php?w=" + word + "&key=9AA9FA4923AC16CED1583C26CF284C3F";
            //金山查詞網址,可選json,&type=json  ,因為缺少例句,未使用
            String url = "http://dict-co.iciba.com/api/dictionary.php?w=" + word + "&type=json&key=9AA9FA4923AC16CED1583C26CF284C3F";

            if (JinshanParseUtil.isEnglish(word)) {
                HttpUtil.sendOkHttpRequest(urlxml, new Callback() {
                    @Override
                    public void onFailure(@NonNull Call call, @NonNull IOException e) {
                        Toast.makeText(MainActivity.this, "獲取翻譯資料失敗!", Toast.LENGTH_SHORT).show();
                    }

                    @Override
                    public void onResponse(@NonNull Call call, @NonNull final Response response) throws IOException {

                        final String result = response.body().string();
                        Log.d(TAG, result);

                        runOnUiThread(new Runnable() {
                            @Override
                            public void run() {

                                JinshanParseUtil.parseJinshanEnglishToChineseXMLWithPull(result);

                                SharedPreferences pref = getSharedPreferences("JinshanEnglishToChinese", MODE_PRIVATE);

                                String queryText = pref.getString("queryText", "空");
                                String voiceEnText = pref.getString("voiceEnText", "空");
                                String voiceEnUrlText = pref.getString("voiceEnUrlText", "空");
                                String voiceAmText = pref.getString("voiceAmText", "空");
                                String voiceAmUrlText = pref.getString("voiceAmUrlText", "空");
                                String meanText = pref.getString("meanText", "空");
                                String exampleText = pref.getString("exampleText", "空");

                                TextView query = (TextView) findViewById(R.id.query);
                                TextView voiceMsg = (TextView) findViewById(R.id.voice_msg);
                                TextView baseMean = (TextView) findViewById(R.id.base_mean);
                                TextView examples = (TextView) findViewById(R.id.related_examples);

                                query.setText(queryText);
                                voiceMsg.setText("英式發音:"+voiceEnText+"\n"+"美式發音:"+voiceAmText+
                                        "\n英式發音地址:"+voiceEnUrlText+"\n美式發音地址:"+voiceAmUrlText);
                                baseMean.setText(meanText);
                                examples.setText(exampleText);

                            }
                        });
                    }
                });
            } else {
                HttpUtil.sendOkHttpRequest(url, new Callback() {
                    @Override
                    public void onFailure(@NonNull Call call, @NonNull IOException e) {
                        Toast.makeText(MainActivity.this, "獲取翻譯資料失敗!", Toast.LENGTH_SHORT).show();
                    }

                    @Override
                    public void onResponse(@NonNull Call call, @NonNull final Response response) throws IOException {

                        final String result = response.body().string();
                        Log.d(TAG, result);

                        runOnUiThread(new Runnable() {
                            @Override
                            public void run() {

                                JinshanParseUtil.parseJinshanChineseToEnglishJSONWithGson(result);

                                SharedPreferences pref = getSharedPreferences("JinshanChineseToEnglishBaseMean", MODE_PRIVATE);

                                String queryText = pref.getString("queryText", "空");
                                String voiceText = pref.getString("voiceText", "空");
                                String voiceUrlText = pref.getString("voiceUrlText", "空");
                                String meanText = pref.getString("meanText", "空");

                                TextView query = (TextView) findViewById(R.id.query);
                                TextView voiceMsg = (TextView) findViewById(R.id.voice_msg);
                                TextView baseMean = (TextView) findViewById(R.id.base_mean);

                                query.setText(queryText);
                                voiceMsg.setText("拼音:"+voiceText+"\n拼音發音:"+voiceUrlText);
                                baseMean.setText(meanText);

                            }
                        });
                    }
                });

                HttpUtil.sendOkHttpRequest(urlxml, new Callback() {
                    @Override
                    public void onFailure(@NonNull Call call, @NonNull IOException e) {
                        Toast.makeText(MainActivity.this, "獲取翻譯資料失敗!", Toast.LENGTH_SHORT).show();
                    }

                    @Override
                    public void onResponse(@NonNull Call call, @NonNull Response response) throws IOException {
                        final String result = response.body().string();

                        runOnUiThread(new Runnable() {
                            @Override
                            public void run() {
                                String example = parseJinshanChineseToEnglishXMLWithPull(result);

                                TextView examples = (TextView) findViewById(R.id.related_examples);
                                examples.setText(example);
                            }
                        });

                    }
                });
            }
        } catch (Exception e) {
            e.printStackTrace();
        }
    }

    //為按鈕設定點選事件
    @Override
    public boolean onOptionsItemSelected(MenuItem item) {
        switch (item.getItemId()) {

            case android.R.id.home:
				//退出程式邏輯
                break;

            default:
        }
        return true;
    }

}
程式碼很長,不過很好理解,就是為翻譯按鈕設定點選事件,判斷編輯框中的是否是英文,是英文則傳送英譯漢的網路請求,否則傳送漢譯英的網路請求。通過解析工具解析後已經儲存到了檔案中,我們在活動中只需要把需要的值從檔案中讀取出來並設定到控制元件中就可以了。
也許你會發現我們繼承的是BaseActivity,這是什麼?其實,為了充分利用系統的狀態列,我們把他的顏色設定為和標題欄一樣的顏色。把它定義在BaseActivity中,可以讓其他活動不需要再編寫相應的程式碼,繼承它就可以了。也是為了程式的可擴充套件性。
在專案中New一個類,名為BaseActivity,編寫以下程式碼:
import android.os.Build;
import android.os.Bundle;
import android.support.v7.app.AppCompatActivity;
import android.view.View;

import com.my.wordbar.R;

public class BaseActivity extends AppCompatActivity {

    @Override
    protected void onCreate(Bundle savedInstanceState) {
        super.onCreate(savedInstanceState);
        setContentView(R.layout.activity_base);

        if (Build.VERSION.SDK_INT >= 21) {
            View decorView = getWindow().getDecorView();
            int option = View.SYSTEM_UI_FLAG_LAYOUT_FULLSCREEN
                    | View.SYSTEM_UI_FLAG_LAYOUT_STABLE;
            decorView.setSystemUiVisibility(option);
            getWindow().setStatusBarColor(getResources().getColor(R.color.colorPrimary));
        }

    }
}
由於該功能(使用系統狀態列)是Android 5.0系統以後才支援的,所以為了相容原來的老系統,使用了if判斷。
最後我們看一下程式的執行效果:
它是漢英自動識別的哦。我們在程式中已經寫過了。這樣一個簡單的程式就寫完了。
再做一下補充,優化一下這個APP。
首先,更改佈局,新增一個小喇叭圖片。(如果你理解了上面的佈局程式碼,新增一個圖片很簡單,稍稍改變一下上面的佈局)
<ScrollView
            android:layout_width="match_parent"
            android:layout_height="match_parent">

            <LinearLayout
                android:layout_width="match_parent"
                android:layout_height="wrap_content"
                android:layout_margin="2dp"
                android:orientation="vertical">

                <LinearLayout
                    android:layout_width="match_parent"
                    android:layout_height="wrap_content"
                    android:orientation="horizontal">

                    <TextView
                        android:layout_width="wrap_content"
                        android:layout_height="wrap_content"
                        android:layout_marginTop="3dp"
                        android:text="@string/text_query"
                        android:textColor="@color/text_col