Tinker 熱修復 踩坑之路
阿新 • • 發佈:2019-02-11
花了幾個小時進行踩坑,總結一下過程
說實話,騰訊的第三方demo從來沒令我們"操心過"。
廢話不多數,直接進教程,手把手接入Tinker
1、準備工作
Tinker 官網 http://tinkerpatch.com/ 花幾分鐘註冊個賬號 新建一個APP APP名稱建議和工程名稱一樣,方便管理
2、SDK接入
1)、配置Tinker版本資訊
我們使用配置檔案去配置版本資訊,易於統一版本和後面更換版本
編輯根目錄的gradle.properties,加入
TINKER_VERSION=1.9.2
TINKERPATCH_VERSION=1.2.2
2).配置app目錄下的build.gradle檔案
apply plugin: 'com.android.application'

apply from: 'tinkerpatch.gradle'
android {
    compileSdkVersion 26
    defaultConfig {
        applicationId "com.feijin.sleep"
        minSdkVersion 19
        targetSdkVersion 26
        versionCode 8
        versionName "0.0.8"
        multiDexEnabled true
        multiDexKeepProguard file("tinkerMultidexKeep.pro")
        //keep specific classes using proguard syntax

    }
    signingConfigs {
        release {//釋出版本的簽名配置
            storeFile file('../keystore/gary.jks')
            keyAlias 'gary'
            storePassword '12345678'
            keyPassword '12345678'
        }
        debug {//除錯版本的簽名配置
            storeFile file('../keystore/gary.jks')
            keyAlias 'gary'
            storePassword '12345678'
            keyPassword '12345678'
        }
    }
    buildTypes {
        release {
            minifyEnabled true
            shrinkResources true
            signingConfig signingConfigs.debug

            proguardFiles 'proguardRules.pro', getDefaultProguardFile('proguard-android.txt')
        }
        debug {
            debuggable true
            minifyEnabled false
            signingConfig signingConfigs.debug
        }
    }
    sourceSets {
        main {
            jniLibs.srcDirs = ['libs']
        }
    }
}

dependencies {
    implementation fileTree(dir: 'libs', include: ['*.jar'])
    implementation 'com.android.support:appcompat-v7:26.1.0'
    implementation 'com.android.support.constraint:constraint-layout:1.0.2'
    testImplementation 'junit:junit:4.12'
    implementation "com.android.support:multidex:1.0.2"
    //若使用annotation需要單獨引用,對於tinker的其他庫都無需再引用
    annotationProcessor("com.tinkerpatch.tinker:tinker-android-anno:${TINKER_VERSION}") {
        changing = true
    }
    compileOnly("com.tinkerpatch.tinker:tinker-android-anno:${TINKER_VERSION}") { changing = true }
    implementation("com.tinkerpatch.sdk:tinkerpatch-android-sdk:${TINKERPATCH_VERSION}") {
        changing = true
    }

}
3) 配置 根目錄下的build.gradle 檔案
// Top-level build file where you can add configuration options common to all sub-projects/modules.
buildscript {
    repositories {
        //mavenLocal()
        google()
        jcenter()
    }
    dependencies {
        classpath 'com.android.tools.build:gradle:3.0.1'
        //無需再單獨引用tinker的其他庫
        classpath "com.tinkerpatch.sdk:tinkerpatch-gradle-plugin:${TINKERPATCH_VERSION}"
    }
}

allprojects {
    repositories {
        //mavenLocal()
        google()
        jcenter()
    }
}
// See http://blog.joda.org/2014/02/turning-off-doclint-in-jdk-8-javadoc.html.
if (JavaVersion.current().isJava8Compatible()) {
    allprojects {
        tasks.withType(Javadoc) {
            options.addStringOption('Xdoclint:none', '-quiet')
        }
    }
}

subprojects {
    tasks.withType(JavaCompile) {
        sourceCompatibility = JavaVersion.VERSION_1_7
        targetCompatibility = JavaVersion.VERSION_1_7
    }
}

task clean(type: Delete) {
    delete rootProject.buildDir
}
4) 在專案根目錄新建tinkerpatch.gradle檔案 程式碼如下
apply plugin: 'tinkerpatch-support'

/**
 * TODO: 請按自己的需求修改為適應自己工程的引數
 */
def bakPath = file("${buildDir}/bakApk/")
def baseInfo = "app-0.0.8-0313-16-40-30"
def variantName = "release"

/**
 * 對於外掛各引數的詳細解析請參考
 * http://tinkerpatch.com/Docs/SDK
 */
tinkerpatchSupport {
    /** 可以在debug的時候關閉 tinkerPatch **/
    /** 當disable tinker的時候需要新增multiDexKeepProguard和proguardFiles,
        這些配置檔案本身由tinkerPatch的外掛自動新增,當你disable後需要手動新增
        你可以copy本示例中的proguardRules.pro和tinkerMultidexKeep.pro,
        需要你手動修改'tinker.sample.android.app'本示例的包名為你自己的包名, com.xxx字首的包名不用修改
     **/
    tinkerEnable = true
    reflectApplication = true
    /**
     * 是否開啟加固模式,只能在APK將要進行加固時使用,否則會patch失敗。
     * 如果只在某個渠道使用了加固,可使用多flavors配置
     **/
    protectedApp = false
    /**
     * 實驗功能
     * 補丁是否支援新增 Activity (新增Activity的exported屬性必須為false)
     **/
    supportComponent = true

    autoBackupApkPath = "${bakPath}"

    appKey = "0d36f0530a76e76c"

    /** 注意: 若釋出新的全量包, appVersion一定要更新 **/
    appVersion = "0.0.8"

    def pathPrefix = "${bakPath}/${baseInfo}/${variantName}/"
    def name = "${project.name}-${variantName}"

    baseApkFile = "${pathPrefix}/${name}.apk"
    baseProguardMappingFile = "${pathPrefix}/${name}-mapping.txt"
    baseResourceRFile = "${pathPrefix}/${name}-R.txt"

    /**
     *  若有編譯多flavors需求, 可以參照: https://github.com/TinkerPatch/tinkerpatch-flavors-sample
     *  注意: 除非你不同的flavor程式碼是不一樣的,不然建議採用zip comment或者檔案方式生成渠道資訊(相關工具:walle 或者 packer-ng)
     **/
}

/**
 * 用於使用者在程式碼中判斷tinkerPatch是否被使能
 */
android {
    defaultConfig {
        buildConfigField "boolean", "TINKER_ENABLE", "${tinkerpatchSupport.tinkerEnable}"
    }
}

/**
 * 一般來說,我們無需對下面的引數做任何的修改
 * 對於各引數的詳細介紹請參考:
 * https://github.com/Tencent/tinker/wiki/Tinker-%E6%8E%A5%E5%85%A5%E6%8C%87%E5%8D%97
 */
tinkerPatch {
    ignoreWarning = false
    useSign = true
    dex {
        dexMode = "jar"
        pattern = ["classes*.dex"]
        loader = []
    }
    lib {
        pattern = ["lib/*/*.so"]
    }

    res {
        pattern = ["res/*", "r/*", "assets/*", "resources.arsc", "AndroidManifest.xml"]
        ignoreChange = []
        largeModSize = 100
    }

    packageConfig {
    }
    sevenZip {
        zipArtifact = "com.tencent.mm:SevenZip:1.1.10"
//        path = "/usr/local/bin/7za"
    }
    buildConfig {
        keepDexApply = false
    }
}
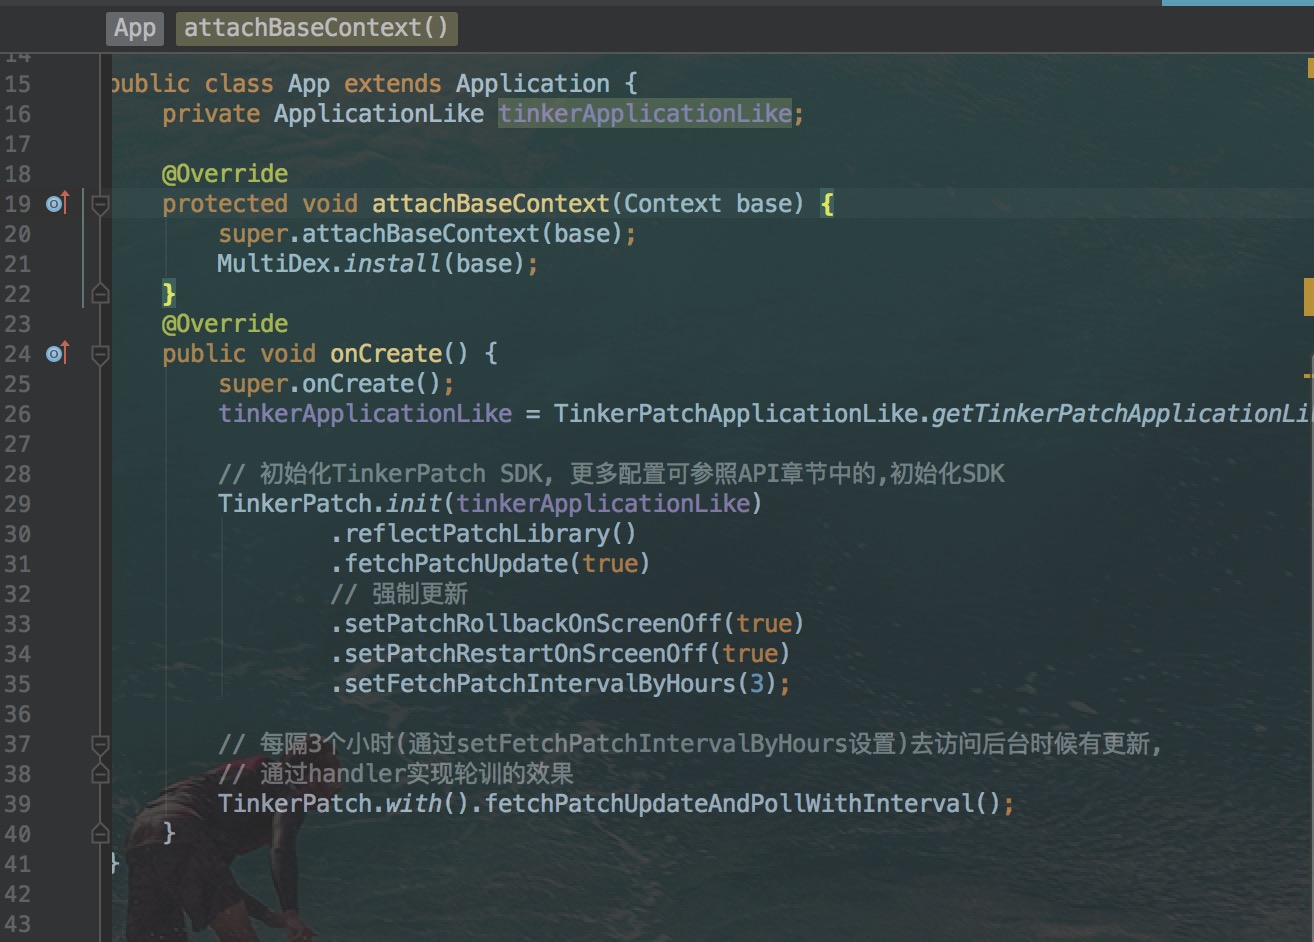
5) 配置application 檔案
3、生成基準包
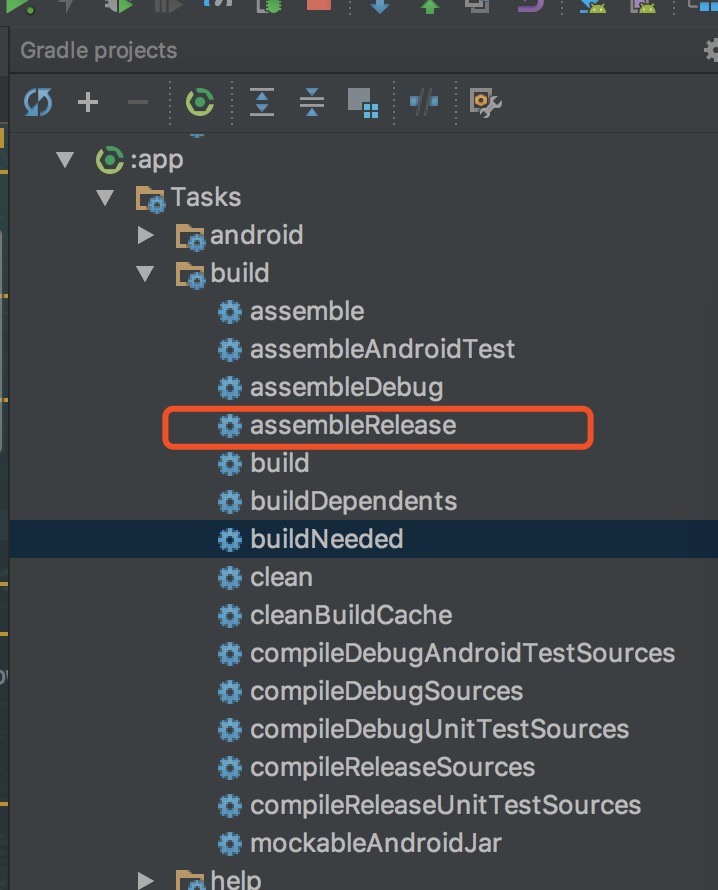
雙擊assembleRelease 生成一個檔案 也就是基準包,通俗點來說 就是當前釋出出去的包,而且還帶有bug的 而這個檔案在哪裡可以獲取到呢,看下圖
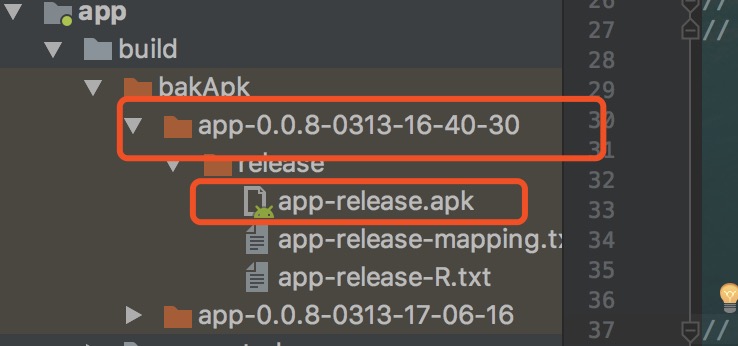
在本地電腦裡 找到這個檔案 安裝到手機 執行一次 然後殺掉
4、新增修復程式碼 隨便寫一些就好了,做一下測試,然後修改 tinkerpatch.gradle 類
/**
 * TODO: 請按自己的需求修改為適應自己工程的引數
*/
def bakPath = file("${buildDir}/bakApk/")
def baseInfo = "app-0.0.8-0313-16-40-30"
def variantName = "release"
/** 注意: 若釋出新的全量包, appVersion一定要更新 **/
appVersion = "0.0.8"
注意的是 appVersion 要和versionName 一樣 然後執行最後一步 如下圖
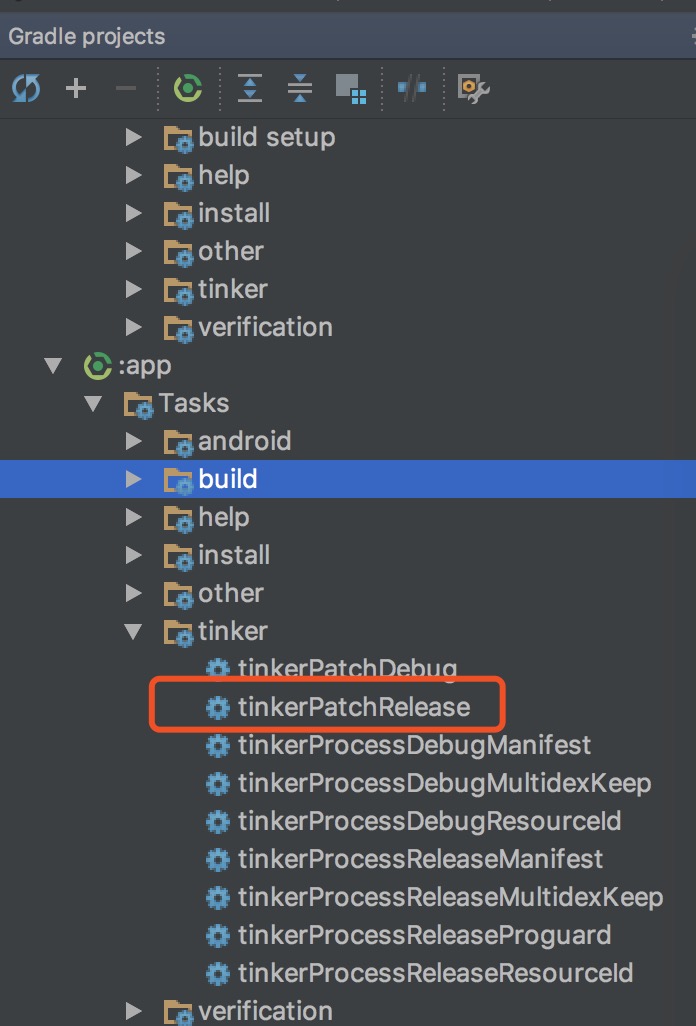
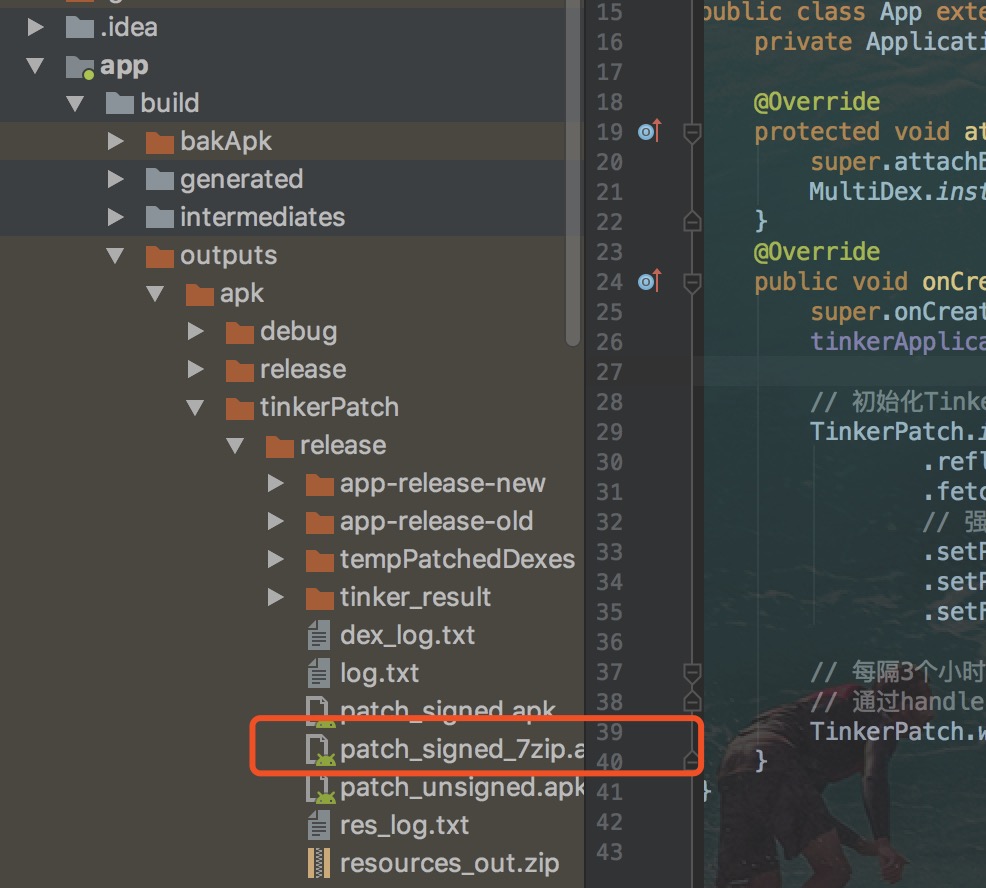
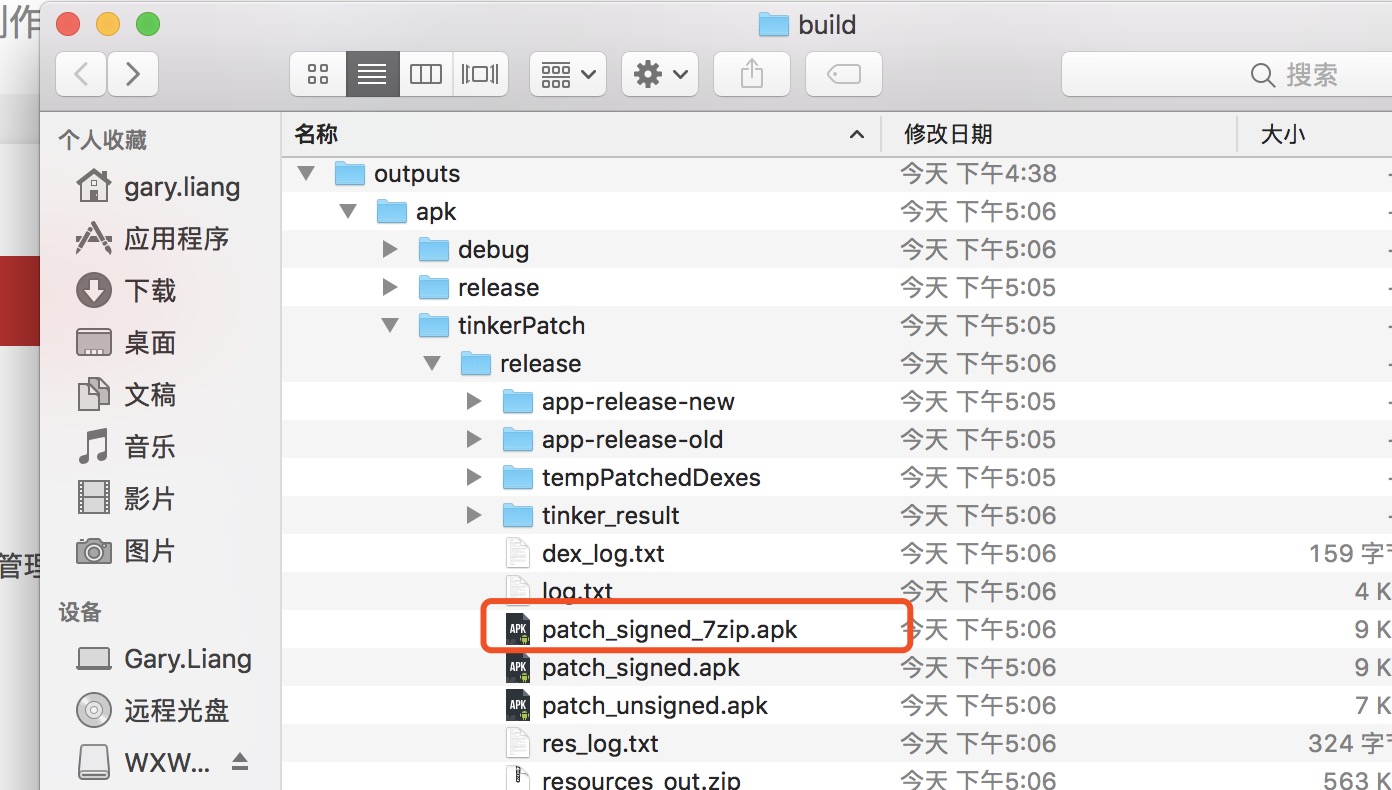
點選thinkerPathRelease 等待片刻後 會生成一個補丁包如下圖
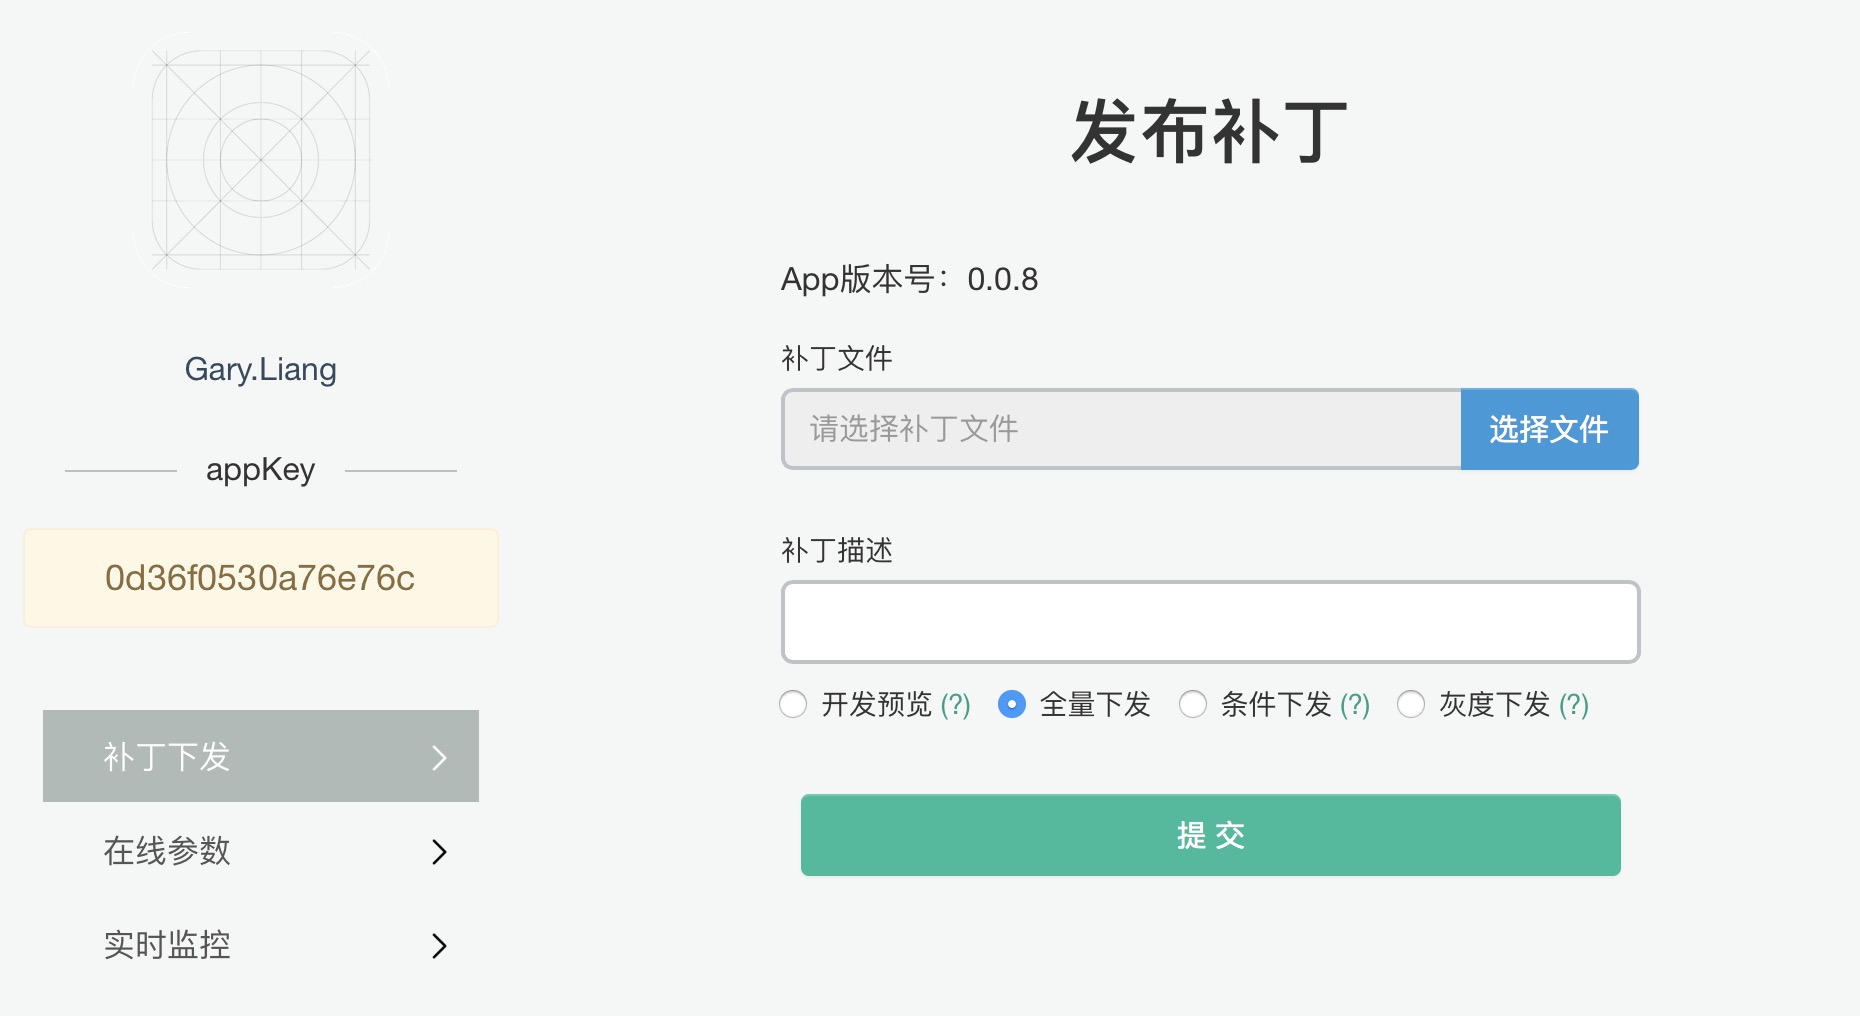
5.釋出補丁包