
Eclipse+CXF框架開發Web服務實戰
二、JDK配置
安裝JDK1.6.0,配置環境變數。
JAVA_HOME:C:\Program Files\Java\jre1.6.0_07。
Path:C:\Program Files\Java\jre1.6.0_07\bin。
CLASSPATH:C:\Program Files\Java\jre1.6.0_07\lib。
因本地只安裝了JRE,故配置資訊按JRE目錄來設定。

三、Tomcat配置
安裝Tomcat,執行apache-tomcat-6.0.14.exe。
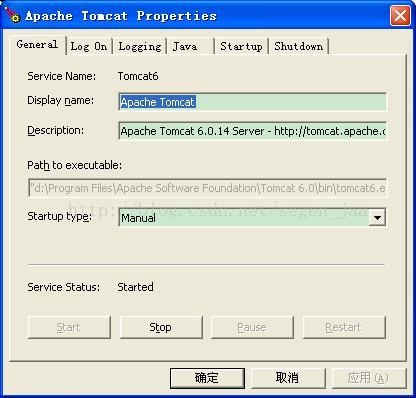
埠號:8080
使用者名稱:admin
密碼:111111
安裝完成後,啟動tomcat。
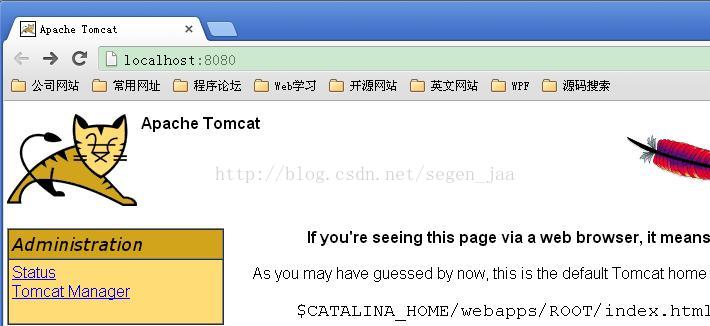
訪問:http://localhost:8080/。出現如下介面則部署成功。

四、CXF服務端
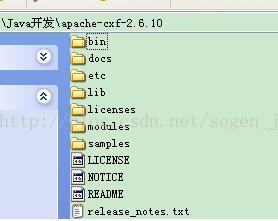
1、下載apache-cxf-2.6.10.zip包,解壓後資料如下。
2、新建Dynamic Web Project。
File—New—Project。

工程名:MyService。
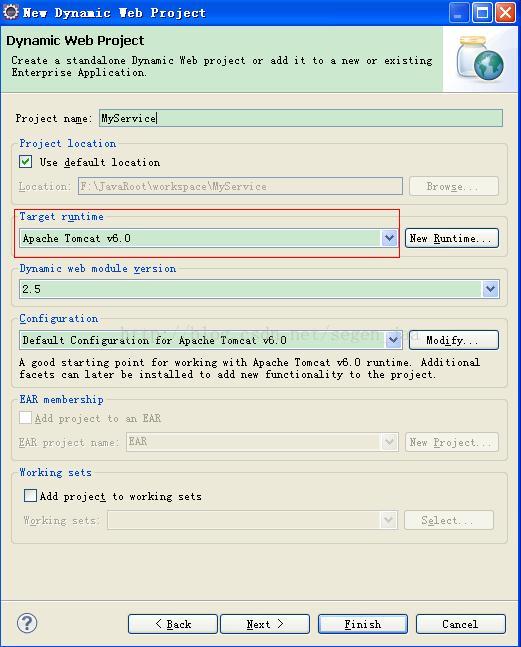
Target runtime要與安裝的Tomcat一致,若不一致點選“New Runtime”設定。
比如我本地安裝的Tomcat為v6.0。
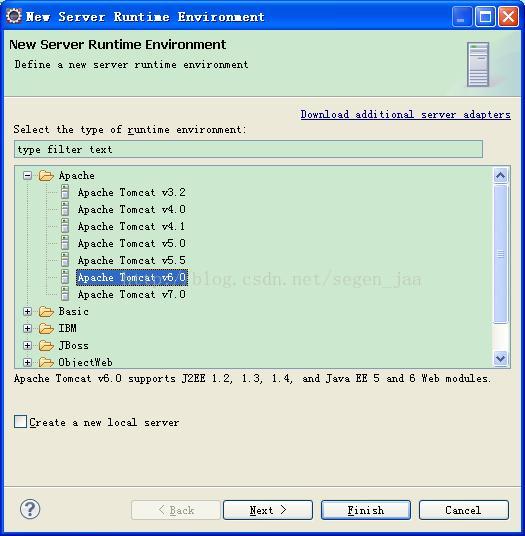
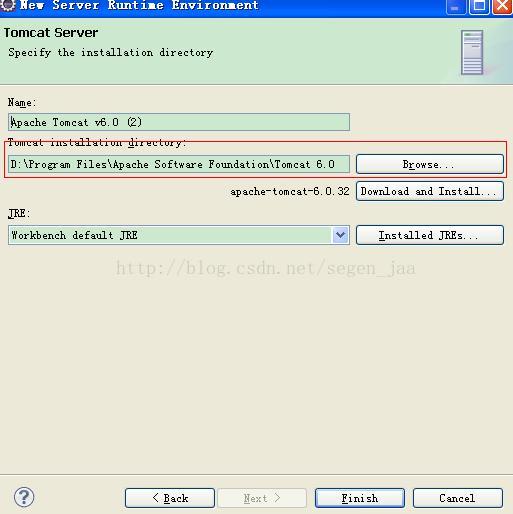
Tomcat installation directory選擇Tomcat安裝目錄。

Default output folder設定為:WebContent/WEB-INF/classes。

3、匯入CXF庫檔案。
CXF庫配置。

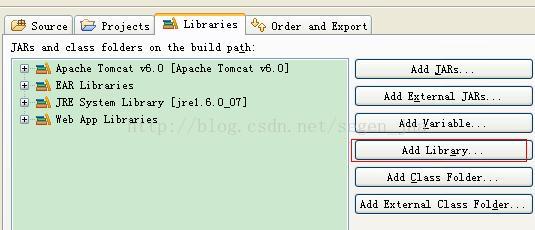


選中apache-cxf-2.6.10包下的lib目錄,匯入所有的jar檔案。
本機目錄為F: \Java開發\apache-cxf-2.6.10\lib。
新增完成後,會出現CXF名稱庫目錄。

4、建立介面IcxfWB。
工程右鍵—New—Interface,新增程式碼:
說明:package com.yxj; import javax.jws.WebService; import javax.jws.WebParam; import javax.jws.WebMethod; @WebService public interface IcxfWB { @WebMethod String sayHello(@WebParam(name="name") String name); }
@WebService:標記表示該介面是一個WebService服務。
@WebMethod:標記表示WebService中的方法。
@WebParam(name="paramName")表示方法中的引數,name屬性限制了引數的名稱,若沒有指定該屬性,引數將會被重新命名。
5、建立服務實現類CxfWBImpl。
package com.yxj;

public class CxfWBImpl implements IcxfWB {
	public String sayHello(String name) {
		return "Hello "+name;
	}
}<?xml version="1.0" encoding="UTF-8"?>
<web-app xmlns:xsi="http://www.w3.org/2001/XMLSchema-instance" xmlns="http://java.sun.com/xml/ns/javaee" xmlns:web="http://java.sun.com/xml/ns/javaee/web-app_2_5.xsd" xsi:schemaLocation="http://java.sun.com/xml/ns/javaee http://java.sun.com/xml/ns/javaee/web-app_2_5.xsd" id="WebApp_ID" version="2.5">
<display-name>MyService</display-name>
<context-param>
<param-name>contextConfigLocation</param-name>
<param-value>WEB-INF/service-beans.xml</param-value>
</context-param>
<listener>
<listener-class>org.springframework.web.context.ContextLoaderListener</listener-class>
</listener>
<servlet>
<servlet-name>CXFServlet</servlet-name>
<servlet-class>org.apache.cxf.transport.servlet.CXFServlet</servlet-class>
</servlet>
<servlet-mapping>
<servlet-name>CXFServlet</servlet-name>
<url-pattern>/*</url-pattern>
</servlet-mapping>
<welcome-file-list>
<welcome-file>index.html</welcome-file>
<welcome-file>index.htm</welcome-file>
<welcome-file>index.jsp</welcome-file>
<welcome-file>default.html</welcome-file>
<welcome-file>default.htm</welcome-file>
<welcome-file>default.jsp</welcome-file>
</welcome-file-list>
</web-app><?xml version="1.0" encoding="UTF-8"?>
<beans xmlns="http://www.springframework.org/schema/beans"
xmlns:xsi="http://www.w3.org/2001/XMLSchema-instance"
xmlns:jaxws="http://cxf.apache.org/jaxws"
xsi:schemaLocation="
http://www.springframework.org/schema/beans
http://www.springframework.org/schema/beans/spring-beans.xsd
http://cxf.apache.org/jaxws http://cxf.apache.org/schemas/jaxws.xsd">
<import resource="classpath:META-INF/cxf/cxf.xml"/>
<import resource="classpath:META-INF/cxf/cxf-extension-soap.xml"/>
<import resource="classpath:META-INF/cxf/cxf-servlet.xml"/>
<bean id="SayHello" class="com.yxj.CxfWBImpl" />
<jaxws:endpoint id="sayHello" implementor="#SayHello" address="/sayHello"/>
</beans>1、打包工程
右鍵工程—Export—WAR file,指定輸出路徑。


2、將war檔案移動至apache-tomcat\webapps下。
本地操作是,複製F:\MyService.war到目錄D:\Program Files\Apache Software Foundation\Tomcat 6.0\webapps。
3、複製CFX檔案到tomcat下。
複製F:\常用軟體\Java開發\apache-cxf-2.6.10\lib目錄下檔案到
F:\JavaRoot\workspace\MyService\WebContent\WEB-INF\lib。
4、重啟Tomcat。
5、瀏覽器訪問http://localhost:8080/MyService。

六、CXF客戶端
1、生成Stub
CXF提供了一個名為“wsdl2java.bat”的工具,該工具可以通過WSDL為特定的服務建立 stub。本地目錄,F:\常用軟體\Java開發\apache-cxf-2.6.10\bin\下wadl2java工具。
命令wsdl2java –p 生成程式碼的包名 –d 生成程式碼的路徑 wsdl地址。
本地命令如下。
wsdl2java -p com.yxj.client -d F:\clientsrc http://localhost:8080/MyService/sayHello?wsdl
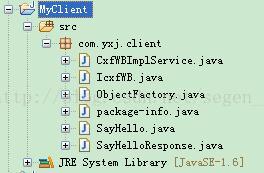
生成結果檔案在F:\clientsrc,生成檔案如圖。

2、新建Java Project。

3、將第一步中生成的F:\clientsrc資料夾下的所有java檔案移至工程src下,重新整理工程。
4、新增CXF包。


使用建立Service時配置好的CXF庫。

6、新建包含有main方法的Class,程式碼如下。
package com.yxj.client;

import org.springframework.context.support.ClassPathXmlApplicationContext;
import com.yxj.client.IcxfWB;

public class ClientCall {

	/**
	 * @param args
	 */
	public static void main(String[] args) {
		// TODO Auto-generated method stub
		ClassPathXmlApplicationContext context
        = new ClassPathXmlApplicationContext(new String[] {"com/yxj/client/client-beans.xml"});

		IcxfWB client = (IcxfWB)context.getBean("sayHello2");
		String response = client.sayHello("World");
	    System.out.println("Response: " + response);
	    System.exit(0);
	}
}檔案內容如下。
<?xml version="1.0" encoding="UTF-8"?>
<beans xmlns="http://www.springframework.org/schema/beans"
       xmlns:jaxws="http://cxf.apache.org/jaxws"
       xmlns:xsi="http://www.w3.org/2001/XMLSchema-instance"
       xsi:schemaLocation="http://www.springframework.org/schema/beans
          http://www.springframework.org/schema/beans/spring-beans.xsd
          http://cxf.apache.org/jaxws http://cxf.apache.org/schemas/jaxws.xsd">
    <jaxws:client id="sayHello2" serviceClass="com.yxj.client.IcxfWB" address="http://localhost:8080/MyService/sayHello?wsdl"/>
</beans>8、執行客戶端,控制檯輸出。
Hello WorldOK,至此大功告成!