Android 仿360懸浮球與加速球
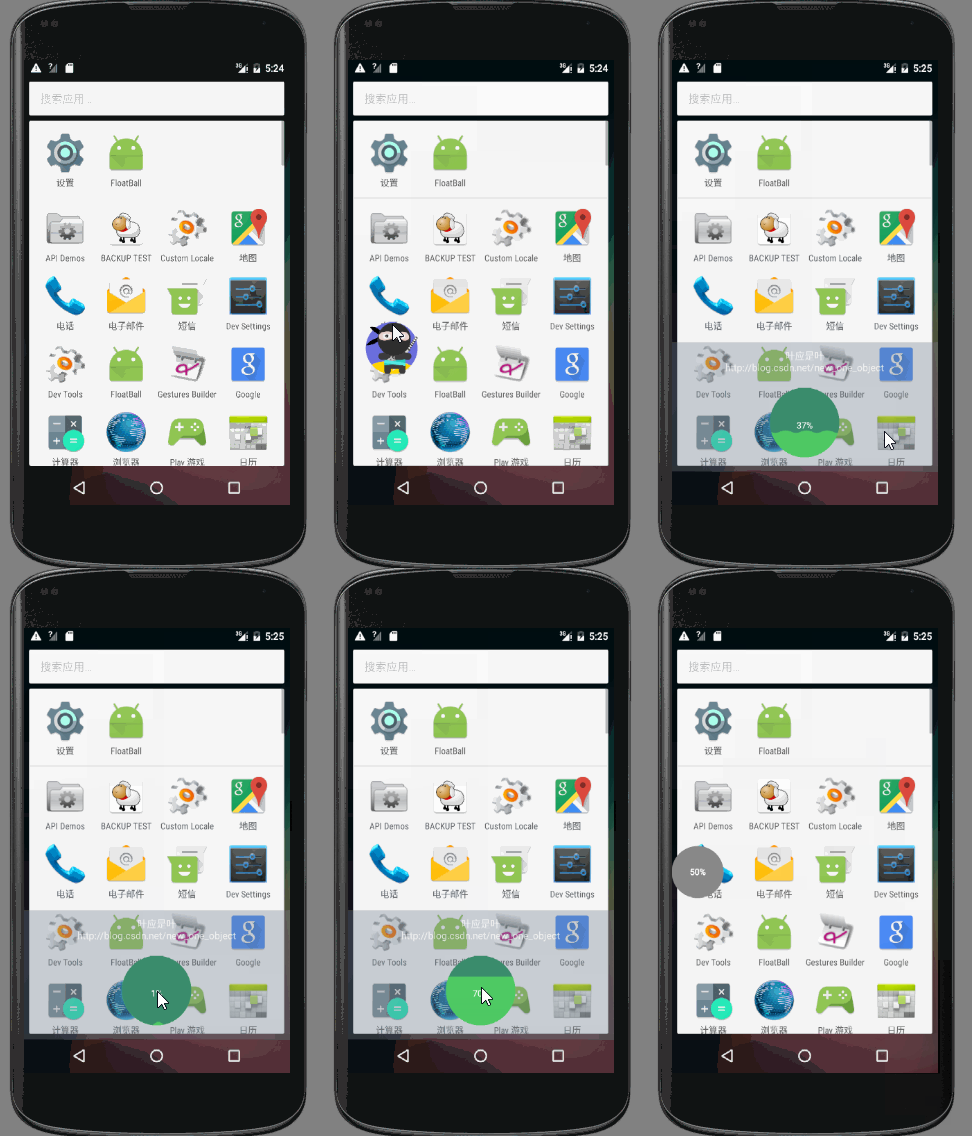
先來看一張動態圖
昨天跟著視訊學瞭如何自定義View並做成仿360懸浮球與加速球的樣式
可以看出來,做成的效果有:
- 點選按鈕後退出Activity,呈現一個圓形的懸浮球,可以隨意拖動並會自動依靠到螢幕一側,且拖動時會變成一張圖片
- 當點選懸浮球時,懸浮球隱藏,底部出現一個加速球,雙擊加速球時,呈現水量逐漸增高且波動幅度較小的效果,單擊時波浪上下波動且幅度漸小
- 點選螢幕不包含底部加速球的部位,加速球會隱藏,懸浮球重新出現
要做出這麼一個效果,需要兩個自定義View與一個自定義ViewGroup
首先,需要先設計懸浮球View——FloatBall
簡單起見,為FloatBall指定一個預設寬度和高度——150畫素
然後在onDraw(Canvas canvas)
/**
* Created by ZY on 2016/8/10.
* 懸浮球
*/
public class FloatBall extends View {
public int width = 150;
public int height = 150;
//預設顯示的文字
private String text = "50%";
//是否在拖動
private boolean isDrag;
private Paint ballPaint;
private 因為FloatBall是不存在於Activity中而在螢幕單獨顯示的,所以需要用WindowManager來新增View並顯示
新建一個類,命名為ViewManager,用來總的管理View的顯示與刪除
私有化建構函式並採用單例模式
    private static ViewManager manager;

    //私有化建構函式
    private ViewManager(Context context) {
        this.context = context;
        init();
    }

    //獲取ViewManager例項
    public static ViewManager getInstance(Context context) {
        if (manager == null) {
            manager = new ViewManager(context);
        }
        return manager;
    }
ViewManager包含有顯示與隱藏懸浮球與加速球的函式
//顯示浮動小球
    public void showFloatBall() {
        if (floatBallParams == null) {
            floatBallParams = new LayoutParams();
            floatBallParams.width = floatBall.width;
            floatBallParams.height = floatBall.height - getStatusHeight();
            floatBallParams.gravity = Gravity.TOP | Gravity.LEFT;
            floatBallParams.type = LayoutParams.TYPE_TOAST;
            floatBallParams.flags = LayoutParams.FLAG_NOT_FOCUSABLE | LayoutParams.FLAG_NOT_TOUCH_MODAL;
            floatBallParams.format = PixelFormat.RGBA_8888;
        }
        windowManager.addView(floatBall, floatBallParams);
    }

    //顯示底部選單
    private void showFloatMenu() {
        if (floatMenuParams == null) {
            floatMenuParams = new LayoutParams();
            floatMenuParams.width = getScreenWidth();
            floatMenuParams.height = getScreenHeight() - getStatusHeight();
            floatMenuParams.gravity = Gravity.BOTTOM;
            floatMenuParams.type = LayoutParams.TYPE_TOAST;
            floatMenuParams.flags = LayoutParams.FLAG_NOT_FOCUSABLE | LayoutParams.FLAG_NOT_TOUCH_MODAL;
            floatMenuParams.format = PixelFormat.RGBA_8888;
        }
        windowManager.addView(floatMenu, floatMenuParams);
    }

    //隱藏底部選單
    public void hideFloatMenu() {
        if (floatMenu != null) {
            windowManager.removeView(floatMenu);
        }
    }
將懸浮球置於Service中開啟,這樣懸浮球就不那麼容易被系統去除了
在onCreate()方法中呼叫showFloatBall()
public class StartFloatBallService extends Service {

    public StartFloatBallService() {
    }

    @Override
    public IBinder onBind(Intent intent) {
        // TODO: Return the communication channel to the service.
        throw new UnsupportedOperationException("Not yet implemented");
    }

    @Override
    public void onCreate() {
        ViewManager manager = ViewManager.getInstance(this);
        manager.showFloatBall();
        super.onCreate();
    }
}
此時,只要為MainActivity新增一個按鈕,並設定當點選按鈕後開啟Service,此時即可看到螢幕顯示了一個懸浮球
    public void startService(View view) {
        Intent intent = new Intent(this, StartFloatBallService.class);
        startService(intent);
        finish();
    }
不過此時懸浮球還不支援拖動與點選,還需要為其新增OnTouchListener與OnClickListener
View.OnTouchListener touchListener = new View.OnTouchListener() {
            float startX;
            float startY;
            float tempX;
            float tempY;

            @Override
            public boolean onTouch(View v, MotionEvent event) {
                switch (event.getAction()) {
                    case MotionEvent.ACTION_DOWN:
                        startX = event.getRawX();
                        startY = event.getRawY();

                        tempX = event.getRawX();
                        tempY = event.getRawY();
                        break;
                    case MotionEvent.ACTION_MOVE:
                        float x = event.getRawX() - startX;
                        float y = event.getRawY() - startY;
                        //計算偏移量,重新整理檢視
                        floatBallParams.x += x;
                        floatBallParams.y += y;
                        floatBall.setDragState(true);
                        windowManager.updateViewLayout(floatBall, floatBallParams);
                        startX = event.getRawX();
                        startY = event.getRawY();
                        break;
                    case MotionEvent.ACTION_UP:
                        //判斷鬆手時View的橫座標是靠近螢幕哪一側,將View移動到依靠螢幕
                        float endX = event.getRawX();
                        float endY = event.getRawY();
                        if (endX < getScreenWidth() / 2) {
                            endX = 0;
                        } else {
                            endX = getScreenWidth() - floatBall.width;
                        }
                        floatBallParams.x = (int) endX;
                        floatBall.setDragState(false);
                        windowManager.updateViewLayout(floatBall, floatBallParams);
                        //如果初始落點與鬆手落點的座標差值超過6個畫素,則攔截該點選事件
                        //否則繼續傳遞,將事件交給OnClickListener函式處理
                        if (Math.abs(endX - tempX) > 6 && Math.abs(endY - tempY) > 6) {
                            return true;
                        }
                        break;
                }
                return false;
            }
        };
        OnClickListener clickListener = new OnClickListener() {

            @Override
            public void onClick(View v) {
                windowManager.removeView(floatBall);
                showFloatMenu();
                floatMenu.startAnimation();
            }
        };
        floatBall.setOnTouchListener(touchListener);
        floatBall.setOnClickListener(clickListener);
加速球ProgressBall的設計較為複雜,需要用到貝塞爾曲線來呈現波浪效果,且單擊雙擊的效果也需要分開呈現
同樣是讓ProgressBall繼承於View
進度值的意義在於限制水面最終上升到的高度,即根據目標進度值與最大進度值的比例來決定水面高度
波浪總的起伏次數Count用於在單擊加速球時,水面上下波動的次數
    //view的寬度
    private int width = 200;
    //view的高度
    private int height = 200;
    //最大進度值
    private final int maxProgress = 100;
    //當前進度值
    private int currentProgress = 0;
    //目標進度值
    private final int targetProgress = 70;
    //是否為單擊
    private boolean isSingleTop;
    //設定波浪總的起伏次數
    private final int Count = 20;
    //當前起伏次數
    private int currentCount;
    //初始振幅大小
    private final int startAmplitude = 15;
    //波浪週期性出現的次數
    private final int cycleCount = width / (startAmplitude * 4) + 1;
初始化畫筆與監聽函式
private void init() {
        //初始化小球畫筆
        ballPaint = new Paint();
        ballPaint.setAntiAlias(true);
        ballPaint.setColor(Color.argb(0xff, 0x3a, 0x8c, 0x6c));
        //初始化(波浪)進度條畫筆
        progressPaint = new Paint();
        progressPaint.setAntiAlias(true);
        progressPaint.setColor(Color.argb(0xff, 0x4e, 0xc9, 0x63));
        progressPaint.setXfermode(new PorterDuffXfermode(PorterDuff.Mode.SRC_IN));
        //初始化文字畫筆
        textPaint = new Paint();
        textPaint.setAntiAlias(true);
        textPaint.setColor(Color.WHITE);
        textPaint.setTextSize(25);

        handler = new Handler();
        path = new Path();
        bitmap = Bitmap.createBitmap(width, height, Bitmap.Config.ARGB_8888);
        bitmapCanvas = new Canvas(bitmap);

        //手勢監聽
        //重點在於將單擊和雙擊操作分隔開
        SimpleOnGestureListener listener = new SimpleOnGestureListener() {
            //雙擊
            @Override
            public boolean onDoubleTap(MotionEvent e) {
                //當前波浪起伏次數為零,說明“單擊效果”沒有影響到現在
                if (currentCount == 0) {
                    //當前進度為零或者已達到目標進度值,說明“雙擊效果”沒有影響到現在,此時可以允許進行雙擊操作
                    if (currentProgress == 0 || currentProgress == targetProgress) {
                        currentProgress = 0;
                        isSingleTop = false;
                        startDoubleTapAnimation();
                    }
                }
                return super.onDoubleTap(e);
            }

            //單擊
            @Override
            public boolean onSingleTapConfirmed(MotionEvent e) {
                //當前進度值等於目標進度值,且當前波動次數為零,則允許進行單擊操作
                if (currentProgress == targetProgress && currentCount == 0) {
                    isSingleTop = true;
                    startSingleTapAnimation();
                }
                return super.onSingleTapConfirmed(e);
            }
        };
        gestureDetector = new GestureDetector(context, listener);
        setOnTouchListener(new OnTouchListener() {
            @Override
            public boolean onTouch(View v, MotionEvent event) {
                return gestureDetector.onTouchEvent(event);
            }
        });
        //接受點選操作
        setClickable(true);
}單擊或雙擊後的漸變效果是利用Handler的postDelayed(Runnable r, long delayMillis)方法來實現的,可以設定一個延時時間去執行Runnable ,然後在Runnable 中再次呼叫自身
class DoubleTapRunnable implements Runnable {
        @Override
        public void run() {
            if (currentProgress < targetProgress) {
                invalidate();
                handler.postDelayed(doubleTapRunnable, 50);
                currentProgress++;
            } else {
                handler.removeCallbacks(doubleTapRunnable);
            }
        }
    }

    //開啟雙擊動作動畫
    public void startDoubleTapAnimation() {
        handler.postDelayed(doubleTapRunnable, 50);
    }

    class SingleTapRunnable implements Runnable {
        @Override
        public void run() {
            if (currentCount < Count) {
                invalidate();
                currentCount++;
                handler.postDelayed(singleTapRunnable, 100);
            } else {
                handler.removeCallbacks(singleTapRunnable);
                currentCount = 0;
            }
        }
    }

    //開啟單擊動作動畫
    public void startSingleTapAnimation() {
        handler.postDelayed(singleTapRunnable, 100);
    }
onDraw(Canvas canvas)的重點在於根據比例值來計算水面高度
@Override
    protected void onDraw(Canvas canvas) {
        //繪製圓形
        bitmapCanvas.drawCircle(width / 2, height / 2, width / 2, ballPaint);
        path.reset();
        //高度隨當前進度值的變化而變化
        float y = (1 - (float) currentProgress / maxProgress) * height;
        //屬性PorterDuff.Mode.SRC_IN代表了progressPaint只顯示與下層層疊的部分,
        //所以以下四點雖然連起來是個矩形,可呈現出來的依然是圓形
        //右上角
        path.moveTo(width, y);
        //右下角
        path.lineTo(width, height);
        //左下角
        path.lineTo(0, height);
        //左上角
        path.lineTo(0, y);
        //繪製頂部波浪
        if (!isSingleTop) {
            //是雙擊
            //根據當前進度大小調整振幅大小,有逐漸減小的趨勢
            float tempAmplitude = (1 - (float) currentProgress / targetProgress) * startAmplitude;
            for (int i = 0; i < cycleCount; i++) {
                path.rQuadTo(startAmplitude, tempAmplitude, 2 * startAmplitude, 0);
                path.rQuadTo(startAmplitude, -tempAmplitude, 2 * startAmplitude, 0);
            }
        } else {
            //是單擊
            //根據當前次數調整振幅大小,有逐漸減小的趨勢
            float tempAmplitude = (1 - (float) currentCount / Count) * startAmplitude;
            //因為想要形成波浪上下起伏的效果,所以根據currentCount的奇偶性來變化貝塞爾曲線轉折點位置
            if (currentCount % 2 == 0) {
                for (int i = 0; i < cycleCount; i++) {
                    path.rQuadTo(startAmplitude, tempAmplitude, 2 * startAmplitude, 0);
                    path.rQuadTo(startAmplitude, -tempAmplitude, 2 * startAmplitude, 0);
                }
            } else {
                for (int i = 0; i < cycleCount; i++) {
                    path.rQuadTo(startAmplitude, -tempAmplitude, 2 * startAmplitude, 0);
                    path.rQuadTo(startAmplitude, tempAmplitude, 2 * startAmplitude, 0);
                }
            }
        }
        path.close();
        bitmapCanvas.drawPath(path, progressPaint);
        String text = (int) (((float) currentProgress / maxProgress) * 100) + "%";
        float textWidth = textPaint.measureText(text);
        Paint.FontMetrics metrics = textPaint.getFontMetrics();
        float baseLine = height / 2 - (metrics.ascent + metrics.descent);
        bitmapCanvas.drawText(text, width / 2 - textWidth / 2, baseLine, textPaint);
        canvas.drawBitmap(bitmap, 0, 0, null);
    }
因為要呈現ProgressBall時不僅僅是其本身,或者還需要背景色或者文字之類的內容,所以可以將其置於ViewGroup中來顯示
佈局檔案
<?xml version="1.0" encoding="utf-8"?>
<RelativeLayout xmlns:android="http://schemas.android.com/apk/res/android"
    android:layout_width="match_parent"
    android:layout_height="match_parent">

    <LinearLayout
        android:id="@+id/layout"
        android:layout_width="match_parent"
        android:layout_height="wrap_content"
        android:layout_alignParentBottom="true"
        android:background="#556f7f8f"
        android:clickable="true"
        android:gravity="center"
        android:orientation="vertical">

        <TextView
            android:layout_width="wrap_content"
            android:layout_height="wrap_content"
            android:layout_gravity="center"
            android:layout_marginTop="10dp"
            android:gravity="center"
            android:text="葉應是葉\nhttp://blog.csdn.net/new_one_object" />

        <com.czy.floatball.View.ProgressBall
            android:layout_width="wrap_content"
            android:layout_height="wrap_content"
            android:layout_margin="20dp" />

    </LinearLayout>
</RelativeLayout>
FloatMenu就作為容納ProgressBall的容器,併為其賦予從下往上滑動顯示的動畫效果
/**
 * Created by ZY on 2016/8/10.
 * 底部選單欄
 */
public class FloatMenu extends LinearLayout {

    private LinearLayout layout;

    private TranslateAnimation animation;

    public FloatMenu(final Context context) {
        super(context);
        View root = View.inflate(context, R.layout.float_menu, null);
        layout = (LinearLayout) root.findViewById(R.id.layout);
        animation = new TranslateAnimation(Animation.RELATIVE_TO_SELF, 0,
                Animation.RELATIVE_TO_SELF, 0,
                Animation.RELATIVE_TO_SELF, 1.0f,
                Animation.RELATIVE_TO_SELF, 0);
        animation.setDuration(500);
        animation.setFillAfter(true);
        layout.setAnimation(animation);
        root.setOnTouchListener(new OnTouchListener() {
            @Override
            public boolean onTouch(View v, MotionEvent event) {
                ViewManager manager = ViewManager.getInstance(context);
                manager.showFloatBall();
                manager.hideFloatMenu();
                return false;
            }
        });
        addView(root);
    }

    public void startAnimation() {
        animation.start();
    }
}

