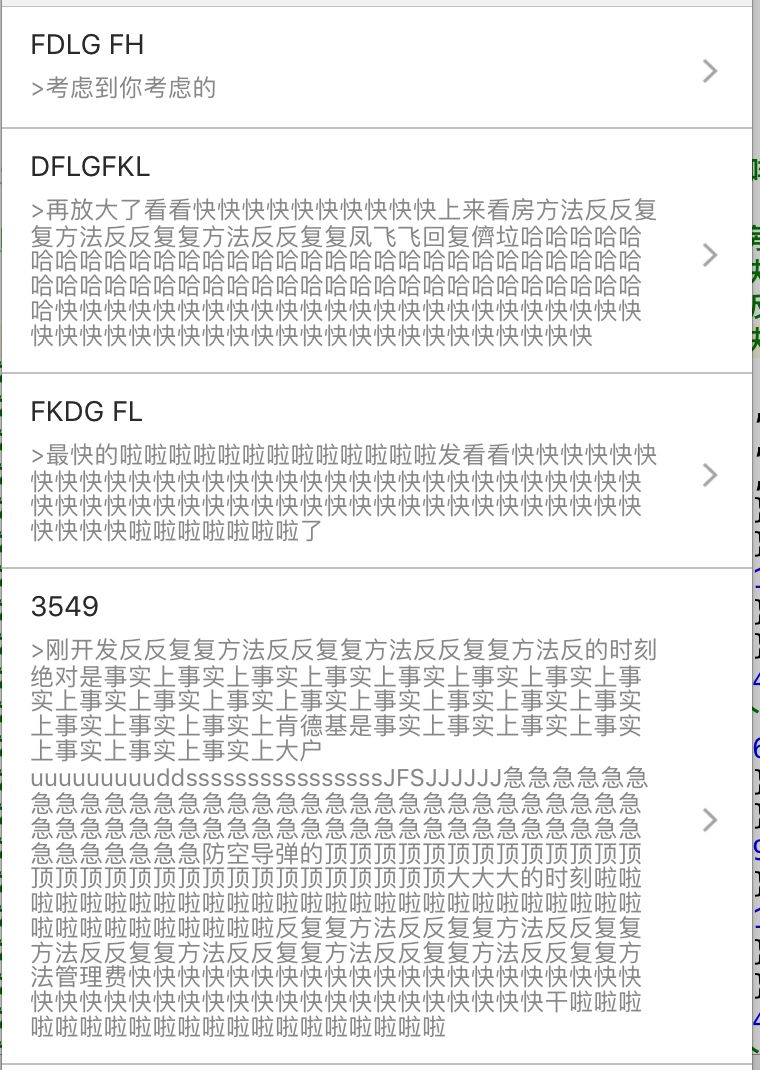
react native 實現動態高度Listview 和圖文混排
當考慮這個動態高度和圖文混排的問題,想必你已經知道如何載入ListView和分組listview,這裡不再贅述...
這裡簡介實現的動態的高度的cell的思路
- 寫一個ListView,準好資料來源
- 在renderRow中渲染自定義的item
- 在item 中佈局text 和image
- 在text 中實現
onLayout={this._onTextLayout.bind(this)}
5._onTextLayout 獲得文字的高度,根據這個高度改變用ref標記的相關元件,包括text,image等等
export default class Item extends Component{
_onTextLayout(event){
let descHeight= event.nativeEvent.layout.height;
totalHeight=descHeight+30>60?descHeight+45:60
this.refs.item.setNativeProps({
style:{
width:Dimensions.get('window').width,
height:totalHeight,
backgroundColor:"white"
}
});
this.refs.nextIcon.setNativeProps({
style:{
width:28,
height:28,
position:'absolute',
left:Dimensions.get('window').width-35,
top:totalHeight/2-12,
resizeMode:Image.resizeMode.contain
}
});
}
render(){
var row =this.props.row;
return(
<TouchableOpacity style={[styles.direction]} {...this.props}>
<View ref="item" style={styles.item}>
<Text style={styles.title} >{row.title}</Text>
<Text style={styles.detailTitle} onLayout={this._onTextLayout.bind(this)} >>{row.detail}</Text>
<Image ref="nextIcon" source={require('../../image/ 
相關推薦
react native 實現動態高度Listview 和圖文混排
當考慮這個動態高度和圖文混排的問題,想必你已經知道如何載入ListView和分組listview,這裡不再贅述... 這裡簡介實現的動態的高度的cell的思路 寫一個ListView,準好資料來源在renderRow中渲染自定義的item在item 中佈局text 和ima
React Native學習筆記之--ListView和RefreshControl實現下拉重新整理
React Native學習筆記之–ListView和RefreshControl實現下拉重新整理 今天利用React Native中的ListView來實現原生開發中的UITableView(Android中就叫ListView)的介面效果。 資料數利用Ch
react native獲取螢幕的寬度和高度
var Dimensions = require('Dimensions'); var {width,height} = Dimensions.get("window");//第一種寫法 var width1 = Dimensions.get('window').width//第二種寫法 expor
React Native 結合ScrollableTab、RefreshControl和FlatList實現新聞分類列表
正好剛開始學RN,熟悉一下控制元件和基本使用。 涉及的知識點: 1、fetch網路請求,get 拼接引數,解析json。 2、ScrollableTabView、ScrollableTabBar 分類佈局。 3、FlatList 資料列表。 4、Navigation
react native 實現ListView的區域性更新
在ReactNative中UI的重新整理大多數情況依賴於state的變更,通過呼叫元件的setState方法來更新state以達到通知元件重新渲染UI的目的。當然這種做法是官方提供的標準解決方案,在進行簡單UI設計時足以滿足大多數需求。 但是當遇到結構複雜並存在資料互動的介面設計時,手動管理state這種
React-Native實現登入頁面,並顯示和清除使用者的輸入
/** * Sample React Native App * https://github.com/facebook/react-native * ES6實現程式碼 */ import Re
React-Native新列表元件FlatList和SectionList學習 | | 聯動列表實現
React-Native在0.43推出了兩款新的列表元件:FlatList(高效能的簡單列表元件)和SectionList(高效能的分組列表元件). http://www.cnblogs.com/shaoting/p/7069312.html 從官方上它們都支援常用
(八)React Native實現呼叫android原生java方法並實現廣播的傳送和接受
接觸到混合應用開發提議後,首先想到了之前學的ionic,其次便是這兩年火遍全球的RN,由於ionic框架用的angular.js,而且angular1和angular2寫法區別很大,angular2對於初學者還是比較好接受的,但是angular1寫的很亂,程式碼
React-Native 獲取元件的寬度和高度
react-native 獲取元件的尺寸有兩種方式 第一種方式使用元素自身的onLayout屬性去獲取,但是這種方式有一個侷限性,就是隻有在初次渲染的時候才會觸發這個函式,而且此種方法獲取的是元件相對於父元件的位置座標。如果我們需要隨時都可以去獲取元件的尺寸或者相對於螢幕的
react native實現隱藏和顯示
1.目的:在APP開發中實現隱藏和顯示功能。如點選某一列表,顯示其列表下的內容 2.實現思路:通過對this.state顯示初始狀態的判斷和三目比較來實現影藏和顯示 3.程式碼實現 大家如果有其他的好方法可以貼出來一起交流學習(RN新手,
Android 動態設定 ListView 和 GridView 高度
1 需求分析 我們可能會有這樣的需求,ListView添加了一個頭部,然後頭部裡面有一個ListView或者GridView,當你按照正常的方式給頭部的ListView或者GridView設定資料的時候,發現它只能顯示一行!!!這可不是我想要的。 那麼怎
React Native 基礎篇 之 ListView 產品列表實現
1.為了測試用的是本地圖片,首先圖片資源整合到專案中。 這裡是android適配的專案 將圖片資源放置在下面 通過json 方式訪問 專案名稱\android\app\src\main\res\drawable 檔案 NewWine.json { "data":[
react native獲取鍵盤高度
elf ide com nat reac mat height one rem componentWillUnmount() { this.keyboardDidShowListener.remove(); this.keyboardDidHideListene
React-Native組件之ListView
ListView在使用dataSource時,我們需要先new一個dataSource對象 constructor(){ super(); this.state = { movies:new ListView.DataSource({
基於React Native實現的介面載入元件react-native-loadview
react-native-loadview 基於React Native實現的介面載入元件, Installation npm install react-native-loadview --save Import into your project import
react-native-vector-icons的安裝和使用
react-native-vector-icons是一個React Native 專案使用最廣泛的向量圖示圖示庫,使用簡單,內容豐富。 react-native-vector-icons官網 react-native-vector-icons圖示展示列表 使用react-native-vector-icon
React Native實現再按一次退出應用程式功能
解決點選兩次手機back鍵退出程式 程式碼及註釋如下: //雙擊返回鍵退出程式
react-native實現多張圖片上傳
最近在搞這個圖片上傳功能,,剛開始的時候iOS用的是 react-native-image-crop-picker這個外掛,,iOS那邊完美執行沒有毛病,,,但是到android這邊之後就開始報各種資源
react-native-swiper設定高度的方法(設定rn輪播圖所佔高度)
效果圖: 直接上解決方案: 1、在Swiper標籤外套一層View <View style={styles.container}> <Sw
實現動態修改ListView中某個Item裡的元件值
1.理解ListView及GridView檢視複用的機制Adapter+靜態ViewHolder的方式可以參照 http://www.myandroidsolutions.com/2012/07/19/android-listview-with-viewholder-tut
