
springboot 企業應用框架搭建
- 建maven應用(不需要web應用)
- 在pom中新增以下配置
<!-- Spring boot 父引用-->
<parent>
<groupId>org.springframework.boot</groupId>
<artifactId>spring-boot-starter-parent</artifactId>
<version>1.4.0.RELEASE</version>
</parent>
<!-- Spring boot 核心web--> - 新建controller
@Controller
@EnableAutoConfiguration
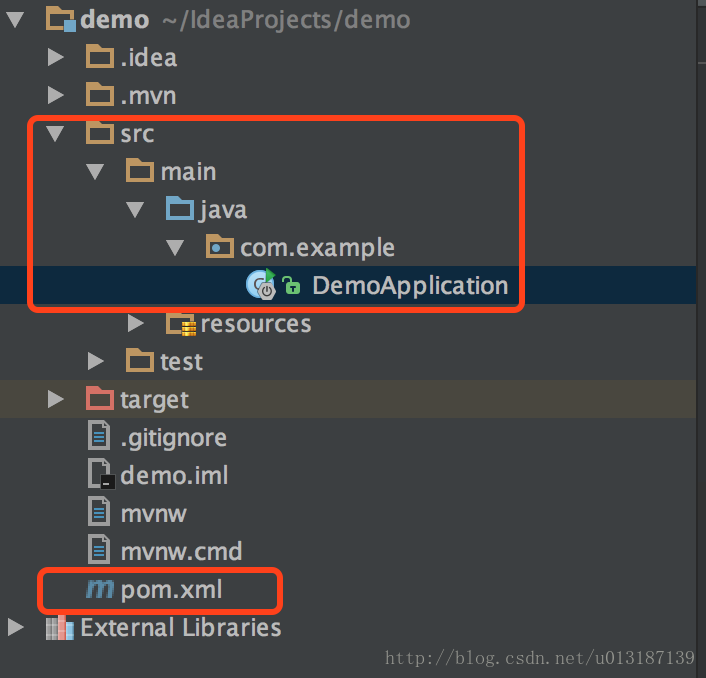
public class 此時的專案目錄結構是這樣的
- 啟動main函式,可以看到控制檯輸出,非常簡單明瞭
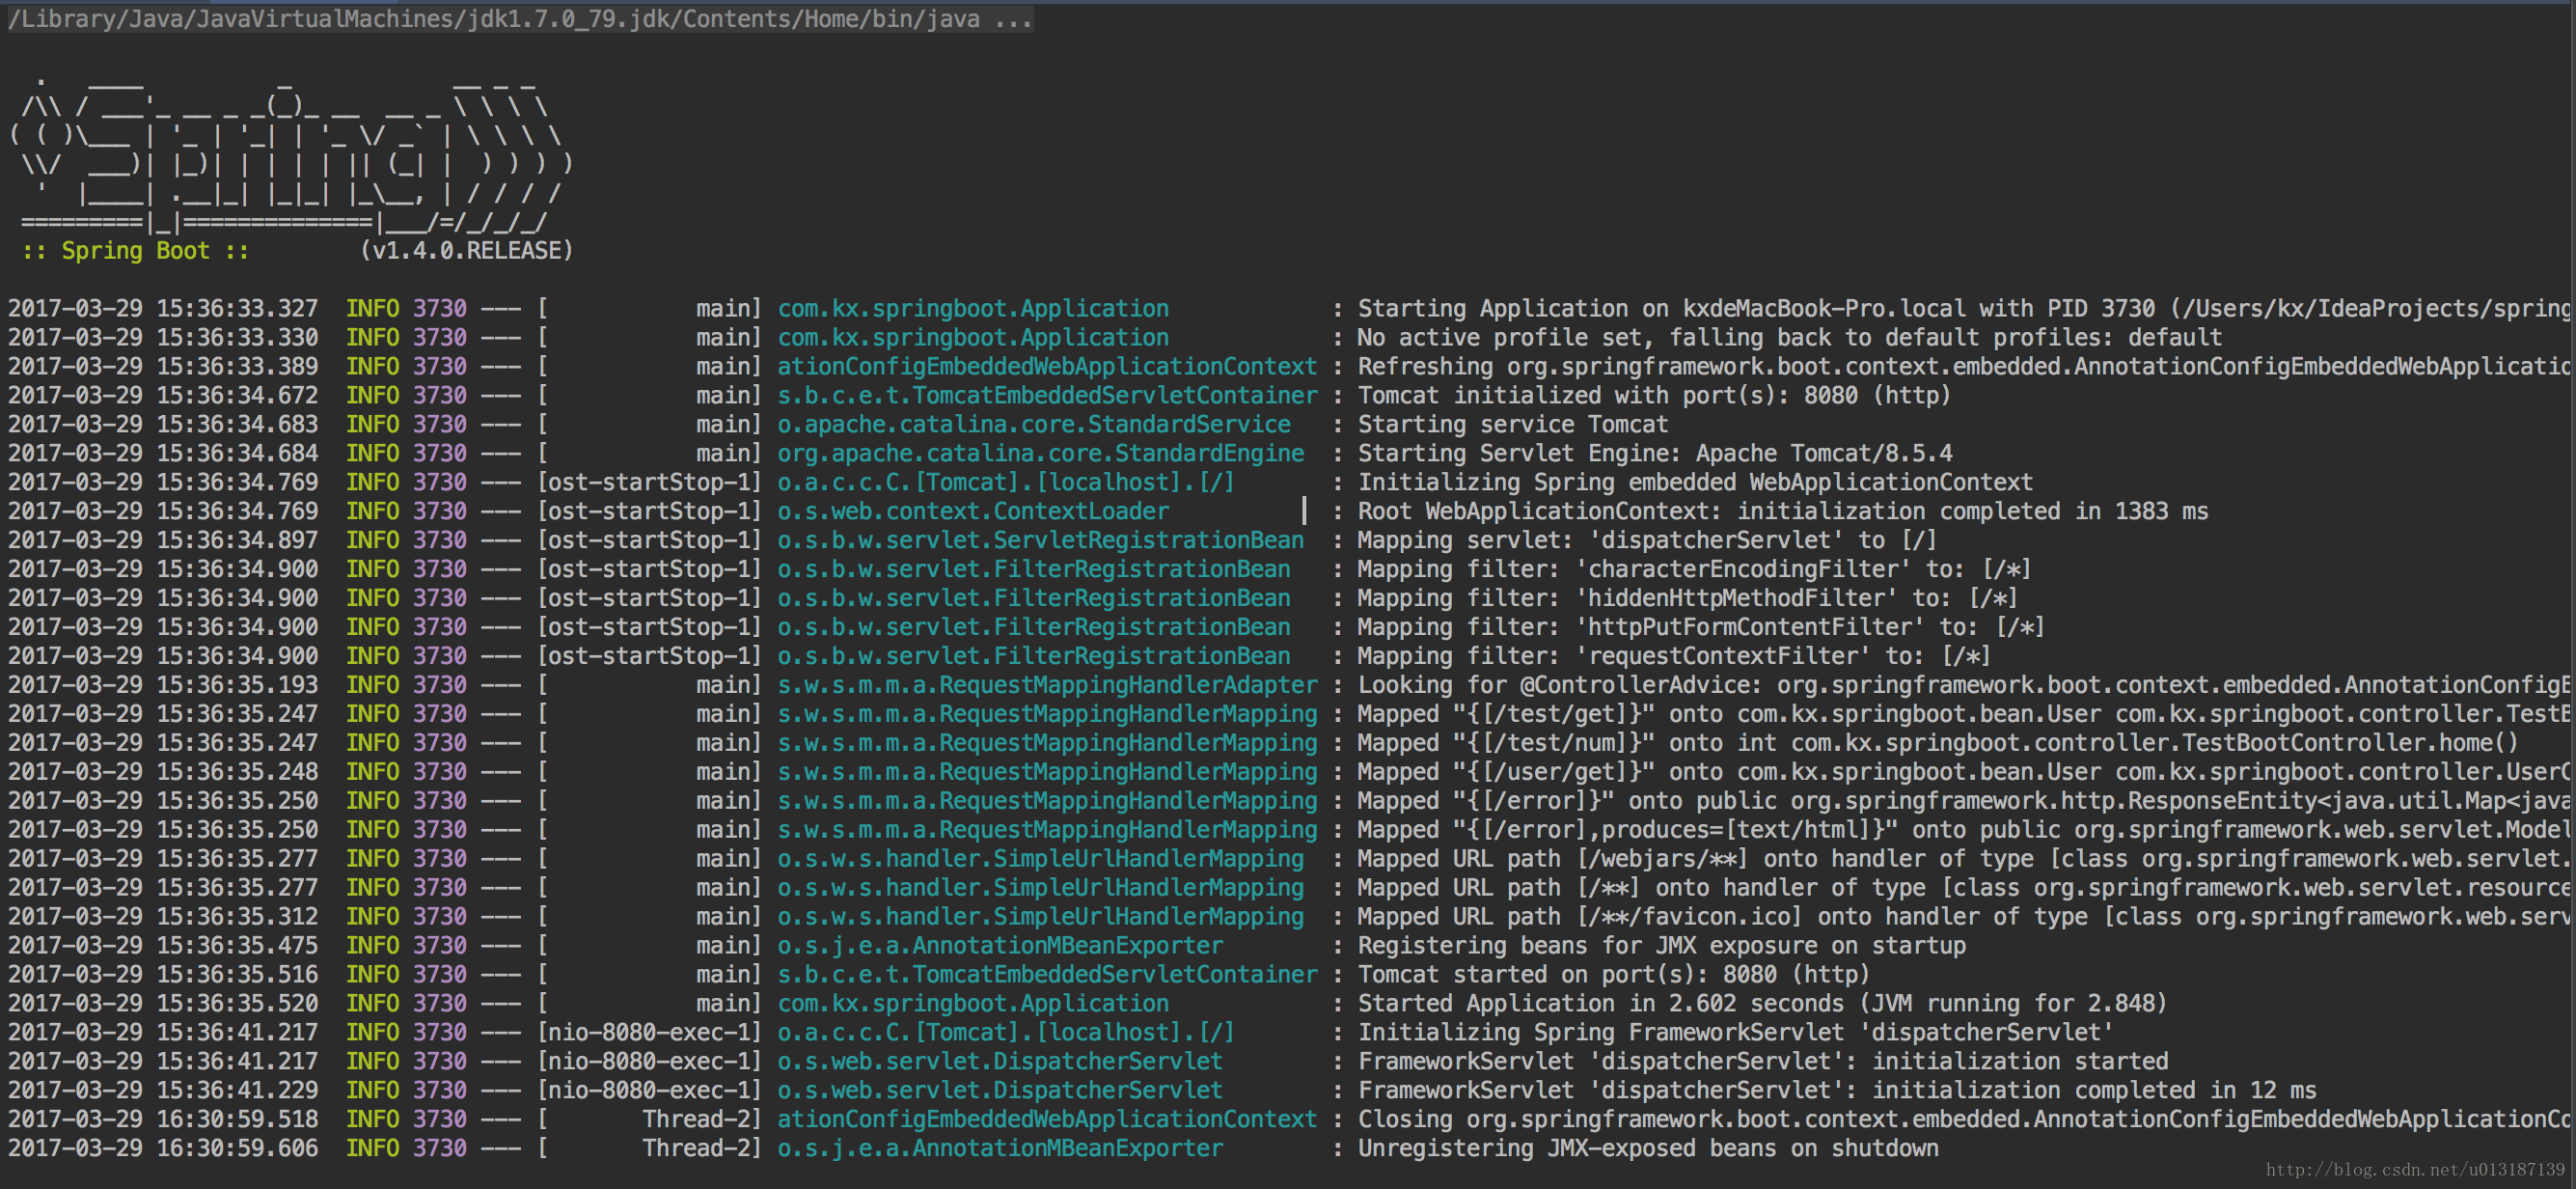
埠預設是8080,啟動log已經寫了,訪問後如圖所示
在搭建了基礎應用的基礎上,想增加service層抽離控制層和業務層程式碼

//業務層介面
public interface TestInterFace {

    public int testInterFace();

    public User testUser();
}

//業務層介面實現
@Service
public class TestInterFaceImpl implements TestInterFace {
    @Override public int testInterFace() {
    return 0;
    }

    @Override public User testUser() {
    return new User();
    }
}
修改controller層程式碼
@Controller
@EnableAutoConfiguration
public class TestBootController {
    @Autowired
    private TestInterFace testInterFace;

    @RequestMapping("/num")
    @ResponseBody
    int home() {
    int i = testInterFace.testInterFace();
    return i;
    }
    @RequestMapping("/get")
    @ResponseBody User getUser() {
    return testInterFace.testUser();
    }

    public static void main(String[] args) throws Exception {
    SpringApplication.run(TestBootController.class, args);
    }

}
啟動後拋異常
org.springframework.beans.factory.UnsatisfiedDependencyException: Error creating bean with name ‘testBootController’: Unsatisfied dependency expressed through field ‘testInterFace’: No qualifying bean of type [com.kx.springboot.service.TestInterFace] found for dependency [com.kx.springboot.service.TestInterFace]: expected at least 1 bean which qualifies as autowire candidate for this dependency. Dependency annotations: {@org.springframework.beans.factory.annotation.Autowired(required=true)}; nested exception is org.springframework.beans.factory.NoSuchBeanDefinitionException: No qualifying bean of type [com.kx.springboot.service.TestInterFace] found for dependency [com.kx.springboot.service.TestInterFace]: expected at least 1 bean which qualifies as autowire candidate for this dependency. Dependency annotations: {@org.springframework.beans.factory.annotation.Autowired(required=true)}
相信大家對這種異常非常常見,注入失敗,這時候問題來了,按照傳統的方式,對注入進行檢查。service層已經加了@service的註解,怎麼還是注入失敗了呢,想檢視配置檔案,發現springboot沒有配置檔案,那麼他是怎麼掃描註解的呢?
百度了一下才知道,springboot預設按照包順序注入,所以在建立controller時service還沒有注入,springboot不需要傳統的xml配置掃描包,只需要添加註解@ComponentScan(basePackages={“com.kx.springboot.service”}),程式碼如下
@Controller
@EnableAutoConfiguration
@ComponentScan(basePackages={"com.kx.springboot.service"})//新增的註解
public class TestBootController {
    @Autowired
    private TestInterFace testInterFace;

    @RequestMapping("/num")
    @ResponseBody
    int home() {
    int i = testInterFace.testInterFace();
    return i;
    }
    @RequestMapping("/get")
    @ResponseBody User getUser() {
    return testInterFace.testUser();
    }

    public static void main(String[] args) throws Exception {
    SpringApplication.run(TestBootController.class, args);
    }

}
{“username”:”username寇鑫123”,”password”:”password寇鑫123”}
- 這時候,又有一個問題,web應用都是多controller,這種啟動方式一次只能啟動一個controller,那麼,怎麼才能啟動應用後訪問多個controller,查閱springboot官方教程後,修改程式碼如下
增加 UserController
@Controller
@RequestMapping("user")
public class UserController {
    @Autowired
    private TestInterFace testInterFace;

    @RequestMapping("/get")
    @ResponseBody User getUser() {
    return testInterFace.testUser();
    }
}
修改原來 TestBootController
@Controller
@RequestMapping("test")
public class TestBootController {
    @Autowired
    private TestInterFace testInterFace;

    @RequestMapping("/num")
    @ResponseBody
    int home() {
    int i = testInterFace.testInterFace();
    return i;
    }

    @RequestMapping("/get")
    @ResponseBody User getUser() {
    return testInterFace.testUser();
    }
}
在包的最外層增加新的應用啟動入口 —> Application
@EnableAutoConfiguration
@ComponentScan(basePackages={"com.kx.springboot"})
public class Application {
public static void main(String[] args) throws Exception {
SpringApplication.run(Application.class, args);
}
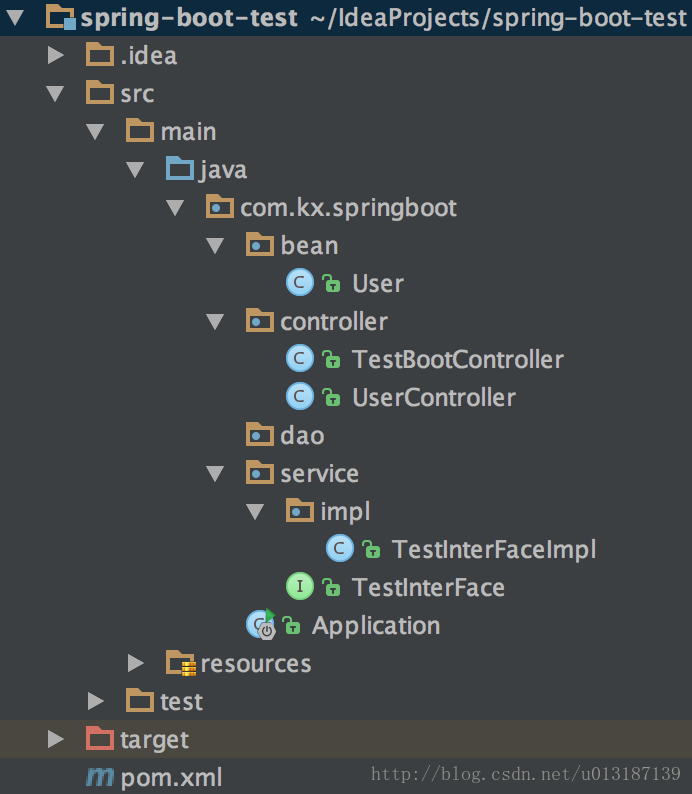
}可以看到,應用啟動入口配置了掃描所有包。此時整個專案的結構如圖所示
- 啟動應用後訪問
{“username”:”username寇鑫123”,”password”:”password寇鑫123”}
{“username”:”username寇鑫123”,”password”:”password寇鑫123”}
到此,符合處理http/json 的web框架已經搭建ok了
============2017-3-30 =============
第一步處理http/json已經完成了,現在給我們的框架里加上日誌記錄的功能
要求:
- 日誌按天記錄,自動生成當天的記錄檔案
- 日誌分級儲存(info,error)
Springboot自帶日誌,所以我們現在直接在SpringBoot中新增日誌
修改 TestController
@Controller
@RequestMapping("test")
public class TestBootController {
//增加日誌
private final Logger log = LoggerFactory.getLogger(TestBootController.class);
@Autowired
private TestInterFace testInterFace;
@RequestMapping("/num")
@ResponseBody
int home() {
int i = testInterFace.testInterFace();
return i;
}
@RequestMapping("/get")
@ResponseBody User getUser() {
//列印日誌
log.info("TestBootController getUser info");
return testInterFace.testUser();
}
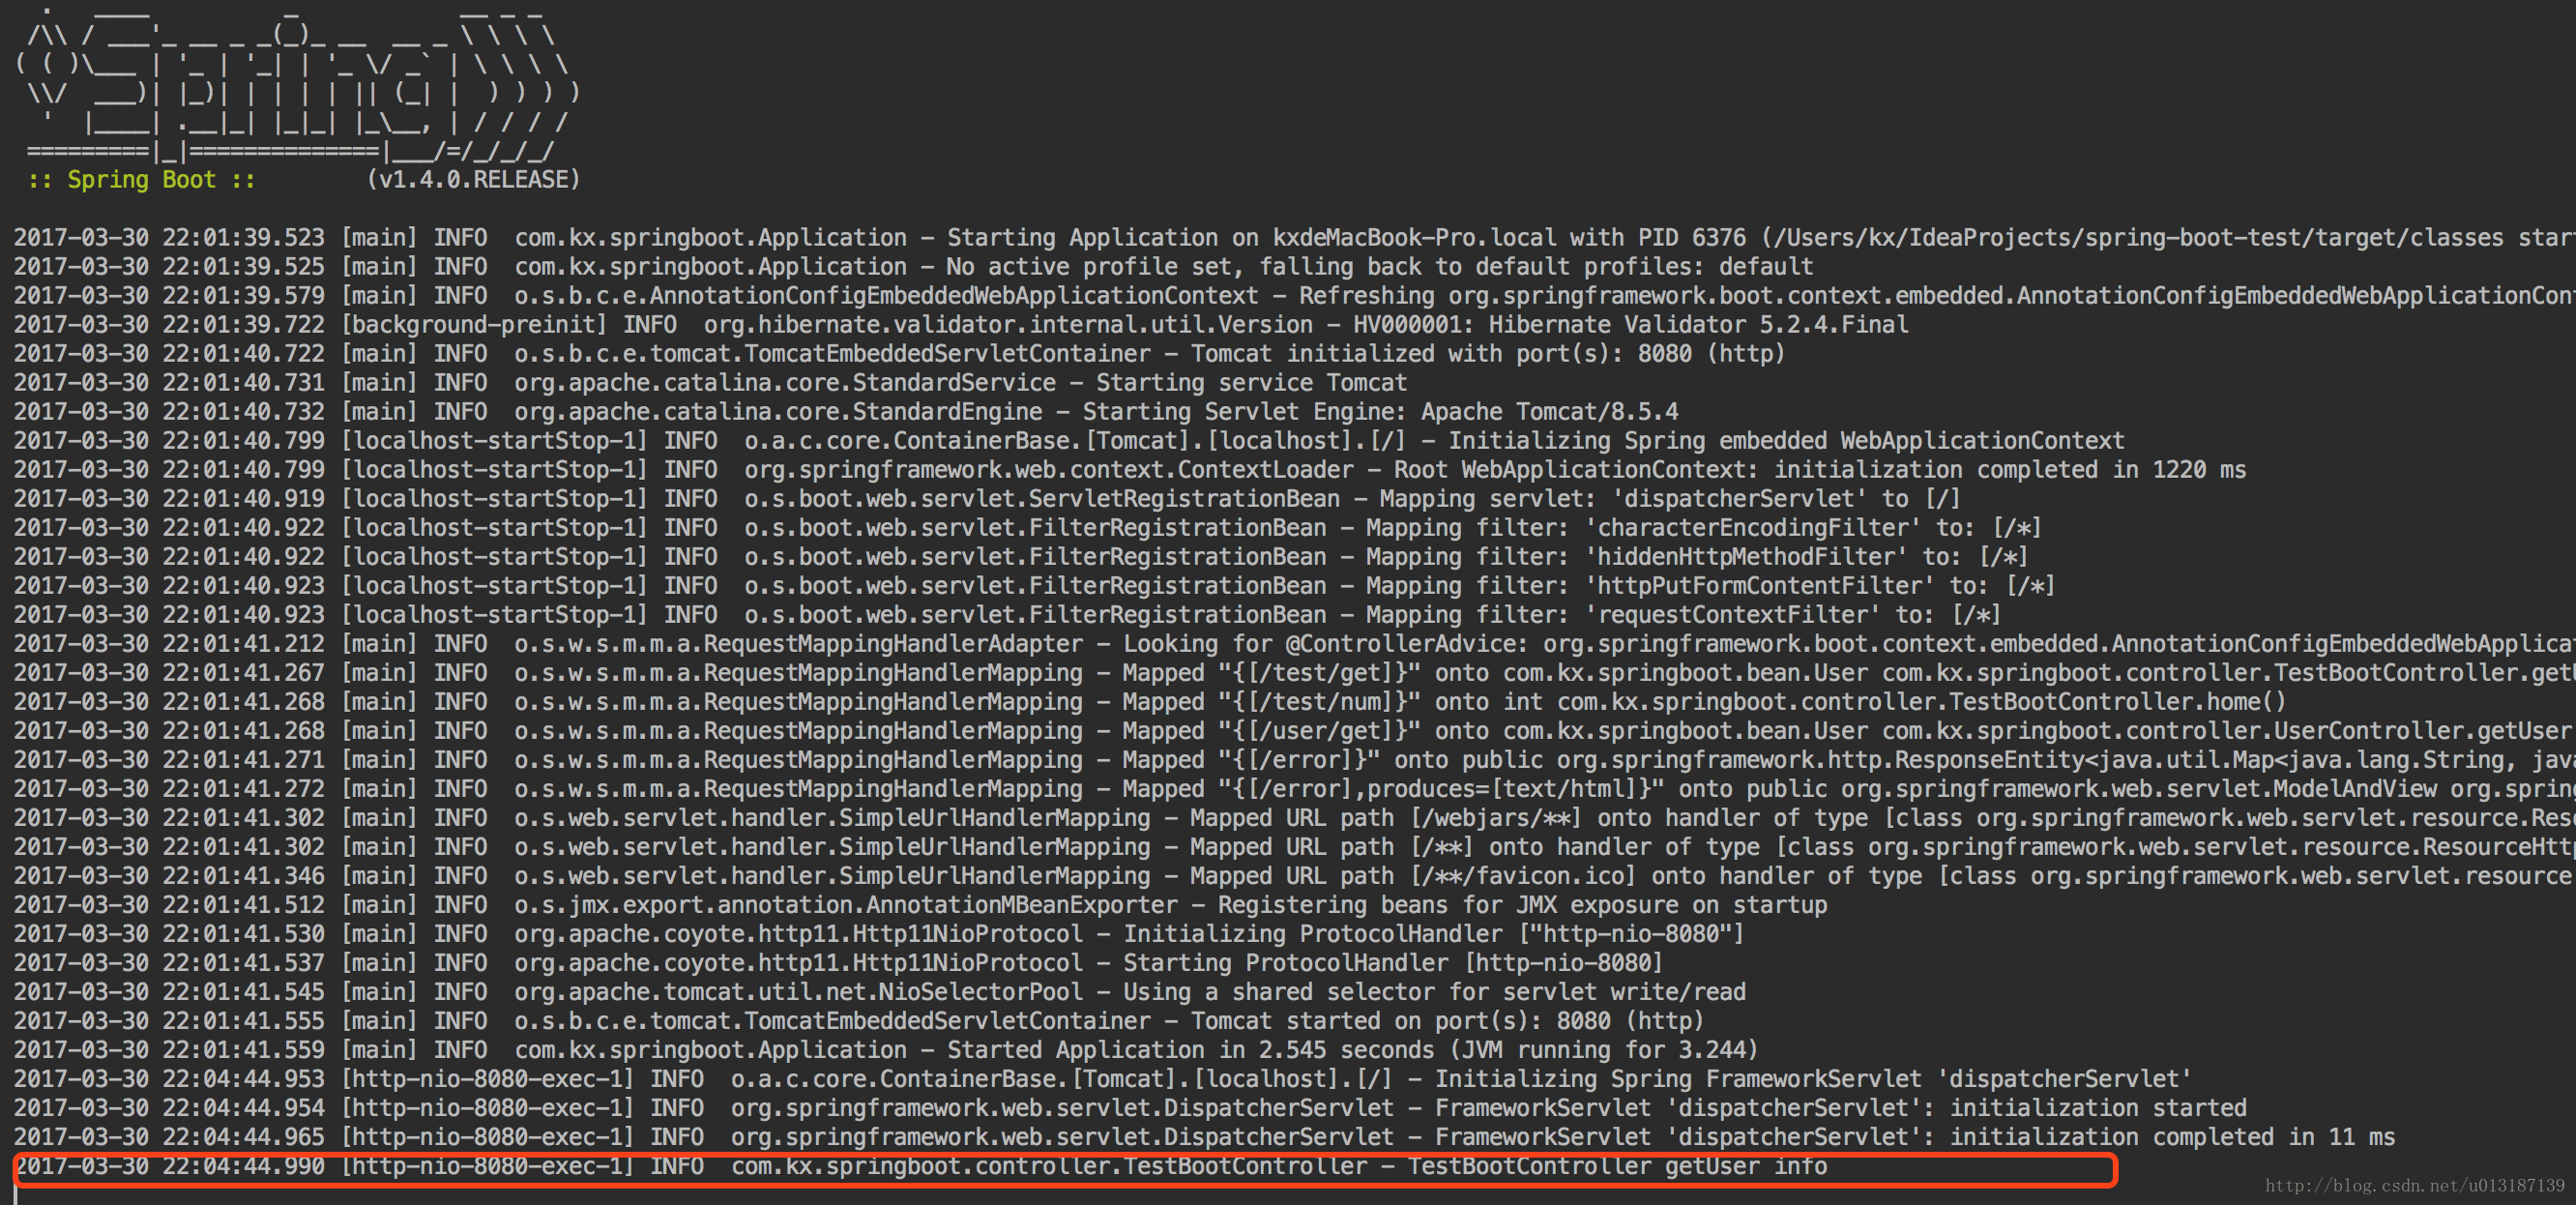
}只增加了兩行程式碼,現在啟動嘗試列印日誌
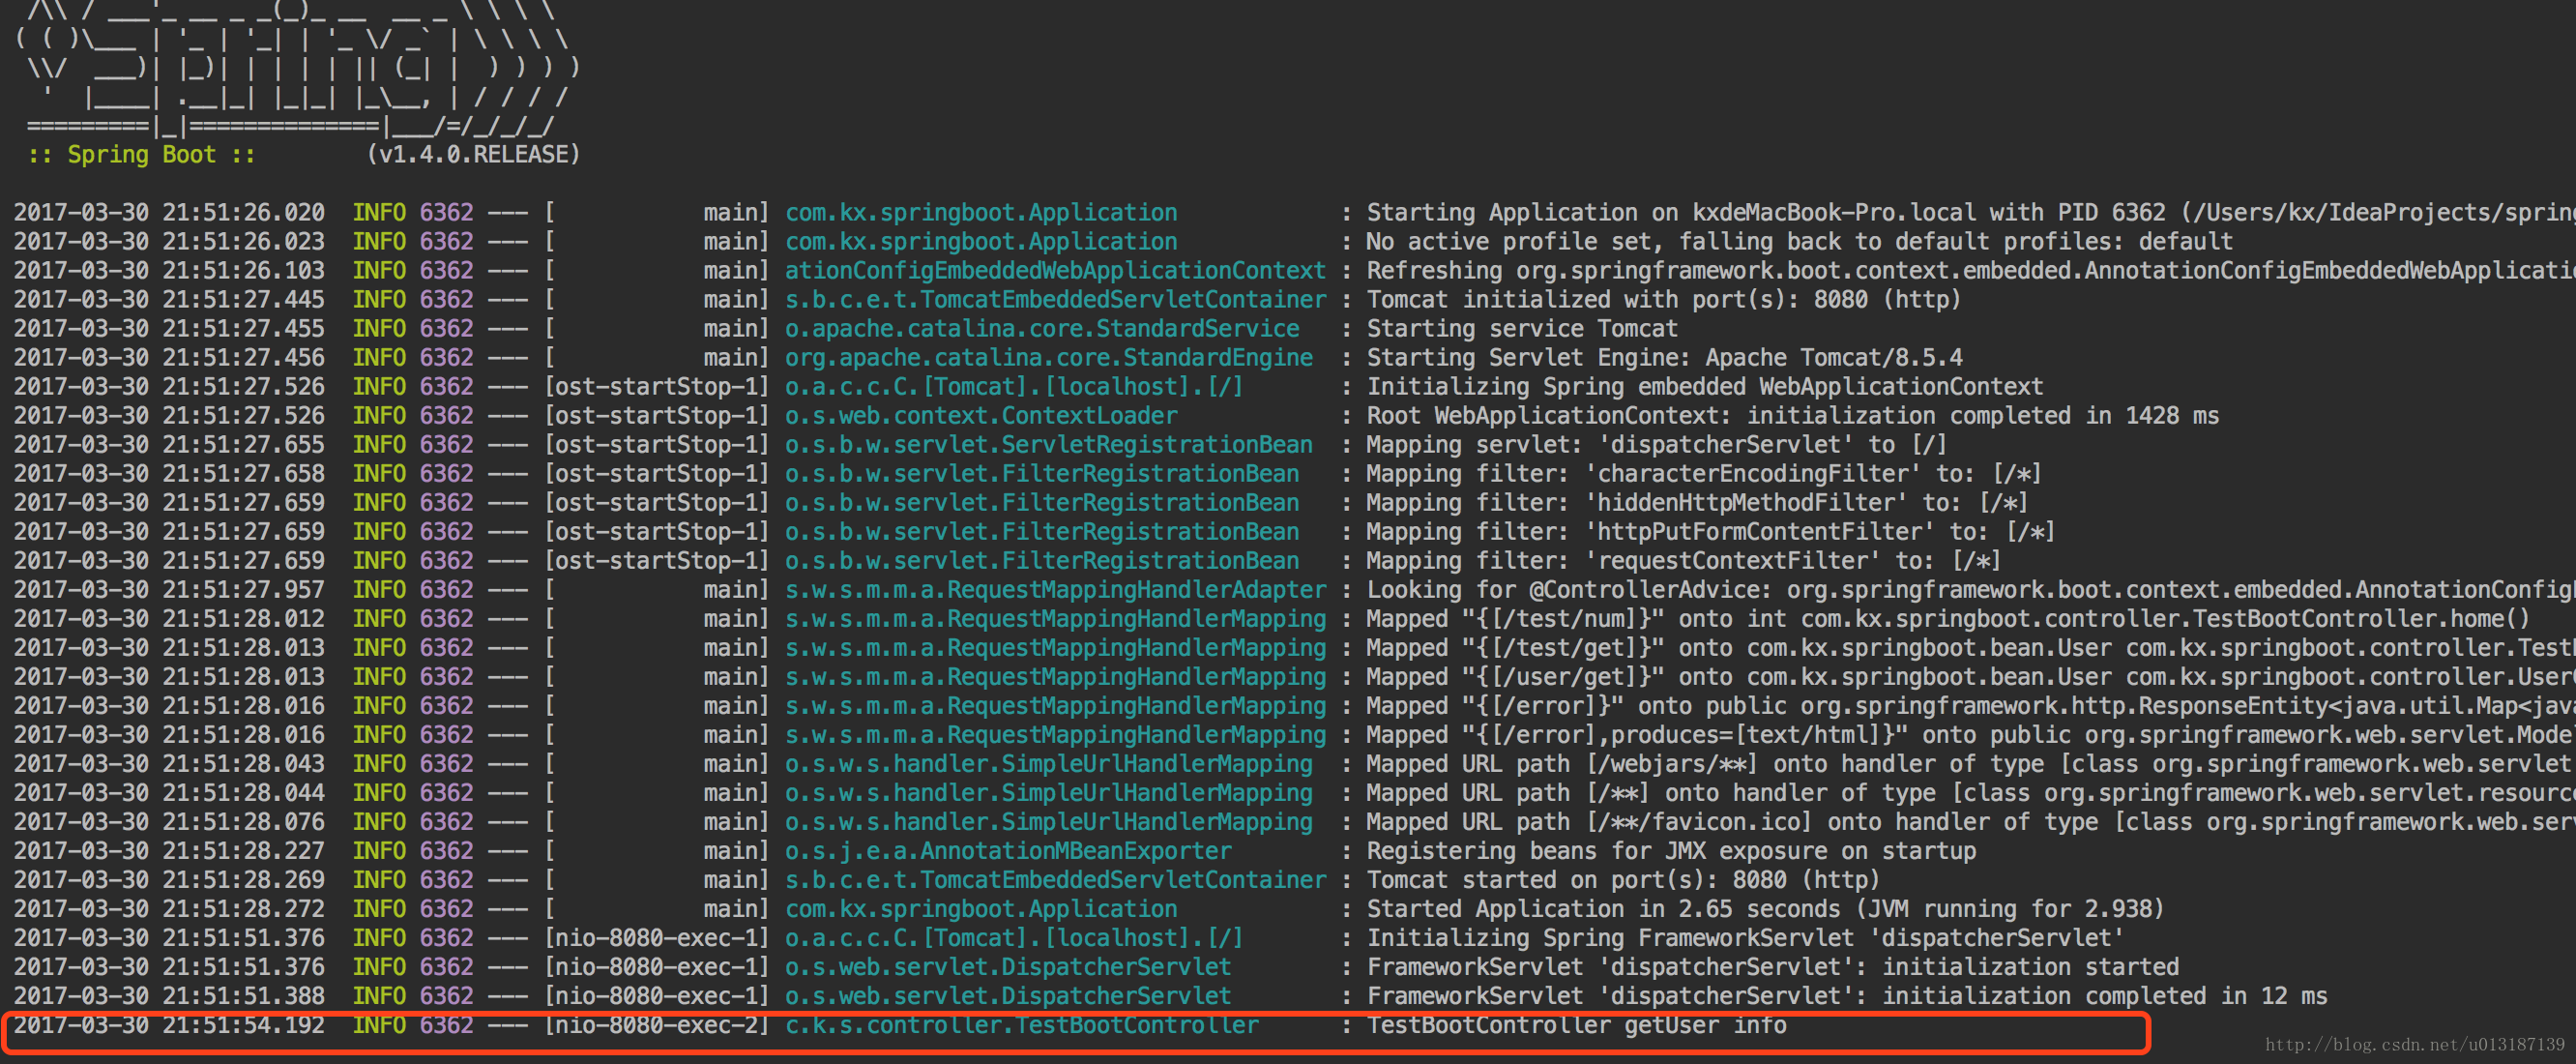
可以看到我們的日誌已經打出來了,那麼現在又有疑問了,這個日誌只是打在控制檯了,並沒有生成檔案,查詢後發現預設日誌如果要列印生成檔案需要新增application.properties,而新增這個只可以打固定名稱格式的日誌,並不能靈活的配置,所以新增Springboot預設支援的logback作為標準日誌輸出
新增新的pom依賴
 <dependency>
            <groupId>org.springframework.boot</groupId>
            <artifactId>spring-boot-starter-logging</artifactId>
</dependency>
在resource下新增logback配置檔案logback.xml
首先配置按天生成日誌,嘗試日誌檔案列印輸出
<?xml version="1.0" encoding="UTF-8"?>

<configuration debug="false">
    <!--定義日誌檔案的儲存地址 勿在 LogBack 的配置中使用相對路徑-->
    <property name="LOG_HOME" value="E:\\LOGS" />
    <!-- 控制檯輸出 -->
    <appender name="STDOUT" class="ch.qos.logback.core.ConsoleAppender">
        <encoder class="ch.qos.logback.classic.encoder.PatternLayoutEncoder">
            <!--格式化輸出:%d表示日期,%thread表示執行緒名,%-5level:級別從左顯示5個字元寬度%msg:日誌訊息,%n是換行符-->
            <pattern>%d{yyyy-MM-dd HH:mm:ss.SSS} [%thread] %-5level %logger{50} - %msg%n</pattern>
        </encoder>
    </appender>
    <!-- 按照每天生成日誌檔案 -->
    <appender name="FILE"  class="ch.qos.logback.core.rolling.RollingFileAppender">
        <rollingPolicy class="ch.qos.logback.core.rolling.TimeBasedRollingPolicy">
            <!--日誌檔案輸出的檔名-->
            <FileNamePattern>${LOG_HOME}/TestSpringBoot.log.%d{yyyy-MM-dd}.log</FileNamePattern>
            <!--日誌檔案保留天數-->
            <MaxHistory>30</MaxHistory>
        </rollingPolicy>
        <encoder class="ch.qos.logback.classic.encoder.PatternLayoutEncoder">
            <!--格式化輸出:%d表示日期,%thread表示執行緒名,%-5level:級別從左顯示5個字元寬度%msg:日誌訊息,%n是換行符-->
            <pattern>%d{yyyy-MM-dd HH:mm:ss.SSS} [%thread] %-5level %logger{50} - %msg%n</pattern>
        </encoder>
        <!--日誌檔案最大的大小-->
        <triggeringPolicy class="ch.qos.logback.core.rolling.SizeBasedTriggeringPolicy">
            <MaxFileSize>10MB</MaxFileSize>
        </triggeringPolicy>
    </appender>

    <!-- 日誌輸出級別 -->
    <root level="INFO">
        <appender-ref ref="STDOUT" />
        <appender-ref ref="FILE" />
    </root>
</configuration>
啟動應用,嘗試輸出日誌
好吧,首先發現我們的日誌不是彩色的了,哭~,不過還好日誌打出來了,那麼看看我們的檔案有沒有生成
//生成檔案
-rw-r--r--  1 kx  staff   5117  3 30 22:19 TestSpringBoot.log.2017-03-30.log

//info 日誌列印效果
2017-03-30 22:21:03.341 [http-nio-8080-exec-3] INFO  com.kx.springboot.controller.TestBootController - TestBootController getUser info
OK,檔案也完美的按照我們指定的路徑生成了,並且檔案命名方式按照配置的日期命名,日誌列印的內容也按照配置的內容正確的列印了,現在配置info日誌和error日誌,區分info和error打出來的日誌檔案
修改 logback.log 增加新的error appender 修改原來的appender 為 info
<?xml version="1.0" encoding="UTF-8"?>
<!--
    Copyright 2010-2011 The myBatis Team
    Licensed under the Apache License, Version 2.0 (the "License");
    you may not use this file except in compliance with the License.
    You may obtain a copy of the License at
        http://www.apache.org/licenses/LICENSE-2.0
    Unless required by applicable law or agreed to in writing, software
    distributed under the License is distributed on an "AS IS" BASIS,
    WITHOUT WARRANTIES OR CONDITIONS OF ANY KIND, either express or implied.
    See the License for the specific language governing permissions and
    limitations under the License.
-->
<configuration debug="false">
    <!--定義日誌檔案的儲存地址 勿在 LogBack 的配置中使用相對路徑-->
    <property name="LOG_HOME" value="E:\\LOGS" />
    <!-- 控制檯輸出 -->
    <appender name="STDOUT" class="ch.qos.logback.core.ConsoleAppender">
        <encoder class="ch.qos.logback.classic.encoder.PatternLayoutEncoder">
            <!--格式化輸出:%d表示日期,%thread表示執行緒名,%-5level:級別從左顯示5個字元寬度%msg:日誌訊息,%n是換行符-->
            <pattern>%d{yyyy-MM-dd HH:mm:ss.SSS} [%thread] %-5level %logger{50} - %msg%n</pattern>
        </encoder>
    </appender>

    <!--修改原來的 appender 為info-->
    <!-- 按照每天生成日誌檔案 -->
    <appender name="DAYINFO"  class="ch.qos.logback.core.rolling.RollingFileAppender">
        <rollingPolicy class="ch.qos.logback.core.rolling.TimeBasedRollingPolicy">
            <!--日誌檔案輸出的檔名-->
            <FileNamePattern>${LOG_HOME}/TestSpringBoot_info.log.%d{yyyy-MM-dd}.log</FileNamePattern>
            <!--日誌檔案保留天數-->
            <MaxHistory>30</MaxHistory>
        </rollingPolicy>
        <!--這裡設定日誌級別為info-->
        <filter class="ch.qos.logback.classic.filter.LevelFilter">
            <level>error</level>
            <onMatch>ACCEPT</onMatch>
            <onMismatch>DENY</onMismatch>
        </filter>
        <encoder class="ch.qos.logback.classic.encoder.PatternLayoutEncoder">
            <!--格式化輸出:%d表示日期,%thread表示執行緒名,%-5level:級別從左顯示5個字元寬度%msg:日誌訊息,%n是換行符-->
            <pattern>%d{yyyy-MM-dd HH:mm:ss.SSS} [%thread] %-5level %logger{50} - %msg%n</pattern>
        </encoder>
        <!--日誌檔案最大的大小-->
        <triggeringPolicy class="ch.qos.logback.core.rolling.SizeBasedTriggeringPolicy">
            <MaxFileSize>10MB</MaxFileSize>
        </triggeringPolicy>
    </appender>

    <!--新增加的error appender-->
    <appender name="DAYERROR"  class="ch.qos.logback.core.rolling.RollingFileAppender">
        <rollingPolicy class="ch.qos.logback.core.rolling.TimeBasedRollingPolicy">
            <!--日誌檔案輸出的檔名-->
            <FileNamePattern>${LOG_HOME}/TestSpringBoot_error.log.%d{yyyy-MM-dd}.log</FileNamePattern>
            <!--日誌檔案保留天數-->
            <MaxHistory>30</MaxHistory>
        </rollingPolicy>
         <!--這裡設定日誌級別為error-->
        <filter class="ch.qos.logback.classic.filter.LevelFilter">
            <level>error</level>
            <onMatch>ACCEPT</onMatch>
            <onMismatch>DENY</onMismatch>
        </filter>
        <encoder class="ch.qos.logback.classic.encoder.PatternLayoutEncoder">
            <!--格式化輸出:%d表示日期,%thread表示執行緒名,%-5level:級別從左顯示5個字元寬度%msg:日誌訊息,%n是換行符-->
            <pattern>%d{yyyy-MM-dd HH:mm:ss.SSS} [%thread] %-5level %logger{50} - %msg%n</pattern>
        </encoder>
        <!--日誌檔案最大的大小-->
        <triggeringPolicy class="ch.qos.logback.core.rolling.SizeBasedTriggeringPolicy">
            <MaxFileSize>10MB</MaxFileSize>
        </triggeringPolicy>
    </appender>

    <!-- 日誌輸出級別 -->
    <root level="INFO">
        <appender-ref ref="STDOUT" />
        <appender-ref ref="DAYINFO" />
        <appender-ref ref="DAYERROR" />
    </root>
</configuration>
啟動應用後發現已經新增了兩個日誌檔案,命名完全按照配置
-rw-r--r--  1 kx  staff      0  3 30 22:19 TestSpringBoot_error.log.2017-03-30.log
-rw-r--r--  1 kx  staff   5117  3 30 22:19 TestSpringBoot_info.log.2017-03-30.log
//info 日誌列印效果
2017-03-30 22:
相關推薦
springboot 企業應用框架搭建
建maven應用(不需要web應用)在pom中新增以下配置 <!-- Spring boot 父引用-->
<parent>
<groupId>org.springframework.boot</grou
企業應用框架簡介
solution 自帶 https 虛擬 數據庫設計 追蹤 希望 領導 需要 本系列的解決方案來源一本書,ASP.NET3.5 商用開發架構精解
豆瓣讀書:https://book.douban.com/subject/5398930/
WROX網址:http://www.
SpringBoot的MyBatis框架搭建
一 增加相關依賴
<dependencies>
<dependency>
<groupId>org.mybatis.spring.boot</groupId>
<artifactId>
React框架搭建但頁面應用package.json基本包和依賴包
5.5 2.0 server 4.5 ack logs ostc style pac
{ //依賴包
"devDependencies": { //babel
"babel-core": "6.24.1",
"babel-loader": "7.0
Maven + SpringBoot框架搭建
bsp mave 安裝jar com cmd 工具 配置 mpi all 工具下載及環境變量配置
JDK; Maven; CMD中 Java -version; mvn -v;
1.Maven
mvn compile //編譯;mvn test //測試
一個小時搭建一個全棧 Web 應用框架
ray 提示窗 ima script nod 讓我 快速 ide 只需要 本文介紹了創建一個簡單的全棧Web應用所需的步驟,其中包括一個Python服務器和一個React前端。你可以輕松的在其基礎上進行構建,根據你的實際需求進行修改,或是添加一些其他技術特性,例如Redux
基於dubbo的分散式專案框架搭建 開發工具idea (springboot+dubbo+zookeeper+redis+rabbitmq+基於Swagger2的restful api) --(二)
1.dubbo-admin 2.5.8的安裝
http://dubbo.apache.org/en-us/index.html
點選GITHUB 跳轉到github下載dubbo原始碼
點選Branch切換到Tags,找到對應的2.5.8版本,下載該版本,下載解壓完以後
基於dubbo的分散式專案框架搭建 開發工具idea (springboot+dubbo+zookeeper+redis+rabbitmq+基於Swagger2的restful api) --(一)
1. spring-boot web框架下載配置
https://start.spring.io/
點選Switch to the full version 勾選詳細的配置
根據需要更改group atrifact...等資訊
&nb
基於dubbo的分散式專案框架搭建 開發工具idea (springboot+dubbo+zookeeper+redis+rabbitmq+基於Swagger2的restful api) --(四)
1.rabbitmq的整合
首先在配置檔案裡增加
#rabbitMQ
spring.rabbitmq.host=127.0.0.1
spring.rabbitmq.port=5672
spring.rabbitmq.username=root
spring.rabbitmq.password
基於dubbo的分散式專案框架搭建 開發工具idea (springboot+dubbo+zookeeper+redis+rabbitmq+基於Swagger2的restful api) --(三)
1.dubbo註冊中心zookeeper 的安裝
http://mirrors.shu.edu.cn/apache/zookeeper/
選擇對應的版本下載即可
修改zoo_sample.cfg為zoo.cfg(可以先備份一份)
在安裝目錄新建data和log目錄
修改zo
使用Springboot+Feign Clients快速搭建REST客戶端應用
本文翻譯:吳嘉俊,叩丁狼高階講師。
在本文中,我們會快速的使用Springboot,配合Feign搭建一個簡單的REST客戶端應用。通過本示例,讓大家對這兩個框架的配合有一個基本的瞭解。
Spring Boot 是一個Java的快速開發框架,用於
SpringBoot入門筆記(二)IDEA下springboot專案spring+mybatis+sqlserver+log4j+簡單登入驗證攔截器的框架搭建
IDEA下springboot專案spring+mybatis+sqlserver+log4j+簡單登入驗證攔截器的框架搭建
先貼一個專案的目錄結構
Attention:templates.html5是templates目錄下新建了一個html5目錄
1.專案建立
這個簡單,選
springboot 框架搭建
文章為學習內容,原文地址:http://blog.csdn.net/cool__wang/article/details/49466609
Maven + Spring Web 專案結構在Eclipse下面的實現 我們在這裡所要實現的關鍵就是如何保證 Maven 規定的目錄結構。 這裡
springboot+mybatis+springMVC基礎框架搭建
mvc adapter scan 編譯插件 java extend -m npr 初始化 項目結構概覽
pom.xml
<project xmlns="http://maven.apache.org/POM/4.0.0" xmlns:xsi="htt
SpringBoot框架搭建系列(一):整合SSM
本次我們使用的是IDEA來建立SpringBoot專案,來整合SSM框架
1、建立maven專案
2、選擇依賴
3、最終的pom.xml
<?xml version="1.0" encoding="UTF-8"?>
<project xmln
SpringBoot框架搭建系列(二):整合pagehelper和mybatis-generator
本次我們整合mybatis的分頁外掛pagehelper,以及mapper自動生成的外掛mybatis-generator
先整合mybatis-generator
1、在pom中引入
<plugin>
<groupId
SpringBoot框架搭建系列(三):解決日期轉換問題和日期展示問題
本次我們解決問題:日期展示問題(返回的json中日期的格式是:"birthday":"1988-08-07T15:00:00.000+0000");需要轉化成指定的格式(年月日時分秒格式)
1、問題如
2、解決方案
在配置中加入
#時間戳統一轉換
spring.j
SpringBoot框架搭建系列(四):日誌整合
本次我們是做日誌整合。
1、在resources目錄下建立檔案:logback-spring.xml
<?xml version="1.0" encoding="UTF-8"?>
<!-- 日誌級別從低到高分為TRACE < DEBUG <
SpringBoot框架搭建系列(五):整合Redis
本次我們整合Redis
1、首先引入依賴
<!--redis-->
<dependency>
<groupId>org.springframework.boot</groupId>
老王自學Python一月,用時60分鐘搭建一個全棧web應用框架!
把想法變為現實的能力是空想家與實幹家的區別。不管你是在一家跨國公司工作,還是正在為自己的創業公司而努力,那些有能力將創意轉化為真正產品的人,都具有寶貴的技能並擁有明顯的實力。如果你能在不到一個小時的時間裡建立一個全棧的Web應用,那麼你就有能力為自己下一個偉大的想法迅速的的建立一個簡單的MVP,或者