
使用NSMutableAttributedString新增下劃線、刪除線、陰影、填充、不同字型顏色等
在iOS開發中,有時會遇到需要新增下劃線,或者設定字串中某幾個字的顏色的情況,最常見的栗子就是註冊頁面,如圖所示:
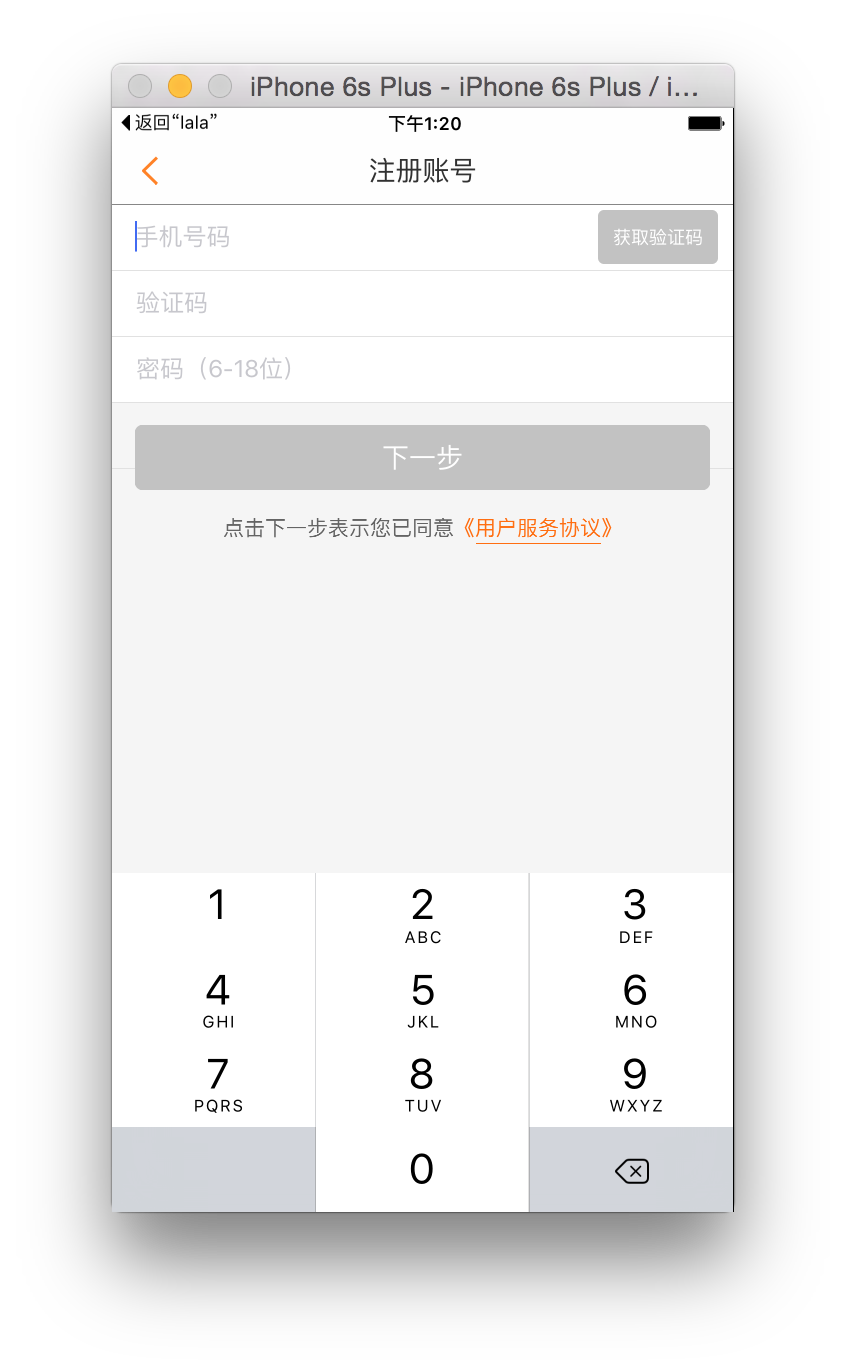
幾乎所有註冊頁面中都會出現這麼一句話 “點選下一步表示您已同意《使用者服務協議》”,而且可以看到,“《使用者服務協議》”幾個字是橙色的,並且它們下面還有下劃線。這是怎麼實現的呢?
有的同學可能會說:“不同顏色就設定兩個label,讓左邊的label顯示前半句並設定為黑色,讓右邊的label顯示後半句並設定為橙色就行了。” 這樣也許是一個辦法,但是感覺有些麻煩,而且如果有很多種顏色呢?難道要設定一大堆label嗎。。。
NSMutableAttributedString 就可以完美的解決這些問題。我們先說一下和 attributes 有關的四個方法:
為某一範圍內文字設定多個屬性
- (void)setAttributes:(NSDictionary *)attrs range:(NSRange)range;
為某一範圍內文字新增某個屬性
- (void)addAttribute:(NSString *)name value:(id)value range:(NSRange)range;
為某一範圍內文字新增多個屬性
- (void)addAttributes:(NSDictionary *)attrs range:(NSRange)range;
移除某一範圍內的某個屬性
- (void)removeAttribute:(NSString
我們來舉個栗子吧:
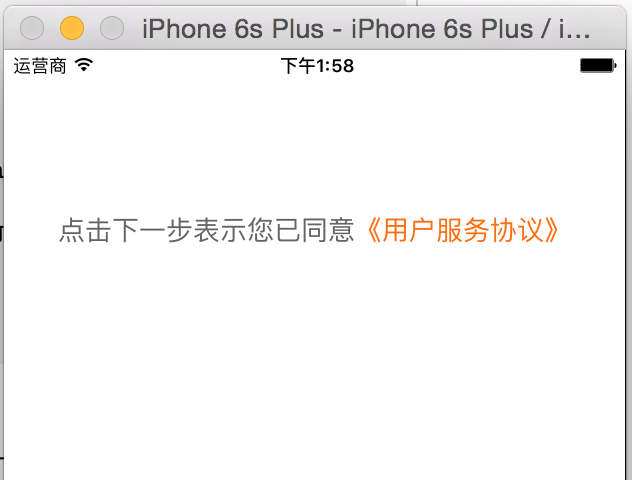
- (void)viewDidLoad {
    [super viewDidLoad];

    UILabel *label = [[UILabel alloc] initWithFrame:CGRectMake(0, 100, ScreenWidth, 40)];
    label.font = [UIFont systemFontOfSize:18]; // 字型大小
    label.textAlignment = NSTextAlignmentCenter; // 文字對齊方式

    NSMutableAttributedString *str = [[NSMutableAttributedString alloc] initWithString:
        @"點選下一步表示您已同意《使用者服務協議》"];
    [str addAttribute:NSForegroundColorAttributeName value:
        [UIColor colorWithRed:100/255.0 green:100/255.0 blue:100/255.0 alpha:1] range:NSMakeRange(0,11)];
    [str addAttribute:NSForegroundColorAttributeName value:
        [UIColor colorWithRed:255/255.0 green:110/255.0 blue:17/255.0 alpha:1] range:NSMakeRange(11,8)];

    label.attributedText = str;
    [self.view addSubview:label];
}
我們建立一個 NSMutableAttributedString 的物件 str,然後為它新增一個屬性,這個屬性的名字叫做 NSForegroundColorAttributeName,就是文字的顏色,它的值是 UIColor 型別的,預設是黑色,我們給它自定義一個顏色。然後我們來設定它的範圍,NSMakeRange(0, 11) 的意思就是說,從第0個字開始,一共11個字。這個範圍其實就是 “點選下一步表示您已同意” 這11個字。(事實上,第一幅圖中的這11個字並不是黑色,但是和黑色比較接近,這不重要~)
然後我們又給這個字串添加了一個屬性,這個屬性還是 NSForegroundColorAttributedName,但是顏色是橙色,並且範圍是從第11(別忘了編號從0開始)個字開始,一共8個字。這個範圍其實就是 “《使用者服務協議》“(書名號也算)
現在我們執行程式來看看效果:
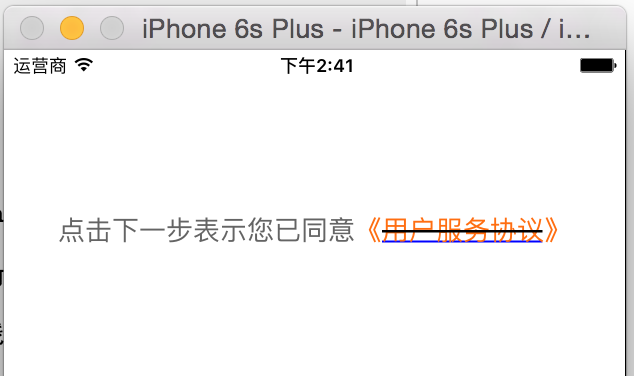
文字顏色已經搞定了,接下來我們來加下劃線。我們在原來程式碼的基礎上再加一句話:
- (void)viewDidLoad {
    [super viewDidLoad];

    UILabel *label = [[UILabel alloc] initWithFrame:CGRectMake(0, 100, ScreenWidth, 40)];
    label.font = [UIFont systemFontOfSize:18]; // 字型大小
    label.textAlignment = NSTextAlignmentCenter; // 文字對齊方式

    NSMutableAttributedString *str = [[NSMutableAttributedString alloc] initWithString:
        @"點選下一步表示您已同意《使用者服務協議》"];
    [str addAttribute:NSForegroundColorAttributeName value:
        [UIColor colorWithRed:100/255.0 green:100/255.0 blue:100/255.0 alpha:1] range:NSMakeRange(0,11)];
    [str addAttribute:NSForegroundColorAttributeName value:
        [UIColor colorWithRed:255/255.0 green:110/255.0 blue:17/255.0 alpha:1] range:NSMakeRange(11,8)];
    [str addAttribute:NSUnderlineStyleAttributeName value:
        [NSNumber numberWithInteger:NSUnderlineStyleSingle] range:NSMakeRange(12, 6)]; // 下劃線

    label.attributedText = str;
    [self.view addSubview:label];
}這裡要注意。我們再來看一遍新增屬性的方法原型:
- (void)addAttribute:(NSString *)name value:(id)value range:(NSRange)range;
注意,引數 value 是 id 型別的。看到這句話,你知道我想說什麼了嗎?
id 是 Objective-C 物件。而 NSInteger 是基本資料型別,不是物件。所以必須寫成 [NSNumber numberWithInteger:123] 的形式。
在設定這個值的時候,我不知道具體應該設為幾,我嘗試了好多數,但是發現竟然有的不對。後來百度了一下,才知道原來它的值有一個列舉:
typedef NS_ENUM(NSInteger, NSUnderlineStyle) {
    NSUnderlineStyleNone                                    = 0x00,
    NSUnderlineStyleSingle                                  = 0x01,
    NSUnderlineStyleThick NS_ENUM_AVAILABLE(10_0, 7_0)      = 0x02,
    NSUnderlineStyleDouble NS_ENUM_AVAILABLE(10_0, 7_0)     = 0x09,

    NSUnderlinePatternSolid NS_ENUM_AVAILABLE(10_0, 7_0)      = 0x0000,
    NSUnderlinePatternDot NS_ENUM_AVAILABLE(10_0, 7_0)        = 0x0100,
    NSUnderlinePatternDash NS_ENUM_AVAILABLE(10_0, 7_0)       = 0x0200,
    NSUnderlinePatternDashDot NS_ENUM_AVAILABLE(10_0, 7_0)    = 0x0300,
    NSUnderlinePatternDashDotDot NS_ENUM_AVAILABLE(10_0, 7_0) = 0x0400,

    NSUnderlineByWord NS_ENUM_AVAILABLE(10_0, 7_0)            = 0x8000
} NS_ENUM_AVAILABLE(10_0, 6_0);
實際上,設定刪除線 NSStrikethroughColorAttributeName 的時候,值也是這個列舉。
// NSUnderlineStyleNone 不設定下劃線/刪除線
// NSUnderlineStyleSingle 設定下劃線/刪除線為細的單線
// NSUnderlineStyleThick 設定下劃線/刪除線為粗的單線
// NSUnderlineStyleDouble 設定下劃線/刪除線為細的雙線
// NSUnderlinePatternSolid 設定下劃線/刪除線樣式為連續的實線// NSUnderlinePatternDot 設定下劃線/刪除線樣式為點,也就是虛線,比如這樣:------
// NSUnderlinePatterDash 設定下劃線/刪除線樣式為破折號,比如這樣:—— —— ——
// NSUnderlinePatternDashDot 設定下劃線/刪除線樣式為連續的破折號和點,比如這樣:——-——-——-
// NSUnderlinePatternDashDotDot 設定下劃線/刪除線樣式為連續的破折號、點、點,比如:——--——--——--
// NSUnderlineByWord 在有空格的地方不設定下劃線/刪除線
我為什麼要把它們分成三段來說呢?因為它們屬於三種,設定的時候不一定只有一種,可以同時設定其中的某兩種或三種都設定。比如這樣:
[str addAttribute:NSUnderlineStyleAttributeName value:
        [NSNumber numberWithInteger:NSUnderlineStyleDouble | NSUnderlinePatternDot] range:NSMakeRange(12, 6)];
實際上下劃線的顏色也是可以設定的。如果沒有設定的話,預設和文字顏色一樣,也就是橙色。我們來嘗試把下劃線換成藍色看看:
- (void)viewDidLoad {
    [super viewDidLoad];

    UILabel *label = [[UILabel alloc] initWithFrame:CGRectMake(0, 100, ScreenWidth, 40)];
    label.font = [UIFont systemFontOfSize:18]; // 字型大小
    label.textAlignment = NSTextAlignmentCenter; // 文字對齊方式

    NSMutableAttributedString *str = [[NSMutableAttributedString alloc] initWithString:
        @"點選下一步表示您已同意《使用者服務協議》"];
    [str addAttribute:NSForegroundColorAttributeName value:
        [UIColor colorWithRed:100/255.0 green:100/255.0 blue:100/255.0 alpha:1] range:NSMakeRange(0,11)];
    [str addAttribute:NSForegroundColorAttributeName value:
        [UIColor colorWithRed:255/255.0 green:110/255.0 blue:17/255.0 alpha:1] range:NSMakeRange(11,8)];
    [str addAttribute:NSUnderlineStyleAttributeName value:
        [NSNumber numberWithInteger:NSUnderlineStyleSingle] range:NSMakeRange(12, 6)]; // 下劃線型別
    [str addAttribute:NSUnderlineColorAttributeName value:
        [UIColor blueColor] range:NSMakeRange(12, 6)]; // 下劃線顏色

    label.attributedText = str;
    [self.view addSubview:label];
}
我們再舉個栗子,新增一個加粗版的刪除線,設定刪除線的顏色為黑色(如果不設定顏色,也預設和文字顏色一樣)
- (void)viewDidLoad {
    [super viewDidLoad];

    UILabel *label = [[UILabel alloc] initWithFrame:CGRectMake(0, 100, ScreenWidth, 40)];
    label.font = [UIFont systemFontOfSize:18]; // 字型大小
    label.textAlignment = NSTextAlignmentCenter; // 文字對齊方式

    NSMutableAttributedString *str = [[NSMutableAttributedString alloc] initWithString:
        @"點選下一步表示您已同意《使用者服務協議》"];
    [str addAttribute:NSForegroundColorAttributeName value:
        [UIColor colorWithRed:100/255.0 green:100/255.0 blue:100/255.0 alpha:1] range:NSMakeRange(0,11)];
    [str addAttribute:NSForegroundColorAttributeName value:
        [UIColor colorWithRed:255/255.0 green:110/255.0 blue:17/255.0 alpha:1] range:NSMakeRange(11,8)];
    [str addAttribute:NSUnderlineStyleAttributeName value:
        [NSNumber numberWithInteger:NSUnderlineStyleSingle] range:NSMakeRange(12, 6)]; // 下劃線型別
    [str addAttribute:NSUnderlineColorAttributeName value:
        [UIColor blueColor] range:NSMakeRange(12, 6)]; // 下劃線顏色
    [str addAttribute:NSStrikethroughStyleAttributeName value:
        [NSNumber numberWithInteger:NSUnderlineStyleThick] range:NSMakeRange(12, 6)]; // 刪除線型別
    [str addAttribute:NSStrikethroughColorAttributeName value:
        [UIColor blackColor] range:NSMakeRange(12, 6)]; // 刪除線顏色

    label.attributedText = str;
    [self.view addSubview:label];
}
然後執行一下來看看效果:
我們再舉最後一個栗子(栗子說:能不能別舉我了~),設定填充:
- (void)viewDidLoad {
    [super viewDidLoad];

    UILabel *label = [[UILabel alloc] initWithFrame:CGRectMake(0, 100, ScreenWidth, 40)];
    label.font = [UIFont systemFontOfSize:18]; // 字型大小
    label.textAlignment = NSTextAlignmentCenter; // 文字對齊方式

    NSMutableAttributedString *str = [[NSMutableAttributedString alloc] initWithString:
        @"點選下一步表示您已同意《使用者服務協議》"];
    [str addAttribute:NSForegroundColorAttributeName value:
        [UIColor colorWithRed:100/255.0 green:100/255.0 blue:100/255.0 alpha:1] range:NSMakeRange(0,11)];
    [str addAttribute:NSForegroundColorAttributeName value:
        [UIColor colorWithRed:255/255.0 green:110/255.0 blue:17/255.0 alpha:1] range:NSMakeRange(11,8)];
    [str addAttribute:NSStrokeWidthAttributeName value:
        [NSNumber numberWithFloat:3.0] range:NSMakeRange(11, 8)]; // 設定填充


    label.attributedText = str;
    [self.view addSubview:label];
}
然後執行一下來看看效果:
同理,填充也可以設定顏色,如果不設定的話,預設和文字顏色一樣。
NSMutableAttributedString 還能設定很多其它屬性,比如段落格式、陰影等等(還有很多哦)
想要完整的學習它請參考蘋果的官方文件:傳送門
最後想說一下它的缺點,也許有的同學已經發現了,下劃線離文字太近了!不能設定下劃線和文字的距離,這是它美中不足的地方。