ASP.NET Core實現OAuth2.0的AuthorizationCode模式
ASP.NET Core實現OAuth2的AuthorizationCode模式
授權伺服器
Program.cs --> Main方法中:需要呼叫UseUrls設定IdentityServer4授權服務的IP地址

1 var host = new WebHostBuilder() 2 .UseKestrel() 3 //IdentityServer4的使用需要配置UseUrls 4 .UseUrls("http://localhost:5114") 5 .UseContentRoot(Directory.GetCurrentDirectory())6 .UseIISIntegration() 7 .UseStartup<Startup>() 8 .Build();

Startup.cs -->ConfigureServices方法中的配置:

1 //RSA:證書長度2048以上,否則拋異常 2 //配置AccessToken的加密證書 3 var rsa = new RSACryptoServiceProvider(); 4 //從配置檔案獲取加密證書 5 rsa.ImportCspBlob(Convert.FromBase64String(Configuration["SigningCredential"])); 6 //配置IdentityServer4 7 services.AddSingleton<IClientStore, MyClientStore>(); //注入IClientStore的實現,可用於執行時校驗Client 8 services.AddSingleton<IScopeStore, MyScopeStore>(); //注入IScopeStore的實現,可用於執行時校驗Scope 9 //注入IPersistedGrantStore的實現,用於儲存AuthorizationCode和RefreshToken等等,預設實現是儲存在記憶體中, 10 //如果服務重啟那麼這些資料就會被清空了,因此可實現IPersistedGrantStore將這些資料寫入到資料庫或者NoSql(Redis)中 11 services.AddSingleton<IPersistedGrantStore, MyPersistedGrantStore>(); 12 services.AddIdentityServer() 13 .AddSigningCredential(new RsaSecurityKey(rsa)); 14 //.AddTemporarySigningCredential() //生成臨時的加密證書,每次重啟服務都會重新生成 15 //.AddInMemoryScopes(Config.GetScopes()) //將Scopes設定到記憶體中 16 //.AddInMemoryClients(Config.GetClients()) //將Clients設定到記憶體中

Startup.cs --> Configure方法中的配置:

1             //使用IdentityServer4
2             app.UseIdentityServer();
3             //使用Cookie模組
4             app.UseCookieAuthentication(new CookieAuthenticationOptions
5             {
6                 AuthenticationScheme = IdentityServerConstants.ExternalCookieAuthenticationScheme,
7                 AutomaticAuthenticate = false,
8                 AutomaticChallenge = false
9             });

Client配置
方式一:
.AddInMemoryClients(Config.GetClients()) //將Clients設定到記憶體中,IdentityServer4從中獲取進行驗證
方式二(推薦):
services.AddSingleton<IClientStore, MyClientStore>(); //注入IClientStore的實現,用於執行時獲取和校驗Client
IClientStore的實現

 1     public class MyClientStore : IClientStore
 2     {
 3         readonly Dictionary<string, Client> _clients;
 4         readonly IScopeStore _scopes;
 5         public MyClientStore(IScopeStore scopes)
 6         {
 7             _scopes = scopes;
 8             _clients = new Dictionary<string, Client>()
 9             {
10                 {
11                     "auth_clientid",
12                     new Client
13                     {
14                         ClientId = "auth_clientid",
15                         ClientName = "AuthorizationCode Clientid",
16                         AllowedGrantTypes = new string[] { GrantType.AuthorizationCode },   //允許AuthorizationCode模式
17                         ClientSecrets =
18                         {
19                             new Secret("secret".Sha256())
20                         },
21                         RedirectUris = { "http://localhost:6321/Home/AuthCode" },
22                         PostLogoutRedirectUris = { "http://localhost:6321/" },
23                         //AccessTokenLifetime = 3600, //AccessToken過期時間, in seconds (defaults to 3600 seconds / 1 hour)
24                         //AuthorizationCodeLifetime = 300,  //設定AuthorizationCode的有效時間,in seconds (defaults to 300 seconds / 5 minutes)
25                         //AbsoluteRefreshTokenLifetime = 2592000,  //RefreshToken的最大過期時間,in seconds. Defaults to 2592000 seconds / 30 day
26                         AllowedScopes = (from l in _scopes.GetEnabledScopesAsync(true).Result select l.Name).ToList(),
27                     }
28                 }
29             };
30         }
31
32         public Task<Client> FindClientByIdAsync(string clientId)
33         {
34             Client client;
35             _clients.TryGetValue(clientId, out client);
36             return Task.FromResult(client);
37         }
38     }

Scope配置
方式一:
.AddInMemoryScopes(Config.GetScopes()) //將Scopes設定到記憶體中,IdentityServer4從中獲取進行驗證
方式二(推薦):
services.AddSingleton<IScopeStore, MyScopeStore>(); //注入IScopeStore的實現,用於執行時獲取和校驗Scope
IScopeStore的實現

 1     public class MyScopeStore : IScopeStore
 2     {
 3         readonly static Dictionary<string, Scope> _scopes = new Dictionary<string, Scope>()
 4         {
 5             {
 6                 "api1",
 7                 new Scope
 8                 {
 9                     Name = "api1",
10                     DisplayName = "api1",
11                     Description = "My API",
12                 }
13             },
14             {
15                 //RefreshToken的Scope
16                 StandardScopes.OfflineAccess.Name,
17                 StandardScopes.OfflineAccess
18             },
19         };
20
21         public Task<IEnumerable<Scope>> FindScopesAsync(IEnumerable<string> scopeNames)
22         {
23             List<Scope> scopes = new List<Scope>();
24             if (scopeNames != null)
25             {
26                 Scope sc;
27                 foreach (var sname in scopeNames)
28                 {
29                     if (_scopes.TryGetValue(sname, out sc))
30                     {
31                         scopes.Add(sc);
32                     }
33                     else
34                     {
35                         break;
36                     }
37                 }
38             }
39             //返回值scopes不能為null
40             return Task.FromResult<IEnumerable<Scope>>(scopes);
41         }
42
43         public Task<IEnumerable<Scope>> GetScopesAsync(bool publicOnly = true)
44         {
45             //publicOnly為true:獲取public的scope;為false:獲取所有的scope
46             //這裡不做區分
47             return Task.FromResult<IEnumerable<Scope>>(_scopes.Values);
48         }
49     }

資源伺服器
測試

流程實現
步驟A
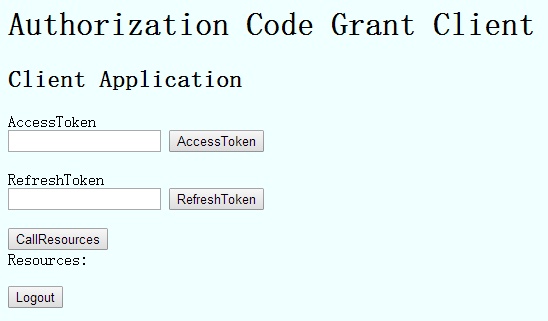
第三方客戶端頁面簡單實現:

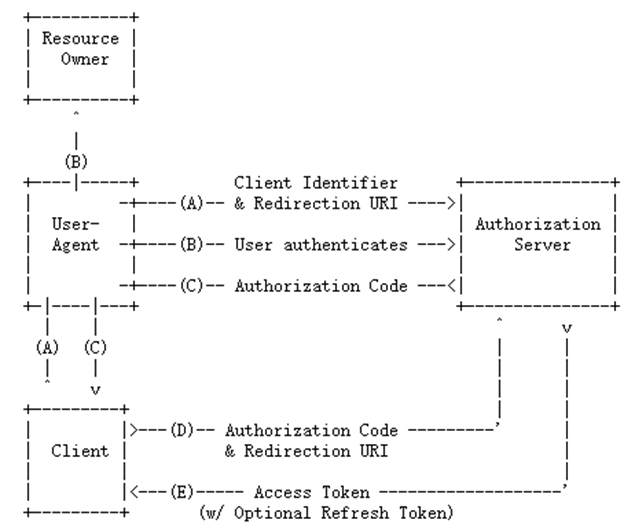
點選AccessToken按鈕進行訪問授權伺服器,就是流程圖中步驟A:

1                         //訪問授權伺服器
2                         return Redirect(OAuthConstants.AuthorizationServerBaseAddress + OAuthConstants.AuthorizePath + "?"
3                             + "response_type=code"
4                             + "&client_id=" + OAuthConstants.Clientid
5                             + "&redirect_uri=" + OAuthConstants.AuthorizeCodeCallBackPath
6                             + "&scope="  + OAuthConstants.Scopes
7                             + "&state=" + OAuthConstants.State);

步驟B
授權伺服器接收到請求後,會判斷使用者是否已經登陸,如果未登陸那麼跳轉到登陸頁面(如果已經登陸,登陸的一些相關資訊會儲存在cookie中):


 1         /// <summary>
 2         /// 登陸頁面
 3         /// </summary>
 4         [HttpGet]
 5         public async Task<IActionResult> Login(string returnUrl)
 6         {
 7             var context = await _interaction.GetAuthorizationContextAsync(returnUrl);
 8             var vm = BuildLoginViewModel(returnUrl, context);
 9             return View(vm);
10         }
11
12         /// <summary>
13         /// 登陸賬號驗證
14         /// </summary>
15         [HttpPost]
16         [ValidateAntiForgeryToken]
17         public async Task<IActionResult> Login(LoginInputModel model)
18         {
19             if (ModelState.IsValid)
20             {
21                 //賬號密碼驗證
22                 if (model.Username == "admin" && model.Password == "123456")
23                 {
24                     AuthenticationProperties props = null;
25                     //判斷是否 記住登陸
26                     if (model.RememberLogin)
27                     {
28                         props = new AuthenticationProperties
29                         {
30                             IsPersistent = true,
31                             ExpiresUtc = DateTimeOffset.UtcNow.AddMonths(1)
32                         };
33                     };
34                     //引數一:Subject,可在資源伺服器中獲取到,資源伺服器通過User.Claims.Where(l => l.Type == "sub").FirstOrDefault();獲取
35                     //引數二:賬號
36                     await HttpContext.Authentication.SignInAsync("admin", "admin", props);
37                     //驗證ReturnUrl,ReturnUrl為重定向到授權頁面
38                     if (_interaction.IsValidReturnUrl(model.ReturnUrl))
39                     {
40                         return Redirect(model.ReturnUrl);
41                     }
42                     return Redirect("~/");
43                 }
44                 ModelState.AddModelError("", "Invalid username or password.");
45             }
46             //生成錯誤資訊的LoginViewModel
47             var vm = await BuildLoginViewModelAsync(model);
48             return View(vm);
49         }

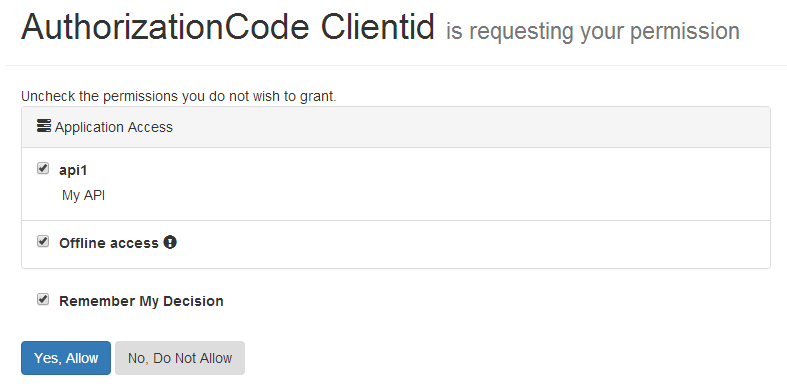
登陸成功後,重定向到授權頁面,詢問使用者是否授權,就是流程圖的步驟B了:


 1         /// <summary>
 2         /// 顯示使用者可授予的許可權
 3         /// </summary>
 4         /// <param name="returnUrl"></param>
 5         /// <returns></returns>
 6         [HttpGet]
 7         public async Task<IActionResult> Index(string returnUrl)
 8         {
 9             var vm = await BuildViewModelAsync(returnUrl);
10             if (vm != null)
11             {
12                 return View("Index", vm);
13             }
14
15             return View("Error", new ErrorViewModel
16             {
17                 Error = new ErrorMessage { Error = "Invalid Request" },
18             });
19         }

步驟C
授權成功,重定向到redirect_uri(步驟A傳遞的)所指定的地址(第三方端),並且會把Authorization Code也設定到url的引數code中:

 1         /// <summary>
 2         /// 使用者授權驗證
 3         /// </summary>
 4         [HttpPost]
 5         [ValidateAntiForgeryToken]
 6         public async Task<IActionResult> Index(ConsentInputModel model)
 7         {
 8             //解析returnUrl
 9             var request = await _interaction.GetAuthorizationContextAsync(model.ReturnUrl);
10             if (request != null && model != null)
11             {
12                 if (ModelState.IsValid)
13                 {
14                     ConsentResponse response = null;
15                     //使用者不同意授權
16                     if (model.Button == "no")
17
