
一個簡單的計算器,使用swift練習專案,模仿iPhone介面
阿新 • • 發佈:2019-02-12
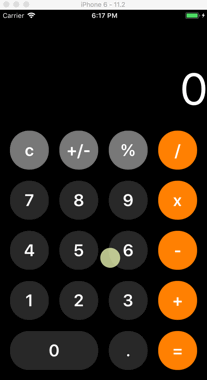
先看效果:
剛剛練習swift,程式碼比oc精簡不少,不過有的地方還是不太習慣,尤其是裡面需要判斷的地方 無論何時都不能值為空,需要用可選型別,加上?和!,接著努力
程式碼:
class ViewController: UIViewController {

    let calResult = UILabel()//用來顯示輸入和結果的label,在最上方
    var frontNum = String()//記錄計算符號前面的數字,比如輸入1+2的順序,1就由frontNum來記錄,2由下面的backnum來記錄,而+號則由handlestyle來記錄
    var backNum = String()
    var handleStyle = String()

    override func viewDidLoad() {
        super.viewDidLoad()
        self.view.backgroundColor = UIColor.black
        UIApplication.shared.statusBarStyle = UIStatusBarStyle.lightContent
        self.createMainView()
    }

    func createMainView() -> () {
        let bottomView = UIView()
        self.view .addSubview(bottomView)

        bottomView.snp .makeConstraints { (make) in
            make.left.right.bottom.equalTo(self.view)
            make.height.equalTo(H(h: 450))
        }

        var titlearr = ["c","+/-","%","/","7","8","9","x","4","5","6","-","1","2","3","+","","",".","="]
        let marginX = CGFloat((SCREENWIDTH-W(w:70*4))/5)
        let marginY = CGFloat((H(h: 450)-H(h: 70*5))/5)
        let width = W(w: 70)
        let height = H(h: 70)

        for i in 0...(titlearr.count-1) {
            let btn = UIButton()
            btn .setTitle(titlearr[i], for: UIControlState.normal)
            btn.titleLabel?.font = UIFont.boldSystemFont(ofSize: 30)
            btn.layer.cornerRadius = W(w: 34)
            btn.adjustsImageWhenHighlighted = true
            btn.layer.masksToBounds = true
            btn .addTarget(self, action: #selector(btnclick), for: UIControlEvents.touchUpInside)
            bottomView .addSubview(btn)

            if (i < 3){
                btn .setBackgroundImage(imageFromColor(color: ColorRGB(r: 120, g: 120, b: 120), viewSize: rectSize(w: 1, h: 1)), for: UIControlState.normal)
                btn .setBackgroundImage(imageFromColor(color: UIColor.white, viewSize: rectSize(w: 1, h: 1)), for: UIControlState.highlighted)
                btn .setTitleColor(UIColor.black, for: UIControlState.highlighted)
            }else if(i%4 == 3){
                btn .setBackgroundImage(imageFromColor(color: UIColor.orange, viewSize: rectSize(w: 1, h: 1)), for: UIControlState.normal)
                btn .setBackgroundImage(imageFromColor(color: ColorRGB(r: 240, g: 217, b: 177), viewSize: rectSize(w: 1, h: 1)), for: UIControlState.highlighted)
            }else{
                btn .setBackgroundImage(imageFromColor(color: ColorRGB(r: 40, g: 40, b: 40), viewSize: rectSize(w: 1, h: 1)), for: UIControlState.normal)
                    btn .setBackgroundImage(imageFromColor(color: ColorRGB(r: 120, g: 120, b: 120), viewSize: rectSize(w: 1, h: 1)), for: UIControlState.highlighted)
            }

            btn.snp .makeConstraints({ (make) in
                make.size.equalTo(rectSize(w: width, h: height))
            make.left.equalTo(bottomView.snp.left).offset(marginX+marginX*CGFloat(i%4)+CGFloat(i%4)*width)
                make.top.equalTo(bottomView.snp.top).offset(marginY*CGFloat(i/4)+CGFloat(i/4)*height)
            })
        }

        let zeroButton = UIButton()
        zeroButton .setTitle("0", for: UIControlState.normal)
        zeroButton .setTitleColor(UIColor.white, for: UIControlState.normal)
        zeroButton.titleLabel?.font = UIFont.boldSystemFont(ofSize: 30)
        zeroButton.layer.cornerRadius = height/2
        zeroButton.layer.masksToBounds = true
        zeroButton .addTarget(self, action: #selector(btnclick), for: UIControlEvents.touchUpInside)
        zeroButton .setBackgroundImage(imageFromColor(color: ColorRGB(r: 40, g: 40, b: 40), viewSize: rectSize(w: 1, h: 1)), for: UIControlState.normal)
        zeroButton .setBackgroundImage(imageFromColor(color: ColorRGB(r: 120, g: 120, b: 120), viewSize: rectSize(w: 1, h: 1)), for: UIControlState.highlighted)
        bottomView .addSubview(zeroButton)

        zeroButton.snp .makeConstraints { (make) in
            make.left.equalTo(bottomView.snp.left).offset(marginX)
            make.bottom.equalTo(bottomView.snp.bottom).offset(-marginY)
            make.size.equalTo(rectSize(w: width*2+marginX, h: height))
        }

        self.calResult.textColor = UIColor.white
        self.calResult.font = UIFont.systemFont(ofSize: 80)
        self.calResult.text = "0"
        self.calResult.numberOfLines = 1
        self.calResult.lineBreakMode = NSLineBreakMode.byWordWrapping
        self.calResult.textAlignment = NSTextAlignment.right
        self.view .addSubview(self.calResult)

        self.calResult.snp .makeConstraints { (make) in
            make.left.right.equalTo(self.view)
            make.bottom.equalTo(bottomView.snp.top).offset(-H(h: 25))
            make.height.equalTo(H(h: 100))
        }
    }

    @objc func btnclick(sender:UIButton) -> Void {
        if(sender.currentTitle == "+" || sender.currentTitle == "-" || sender.currentTitle == "x" || sender.currentTitle == "/"){
            self.handleStyle = String(sender.currentTitle!)
            self.calResult.text = "0"
        }else if String(sender.currentTitle!) == "=" {
            var frontResult = self.frontNum
            var backResult = self.backNum
            if frontResult == ""{
                frontResult = "0"
            }
            if backResult == ""{
                backResult = "0"
            }

            var result = Double()
            if self.handleStyle == "+"{
                result = Double(frontResult)! + Double(backResult)!
            }else if self.handleStyle == "-"{
                result = Double(frontResult)! - Double(backResult)!
            }else if self.handleStyle == "x"{
                result = Double(frontResult)! * Double(backResult)!
            }else if self.handleStyle == "/"{
                result = Double(frontResult)! / Double(backResult)!
            }else if self.handleStyle == "%"{
                let presult = Int(frontResult)! %  Int(backResult)!
                result = Double(presult)
            }else if self.handleStyle == ""{
                result = Double(frontResult)!
            }
            self.calResult.text = String(result)
        }else if sender.currentTitle == "c"{
            self.frontNum = ""
            self.backNum = ""
            self.handleStyle = ""
            self.calResult.text = "0"
        }else if sender.currentTitle == "%"{
            if self.frontNum == ""{
                self.frontNum = "0"
            }
            self.handleStyle = String(describing: sender.currentTitle)
        }else if sender.currentTitle == "+/-"{
            return
        }else if sender.currentTitle == "."{
            if self.handleStyle == ""{
                if self.frontNum .contains("."){
                    return
                }
                self.frontNum .append(sender.currentTitle!)
            }else{
                if self.backNum .contains("."){
                    return
                }
                self.backNum .append(sender.currentTitle!)
            }
        }else{
            let number = Int(sender.currentTitle!)
            if number! >= 0 {
                if self.handleStyle == ""{
                    self.frontNum .append(sender.currentTitle!)
                    self.calResult.text = self.frontNum
                }else{
                    self.backNum .append(sender.currentTitle!)
                    self.calResult.text = self.backNum
                }

            }
        }
    }


    override func didReceiveMemoryWarning() {
        super.didReceiveMemoryWarning()
        // Dispose of any resources that can be recreated.
    }


}
大體就是這樣,用到了snapkit做的適配,用到了一些oc裡的巨集,在專案裡建了一個swift檔案儲存各種方法,裡面包含顏色轉圖片,顏色輸入rgb,設定frame的方法等等,具體都在專案中,專案不大,一個檔案是主要程式碼,其他只有一個工具類而已。