spring整合WebService入門詳解
前言
webservice這個不知道大家首次接觸的時候是怎麼理解的,反正我記得我當時第一次接觸這個東西的時候以為又是一個XX框架,覺得還挺高大上。然而這一切在之後我使用過後才發現這些全都是YY。
那麼webservice到底是什麼呢,根據我自己的理解:簡單來說就像是一個公開的介面,其他系統不管你是用什麼語言來編寫的都可以呼叫這個介面,並可以返回相應的資料給你。就像是現在很多的天氣應用,他們肯定不會自己去搞一個氣象局之類的部門去監測天氣,大多都是直接呼叫一個天氣介面,然後返回天氣資料,相關應用就可以將這些資訊展示給使用者了。
通常來說釋出這類介面的應用都是用一兩種語言來編寫即可,但是呼叫這個介面應用可能會是各種語言來編寫的,為了滿足這樣的需求webservice出現了。
簡單來說webservice就是為了滿足以上需求而定義出來的規範。
Spring整合CXF
在Java中實現webservice有多種方法,java本身在jdk1.7之後也對webservice有了預設的實現,但是在我們實際開發中一般還是會使用框架來,比如這裡所提到的CXF就有著廣泛的應用。
廢話我就不多說了,直接講Spring整合CXF,畢竟現在的JavaEE開發是離不開Spring了。
該專案還是基於之前的SSM進行開發的。
加入maven依賴
第一步肯定是要加入maven依賴:
|
<!--cxf--> <!-- https://mvnrepository.com/artifact/org.apache.cxf/cxf-rt-frontend-jaxws --> <dependency> <groupId>org.apache.cxf</groupId> <artifactId>cxf-rt-frontend-jaxws</artifactId> <version>3.1.6</version> </dependency> <!-- https://mvnrepository.com/artifact/org.apache.cxf/cxf-core --> <dependency> <groupId> <artifactId>cxf-core</artifactId> <version>3.1.6</version> </dependency> <!-- https://mvnrepository.com/artifact/org.apache.cxf/cxf-rt-transports-http --> <dependency> <groupId>org.apache.cxf</groupId> <artifactId>cxf-rt-transports-http</artifactId> <version>3.1.6</version> </dependency> |
web.xml配置
接著我們需要配置一個CXF的servlet:
|
<!--定義一個cxf的servlet--> <servlet> <servlet-name>CXFServlet</servlet-name> <servlet-class>org.apache.cxf.transport.servlet.CXFServlet</servlet-class> </servlet> <servlet-mapping> <servlet-name>CXFServlet</servlet-name> <url-pattern>/webservice/*</url-pattern> </servlet-mapping> |
之後只要我們訪問webservice/*這個地址就會進入CXF的servlet中。
整合Spring配置
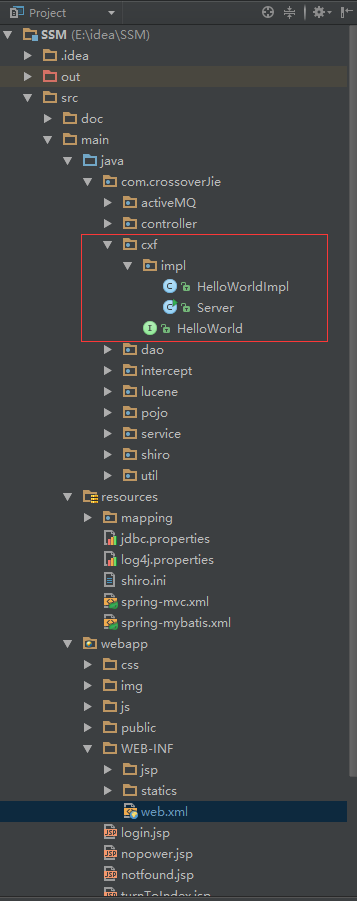
接下來是最重要的一部,用Spring整合CXF:在這之前我有新建一個CXF的包,如下圖:
這裡有兩個主要類
- HelloWorld介面。
- 實現HelloWorld介面的HelloWorldImpl類。
程式碼如下:
HelloWorld.javapackage com.crossoverJie.cxf;
import javax.jws.WebService;
@WebService
public interface HelloWorld {
public String say(String str);
}
其中就只定義了一個簡單的say()方法。
HelloWorldImpl.java
|
package com.crossoverJie.cxf.impl; import com.crossoverJie.cxf.HelloWorld; import org.springframework.stereotype.Component; import javax.jws.WebService; @Component("helloWorld") @WebService public class HelloWorldImpl implements HelloWorld { public String say(String str) { return "Hello"+str; } } |
這裡就是對say()方法的簡單實現。
接下來就是整合Spring了,由於需要使用到CXF的標籤,所以我們需要新增額外的命名路徑如下:
|
<beans xmlns="http://www.springframework.org/schema/beans" xmlns:xsi="http://www.w3.org/2001/XMLSchema-instance" xmlns:p="http://www.springframework.org/schema/p" xmlns:aop="http://www.springframework.org/schema/aop" xmlns:context="http://www.springframework.org/schema/context" xmlns:jee="http://www.springframework.org/schema/jee" xmlns:tx="http://www.springframework.org/schema/tx" xmlns:jaxws="http://cxf.apache.org/jaxws" xsi:schemaLocation=" http://www.springframework.org/schema/aop http://www.springframework.org/schema/aop/spring-aop-4.0.xsd http://www.springframework.org/schema/beans http://www.springframework.org/schema/beans/spring-beans-4.0.xsd http://www.springframework.org/schema/context http://www.springframework.org/schema/context/spring-context-4.0.xsd http://www.springframework.org/schema/jee http://www.springframework.org/schema/jee/spring-jee-4.0.xsd http://www.springframework.org/schema/tx http://www.springframework.org/schema/tx/spring-tx-4.0.xsd http://cxf.apache.org/jaxws http://cxf.apache.org/schemas/jaxws.xsd"> <import resource="classpath:META-INF/cxf/cxf.xml"/> <import resource="classpath:META-INF/cxf/cxf-servlet.xml"/> <!-- 自動掃描webService --> <context:component-scan base-package="com.crossoverJie.cxf" /> <!-- 定義webservice的釋出介面 --> <jaxws:endpoint implementor="#helloWorld" address="/HelloWorld" </beans> |
總結
以上就是一個簡單的webservice入門例項,更多的關於CXF攔截器,客戶端呼叫就沒有做過多介紹,後續有時間的話再接著更新。

