
iOS10本地推送和遠端推送的原理
使用遠端推送首先要在capacity中開啟後推送服務開關,有兩個地方要開啟。
參考:http://www.jianshu.com/p/bb89d636f989
http://www.jianshu.com/p/f6701763f8f2http://blog.csdn.net/watson2017/article/details/54907289
Notifications 回顧
-
iOS 3 - Apple 引入推送通知
-
iOS 4 - 引入本地通知
-
iOS 5 - 有了通知中心
-
iOS 6 - 通知中心與iCloud同步
-
iOS 7 - 後臺靜默推送
-
iOS 8 - 重新設定了通知許可權,可互動通知
-
iOS 9 - 支援在通知中回覆訊息,
Provider
 API
等等
遠端推送就是蘋果的APNs服務,在手機聯網的情況下,手機會和蘋果的的伺服器建立一個長連線,應用程式處於退出或者在後臺的狀態時,可以接受到遠端推送的訊息.這個服務需要99美金.
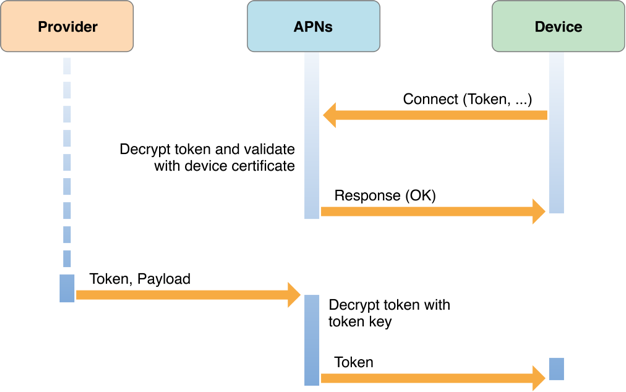

聯網的時候,iOS系統會自動的把裝置UDID和app的bundleID傳送給蘋果的伺服器,呼叫蘋果的API生成一個devicetoken,然後蘋果伺服器會吧devicetoken打包成一個NSData物件傳送給蘋果裝置,蘋果裝置把這個devicetoken告訴app應用,app在啟動的時候,
如果app解除安裝了重灌,deviceToken會變;
同一個賬號,更換手機,device token會跟新;
同一個賬號,多點登入會儲存多個device token ;告訴蘋果伺服器幾個devicetoken,就給您推送幾個裝置;
同一個手機,登入有多個賬號時,如果devictoken之前存在,並且對應的賬號ID不是和現在的賬號ID一樣,就清空之前賬號的devicetoken,儲存現在賬號的devicetoken.
當我發訊息給其他使用者時,伺服器會根據對方賬號ID找到對應的deviceToken,告訴蘋果伺服器,蘋果伺服器根據devicetoken傳送訊息;
開發是的token和生產環境 的token是不一樣的,release版本的需要打包成Ahoc測試;
//=======================
//
// AppDelegate.m
// iOS10通知使用
//
// Created by lambo on 2016/11/4.
// Copyright © 2016年 cn.lr. All rights reserved.
//
#import "AppDelegate.h"
@interface AppDelegate ()<UNUserNotificationCenterDelegate>
@end
@implementation AppDelegate
//程式完成啟動
- (BOOL)application:(UIApplication *)application didFinishLaunchingWithOptions:(NSDictionary *)launchOptions {
//程式進入前臺,角標清零
[UIApplicationsharedApplication].applicationIconBadgeNumber=0;
//註冊通知,本地通知和遠端通知都用這個
UNUserNotificationCenter *center=[UNUserNotificationCentercurrentNotificationCenter];
center.delegate=self;//設定代理
//請求獲取通知許可權(角標,聲音,彈框)
[center requestAuthorizationWithOptions:(UNAuthorizationOptionBadge |UNAuthorizationOptionSound |UNAuthorizationOptionAlert)completionHandler:^(BOOL granted,NSError * _Nullable error) {
if (granted) {
//獲取使用者是否同意開啟通知
NSLog(@"request authorization successed!");
}else{
//請開啟通知推送
}
}];
// //註冊遠端通知的時候一定加上要這個
// [[UIApplication sharedApplication]registerForRemoteNotifications];
//********************* 獲取通知授權和設定
[center getNotificationSettingsWithCompletionHandler:^(UNNotificationSettings *_Nonnull settings) {
if (settings.authorizationStatus ==UNAuthorizationStatusNotDetermined)
{
NSLog(@"未選擇");
}elseif (settings.authorizationStatus ==UNAuthorizationStatusDenied){
NSLog(@"未授權");
}elseif (settings.authorizationStatus ==UNAuthorizationStatusAuthorized){
NSLog(@"已授權");
}
}];
returnYES;
}
//**********************設定本地通知*********************
-(void)touchesBegan:(NSSet<UITouch *> *)touches withEvent:(UIEvent *)event{
//註冊通知
UNUserNotificationCenter *center = [UNUserNotificationCentercurrentNotificationCenter];
//**************************/設定推送的內容
UNMutableNotificationContent *content = [[UNMutableNotificationContentalloc]init];
content.title =@"wwwwww";//標題
content.subtitle =@"wwwwwww 707";//子標題
content.body =@"Woah!wwwww?";//內容
content.badge = @3;//數字角標
//***********************本地通知新增聲音*******************
// UNNotificationSound *sound=[UNNotificationSound soundNamed:@""];
// content.sound=sound;
//********************************本地通知新增影象附件**********************
NSError *error=nil;
NSString *imagePath=[[NSBundlemainBundle]pathForResource:@"1"ofType:@"jpg"];
UNNotificationAttachment *imageAttachment=[UNNotificationAttachmentattachmentWithIdentifier:@"imageIdentifier"URL:[NSURLfileURLWithPath:imagePath]options:nilerror:&error];
content.attachments[email protected][imageAttachment];
//*********************本地通知新增視訊(注意天加視訊的時候預設不是新增到bundle中的,需要手動add target to )**************
// NSString *videoPath=[[NSBundle mainBundle] pathForResource:@"1" ofType:@"png"];
// UNNotificationAttachment *videoAttachment=[UNNotificationAttachment attachmentWithIdentifier:@"imageIdentifier" URL:[NSURL fileURLWithPath:videoPath] options:nil error:&error];
// [email protected][videoAttachment];
//******************************按鈕*********************
//文字互動(iOS10之後支援對通知的文字互動)
/**options
UNNotificationActionOptionAuthenticationRequired 用於文字
UNNotificationActionOptionForeground 前臺模式,進入APP
UNNotificationActionOptionDestructive 銷燬模式,不進入APP
*/
NSMutableArray *mArr=[NSMutableArrayarrayWithCapacity:0];
UNNotificationAction *actionA=[UNNotificationActionactionWithIdentifier:@"needUnlock"title:@"需要解鎖"options:UNNotificationActionOptionForeground];//需要解鎖,不進入app
UNNotificationAction *actionB=[UNNotificationActionactionWithIdentifier:@"red"title:@"紅色文字"options:UNNotificationActionOptionForeground];//點選不會進入app;
UNTextInputNotificationAction *actionC=[UNTextInputNotificationActionactionWithIdentifier:@"text"title:@"文字"options:UNNotificationActionOptionForegroundtextInputButtonTitle:@"我的文字"textInputPlaceholder:@"輸入文字"];
[mArr addObjectsFromArray:@[actionA,actionB,actionC]];
UNNotificationCategory *category=[UNNotificationCategorycategoryWithIdentifier:@"categoryIdentifier"actions:mArrintentIdentifiers:@[]options:UNNotificationCategoryOptionCustomDismissAction];
[[UNUserNotificationCentercurrentNotificationCenter]setNotificationCategories:[NSSetsetWithObject:category]];
content.categoryIdentifier=@"categoryIdentifier";
//內容的分類標識,必須和categaryIdentifier一致,和自定義的內容擴充套件中info.plist中的 UNNotificationExtensionCategory 的值一樣
//******************/triger---根據指定的日期和時間來展示本地通知,並且支援迴圈條件
// UserNotifications提供了三種觸發器:
// UNTimeIntervalNotificationTrigger:一定時間後觸發
// UNCalendarNotificationTrigger:在某月某日某時觸發
// UNLocationNotificationTrigger:在使用者進入或是離開某個區域時觸發
//3秒鍾後提醒
UNTimeIntervalNotificationTrigger *trigger1 = [UNTimeIntervalNotificationTriggertriggerWithTimeInterval:3 repeats:NO];
// //每小時重複 1次(迴圈)
// UNTimeIntervalNotificationTrigger *trigger2 = [UNTimeIntervalNotificationTrigger triggerWithTimeInterval:3600 repeats:YES];
// //每週一早上 8:00提醒我
// NSDateComponents *components = [[NSDateComponents alloc] init];
// components.weekday = 2;
// components.hour = 8;
// UNCalendarNotificationTrigger *trigger3 = [UNCalendarNotificationTrigger triggerWithDateMatchingComponents:components repeats:YES];
// //#import <CoreLocation/CoreLocation.h>
// //一到麥當勞就喊我下車
// CLRegion *region = [[CLRegion alloc] init];
// UNLocationNotificationTrigger *trigger4 = [UNLocationNotificationTrigger triggerWithRegion:region repeats:NO];
//*****************傳送請求********************************8
NSString *requestIdentifier =@"sampleRequest";//傳送請求識別符號
UNNotificationRequest *request = [UNNotificationRequestrequestWithIdentifier:requestIdentifier
content:contenttrigger:trigger1];
[center addNotificationRequest:requestwithCompletionHandler:^(NSError *_Nullable error) {
NSLog(@"error001---%@",error);
}];
// - 獲取未展示的通知
[center getPendingNotificationRequestsWithCompletionHandler:^(NSArray<UNNotificationRequest *> * _Nonnull requests) {
NSLog(@"未展示的通知%@",requests);
}];
// - 獲取展示過的通知
[center getDeliveredNotificationsWithCompletionHandler:^(NSArray<UNNotification *> * _Nonnull notifications) {
NSLog(@"展示過的通知%@",notifications);
}];
// - 移除還未展示的通知
// [center removePendingNotificationRequestsWithIdentifiers: @[@"sampleRequest"]];
// [center removeAllPendingNotificationRequests]; // - (void)cancelAllLocalNotifications;
//// - 移除已經展示過的通知
// [center removeDeliveredNotificationsWithIdentifiers:@[@"my_notification"]];
// [center removeAllDeliveredNotifications];
//新增推送成功後的處理!
[center addNotificationRequest:requestwithCompletionHandler:^(NSError *_Nullable error) {
// UIAlertController *alert = [UIAlertController alertControllerWithTitle:@"本地通知" message:@"成功新增推送" preferredStyle:UIAlertControllerStyleAlert];
// UIAlertAction *cancelAction = [UIAlertAction actionWithTitle:@"取消" style:UIAlertActionStyleCancel handler:nil];
// [alert addAction:cancelAction];
// [[UIApplication sharedApplication].keyWindow.rootViewController presentViewController:alert animated:YES completion:nil];
}];
}
- (void)applicationWillResignActive:(UIApplication *)application {
}
- (void)applicationDidEnterBackground:(UIApplication *)application {
}
- (void)applicationWillEnterForeground:(UIApplication *)application {
}
- (void)applicationDidBecomeActive:(UIApplication *)application {
}
- (void)applicationWillTerminate:(UIApplication *)application {
}
//本地推送的時候,都是設定好的內容,可以設定推送的時間和是否迴圈推送,
如果沒有新的推送內容,則每次開啟都是以前那個推送內容。哪怕app刪了重新裝上也是一樣推送以前的內容。
程式退出和在後臺都會推送通知。
//在應用內展示通知。App處於前臺時獲取並處理即將觸發的推送:
-(void)userNotificationCenter:(UNUserNotificationCenter *)center willPresentNotification:(UNNotification *)notification withCompletionHandler:(void (^)(UNNotificationPresentationOptions))completionHandler{
NSDictionary *userInfo = notification.request.content.userInfo;
//前臺執行推送顯示紅色Label
[selfshowLabelWithUserInfo:userInfocolor:[UIColorredColor]];
//可以設定當收到通知後,有哪些效果呈現(聲音/提醒/數字角標);預設App在前臺執行時不會進行彈窗,在程式接收通知呼叫此介面可實現指定的推送彈窗。--iOS10以下還可繼續使用,iOS10以上在[UNUserNotificationCenterDelegate willPresentNotification:withCompletionHandler:]方法中呼叫completionHandler(UNNotificationPresentationOptionSound | UNNotificationPresentationOptionAlert);即可
completionHandler(UNNotificationPresentationOptionBadge|
UNNotificationPresentationOptionSound|UNNotificationPresentationOptionAlert);
NSLog(@"前臺掉用");
// //1. 處理通知
// 在傳送通知前,有機會修改通知;(要用到UNNotificationServiceExtension ,提供在遠端推送將要被 push 出來前,處理推送顯示內容的機會)
// //2. 處理完成後條用 completionHandler,用於指示在前臺顯示通知的形式
// completionHandler(UNNotificationPresentationOptionAlert);
//
//====================
NSDictionary * userInfo = notification.request.content.userInfo;
UNNotificationRequest *request = notification.request;//收到推送的請求
UNNotificationContent *content = request.content;//收到推送的訊息內容
NSNumber *badge = content.badge; //推送訊息的角標
NSString *body = content.body; //推送訊息體
UNNotificationSound *sound = content.sound; //推送訊息的聲音
NSString *subtitle = content.subtitle; //推送訊息的副標題
NSString *title = content.title; //推送訊息的標題
if([notification.request.triggerisKindOfClass:[UNPushNotificationTriggerclass]]) {
NSLog(@"iOS10前臺收到遠端通知:");
}
else {
// 判斷為本地通知
NSLog(@"iOS10前臺收到本地通知:{\\\\nbody:%@,\\\\ntitle:%@,\\\\nsubtitle:%@,\\\\nbadge:%@,\\\\nsound:%@,\\\\nuserInfo:%@\\\\n}",body,title,subtitle,badge,sound,userInfo);
}
completionHandler(UNNotificationPresentationOptionBadge|UNNotificationPresentationOptionSound|UNNotificationPresentationOptionAlert);//需要執行這個方法,選擇是否提醒使用者,有Badge、Sound、Alert三種類型可以設定}
}
//在前臺或者點選通知進入app時呼叫,收到通知響應時的處理工作。使用者與你推送的通知進行互動時被呼叫:
//開啟應用程式,刪除通知,選擇通知按鈕
-(void)userNotificationCenter:(UNUserNotificationCenter *)center didReceiveNotificationResponse:(
使用遠端推送首先要在capacity中開啟後推送服務開關,有兩個地方要開啟。
參考:http://www.jianshu.com/p/bb89d636f989
http://www.jianshu.com/p/f6701763f8f2
http:
——本地推送通知
推送通知的作用?
在App退到後臺或者完全退出時,可以使用通知來告訴使用者某件事情,比如推送新的聊天訊息、新聞等
通知對應的效果:
在主螢幕的頂端會出現通知訊息
當手機鎖屏時出現在鎖屏介面,可以通過滑動開啟該App,
在通知中心中
Provider是給你手機應用發出推送訊息的伺服器,而APNS(Apple Push Notification Service)則是蘋果訊息推送伺服器。你本地的伺服器當需要給應用推送一條訊息的時候,先要將訊息發出到蘋果推送伺服器,然後再由蘋果推送伺服器將訊息發到安裝了該應用的手機。
接下來再看一張解釋圖
本地推送,例:app鬧鐘,定時提醒==
/*
//iOS8以後需要先註冊本地通知,需要經過使用者的同意
if ([[UIDevice currentDevice].systemVersion doubleValue] >= 8.0) {
維護一個程式,當手機升級到ios8之後就不能接收到遠端推送,顯示註冊失敗,查了下資料,原來是沒有獲取使用者許可,加了個方法試了下,ok
if ([[[UIDevice currentDevice]systemVersion ]integerValue] >= 8) {
最近做專案用到手機實時推送和介面實時推送兩種功能,分別用了Fleck和極光推送。
Fleck:
Fleck是 C# 實現的 WebSocket 伺服器。比WebSoket更容易配置,開發更為簡單。
官方地址:https://github.com/sta 1. 開啟SecureCRT 連線相應的主機
2. 開啟會話後,使用快捷鍵 alt + p,進入 sftp> 介面
3. 檢視 sftp 相應的命令
help
4. 常用命令
(1)檢視遠端機當前路徑(pwd) 和 本地機當前路
一、測試中圖片上傳到本地硬碟
1、配置本地檔案上傳虛擬路徑(二種方式)
(1)方式一:yaml配置檔案
server:
port: 8081
#配置檔案上傳的虛擬路徑
web:
upload:
以github為例
本例中新建的是angular專案,angular專案使用命令生成,只能選擇空的資料夾,但是sourcetree從遠端clone專案也是必須目標是空資料夾,這就要是本文解決
以在庫中新增新的類為例子
1.本地私有庫的升級
只需要把新增的類 拖入到 classes 資料夾中 然後在 podfile 檔案目錄中 重新 pod install 即可
2.遠端私有庫的升級
2.1 把新增的類 拖入到 classes 資料夾中
遠端推送
新增新的框架 UserNotifications.framework
#import <UserNotifications/UserNotifications.h>
#pragma mark 註冊推送
-(void)regis
本文是另外一篇博文 Win10 Ubuntu子系統設定Git伺服器和SSH Server 證書登入,實現win10和macOS原始碼同步 的一部分,單獨拿出來說一下:
首先,設定好遠端Git Server的ssh證書登入,假設使用者名稱是git,遠端伺服器Host設定為n
1.git強制覆蓋本地檔案(與git遠端倉庫保持一致):
git fetch --all
git reset --hard origin/master
git pull
git強制覆蓋本地命令(單條執行):
git fetch --all &&
我們在多臺電腦上開發一個專案的時候,需要經常修改提交內容並在另一臺電腦上更新遠端最新的程式碼,今天看了一下如何從遠端程式碼倉庫獲取更新到本地。
檢視遠端分支
使用如下命令可以檢視遠端倉庫( Git for Windows之基礎環境搭建與基礎操作中介紹了Git基本環境的構建與基本的操作.生成了一個本地git版本庫,本文將介紹如何將這個版本庫推送到遠端倉庫(碼雲,github也可以).
1、註冊碼雲的賬號,建立一個public的專案
點選進入該專案,有如下資訊:
(1)、紅
大家有的時候,會在本地新建專案,這裡說一下在本地專案建立本地GIT中倉庫,然後推到遠端倉庫的步驟
1.在本地專案的資料夾下,GIT中倉庫初始化
初始化本地的Git倉庫
2。
將本地檔案索引新增至混帳庫中
3。
4。
第一步 把自己的ssk放到你要推送的那個人的電腦上
克隆遠端倉庫 git clone [email protected]:qijinping/XiangMuPing.git
進入專案檔案裡面 去git checkout -b mm //新建分支
git a
Git初始化本地已有專案,並推送到遠端Git倉庫操作
1. 建立本地專案,在專案根目錄執行git init命令
git init
2. 在git伺服器上建立一個倉庫,這裡使用GitHub建立一個倉庫。
例如這個git倉庫 https://github.com/ios-z
命令
建立:git checkout -b 分支名
推送:git add 檔名
git commit -m “註釋”
git push origin 本地分支名
切換:git checkout 分支名
步驟:
檢視分支
1.輸入git branch回車
注:命令
1、獲取遠端供應商的repo映象
repo init --mirror -u ssh://[email protected]$host_name:29418/manifests -b xx_branch --repo-url=ssh://[email protected]$h 相關推薦
iOS10本地推送和遠端推送的原理
iOS 推送通知:本地通知(UILocalNotification)和遠端通知(APNs)詳解
IOS 推送(本地推送、遠端推送、三方推送[極光推送])
本地推送,遠端推送(JPUSHService極光推送例)
ios (推送之遠端推送)升級成ios8系統之後有些程式接收不到遠端推送
.net實現手機推送和介面推送
sftp本地上傳和遠端下載
SpringBoot檔案(本地虛擬路徑和遠端ftp)上傳
sourcetree將已經存在的的本地資料夾和遠端倉庫關聯
本地私有庫和遠端私有庫的升級
iOS10 遠端推送和本地推送
Git 推送本地所有分支和拉取遠端所有分支
git強制覆蓋原生代碼和強制推送本地到遠端倉庫
git 更新遠端程式碼到本地和將原生代碼推送到遠端。
Git for Windows之推送本地版本庫到遠端倉庫
git push 本地專案推送到遠端分支
github多人協作本地分支推送到遠端
Git初始化本地已有專案,並推送到遠端Git倉庫操作
本地分支建立,推送和切換
將本地repo映象推送到遠端gerrit伺服器