
ART模式下基於dex2oat脫殼的原理分析
一般情況下,Android Dex檔案在載入到記憶體之前需要先對dex檔案進行優化處理(如果Android Dex檔案已經優化過,則不需要進行優化處理操作,後面進行載入到記憶體即可),在Dalvik虛擬機器模式下,Android dex檔案經過dex2oat程序優化為odex檔案,在ART虛擬機器模式下,Android dex檔案經過dex2oat程序優化為oat檔案-OAT檔案為一種私有的ELF格式檔案,和一般的ELF檔案稍有一些不同。Dalvik虛擬機器模式下,Android Dex檔案優化為odex檔案的處理比較簡單,即使Android Dex檔案被Android加固所加固處理,只要Android應用執行時能保證dex檔案的類方法的資料是完整的就沒有問題,Dalvik虛擬機器模式下Android dex檔案的優化對Android加固的處理影響不是很大;ART虛擬機器模式下,Android dex檔案的優化處理比價複雜,在Android dex檔案優化處理時要保證dex檔案類方法的資料完整,因此ART虛擬機器模式下的dex檔案優化對Android加固還是有比較大的影響,ART虛擬機器模式下dex檔案的載入也比較複雜,也致使一些Android加固廠商對ART虛擬機器模式下dex檔案優化的疏忽,最終導致ART虛擬機器模式下可以在dex檔案優化時進行dex檔案的記憶體dump操作。
ART模式下基於dex2oat脫殼的文章整理:
《記一次APP脫殼重打包過程》主要講360加固dex2oat脫殼後的重打包修復,對於360加固的重打包修復有必要學習研究和實踐一下。
ART虛擬機器模式下,Android dex檔案的載入 openDexFileNative函式 對應的Native實現函式為Jni函式動態註冊的 DexFile_openDexFileNative函式 ,也就是說ART虛擬機器模式下Android dex檔案的載入最終呼叫的是DexFile_openDexFileNative函式來實現的。
static jint DexFile_openDexFileNative(JNIEnv* env, jclass, jstring javaSourceName, jstring javaOutputName, jint) {

  // 得到需要載入的dex檔案的檔案路徑
  ScopedUtfChars sourceName(env, javaSourceName);
  if (sourceName.c_str() == NULL) {
    return 0;
  }

  // 構建dex檔案載入的路徑字串
  std::string dex_location(sourceName.c_str());
  // dex檔案優化後的存放路徑字串
  NullableScopedUtfChars outputName(env, javaOutputName);
  if (env->ExceptionCheck()) {
    return 0;
  }
  ScopedObjectAccess soa(env);

  // 儲存dex檔案的Checksum
  uint32_t dex_location_checksum;
  // 獲取dex檔案的Checksum進行校驗檢查
  if (!DexFile::GetChecksum(dex_location, &dex_location_checksum)) {
    LOG(WARNING) << "Failed to compute checksum: " << dex_location;
    ThrowLocation throw_location = soa.Self()->GetCurrentLocationForThrow();
    soa.Self()->ThrowNewExceptionF(throw_location, "Ljava/io/IOException;",
                                   "Unable to get checksum of dex file: %s", dex_location.c_str());
    return 0;
  }

  // 獲取當前程序的執行時的ClassLinker例項物件
  ClassLinker* linker = Runtime::Current()->GetClassLinker();

  // dex檔案格式的簡單結構體描述?
  const DexFile* dex_file;
  // 判斷存放優化後dex檔案的檔案路徑是否為NULL
  if (outputName.c_str() == NULL) {
     // 獲取優化後的oat檔案並載入到記憶體,返回dex檔案載入到記憶體後的描述結構體dex_file
    dex_file = linker->FindDexFileInOatFileFromDexLocation(dex_location, dex_location_checksum);
  } else {

    // 構建存放優化後的dex檔案oat的路徑字串
    std::string oat_location(outputName.c_str());
    // 獲取優化後的oat檔案並載入到記憶體,返回dex檔案載入到記憶體後的描述結構體dex_file
    dex_file = linker->FindOrCreateOatFileForDexLocation(dex_location, dex_location_checksum, oat_location);
  }
  if (dex_file == NULL) {
    LOG(WARNING) << "Failed to open dex file: " << dex_location;
    ThrowLocation throw_location = soa.Self()->GetCurrentLocationForThrow();
    soa.Self()->ThrowNewExceptionF(throw_location, "Ljava/io/IOException;",
                                   "Unable to open dex file: %s", dex_location.c_str());
    return 0;
  }
  // 設定函式返回值,返回dex檔案載入到記憶體後的描述結構體DexFile*指標
  return static_cast<jint>(reinterpret_cast<uintptr_t>(dex_file));
}
ART虛擬機器模式下,Android dex檔案的載入有DexFile_openDexFileNative函式來實現,在dex檔案被 載入之前,先進行dex檔案的校驗處理,dex檔案的校驗通過之後,當沒有指定dex檔案優化後的檔案路徑,呼叫 FindDexFileInOatFileFromDexLocation函式 進行dex檔案的優化和載入處理;當指定了dex檔案優化後的檔案路徑則呼叫 函式FindOrCreateOatFileForDexLocation 進行dex檔案的優化和載入處理。FindDexFileInOatFileFromDexLocation函式 和 FindOrCreateOatFileForDexLocation函式 在被載入的dex檔案沒被優化時,最終都會呼叫 GenerateOatFile函式建立dex2oat程序執行dex檔案的優化處理,將原始的dex檔案優化處理為私有ELF檔案格式的oat檔案。

FindOrCreateOatFileForDexLocationLocked函式 的實現程式碼如下,首先建立的新檔案用於存放優化的oat檔案並保持該檔案鎖定,然後進行優化的oat檔案的查詢,如果沒有找到dex檔案優化後的oat檔案,則進行dex檔案的優化處理得到oat檔案,後面進行oat檔案載入到記憶體的處理,其他的操作暫時不關注。
const DexFile* ClassLinker::FindOrCreateOatFileForDexLocationLocked(const std::string& dex_location,
                                                                    uint32_t dex_location_checksum,
                                                                    const std::string& oat_location) {
  // We play a locking game here so that if two different processes
  // race to generate (or worse, one tries to open a partial generated
  // file) we will be okay. This is actually common with apps that use
  // DexClassLoader to work around the dex method reference limit and
  // that have a background service running in a separate process.
  ScopedFlock scoped_flock;
  // 開啟或者建立優化後oat檔案並保持oat檔案鎖定
  if (!scoped_flock.Init(oat_location)) {
    LOG(ERROR) << "Failed to open locked oat file: " << oat_location;
    return NULL;
  }

  // Check if we already have an up-to-date output file
  // 判斷優化後的oat檔案是否存在
  const DexFile* dex_file = FindDexFileInOatLocation(dex_location,
                                                     dex_location_checksum,
                                                     oat_location);
  if (dex_file != NULL) {
    // 存在,直接返回優化後的oat檔案的描述結構體資訊
    return dex_file;
  }

  // Generate the output oat file for the dex file
  VLOG(class_linker) << "Generating oat file " << oat_location << " for " << dex_location;
  // 建立dex2oat程序優化dex檔案為oat檔案
  if (!GenerateOatFile(dex_location, scoped_flock.GetFile().Fd(), oat_location)) {
    LOG(ERROR) << "Failed to generate oat file: " << oat_location;
    return NULL;
  }
  // 載入oat檔案到記憶體中
  const OatFile* oat_file = OatFile::Open(oat_location, oat_location, NULL,
                                          !Runtime::Current()->IsCompiler());
  if (oat_file == NULL) {
    LOG(ERROR) << "Failed to open generated oat file: " << oat_location;
    return NULL;
  }
  RegisterOatFileLocked(*oat_file);
  const OatFile::OatDexFile* oat_dex_file = oat_file->GetOatDexFile(dex_location, &dex_location_checksum);
  if (oat_dex_file == NULL) {
    LOG(ERROR) << "Failed to find dex file " << dex_location
               << " (checksum " << dex_location_checksum
               << ") in generated oat file: " << oat_location;
    return NULL;
  }
  const DexFile* result = oat_dex_file->OpenDexFile();
  CHECK_EQ(dex_location_checksum, result->GetLocationChecksum())
          << "dex_location=" << dex_location << " oat_location=" << oat_location << std::hex
          << " dex_location_checksum=" << dex_location_checksum
          << " DexFile::GetLocationChecksum()=" << result->GetLocationChecksum();
  return result;
}有關ART虛擬機器模式下,OAT檔案載入到Android程序記憶體中的詳細分析,可以參考老羅的部落格《Android執行時ART載入OAT檔案的過程分析》。GenerateOatFile函式 的程式碼實現分析如下。
// dex_filename為被載入的dex檔案的路徑字串
// oat_fd為dex檔案優化的oat檔案的檔案指標
// oat_cache_filename為存放優化後dex檔案oat的檔案路徑
bool ClassLinker::GenerateOatFile(const std::string& dex_filename,
                                  int oat_fd,
                                  const std::string& oat_cache_filename) {
  // 獲取Android系統的根路徑"/system"
  std::string dex2oat_string(GetAndroidRoot());
  // 拼接字串得到優化dex檔案的程式dex2oat檔案的路徑字串
  dex2oat_string += (kIsDebugBuild ? "/bin/dex2oatd" : "/bin/dex2oat");
  // 獲取到優化dex檔案的程式dex2oat檔案的路徑字串
  const char* dex2oat = dex2oat_string.c_str();

  // 獲取到當前程序的ClassPath的路徑字串
  const char* class_path = Runtime::Current()->GetClassPathString().c_str();

  // 獲取到當前程序的堆Heap指標
  gc::Heap* heap = Runtime::Current()->GetHeap();
  // 得到boot_image的優化字串引數選項"--boot-image="
  std::string boot_image_option_string("--boot-image=");
  // 設定imageSpace檔案的路徑字串
  boot_image_option_string += heap->GetImageSpace()->GetImageFilename();
  const char* boot_image_option = boot_image_option_string.c_str();

  std::string dex_file_option_string("--dex-file=");
  // 設定需要優化的dex檔案的路徑字串
  dex_file_option_string += dex_filename;
  const char* dex_file_option = dex_file_option_string.c_str();

  std::string oat_fd_option_string("--oat-fd=");
  // 設定被優化的oat檔案的檔案指標
  StringAppendF(&oat_fd_option_string, "%d", oat_fd);
  const char* oat_fd_option = oat_fd_option_string.c_str();

  std::string oat_location_option_string("--oat-location=");
  // 設定被優化後的dex檔案oat的存放路徑
  oat_location_option_string += oat_cache_filename;
  const char* oat_location_option = oat_location_option_string.c_str();

  std::string oat_compiler_filter_string("-compiler-filter:");
  // 設定編譯選項引數
  switch (Runtime::Current()->GetCompilerFilter()) {
    case Runtime::kInterpretOnly:
      oat_compiler_filter_string += "interpret-only";
      break;
    case Runtime::kSpace:
      oat_compiler_filter_string += "space";
      break;
    case Runtime::kBalanced:
      oat_compiler_filter_string += "balanced";
      break;
    case Runtime::kSpeed:
      oat_compiler_filter_string += "speed";
      break;
    case Runtime::kEverything:
      oat_compiler_filter_string += "everything";
      break;
    default:
      LOG(FATAL) << "Unexpected case.";
  }
  const char* oat_compiler_filter_option = oat_compiler_filter_string.c_str();

  // fork and exec dex2oat
  // fork新程序對dex檔案進行優化處理
  pid_t pid = fork();
  if (pid == 0) {
    // no allocation allowed between fork and exec

    // change process groups, so we don't get reaped by ProcessManager
    setpgid(0, 0);

    // gLogVerbosity.class_linker = true;
    VLOG(class_linker) << dex2oat
                       << " --runtime-arg -Xms64m"
                       << " --runtime-arg -Xmx64m"
                       << " --runtime-arg -classpath"
                       << " --runtime-arg " << class_path
                       << " --runtime-arg " << oat_compiler_filter_option
#if !defined(ART_TARGET)
                       << " --host"
#endif
                       << " " << boot_image_option
                       << " " << dex_file_option
                       << " " << oat_fd_option
                       << " " << oat_location_option;

    // 建立dex2oat程序對dex檔案進行優化為oat檔案
    execl(dex2oat, dex2oat,
          "--runtime-arg", "-Xms64m",
          "--runtime-arg", "-Xmx64m",
          "--runtime-arg", "-classpath",
          "--runtime-arg", class_path,
          "--runtime-arg", oat_compiler_filter_option,
#if !defined(ART_TARGET)
          "--host",
#endif
          boot_image_option, // imageSpace檔案的路徑
          dex_file_option, // 被優化的dex檔案的路徑
          oat_fd_option, // 優化後oat檔案的檔案指標
          oat_location_option, // 優化後dex檔案oat的存放檔案路徑
          NULL);

    PLOG(FATAL) << "execl(" << dex2oat << ") failed";
    return false;
  } else {
    // wait for dex2oat to finish
    // 等待dex檔案被優化為oat成功完成
    int status;
    pid_t got_pid = TEMP_FAILURE_RETRY(waitpid(pid, &status, 0));
    if (got_pid != pid) {
      PLOG(ERROR) << "waitpid failed: wanted " << pid << ", got " << got_pid;
      return false;
    }
    if (!WIFEXITED(status) || WEXITSTATUS(status) != 0) {
      LOG(ERROR) << dex2oat << " failed with dex-file=" << dex_filename;
      return false;
    }
  }
  return true;
}
ART模式下基於dex2oat脫殼就是在建立dex2oat程序進行dex檔案優化具體處理之前進行dex檔案的記憶體dump處理,實現Android加固的dex檔案脫殼。以Android 4.4.4 r1的原始碼為例,ART虛擬機器模式下,dex檔案的優化處理程序dex2oat的原始碼實現在檔案 /art/dex2oat/dex2oat.cc 中,在呼叫 dex2oat函式 進行dex的優化之前會先判斷dex檔案是否可寫。因此,選擇在這個程式碼點進行原始dex檔案的記憶體dump處理。
Dex2oatHunter脫殼工具新增的dump dex檔案的程式碼如下所示,主要是針對早些時候的360加固和騰訊樂加固的脫殼處理。Dex2oatHunter脫殼工具作者提供的脫殼程式碼是應用在Android 4.4系統的ART虛擬機器模式下的,因此在編譯後修改後的dex2aot程式後,在進行360加固和騰訊樂加固的脫殼時,需要將Android系統切換到ART虛擬機器模式下才能生效。
    for (const auto& dex_file : dex_files) {
      if (!dex_file->EnableWrite()) {
        PLOG(ERROR) << "Failed to make .dex file writeable '" << dex_file->GetLocation() << "'\n";
      }
	  ///////////////////////////////////////////
      std::string dex_name = dex_file->GetLocation();
      LOG(INFO) << "Finding:dex file name-->" << dex_name;
	  // dump 360加固寶的dex檔案
      if (dex_name.find("jiagu") != std::string::npos)
      {
       LOG(INFO) << "Finding:dex file from qihoo-->" << dex_name;
          int len = dex_file->Size();
          char filename[256] = {0};
          sprintf(filename, "%s_%d.dex", dex_name.c_str(), len);
          int fd = open(filename , O_WRONLY | O_CREAT | O_TRUNC , S_IRWXU);
          if (fd > 0)
          {
              if (write(fd, (char*)dex_file->Begin(), len) <= 0)
              {
                 LOG(INFO) << "Finding:write target dex file failed-->" << filename;
              }
                 LOG(INFO) << "Finding:write target dex file successfully-->" << filename;
             close(fd);
          }else
          {
             LOG(INFO) << "Finding:open target dex file failed-->" << filename;
          }
      }
	  // dump 騰訊樂固的dex檔案
      if (tx_oat_filename.find("libshellc") != std::string::npos)
      {
       LOG(INFO) << "Finding:dex file from legu-->" << dex_name;
          int len = dex_file->Size();
          char filename[256] = {0};
          sprintf(filename, "%s_%d.dex", tx_oat_filename.c_str(), len);
          int fd = open(filename , O_WRONLY | O_CREAT | O_TRUNC , S_IRWXU);
          if (fd > 0)
          {
              if (write(fd, (char*)dex_file->Begin(), len) <= 0)
              {
                 LOG(INFO) << "Finding:write target dex file failed-->" << filename;
              }
                 LOG(INFO) << "Finding:write target dex file successfully-->" << filename;
             close(fd);
          }else
          {
             LOG(INFO) << "Finding:open target dex file failed-->" << filename;
          }
		  ///////////////////////////////////////////
      }
    }
經過測試,上面新增的脫殼程式碼在Android 5.1系統的原始碼上也適用,並且修改的程式碼點位置也是這個地方。儘管上面新增的脫殼程式碼能對360加固和騰訊樂固進行dump脫殼,但是感覺靈活性不夠,只能對360加固和騰訊加固進行處理,過濾的字串是固定的,一旦修改後的dex2oat程式編譯好,過濾字串一改變又得重新編譯dex2oat程式,重新打包Android的映象檔案。基於這些麻煩和通用性不夠的問題,對上面的程式碼進行了修改,增加了脫殼的通用性,動態的配置脫殼的過濾字串,程式碼實現如下。在沒有設定脫殼過濾字串的情況下,預設只支援對360加固進行脫殼;如果需要配置脫殼過濾字串,可以構建和編輯
/data/dex_dump_filter 配置檔案 在Android 5.1 的系統原始碼上測試通過。
    /******Android加固dex檔案的dump*******/
    // 獲取被優化的Android dex檔案的檔案路徑
    std::string dex_file_name = dex_file->GetLocation();
    LOG(INFO) << "Fly---get Dex File Name: " << dex_file_name;

    // dex dump的過濾詞
    std::string str_dex_dump_filter;
    FILE *fp = NULL;

    std::string filter_path_name = "/data/dex_dump_filter";
    if (access(filter_path_name.c_str(), F_OK) == 0) {
      // 開啟配置檔案/data/dex_dump_filter
      fp = fopen("/data/dex_dump_filter", "r");
      if (fp == NULL) {
        LOG(INFO) << "Fly---get /data/dex_dump_filter ";

        // 預設dump 360加固dex的oat檔案
        str_dex_dump_filter = ".jiagu";

       } else {
         char szFilterBuffer[128] = {0};

         // 讀取檔案中的第1行字串---dex dump的過濾詞
         fgets(szFilterBuffer, strlen(szFilterBuffer), fp);
         szFilterBuffer[strlen(szFilterBuffer) - 1]=0;

         // 進行字串的拷貝
         str_dex_dump_filter.copy(szFilterBuffer, 0, strlen(szFilterBuffer) - 1);
         fclose(fp);
         fp = NULL;
       }
    } else {
      // 預設dump 360加固dex的oat檔案
      str_dex_dump_filter = ".jiagu";
    }
    // 進行dex dump的過濾
    if (dex_file_name.find(str_dex_dump_filter.c_str()) != std::string::npos) {
       // 獲取優化後的oat檔案的大小
       int nLenth = dex_file->Size();

       char szBuffer[256] = {0};
       // 格式化字串得到dump的dex檔案(OAT)的名稱
       sprintf(szBuffer, "%s_%d.dex", dex_file_name.c_str(), nLenth);

       // 開啟或者建立檔案
       int fopen = open(szBuffer, O_WRONLY | O_CREAT | O_TRUNC , S_IRWXU);
       // 判斷檔案是否開啟成功
       if (fopen > 0) {
         // 將優化後dex的oat檔案儲存到指定名稱檔案中。
         if (write(fopen, (char*)(dex_file->Begin()), nLenth) <= 0) {
           LOG(INFO) << "Fly---write target dex file failed: " << szBuffer;
         } else {
           // 將優化後dex的oat檔案儲存到dex檔案優化目錄下成功
           LOG(INFO) << "Fly---write target dex file OK: " << szBuffer;
         }
         // 關閉檔案
         close(fopen);
        } else {
         LOG(INFO) << "Fly---open target dex file failed: " << szBuffer;
        }
    }
    /******Android加固dex檔案的dump*******/
ART虛擬機器模式下基於dex2oat脫殼是有必要條件的:1. 需要脫殼的Android加固應用必須執行ART虛擬機器模式下;2.需要脫殼的Android加固應用通過DexClassLoader載入的dex檔案必須是沒有經過優化處理的,比如 梆梆加固載入的dex檔案是已經經過優化處理的oat檔案,因此針對這類情況的Android加固應用使用ART虛擬機器模式下基於dex2oat脫殼是無效的。
在Android 5.1系統的原始碼情況下,按照上面我提供的脫殼程式碼修改Android 5.1系統的 dex2oat的原始碼,然後編譯生成Android 5.1模擬器的系統映象檔案,進行360加固Android應用的脫殼測試,結果如下圖所示:
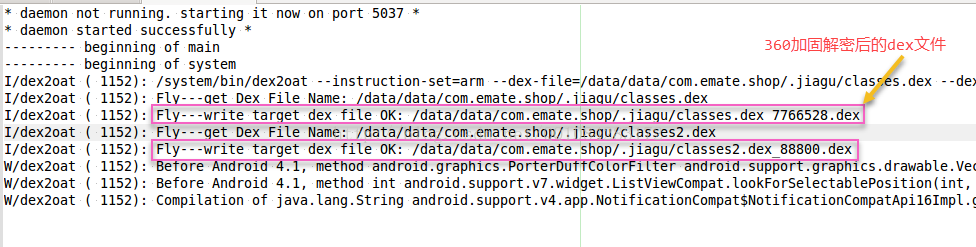
Android系統的 /data/data/com.emate.shop/.jiagu 目錄下360加固 dump出來的dex檔案截圖如下:
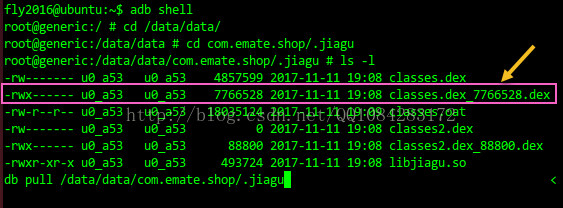
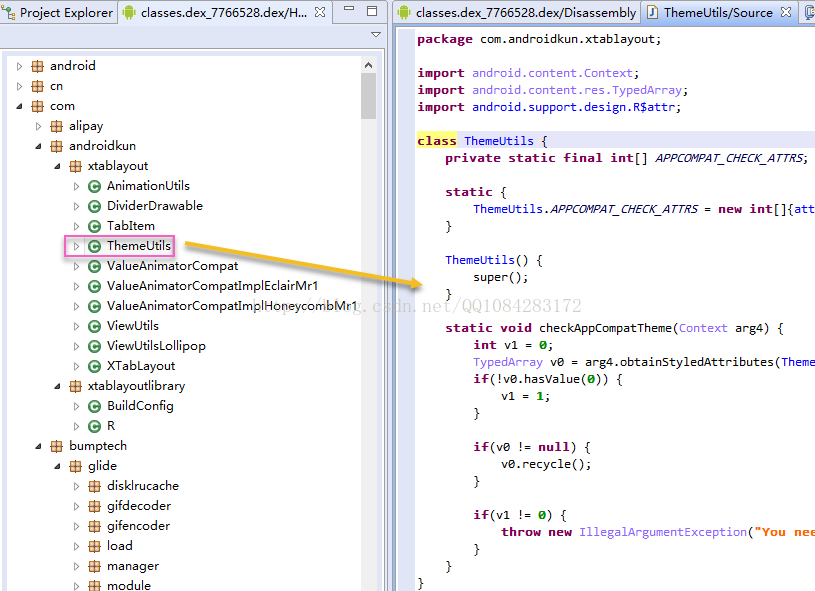
經過驗證dex檔案發現 classes.dex_7766528.dex 檔案 就是原始的dex檔案,如下圖:
後記:儘管這種脫殼的方法不是很通用也不能脫最新版的360加固和騰訊樂固了,但是提供了一種ART虛擬機器模式下基於dex2oat脫殼的思路。知識很多,整理真的很需要時間~