
GitHub開源控制元件的使用合集
阿新 • • 發佈:2019-02-14
Android的載入動畫AVLoadingIndicatorView
專案地址:
https://github.com/81813780/AVLoadingIndicatorView首先,在 build.gradle.中新增;
  dependencies {
       compile 'com.wang.avi:library:2.1.3'
    }
然後在xml中使用;
<com.wang.avi.AVLoadingIndicatorView
android:id="@+id/avi"
android:layout_width="wrap_content" 也可以通過程式碼顯示或者隱藏;
void startAnim(){
avi.show();
// or avi.smoothToShow();
}
void stopAnim(){
avi.hide();
// or avi.smoothToHide();
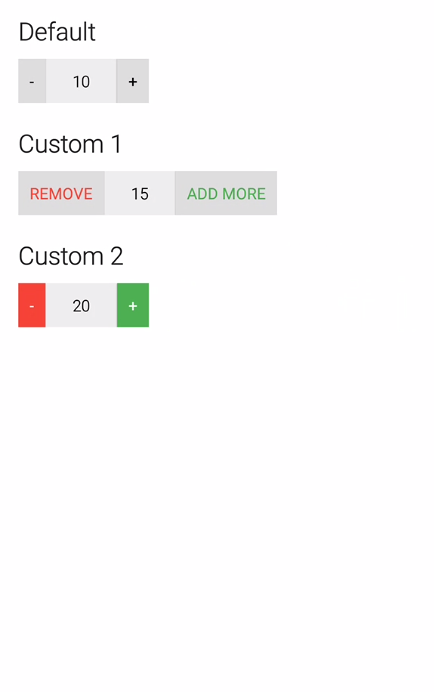
}QuantityView 類似購物車數量調節:
效果圖:
專案在GitHub上的地址:
https: 專案使用:
在gradle中新增
compile 'me.himanshusoni.quantityview:quantity-view:1.1.3'
在XML中添加布局:
<?xml version="1.0" encoding="utf-8"?>
<LinearLayout xmlns:android="http://schemas.android.com/apk/res/android"
    xmlns:app="http://schemas.android.com/apk/res-auto"
    xmlns:tools="http://schemas.android.com/tools"
    android:layout_width="match_parent"
    android:layout_height="match_parent"
    android:background="@color/md_white_1000"
    android:orientation="vertical"
    android:paddingBottom="@dimen/activity_vertical_margin"
    android:paddingLeft="@dimen/activity_horizontal_margin"
    android:paddingRight="@dimen/activity_horizontal_margin"
    android:paddingTop="@dimen/activity_vertical_margin"
    tools:context=".MainActivity">

    <TextView
        android:layout_width="wrap_content"
        android:layout_height="wrap_content"
        android:text="Default"
        android:textAppearance="?android:textAppearanceLarge" />

    <me.himanshusoni.quantityview.QuantityView
        android:id="@+id/quantityView_default"
        android:layout_width="wrap_content"
        android:layout_height="wrap_content"
        android:layout_marginTop="10dp"
        app:qv_quantity="10" />

    <TextView
        android:layout_width="wrap_content"
        android:layout_height="wrap_content"
        android:layout_marginTop="20dp"
        android:text="Custom 1"
        android:textAppearance="?android:textAppearanceLarge" />

    <me.himanshusoni.quantityview.QuantityView
        android:id="@+id/quantityView_custom_1"
        android:layout_width="wrap_content"
        android:layout_height="wrap_content"
        android:layout_marginTop="10dp"
        app:qv_addButtonText="ADD MORE"
        app:qv_addButtonTextColor="@color/md_green_500"
        app:qv_maxQuantity="20"
        app:qv_quantity="15"
        app:qv_removeButtonText="REMOVE"
        app:qv_removeButtonTextColor="@color/md_red_500" />

    <TextView
        android:layout_width="wrap_content"
        android:layout_height="wrap_content"
        android:layout_marginTop="20dp"
        android:text="Custom 2"
        android:textAppearance="?android:textAppearanceLarge" />

    <me.himanshusoni.quantityview.QuantityView
        android:id="@+id/quantityView_custom_2"
        android:layout_width="wrap_content"
        android:layout_height="wrap_content"
        android:layout_marginTop="10dp"
        app:qv_addButtonBackground="@drawable/add_selector"
        app:qv_addButtonTextColor="@color/md_white_1000"
        app:qv_quantity="20"
        app:qv_removeButtonBackground="@drawable/remove_selector"
        app:qv_removeButtonTextColor="@color/md_white_1000" />


</LinearLayout>
Java中的使用程式碼:
public class SlideDateTimeActivity extends FragmentActivity {

    @Bind(R.id.button)
    Button button;

    private SimpleDateFormat mFormatter = new SimpleDateFormat("MMMM dd yyyy hh:mm aa");
    private Button mButton;

    private SlideDateTimeListener listener = new SlideDateTimeListener() {

        @Override
        public void onDateTimeSet(Date date) {
            Toast.makeText(SlideDateTimeActivity.this,
                    mFormatter.format(date), Toast.LENGTH_SHORT).show();
        }

        // Optional cancel listener
        @Override
        public void onDateTimeCancel() {
            Toast.makeText(SlideDateTimeActivity.this,
                    "Canceled", Toast.LENGTH_SHORT).show();
        }
    };

    @Override
    protected void onCreate(Bundle savedInstanceState) {
        super.onCreate(savedInstanceState);
        setContentView(R.layout.activity_slide_date_time_picker);
        ButterKnife.bind(this);
        button.setOnClickListener(new View.OnClickListener() {

            @Override
            public void onClick(View v) {
                new SlideDateTimePicker.Builder(getSupportFragmentManager())
                        .setListener(listener)
                        .setInitialDate(new Date())
                        //.setMinDate(minDate)
                        //.setMaxDate(maxDate)
                        //.setIs24HourTime(true)
                        //.setTheme(SlideDateTimePicker.HOLO_DARK)
                        //.setIndicatorColor(Color.parseColor("#990000"))
                        .build()
                        .show();
            }
        });
    }

}
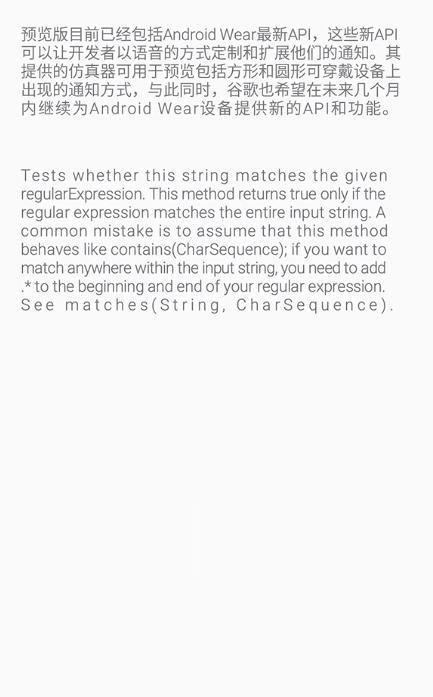
Justified 實現Textview和Edittext文字左右對齊。
效果圖:
專案在GitHub上的地址:
https://github.com/programingjd/justified專案使用:
在gradle中新增
compile 'com.uncopt:android.justified:1.0'在XML中添加布局:
<?xml version="1.0" encoding="utf-8"?>
<LinearLayout xmlns:android="http://schemas.android.com/apk/res/android"
    xmlns:tools="http://schemas.android.com/tools"
    android:layout_width="match_parent"
    android:layout_height="match_parent"
    android:orientation="vertical"
    tools:context="com.zerom.mtest.Justifiedtextview">

    <me.biubiubiu.justifytext.library.JustifyTextView
        android:layout_width="match_parent"
        android:layout_height="wrap_content"
        android:layout_margin="@dimen/margin_20"
        android:text="預覽版目前已經包括Android Wear最新API,這些新API可以讓開發者以語音的方式定製和擴充套件他們的通知。其提供的模擬器可用於預覽包括方形和圓形可穿戴裝置上出現的通知方式,與此同時,谷歌也希望在未來幾個月內繼續為Android Wear裝置提供新的API和功能。" />

    <me.biubiubiu.justifytext.library.JustifyTextView
        android:layout_width="match_parent"
        android:layout_height="wrap_content"
        android:layout_margin="@dimen/margin_20"
        android:text="Tests whether this string matches the given regularExpression. This method returns true only if the regular expression matches the entire input string. A common mistake is to assume that this method behaves like contains(CharSequence); if you want to match anywhere within the input string, you need to add .* to the beginning and end of your regular expression. See matches(String, CharSequence)." />

</LinearLayout>
android-shapeLoadingView實現高仿新版58 載入動畫
效果圖:
專案在GitHub上的地址:
https://github.com/zzz40500/android-shapeLoadingView專案使用:
在gradle中新增
compile 'com.github.zzz40500:android-shapeLoadingView:1.0.3.2'在XML中添加布局:
<?xml version="1.0" encoding="utf-8"?>
<RelativeLayout xmlns:android="http://schemas.android.com/apk/res/android"
    xmlns:tools="http://schemas.android.com/tools"
    android:layout_width="match_parent"
    android:layout_height="match_parent"
    xmlns:app="http://schemas.android.com/apk/res-auto"
    android:paddingBottom="@dimen/activity_vertical_margin"
    android:paddingLeft="@dimen/activity_horizontal_margin"
    android:paddingRight="@dimen/activity_horizontal_margin"
    android:paddingTop="@dimen/activity_vertical_margin"
    tools:context=".ShapeLoadingctivity">

    <com.mingle.widget.LoadingView
        android:id="@+id/loadView"
        android:layout_width="wrap_content"
        android:layout_height="wrap_content"
        android:layout_centerInParent="true"
        app:loadingText="載入中..." />

</RelativeLayout>
SlideDateTimePicker實現時間選擇器,可以選擇年月日小時分鐘
效果圖:
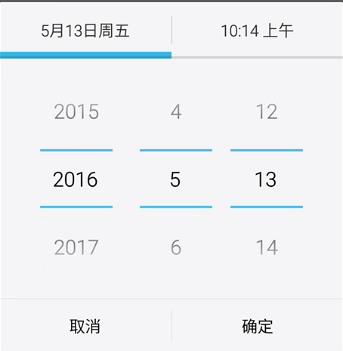
專案在GitHub上的地址:
https://github.com/jjobes/SlideDateTimePicker專案使用:
新增依賴包;
Java中的使用程式碼:
public class SlideDateTimeActivity extends FragmentActivity {

    @Bind(R.id.button)
    Button button;

    private SimpleDateFormat mFormatter = new SimpleDateFormat("MMMM dd yyyy hh:mm aa");
    private Button mButton;

    private SlideDateTimeListener listener = new SlideDateTimeListener() {

        @Override
        public void onDateTimeSet(Date date) {
            Toast.makeText(SlideDateTimeActivity.this,
                    mFormatter.format(date), Toast.LENGTH_SHORT).show();
        }

        // Optional cancel listener
        @Override
        public void onDateTimeCancel() {
            Toast.makeText(SlideDateTimeActivity.this,
                    "Canceled", Toast.LENGTH_SHORT).show();
        }
    };

    @Override
    protected void onCreate(Bundle savedInstanceState) {
        super.onCreate(savedInstanceState);
        setContentView(R.layout.activity_slide_date_time_picker);
        ButterKnife.bind(this);
        button.setOnClickListener(new View.OnClickListener() {

            @Override
            public void onClick(View v) {
                new SlideDateTimePicker.Builder(getSupportFragmentManager())
                        .setListener(listener)
                        .setInitialDate(new Date())
                        //.setMinDate(minDate)
                        //.setMaxDate(maxDate)
                        //.setIs24HourTime(true)
                        //.setTheme(SlideDateTimePicker.HOLO_DARK)
                        //.setIndicatorColor(Color.parseColor("#990000"))
                        .build()
                        .show();
            }
        });
    }

}
Labelview實現標籤功能,在控制元件上面展示斜的文字
效果圖:
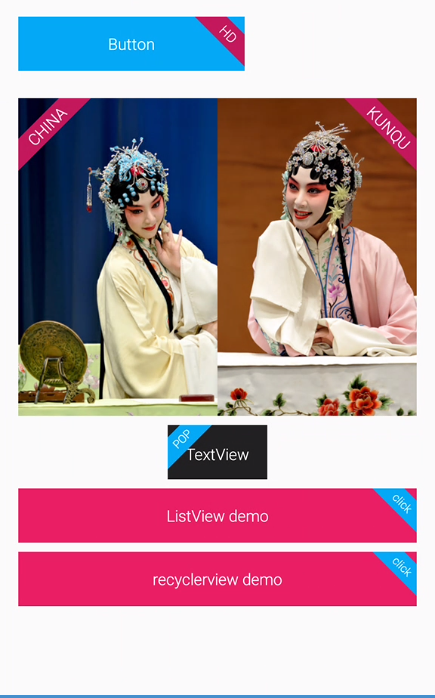
專案在GitHub上的地址:
https://github.com/linger1216//labelview專案使用:
在gradle中新增
compile 'com.github.linger1216:labelview:v1.1.0'在XML中添加布局:
<ScrollView xmlns:android="http://schemas.android.com/apk/res/android"
    xmlns:app="http://schemas.android.com/apk/res-auto"
    xmlns:tools="http://schemas.android.com/tools"
    android:layout_width="match_parent"
    android:layout_height="match_parent"
    android:paddingBottom="@dimen/activity_vertical_margin"
    android:paddingLeft="@dimen/activity_horizontal_margin"
    android:paddingRight="@dimen/activity_horizontal_margin"
    android:paddingTop="@dimen/activity_vertical_margin"
    tools:context=".MainActivity">


    <LinearLayout
        android:layout_width="match_parent"
        android:orientation="vertical"
        android:layout_height="wrap_content">

        <com.lid.lib.LabelButtonView
            android:id="@+id/labelbutton"
            android:layout_width="200dp"
            android:layout_height="48dp"
            android:background="#03a9f4"
            android:gravity="center"
            android:text="Button"
            android:textColor="#ffffff"
            app:label_backgroundColor="#C2185B"
            app:label_distance="20dp"
            app:label_height="20dp"
            app:label_orientation="RIGHT_TOP"
            app:label_text="HD"
            app:label_textSize="12sp" />

        <LinearLayout
            android:layout_width="match_parent"
            android:layout_height="wrap_content"
            android:layout_marginTop="24dp">

            <com.lid.lib.LabelImageView
                android:id="@+id/image1"
                android:layout_width="0dp"
                android:layout_height="match_parent"
                android:layout_weight="1"
                android:scaleType="centerCrop"
                android:src="@mipmap/image1"
                app:label_backgroundColor="#C2185B"
                app:label_orientation="LEFT_TOP"
                app:label_text="CHINA" />


            <com.lid.lib.LabelImageView
                android:id="@+id/image2"
                android:layout_width="0dp"
                android:layout_height="match_parent"
                android:layout_weight="1"
                android:scaleType="centerCrop"
                android:src="@mipmap/image2"
                app:label_backgroundColor="#C2185B"
                app:label_orientation="RIGHT_TOP"
                app:label_text="KUNQU" />
        </LinearLayout>


        <com.lid.lib.LabelTextView
            android:id="@+id/text"
            android:layout_width="wrap_content"
            android:layout_height="48dp"
            android:layout_gravity="center"
            android:layout_marginTop="8dp"
            android:background="#212121"
            android:gravity="center"
            android:padding="16dp"
            android:text="TextView"
            android:textColor="#ffffff"
            app:label_backgroundColor="#03A9F4"
            app:label_distance="15dp"
            app:label_orientation="LEFT_TOP"
            app:label_text="POP"
            app:label_textSize="10sp" />


        <com.lid.lib.LabelButtonView
            android:id="@+id/click"
            android:layout_width="match_parent"
            android:layout_height="48dp"
            android:layout_gravity="center_horizontal"
            android:layout_marginTop="8dp"
            android:background="#E91E63"
            android:gravity="center"
            android:text="ListView demo"
            android:textColor="#ffffff"
            app:label_backgroundColor="#03A9F4"
            app:label_distance="15dp"
            app:label_orientation="RIGHT_TOP"
            app:label_text="click"
            app:label_textSize="10sp" />


        <com.lid.lib.LabelButtonView
            android:id="@+id/click11"
            android:layout_width="match_parent"
            android:layout_height="48dp"
            android:layout_gravity="center_horizontal"
            android:layout_marginTop="8dp"
            android:background="#E91E63"
            android:gravity="center"
            android:text="recyclerview demo"
            android:textColor="#ffffff"
            app:label_backgroundColor="#03A9F4"
            app:label_distance="15dp"
            app:label_orientation="RIGHT_TOP"
            app:label_text="click"
            app:label_textSize="10sp" />

    </LinearLayout>

</ScrollView>
PullZoomView實現類似微信,下拉listview,頂部圖片放大效果
專案在GitHub上的地址:
https://github.com/Frank-Zhu/PullZoomView專案使用:
在gradle中新增
compile 'com.github.frank-zhu:pullzoomview:1.0.0'在XML中添加布局:
<?xml version="1.0" encoding="utf-8"?>
<RelativeLayout xmlns:android="http://schemas.android.com/apk/res/android"
    android:layout_width="match_parent"
    android:layout_height="match_parent"
    >
    <com.zerom.mtest.parallaxListView.ParallaxScollListView
        android:id="@+id/layout_listview"
        android:layout_width="match_parent"
        android:layout_height="match_parent"
        android:cacheColorHint="@null"
        android:duplicateParentState="true"
        android:scrollingCache="false"
        android:headerDividersEnabled="false"
        android:footerDividersEnabled="false"
        android:overScrollMode="never"
        android:scrollbars="none"
        />
</RelativeLayout>
Java中的程式碼:
ParallaxScollListView.class
public class ParallaxScollListView extends ListView implements AbsListView.OnScrollListener {

    public final static double NO_ZOOM = 1;
    public final static double ZOOM_X2 = 2;

    private ImageView mImageView;
    private int mDrawableMaxHeight = -1;
    private int mImageViewHeight = -1;
    private int mDefaultImageViewHeight = 0;
    private double mZoomRatio;

    private interface OnOverScrollByListener {
        public boolean overScrollBy(int deltaX, int deltaY, int scrollX,
                                    int scrollY, int scrollRangeX, int scrollRangeY,
                                    int maxOverScrollX, int maxOverScrollY, boolean isTouchEvent);
    }

    private interface OnTouchEventListener {
        public void onTouchEvent(MotionEvent ev);
    }

    public ParallaxScollListView(Context context, AttributeSet attrs,
                                 int defStyle) {
        super(context, attrs, defStyle);
        init(context);
    }

    public ParallaxScollListView(Context context, AttributeSet attrs) {
        super(context, attrs);
        init(context);
    }

    public ParallaxScollListView(Context context) {
        super(context);
        init(context);
    }

    public void init(Context context) {
        mDefaultImageViewHeight = context.getResources().getDimensionPixelSize(R.dimen.size_default_height);
    }

    @Override
    protected void onLayout(boolean changed, int l, int t, int r, int b) {
        super.onLayout(changed, l, t, r, b);
        initViewsBounds(mZoomRatio);
    }

    @Override
    public void onScrollStateChanged(AbsListView view, int scrollState) {
    }

    @Override
    protected boolean overScrollBy(int deltaX, int deltaY, int scrollX,
                                   int scrollY, int scrollRangeX, int scrollRangeY,
                                   int maxOverScrollX, int maxOverScrollY, boolean isTouchEvent) {
        boolean isCollapseAnimation = false;

        isCollapseAnimation = scrollByListener.overScrollBy(deltaX, deltaY,
                scrollX, scrollY, scrollRangeX, scrollRangeY, maxOverScrollX,
                maxOverScrollY, isTouchEvent)
                || isCollapseAnimation;

        return isCollapseAnimation || super.overScrollBy(deltaX, deltaY,
                scrollX, scrollY, scrollRangeX, scrollRangeY, maxOverScrollX,
                maxOverScrollY, isTouchEvent);
    }

    @Override
    public void onScroll(AbsListView view, int firstVisibleItem,
                         int visibleItemCount, int totalItemCount) {
    }

    @Override
    protected void onScrollChanged(int l, int t, int oldl, int oldt) {
        super.onScrollChanged(l, t, oldl, oldt);
        View firstView = (View) mImageView.getParent();
        // firstView.getTop < getPaddingTop means mImageView will be covered by top padding,
        // so we can layout it to make it shorter
        if (firstView.getTop() < getPaddingTop() && mImageView.getHeight() > mImageViewHeight) {
            mImageView.getLayoutParams().height = Math.max(mImageView.getHeight() - (getPaddingTop() - firstView.getTop()), mImageViewHeight);
            // to set the firstView.mTop to 0,
            // maybe use View.setTop() is more easy, but it just support from Android 3.0 (API 11)
            firstView.layout(firstView.getLeft(), 0, firstView.getRight(), firstView.getHeight());
            mImageView.requestLayout();
        }
    }

    @Override
    public boolean onTouchEvent(MotionEvent ev) {
        touchListener.onTouchEvent(ev);
        return super.onTouchEvent(ev);
    }

    public void setParallaxImageView(ImageView iv) {
        mImageView = iv;
        mImageView.setScaleType(ImageView.ScaleType.CENTER_CROP);
    }

    private void initViewsBounds(double zoomRatio) {
        if (mImageViewHeight == -1) {
            mImageViewHeight = mImageView.getHeight();
            if (mImageViewHeight <= 0) {
                mImageViewHeight = mDefaultImageViewHeight;
            }
            double ratio = ((double) mImageView.getDrawable().getIntrinsicWidth()) / ((double) mImageView.getWidth());

            mDrawableMaxHeight = (int) ((mImageView.getDrawable().getIntrinsicHeight() / ratio) * (zoomRatio > 1 ?
                    zoomRatio : 1));
        }
    }

    public void setZoomRatio(double zoomRatio) {
        mZoomRatio = zoomRatio;
    }

    private OnOverScrollByListener scrollByListener = new OnOverScrollByListener() {
        @Override
        public boolean overScrollBy(int deltaX, int deltaY, int scrollX,
                                    int scrollY, int scrollRangeX, int scrollRangeY,
                                    int maxOverScrollX, int maxOverScrollY, boolean isTouchEvent) {
            if (mImageView.getHeight() <= mDrawableMaxHeight && isTouchEvent) {
                if (deltaY < 0) {
                    if (mImageView.getHeight() - deltaY / 2 >= mImageViewHeight) {
                        mImageView.getLayoutParams().height = mImageView.getHeight() - deltaY / 2 < mDrawableMaxHeight ?
                                mImageView.getHeight() - deltaY / 2 : mDrawableMaxHeight;
                        mImageView.requestLayout();
                    }
                } else {
                    if (mImageView.getHeight() > mImageViewHeight) {
                        mImageView.getLayoutParams().height = mImageView.getHeight() - deltaY > mImageViewHeight ?
                                mImageView.getHeight() - deltaY : mImageViewHeight;
                        mImageView.requestLayout();
                        return true;
                    }
                }
            }
            return false;
        }
    };

    private OnTouchEventListener touchListener = new OnTouchEventListener() {
        @Override
        public void onTouchEvent(MotionEvent ev) {
            if (ev.getAction() == MotionEvent.ACTION_UP) {
                if (mImageViewHeight - 1 < mImageView.getHeight()) {
                    ResetAnimimation animation = new ResetAnimimation(
                            mImageView, mImageViewHeight);
                    animation.setDuration(300);
                    mImageView.startAnimation(animation);
                }
            }
        }
    };

    public class ResetAnimimation extends Animation {
        int targetHeight;
        int originalHeight;
        int extraHeight;
        View mView;

        protected ResetAnimimation(View view, int targetHeight) {
            this.mView = view;
            this.targetHeight = targetHeight;
            originalHeight = view.getHeight();
            extraHeight = this.targetHeight - originalHeight;
        }

        @Override
        protected void applyTransformation(float interpolatedTime,
                                           Transformation t) {

            int newHeight;
            newHeight = (int) (targetHeight - extraHeight * (1 - interpolatedTime));
            mView.getLayoutParams().height = newHeight;
            mView.requestLayout();
        }
    }
}
ParallaxListViewActivity.class
public class ParallaxListViewActivity extends AppCompatActivity {


    @Bind(R.id.layout_listview)
    ParallaxScollListView layoutListview;

    @Override
    protected void onCreate(Bundle savedInstanceState) {
        super.onCreate(savedInstanceState);
        setContentView(R.layout.activity_parallax_list_view);
        ButterKnife.bind(this);

        View header = LayoutInflater.from(this).inflate(R.layout.listview_header, null);
        ImageView mImageView = (ImageView) header.findViewById(R.id.layout_header_image);

        layoutListview.setZoomRatio(ParallaxScollListView.ZOOM_X2);
        layoutListview.setParallaxImageView(mImageView);
        layoutListview.addHeaderView(header);

        ArrayAdapter<String> adapter = new ArrayAdapter<String>(this,
                android.R.layout.simple_expandable_list_item_1,
                new String[]{
                        "First Item",
                        "Second Item",
                        "Third Item",
                        "Fifth Item",
                        "Sixth Item",
                        "Seventh Item",
                        "Eighth Item",
                        "Ninth Item",
                        "Tenth Item",
                        "....."
                }
        );
        layoutListview.setAdapter(adapter);
    }
}
SwipeMenuListView實現listview滑動刪除。
效果圖:
專案在GitHub上的地址:
https://github.com/baoyongzhang/SwipeMenuListView專案使用:
在gradle中新增
compile 'com.baoyz.swipemenulistview:library:1.3.0'有兩種側滑刪除的列表,一種是側滑內容都一樣的列表,SimpleActivity.class;
另一種是側滑內容不一樣的列表,DifferentMenuActivity.class;
SimpleActivity.class
public class SimpleActivity extends AppCompatActivity {

    private List<ApplicationInfo> mAppList;
    private AppAdapter mAdapter;
    private SwipeMenuListView mListView;

    @Override
    protected void onCreate(Bundle savedInstanceState) {
        super.onCreate(savedInstanceState);
        setContentView(R.layout.activity_simple);

        mAppList = getPackageManager().getInstalledApplications(0);

        mListView = (SwipeMenuListView) findViewById(R.id.listView);

        mAdapter = new AppAdapter();
        mListView.setAdapter(mAdapter);

        // step 1. create a MenuCreator
        SwipeMenuCreator creator = new SwipeMenuCreator() {

            @Override
            public void create(SwipeMenu menu) {
                // create "open" item
                SwipeMenuItem openItem = new SwipeMenuItem(
                        getApplicationContext());
                // set item background
                openItem.setBackground(new ColorDrawable(Color.rgb(0xC9, 0xC9,
                        0xCE)));
                // set item width
                openItem.setWidth(dp2px(90));
                // set item title
                openItem.setTitle("Open");
                // set item title fontsize
                openItem.setTitleSize(18);
                // set item title font color
                openItem.setTitleColor(Color.WHITE);
                // add to menu
                menu.addMenuItem(openItem);

                // create "delete" item
                SwipeMenuItem deleteItem = new SwipeMenuItem(
                        getApplicationContext());
                // set item background
                deleteItem.setBackground(new ColorDrawable(Color.rgb(0xF9,
                        0x3F, 0x25)));
                // set item width
                deleteItem.setWidth(dp2px(90));
                // set a icon
                deleteItem.setIcon(R.mipmap.ic_delete);
                // add to menu
                menu.addMenuItem(deleteItem);
            }
        };
        // set creator
        mListView.setMenuCreator(creator);

        // step 2. listener item click event
        mListView.setOnMenuItemClickListener(new SwipeMenuListView.OnMenuItemClickListener() {
            @Override
            public boolean onMenuItemClick(int position, SwipeMenu menu, int index) {
                ApplicationInfo item = mAppList.get(position);
                switch (index) {
                    case 0:
                        // open
                        open(item);
                        break;
                    case 1:
                        // delete
//                  delete(item);
                        mAppList.remove(position);
                        mAdapter.notifyDataSetChanged();
                        break;
                }
                return false;
            }
        });

        // set SwipeListener
        mListView.setOnSwipeListener(new SwipeMenuListView.OnSwipeListener() {

            @Override
            public void onSwipeStart(int position) {
                // swipe start
            }

            @Override
            public void onSwipeEnd(int position) {
                // swipe end
            }
        });

        // set MenuStateChangeListener
        mListView.setOnMenuStateChangeListener(new SwipeMenuListView.OnMenuStateChangeListener() {
            @Override
            public void onMenuOpen(int position) {
            }

            @Override
            public void onMenuClose(int position) {
            }
        });

        // other setting
//      listView.setCloseInterpolator(new BounceInterpolator());

        // test item long click
        mListView.setOnItemLongClickListener(new AdapterView.OnItemLongClickListener() {

            @Override
            public boolean onItemLongClick(AdapterView<?> parent, View view,
                                           int position, long id) {
                Toast.makeText(getApplicationContext(), position + " long click", Toast.LENGTH_SHORT).show();
                return false;
            }
        });

    }

    private void delete(ApplicationInfo item) {
        // delete app
        try {
            Intent intent = new Intent(Intent.ACTION_DELETE);
            intent.setData(Uri.fromParts("package", item.packageName, null));
            startActivity(intent);
        } catch (Exception e) {
        }
    }

    private void open(ApplicationInfo item) {
        // open app
        Intent resolveIntent = new Intent(Intent.ACTION_MAIN, null);
        resolveIntent.addCategory(Intent.CATEGORY_LAUNCHER);
        resolveIntent.setPackage(item.packageName);
        List<ResolveInfo> resolveInfoList = getPackageManager()
                .queryIntentActivities(resolveIntent, 0);
        if (resolveInfoList != null && resolveInfoList.size() > 0) {
            ResolveInfo resolveInfo = resolveInfoList.get(0);
            String activityPackageName = resolveInfo.activityInfo.packageName;
            String className = resolveInfo.activityInfo.name;

            Intent intent = new Intent(Intent.ACTION_MAIN);
            intent.addCategory(Intent.CATEGORY_LAUNCHER);
            ComponentName componentName = new ComponentName(
                    activityPackageName, className);

            intent.setComponent(componentName);
            startActivity(intent);
        }
    }

    class AppAdapter extends BaseAdapter {

        @Override
        public int getCount() {
            return mAppList.size();
        }

        @Override
        public ApplicationInfo getItem(int position) {
            return mAppList.get(position);
        }

        @Override
        public long getItemId(int position) {
            return position;
        }

        @Override
        public View getView(int position, View convertView, ViewGroup parent) {
            if (convertView == null) {
                convertView = View.inflate(getApplicationContext(),
                        R.layout.item_list_app, null);
                new ViewHolder(convertView);
            }
            ViewHolder holder = (ViewHolder) convertView.getTag();
            ApplicationInfo item = getItem(position);
            holder.iv_icon.setImageDrawable(item.loadIcon(getPackageManager()));
            holder.tv_name.setText(item.loadLabel(getPackageManager()));
            holder.iv_icon.setOnClickListener(new View.OnClickListener() {
                @Override
                public void onClick(View v) {
                    Toast.makeText(SimpleActivity.this, "iv_icon_click", Toast.LENGTH_SHORT).show();
                }
            });
            holder.tv_name.setOnClickListener(new View.OnClickListen