
OpenGL+Xcode環境配置
步驟1:安裝brew
開啟終端,複製下面一行命令執行,安裝需要一分鐘左右,過程中需要輸入密碼,其他無需操作
/usr/bin/ruby -e "$(curl -fsSL https://raw.githubusercontent.com/Homebrew/install/master/install)"
步驟2:安裝GLFW、GLEW庫
在終端輸入:$ brew install glew$ brew install glfw【注:有的教程中是brew install glfw3,博主這樣進行安裝後代碼不能正常執行,找不到庫檔案,改為glfw其實就是預設安裝glfw的最新版本】
步驟3:下載glad庫
開啟GLAD的線上服務
【以上三步不能正常完成的,可在以下地址下載博主整理好的庫檔案:
https://github.com/xiaobooo/OpenGL/tree/master/Base】
步驟4:在專案中進行配置
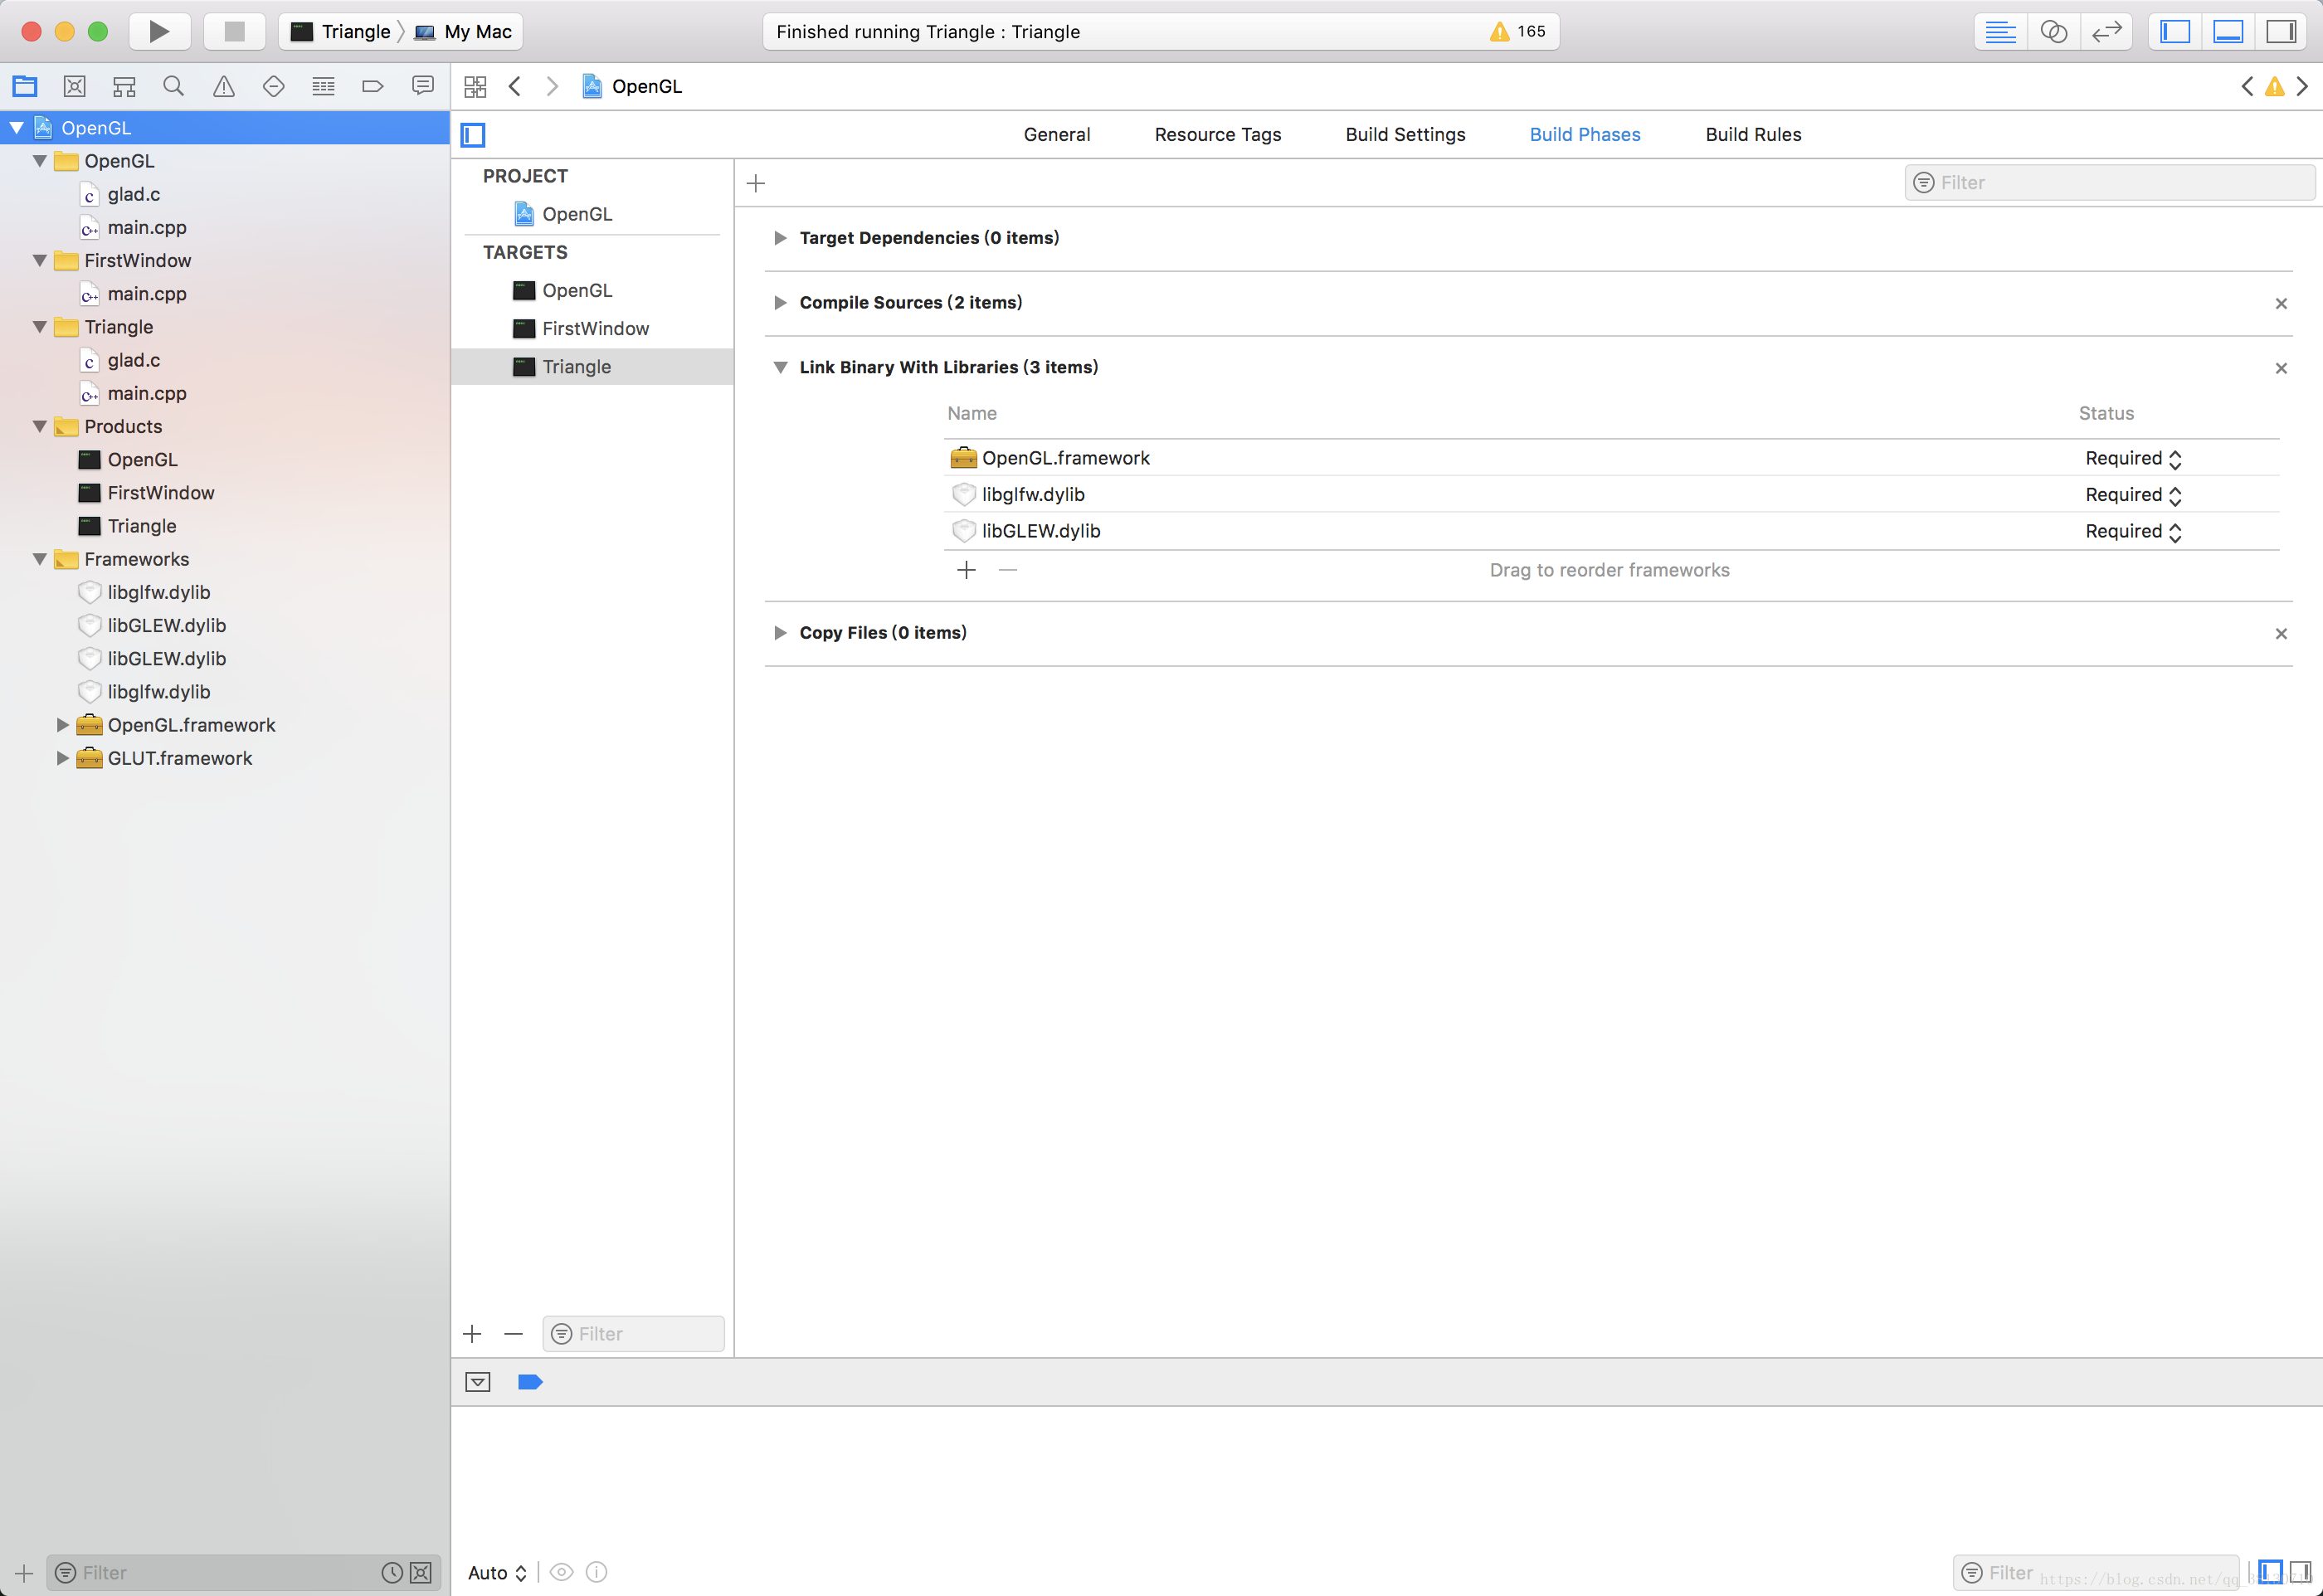
單擊專案,進入專案設定頁面
Build Phases --->Link Binary With Libraries
新增OpenGL.framework, libglfw.lib, libGLEW.dylib【後兩個檔案可以在下載的glfw/glew庫檔案中的lib資料夾中找到】
專案標頭檔案有引入glut.h的還需要新增GLUT.framework
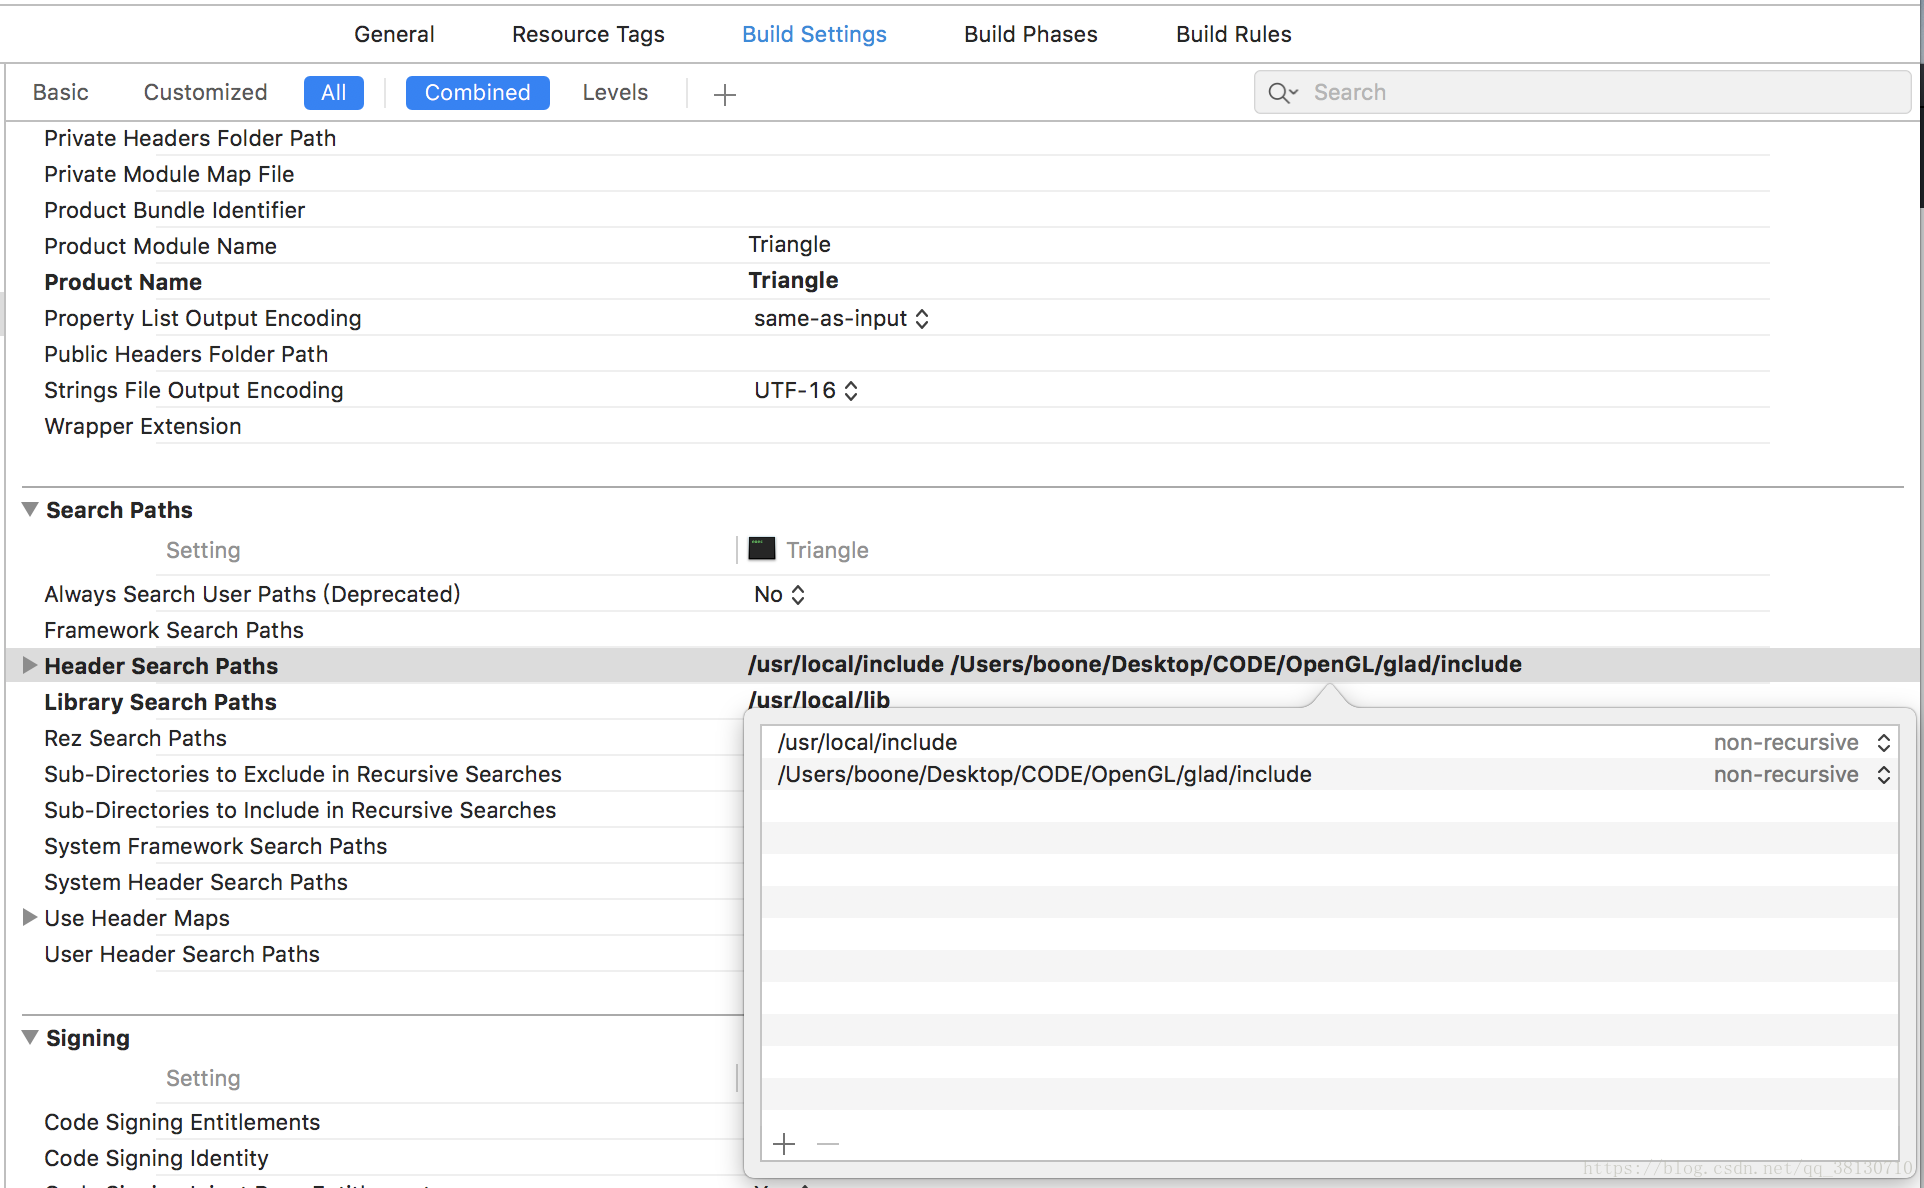
Build Settings --->Search Paths
在Header Search Paths中新增/usr/local/include【通過brew安裝glfw/glew的直接這樣新增即可,穩穩地】
需要GLAD庫的還需要新增glad庫檔案中的include資料夾的位置
在Library Search Paths中新增/usr/local/lib
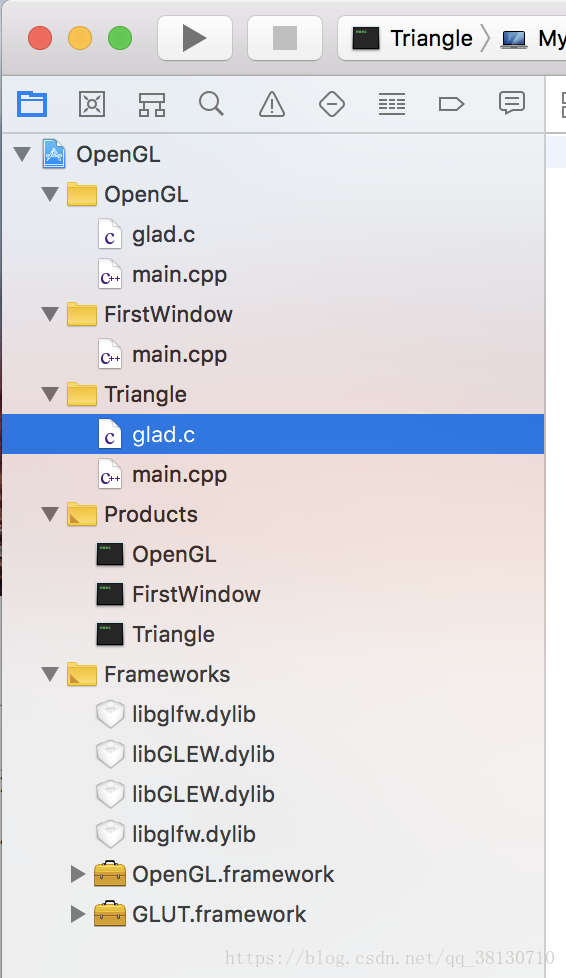
需要glad的同學還需要將glad.c放入工程中,直接拖入即可:
大功告成,測試程式碼:
//
//  main.cpp
//  Triangle
//
//  Created by boone on 2018/7/3.
//  Copyright © 2018年 boone. All rights reserved.
//
#include <glad/glad.h>
#include <GLFW/glfw3.h>

#include <iostream>

using namespace std;

const unsigned int WIDTH = 800;

const unsigned int HEIGHT = 800;

//頂點著色器
const char *vertexShaderSource = "#version 330 core\n"
"layout (location = 0) in vec3 aPos;\n"
"void main()\n"
"{\n"
"   gl_Position = vec4(aPos.x, aPos.y, aPos.z, 1.0);\n"
"}\0";
//片段著色器
const char *fragmentShaderSource = "#version 330 core\n"
"out vec4 FragColor;\n"
"void main()\n"
"{\n"
"   FragColor = vec4(1.0f, 0.5f, 0.2f, 1.0f);\n"
"}\n\0";

void framebuffer_size_callback(GLFWwindow* window, int width, int height){
    glViewport(0, 0, width, height);
}
void pressInput(GLFWwindow* window){
    if(glfwGetKey(window, GLFW_KEY_ESCAPE) == GLFW_PRESS)
        glfwSetWindowShouldClose(window, true);
}

int main(){
    //初始化視窗
    glfwInit();
    glfwWindowHint(GLFW_CONTEXT_VERSION_MAJOR, 3);
    glfwWindowHint(GLFW_CONTEXT_VERSION_MINOR, 3);
    glfwWindowHint(GLFW_OPENGL_PROFILE, GLFW_OPENGL_CORE_PROFILE);

    glfwWindowHint(GLFW_OPENGL_FORWARD_COMPAT, GL_TRUE);     //相容Mac OS X

    GLFWwindow* window = glfwCreateWindow(WIDTH, HEIGHT, "Xiaobooo's Triange", NULL, NULL);

    //判斷視窗建立是否成功
    if(window == NULL){
        cout<<"Fail to Create Window"<<endl;
        glfwTerminate();
        return -1;
    }
    glfwMakeContextCurrent(window);
    glfwSetFramebufferSizeCallback(window, framebuffer_size_callback);

    // glad: load all OpenGL function pointers
    // ---------------------------------------
    if (!gladLoadGLLoader((GLADloadproc)glfwGetProcAddress))
    {
        std::cout << "Failed to initialize GLAD" << std::endl;
        return -1;
    }

    //建立頂點著色器
    int vertexShader = glCreateShader(GL_VERTEX_SHADER);
    glShaderSource(vertexShader, 1, &vertexShaderSource, NULL);
    glCompileShader(vertexShader);
    //檢查頂點著色器編譯是否成功
    int success;
    char infoLog[512];
    glGetShaderiv(vertexShader, GL_COMPILE_STATUS, &success);
    if(!success){
        glGetShaderInfoLog(vertexShader, 512, NULL, infoLog);
        cout<<"ERROR: VertexShader Compile Fail"<<infoLog<<endl;
    }

    //建立片段著色器
    int fragmentShader = glCreateShader(GL_FRAGMENT_SHADER);
    glShaderSource(fragmentShader, 1, &fragmentShaderSource, NULL);
    glCompileShader(fragmentShader);

    //檢查片段著色器是否編譯成功
    glGetShaderiv(fragmentShader, GL_COMPILE_STATUS, &success);
    if(!success){
        glGetShaderInfoLog(fragmentShader, 512, NULL, infoLog);
        cout<<"ERROR: FragmentShader Compile Fail"<<infoLog<<endl;
    }

    //連結著色器
    int shaderProgram = glCreateProgram();
    glAttachShader(shaderProgram, vertexShader);
    glAttachShader(shaderProgram, fragmentShader);
    glLinkProgram(shaderProgram);

    //檢查著色器連結是否成功
    glGetProgramiv(shaderProgram, GL_LINK_STATUS, &success);
    if(!success){
        glGetProgramInfoLog(shaderProgram, 512, NULL, infoLog);
        cout<<"ERROR: Shader Link Fail"<<infoLog<<endl;
    }
    glDeleteShader(vertexShader);
    glDeleteShader(fragmentShader);

    //設定頂點座標
    float vertices[]={
        -0.5f, -0.5f, 0.0f, // left
        0.5f, -0.5f, 0.0f, // right
        0.0f,  0.5f, 0.0f  // top
    };

    unsigned int VBO, VAO;
    glGenVertexArrays(1, &VAO);
    glGenBuffers(1, &VBO);
    // bind the Vertex Array Object first, then bind and set vertex buffer(s), and then configure vertex attributes(s).
    glBindVertexArray(VAO);

    glBindBuffer(GL_ARRAY_BUFFER, VBO);
    glBufferData(GL_ARRAY_BUFFER, sizeof(vertices), vertices, GL_STATIC_DRAW);

    glVertexAttribPointer(0, 3, GL_FLOAT, GL_FALSE, 3 * sizeof(float), (void*)0);
    glEnableVertexAttribArray(0);

    // note that this is allowed, the call to glVertexAttribPointer registered VBO as the vertex attribute's bound vertex buffer object so afterwards we can safely unbind
    glBindBuffer(GL_ARRAY_BUFFER, 0);

    // You can unbind the VAO afterwards so other VAO calls won't accidentally modify this VAO, but this rarely happens. Modifying other
    // VAOs requires a call to glBindVertexArray anyways so we generally don't unbind VAOs (nor VBOs) when it's not directly necessary.
    glBindVertexArray(0);


    //迴圈渲染
    while(!glfwWindowShouldClose(window)){

        pressInput(window);

        glClearColor(0.8f, 0.8f, 0.8f, 0.8f);
        glClear(GL_COLOR_BUFFER_BIT);

        glUseProgram(shaderProgram);
        glBindVertexArray(VAO);
        glDrawArrays(GL_TRIANGLES,0,3);

        glfwSwapBuffers(window);
        glfwPollEvents();
    }

    glDeleteVertexArrays(1,&VAO);
    glDeleteBuffers(1,&VBO);

    //釋放分配的資源
    glfwTerminate();
    return 0;
}
博主opengl學習日記:https://github.com/xiaobooo/OpenGL