
VS2012下基於Glut OpenGL GL_POLYGON_STIPPLE示例程式:
阿新 • • 發佈:2019-02-14
直線可以被畫成虛線,而多邊形則可以進行鏤空。
首先,使用glEnable(GL_POLYGON_STIPPLE);來啟動鏤空模式(使用glDisable(GL_POLYGON_STIPPLE)可以關閉之)。
然後,使用glPolygonStipple來設定鏤空的樣式。
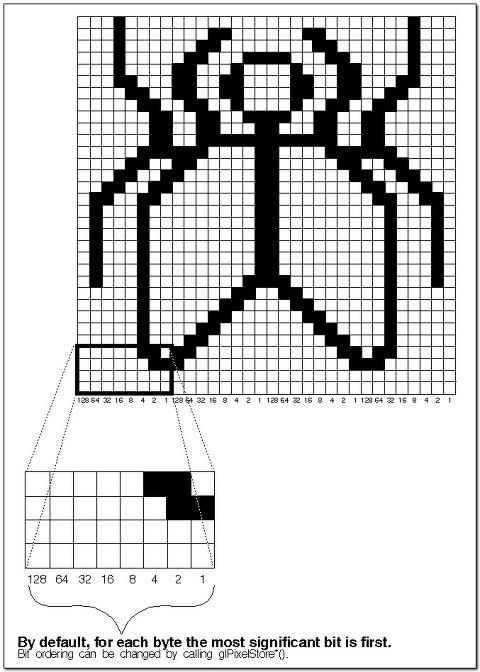
void glPolygonStipple(const GLubyte *mask);
其中的引數mask指向一個長度為128位元組的空間,它表示了一個32*32的矩形應該如何鏤空。其中:第一個位元組表示了最左下方的從左到右(也可以是從右到左,這個可以修改)8個畫素是否鏤空(1表示不鏤空,顯示該畫素;0表示鏤空,顯示其後面的顏色),最後一個位元組表示了最右上方的8個畫素是否鏤空。
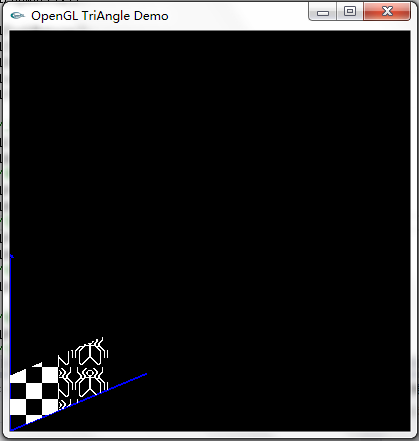
Demo的顯示效果如下:可以發現即使是在旋轉座標系時圖案還是平面填充的,和紋理不一樣。

原始碼如下所示:
// GlutPolygonStippleDemo.cpp : 定義控制檯應用程式的入口點。
//

#include "stdafx.h"
#include <gl/glut.h>
#include <math.h>

//圓周率巨集
#define GL_PI 3.1415f
GLubyte stippledata[128] = { //第一個矩形點畫模式的mask值
0x00, 0x00, 0xff, 0xff,
0x00, 0x00, 0xff, 0xff,
0x00, 0x00, 0xff, 0xff,
0x00, 0x00, 0xff, 0xff,
0x00, 0x00, 0xff, 0xff,
0x00, 0x00, 0xff, 0xff,
0x00, 0x00, 0xff, 0xff,
0x00, 0x00, 0xff, 0xff,
0x00, 0x00, 0xff, 0xff,
0x00, 0x00, 0xff, 0xff,
0x00, 0x00, 0xff, 0xff,
0x00, 0x00, 0xff, 0xff,
0x00, 0x00, 0xff, 0xff,
0x00, 0x00, 0xff, 0xff,
0x00, 0x00, 0xff, 0xff,
0x00, 0x00, 0xff, 0xff,

0xff, 0xff, 0x00, 0x00,
0xff, 0xff, 0x00, 0x00,
0xff, 0xff, 0x00, 0x00,
0xff, 0xff, 0x00, 0x00,
0xff, 0xff, 0x00, 0x00,
0xff, 0xff, 0x00, 0x00,
0xff, 0xff, 0x00, 0x00,
0xff, 0xff, 0x00, 0x00,
0xff, 0xff, 0x00, 0x00,
0xff, 0xff, 0x00, 0x00,
0xff, 0xff, 0x00, 0x00,
0xff, 0xff, 0x00, 0x00,
0xff, 0xff, 0x00, 0x00,
0xff, 0xff, 0x00, 0x00,
0xff, 0xff, 0x00, 0x00,
0xff, 0xff, 0x00, 0x00,
};
GLubyte flydata[128] = { //第二個矩形點畫模式的mask值
0x00, 0x00, 0x00, 0x00,
0x00, 0x00, 0x00, 0x00,
0x03, 0x80, 0x01, 0xC0,
0x06, 0xC0, 0x03, 0x60,
0x04, 0x60, 0x06, 0x20,
0x04, 0x30, 0x0C, 0x20,
0x04, 0x18, 0x18, 0x20,
0x04, 0x0C, 0x30, 0x20,
0x04, 0x06, 0x60, 0x20,
0x44, 0x03, 0xC0, 0x22,
0x44, 0x01, 0x80, 0x22,
0x44, 0x01, 0x80, 0x22,
0x44, 0x01, 0x80, 0x22,
0x44, 0x01, 0x80, 0x22,
0x44, 0x01, 0x80, 0x22,
0x44, 0x01, 0x80, 0x22,

0x66, 0x01, 0x80, 0x66,
0x33, 0x01, 0x80, 0xCC,
0x19, 0x81, 0x81, 0x98,
0x0C, 0xC1, 0x83, 0x30,
0x07, 0xe1, 0x87, 0xe0,
0x03, 0x3f, 0xfc, 0xc0,
0x03, 0x31, 0x8c, 0xc0,
0x03, 0x33, 0xcc, 0xc0,
0x06, 0x64, 0x26, 0x60,
0x0c, 0xcc, 0x33, 0x30,
0x18, 0xcc, 0x33, 0x18,
0x10, 0xc4, 0x23, 0x08,
0x10, 0x63, 0xC6, 0x08,
0x10, 0x30, 0x0c, 0x08,
0x10, 0x18, 0x18, 0x08,
0x10, 0x00, 0x00, 0x08,
};

//獲取螢幕的寬度
GLint SCREEN_WIDTH=0;
GLint SCREEN_HEIGHT=0;
//設定程式的視窗大小
GLint windowWidth=400;
GLint windowHeight=400;
//繞x軸旋轉角度
GLfloat xRotAngle=0.0f;
//繞y軸旋轉角度
GLfloat yRotAngle=0.0f;

//是否開啟不顯示背面功能
GLint cullFace=0;
//是否開啟深度測試功能
GLint depthTest=0;
//背面是採用線條描外框還是使用單色填充
GLint outLine=0;
//選單回撥函式
void processMenu(int value){
	switch(value){
		case 1:
			depthTest=!depthTest;
			break;
		case 2:
			cullFace=!cullFace;
		case 3:
			outLine=!outLine;
			break;
			break;
		default:
			break;
	}
	//重新繪製
	glutPostRedisplay();
}
//顯示回撥函式
void renderScreen(void){
    GLfloat x,y,z,angle;
    //把整個視窗清理為當前清理顏色:黑色
    glClear(GL_COLOR_BUFFER_BIT|GL_DEPTH_BUFFER_BIT);
    //將當前Matrix狀態入棧
    glPushMatrix();
    //座標系繞x軸旋轉xRotAngle
    glRotatef(xRotAngle,1.0f,0.0f,0.0f);
    //座標系繞y軸旋轉yRotAngle
    glRotatef(yRotAngle,0.0f,1.0f,0.0f);
	if(depthTest)
		glEnable(GL_DEPTH_TEST);//開啟深度測試功能
	else
		glDisable(GL_DEPTH_TEST);//關閉深度測試功能
	if(cullFace)
		glEnable(GL_CULL_FACE);//開啟不顯示背面功能
	else
		glDisable(GL_CULL_FACE);//關閉不顯示背面功能
	if(outLine)
		glPolygonMode(GL_BACK,GL_LINE);//多邊形背部使用線條描框
	else
		glPolygonMode(GL_BACK,GL_FILL);//多邊形背部使用單色填充
	x=0.0f;
	y=0.0f;
    z=0.0f;
	//進行平滑處理
	glEnable(GL_LINE_SMOOTH);
	glHint(GL_LINE_SMOOTH,GL_NICEST);
	//藍色繪製座標系
	glColor3f(0.0f,0.0f,1.0f);
	glBegin(GL_LINES);
		glVertex3f(-200.0f,0.0f,0.0f);
		glVertex3f(200.0f,0.0f,0.0f);
		glVertex3f(0.0f,-200.0f,0.0f);
		glVertex3f(0.0f,200.0f,0.0f);
		glVertex3f(0.0f,0.0f,-200.0f);
		glVertex3f(0.0f,0.0f,200.0f);
	glEnd();

	glPushMatrix();
	glTranslatef(200.0f,0.0f,0.0f);
	glRotatef(90.0f,0.0f,1.0f,0.0f);
	glutWireCone(3,6,10,10);
	glPopMatrix();

	glPushMatrix();
	glTranslatef(0.0f,200.0f,0.0f);
	glRotatef(-90.0f,1.0f,0.0f,0.0f);
	glutWireCone(3,6,10,10);
	glPopMatrix();

	glPushMatrix();
	glTranslatef(0.0f,0.0f,200.0f);
	glRotatef(90.0f,0.0f,0.0f,1.0f);
	glutWireCone(3,6,10,10);
	glPopMatrix();

	//開始白色GL_POLYGON_STIPPLE繪製
	glColor3f(1.0f,1.0f,1.0f);
	glEnable(GL_POLYGON_STIPPLE);
	//黑白交替圖案繪製第一個矩形
	glPolygonStipple(stippledata);
	glRectf(0.0f,0.0f,64.0f,64.0f);
	//蒼蠅圖案繪製第二個矩形
	glPolygonStipple(flydata);
	glRectf(64.0f,0.0f,128.0f,64.0f);
	//結束GL_POLYGON_STIPPLE繪製
	glDisable(GL_POLYGON_STIPPLE);

    //恢復壓入棧的Matrix
    glPopMatrix();
    //交換兩個緩衝區的指標
    glutSwapBuffers();
}
//設定Redering State
void setupRederingState(void){
    //設定清理顏色為黑色
    glClearColor(0.0f,0.0,0.0,1.0f);
    //設定繪畫顏色為綠色
    glColor3f(0.0f,1.0f,0.0f);
	//平面填充
	glShadeModel(GLU_FLAT);
}
//視窗大小變化回撥函式
void changSize(GLint w,GLint h){
    //橫寬比率
    GLfloat ratio;
    //設定座標系為x(-100.0f,100.0f)、y(-100.0f,100.0f)、z(-100.0f,100.0f)
    GLfloat coordinatesize=100.0f;
    //視窗寬高為零直接返回
    if((w==0)||(h==0))
        return;
    //設定視口和視窗大小一致
    glViewport(0,0,w,h);
    //對投影矩陣應用隨後的矩陣操作
    glMatrixMode(GL_PROJECTION);
    //重置當前指定的矩陣為單位矩陣
    glLoadIdentity();
    ratio=(GLfloat)w/(GLfloat)h;
    //正交投影
	/*
    if(w<h)
        glOrtho(-coordinatesize,coordinatesize,-coordinatesize/ratio,coordinatesize/ratio,-coordinatesize,coordinatesize);
    else
        glOrtho(-coordinatesize*ratio,coordinatesize*ratio,-coordinatesize,coordinatesize,-coordinatesize,coordinatesize);
	*/
	glOrtho(0.0f,w,0.0f,h,-coordinatesize,coordinatesize);
    //對模型檢視矩陣堆疊應用隨後的矩陣操作
    glMatrixMode(GL_MODELVIEW);
    //重置當前指定的矩陣為單位矩陣
    glLoadIdentity();
}

//按鍵輸入處理回撥函式
void specialKey(int key,int x,int y){

    if(key==GLUT_KEY_UP){
        xRotAngle-=5.0f;
    }
    else if(key==GLUT_KEY_DOWN){
        xRotAngle+=5.0f;
    }
    else if(key==GLUT_KEY_LEFT){
        yRotAngle-=5.0f;
    }
    else if(key==GLUT_KEY_RIGHT){
        yRotAngle+=5.0f;
    }
    //重新繪製
    glutPostRedisplay();
}

int main(int argc, char* argv[])
{
    //初始化glut
    glutInit(&argc,argv);
    //使用雙緩衝區模式
    glutInitDisplayMode(GLUT_DOUBLE|GLUT_RGBA|GLUT_DEPTH);
    //獲取系統的寬畫素
    SCREEN_WIDTH=glutGet(GLUT_SCREEN_WIDTH);
    //獲取系統的高畫素
    SCREEN_HEIGHT=glutGet(GLUT_SCREEN_HEIGHT);
	//建立視窗,視窗名字為OpenGL TriAngle Demo
    glutCreateWindow("OpenGL PloygonStipple Demo");
	//選單回撥函式
	glutCreateMenu(processMenu);
	//新增選單
	glutAddMenuEntry("Toggle depth test",1);
	glutAddMenuEntry("Toggle cull face",2);
	glutAddMenuEntry("Toggle back outline",3);
	//將選單榜定到滑鼠右鍵上
	glutAttachMenu(GLUT_RIGHT_BUTTON);
    //設定視窗大小
    glutReshapeWindow(windowWidth,windowHeight);
    //視窗居中顯示
    glutPositionWindow((SCREEN_WIDTH-windowWidth)/2,(SCREEN_HEIGHT-windowHeight)/2);
    //視窗大小變化時的處理函式
    glutReshapeFunc(changSize);
    //設定顯示回撥函式
    glutDisplayFunc(renderScreen);
    //設定按鍵輸入處理回撥函式
    glutSpecialFunc(specialKey);
    //設定全域性渲染引數
    setupRederingState();
    glutMainLoop();
    return 0;
}