
jni呼叫kernel驅動檔案程式碼分析
轉自: https://www.cnblogs.com/armlinux/archive/2012/01/14/2396768.html
重溫了一下程式碼流程,留個腳印,以備後用
Android Hal 分析
-------rockchip Andy
本文是基於android4.0.3.對應其他低版本的程式碼,可能有所差異,但基本大同小異。
Android的HAL是為了保護一些硬體提供商的智慧財產權而提出的,是為了避開linux的GPL束縛。思路是把控制硬體的動作都放到了Android HAL中,而linux driver僅僅完成一些簡單的資料互動作用,甚至把硬體暫存器空間直接對映到user space。而Android是基於Aparch的license,因此硬體廠商可以只提供二進位制程式碼,所以說Android只是一個開放的平臺,並不是一個開源的平臺。也許也正是因為Android不遵從GPL,所以Greg Kroah-Hartman才在2.6.33核心將Andorid驅動從linux中刪除。GPL和硬體廠商目前還是有著無法彌合的裂痕。Android想要把這個問題處理好也是不容易的。
總結下來,Android HAL存在的原因主要有:
1. 並不是所有的硬體裝置都有標準的linux kernel的介面
2. KERNEL DRIVER涉及到GPL的版權。某些裝置製造商並不原因公開硬體驅動,所以才去用HAL方 式繞過GPL。
3. 針對某些硬體,An有一些特殊的需求
現有HAL架構由Patrick Brady (Google) 在2008 Google I/O演講中提出的,如下圖:

一、 原始碼位置
/hardware/libhardware_legacy/ - 舊的架構、採取連結庫模組的方式
/hardware/libhardware 新架構、調整為 HAL stub 目錄的結構如下:
/hardware/libhardware/hardware.c 編譯成libhardware.s置於/system/lib
/hardware/libhardware/include/hardware目錄下包含如下標頭檔案:
hardware.h 通用硬體模組標頭檔案
copybit.h copybit模組標頭檔案
gralloc.h gralloc模組標頭檔案
lights.h 背光模組標頭檔案
overlay.h overlay模組標頭檔案
qemud.h qemud模組標頭檔案
sensors.h 感測器模組標頭檔案
/hardware/libhardware/modules 目錄下定義了很多硬體模組
/hardware/msm7k /hardware/qcom /hardware/ti /device/Samsung
/device/moto 各個廠商平臺相關的hal
這些硬體模組都編譯成xxx.xxx.so,目標位置為/system/lib/hw目錄
二、 HAL層的實現方式
目前HAL存在兩種構架,位於libhardware_legacy目錄下的“舊HAL架構”和位於libhardware目錄下的“新HAL架構”。兩種框架如下圖所示:
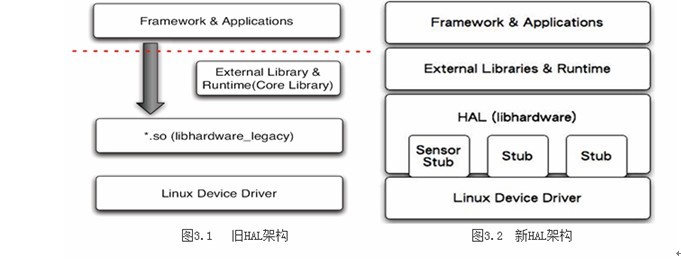
libhardware_legacy 是將 *.so 檔案當作shared library來使用,在runtime(JNI 部份)以 direct function call 使用 HAL module。通過直接函式呼叫的方式,來操作驅動程式。當然,應用程式也可以不需要通過 JNI 的方式進行,直接載入 *.so (dlopen)的做法呼叫*.so 裡的符號(symbol)也是一種方式。總而言之是沒有經過封裝,上層可以直接操作硬體。
現在的libhardware 架構,就有stub的味道了。HAL stub 是一種代理人(proxy)的概念,stub 雖然仍是以 *.so檔的形式存在,但HAL已經將 *.so 檔隱藏起來了。Stub 向 HAL提供操作函式(operations),而 runtime 則是向 HAL 取得特定模組(stub)的 operations,再 callback 這些操作函式。這種以 indirect function call 的架構,讓HAL stub 變成是一種包含關係,即 HAL 裡包含了許許多多的 stub(代理人)。Runtime 只要說明型別,即 module ID,就可以取得操作函式。對於目前的HAL,可以認為Android定義了HAL層結構框架,通過幾個介面訪問硬體從而統一了呼叫方式。
Android的HAL的實現需要通過JNI(Java Native Interface),JNI簡單來說就是java程式可以呼叫C/C++寫的動態連結庫,這樣的話,HAL可以使用C/C++語言編寫,效率更高。JNI->通用硬體模組->硬體模組->核心驅動介面,具體一點:JNI->libhardware.so->xxx.xxx.so->kernel,具體來說:android frameworks中JNI呼叫hardware.c中定義的hw_get_module函式來獲取硬體模組,然後呼叫硬體模組中的方法,硬體模組中的方法直接呼叫核心介面完成相關功能
在Android下訪問HAL大致有以下兩種方式:
(1)Android的app可以直接通過service呼叫.so格式的jni
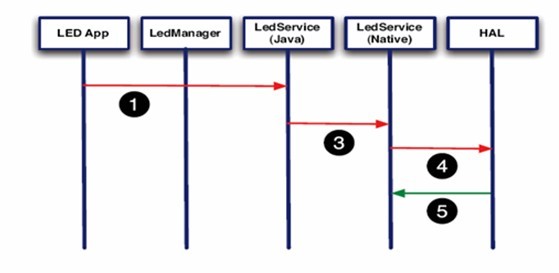
(2)經過Manager呼叫service
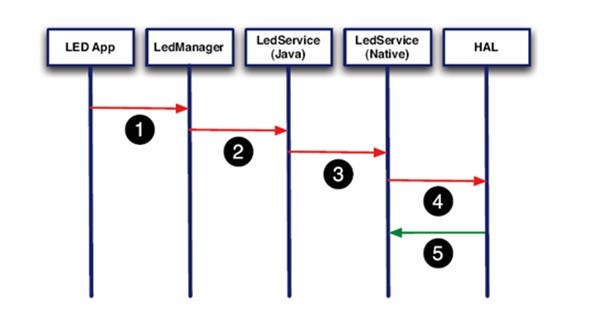
上面兩種方法應該說是各有優缺點,第一種方法簡單高效,但不正規。第二種方法實現起來比較複雜,但更符合目前的Android框架。第二種方法中,LegManager和LedService(java)在兩個程序中,需要通過程序通訊的方式來通訊。
在現在的android框架中,這兩種方式都存在,比如對於lights,是直接透過LightsService呼叫JNI,而對於sensor,中間則是通過SensorsManager
來呼叫JNI的。
1、通用硬體模組(libhardware.so)
一般來說HAL moudle需要涉及的是三個關鍵結構體:
struct hw_module_t;
struct hw_module_methods_t;
struct hw_device_t;
這三個結構體定義在hardware.h中。
(1)標頭檔案為:/hardware/libhardware/include/hardware/hardware.h
標頭檔案中主要定義了通用硬體模組結構體hw_module_t,聲明瞭JNI呼叫的介面函式hw_get_module、hw_module_t定義如下:
/**
* Every hardware module must have a data structure named HAL_MODULE_INFO_SYM
* and the fields of this data structure must begin with hw_module_t
* followed by module specific information.
*/
typedef struct hw_module_t {
/** tag must be initialized to HARDWARE_MODULE_TAG */
uint32_t tag;
/** major version number for the module */
uint16_t version_major;
/** minor version number of the module */
uint16_t version_minor;
/** Identifier of module */
const char *id;
/** Name of this module */
const char *name;
/** Author/owner/implementor of the module */
const char *author;
/** Modules methods */
struct hw_module_methods_t* methods; //硬體模組的方法
/** module's dso */
void* dso;
/** padding to 128 bytes, reserved for future use */
uint32_t reserved[32-7];
} hw_module_t;
如註釋所說,所有的hal模組都要有一個以HAL_MODULE_INFO_SYM命名的結構,而且這個結構要以hw_module_t開始,即要繼承hw_module_t這個結構,比如lights,sensor:
struct sensors_module_t {
struct hw_module_t common;
int (*get_sensors_list)(struct sensors_module_t* module,
struct sensor_t const** list);
};
/*
* The lights Module
*/
struct light_module_t HAL_MODULE_INFO_SYM = {
common: {
tag: HARDWARE_MODULE_TAG,
version_major: 1,
version_minor: 0,
id: LIGHTS_HARDWARE_MODULE_ID,
name: "Lights module",
author: "Rockchip",
methods: &light_module_methods,
}
};
const struct sensors_module_t HAL_MODULE_INFO_SYM = {
.common = {
.tag = HARDWARE_MODULE_TAG,
.version_major = 1,
.version_minor = 0,
.id = SENSORS_HARDWARE_MODULE_ID,
.name = "Stingray SENSORS Module",
.author = "Motorola",
.methods = &sensors_module_methods,
},
.get_sensors_list = sensors__get_sensors_list
};
hw_module_t中比較重要的是硬體模組方法結構體hw_module_methods_t定義如下:
typedef struct hw_module_methods_t {
/** Open a specific device */
int (*open)(const struct hw_module_t* module, const char* id,
struct hw_device_t** device);
} hw_module_methods_t;
該方法在定義HAL_MODULE_INFO_SYM的時候被初始化。目前該結構中只定義了一個open方法,其中呼叫的裝置結構體引數hw_device_t定義如下:
/**
* Every device data structure must begin with hw_device_t
* followed by module specific public methods and attributes.
*/
typedef struct hw_device_t {
/** tag must be initialized to HARDWARE_DEVICE_TAG */
uint32_t tag;
/** version number for hw_device_t */
uint32_t version;
/** reference to the module this device belongs to */
struct hw_module_t* module;
/** padding reserved for future use */
uint32_t reserved[12];
/** Close this device */
int (*close)(struct hw_device_t* device);
} hw_device_t;
struct light_device_t {
struct hw_device_t common;
int (*set_light)(struct light_device_t* dev,
struct light_state_t const* state);
};
/**
* Every device data structure must begin with hw_device_t
* followed by module specific public methods and attributes.
*/
struct sensors_poll_device_t {
struct hw_device_t common;
int (*activate)(struct sensors_poll_device_t *dev,
int handle, int enabled);
int (*setDelay)(struct sensors_poll_device_t *dev,
int handle, int64_t ns);
int (*poll)(struct sensors_poll_device_t *dev,
sensors_event_t* data, int count);
};
亦如註釋所說,每一個裝置的資料結構都必須也以hw_device_t開始。hw_get_module函式宣告如下:
int hw_get_module(const char *id, const struct hw_module_t **module);
引數id為模組標識,定義在/hardware/libhardware/include/hardware錄下的硬體模組標頭檔案中,引數module是硬體模組地址,定義在/hardware/libhardware/include/hardware/hardware.h中
下面以lights模組為例進行分析:
在lights.h中定義有lights模組的ID
#define LIGHTS_HARDWARE_MODULE_ID "lights"
在JNI層會通過hw_ge_module()方法獲得對應的模組,對於lights,在
frameworks/base/services/jni/com_android_server_LightsService.cpp的init_native方法中,程式碼如下:
static jint init_native(JNIEnv *env, jobject clazz)
{
int err;
hw_module_t* module;
Devices* devices;
devices = (Devices*)malloc(sizeof(Devices));
err = hw_get_module(LIGHTS_HARDWARE_MODULE_ID, (hw_module_t const**)&module);
if (err == 0) {
devices->lights[LIGHT_INDEX_BACKLIGHT]
= get_device(module, LIGHT_ID_BACKLIGHT);
………………………………………….
}
hw_get_module函式在hardware.c中實現:
int hw_get_module(const char *id, const struct hw_module_t **module)
{
return hw_get_module_by_class(id, NULL, module);
}
再看hw_get_module_by_class時如何實現的:
首先在hardware.c的開始有如下定義和註釋:
/** Base path of the hal modules */
#define HAL_LIBRARY_PATH1 "/system/lib/hw"
#define HAL_LIBRARY_PATH2 "/vendor/lib/hw"
/**
* There are a set of variant filename for modules. The form of the filename
* is "<MODULE_ID>.variant.so" so for the led module the Dream variants
* of base "ro.product.board", "ro.board.platform" and "ro.arch" would be:
*
* led.trout.so
* led.msm7k.so
* led.ARMV6.so
* led.default.so
*/
static const char *variant_keys[] = {
"ro.hardware", /* This goes first so that it can pick up a different
file on the emulator. */
"ro.product.board",
"ro.board.platform",
"ro.arch"
};
static const int HAL_VARIANT_KEYS_COUNT =
(sizeof(variant_keys)/sizeof(variant_keys[0]));
int hw_get_module_by_class(const char *class_id, const char *inst,
const struct hw_module_t **module)
{
int status;
int i;
const struct hw_module_t *hmi = NULL;
char prop[PATH_MAX];
char path[PATH_MAX];
char name[PATH_MAX];
if (inst)
snprintf(name, PATH_MAX, "%s.%s", class_id, inst);
else
strlcpy(name, class_id, PATH_MAX);
/*
* Here we rely on the fact that calling dlopen multiple times on
* the same .so will simply increment a refcount (and not load
* a new copy of the library).
* We also assume that dlopen() is thread-safe.
*/
/* Loop through the configuration variants looking for a module */
for (i=0 ; i<HAL_VARIANT_KEYS_COUNT+1 ; i++) {
if (i < HAL_VARIANT_KEYS_COUNT) {
if (property_get(variant_keys[i], prop, NULL) == 0) {
continue;
}
snprintf(path, sizeof(path), "%s/%s.%s.so",
HAL_LIBRARY_PATH2, name, prop);
if (access(path, R_OK) == 0) break;
snprintf(path, sizeof(path), "%s/%s.%s.so",
HAL_LIBRARY_PATH1, name, prop);
if (access(path, R_OK) == 0) break;
} else {
snprintf(path, sizeof(path), "%s/%s.default.so",
HAL_LIBRARY_PATH1, name);
if (access(path, R_OK) == 0) break;
}
}
status = -ENOENT;
if (i < HAL_VARIANT_KEYS_COUNT+1) {
/* load the module, if this fails, we're doomed, and we should not try
* to load a different variant. */
status = load(class_id, path, module);
}
return status;
}
可以看到,在hw_get_module_by_class函式中,先通過property_get獲得varient_key中定義的系統屬性,如果系統中有定義該屬性,就會獲得一個模組名.屬性名組成的一個so的名稱,然後去定義兩個patch(/system/lib/hw、/vendor/lib/hw)下檢視,該so是否存在,如果存在,幾回呼叫load函式,開啟.so.例如在rockchip的rk29平臺上,有定義ro.product.board = rk29sdk,在這裡會得到lights.rk29sdk.so。
再看load函式的實現:
/**
* Load the file defined by the variant and if successful
* return the dlopen handle and the hmi.
* @return 0 = success, !0 = failure.
*/
static int load(const char *id,const char *path,
const struct hw_module_t **pHmi)
{
int status;
void *handle;
struct hw_module_t *hmi;
/*
* load the symbols resolving undefined symbols before
* dlopen returns. Since RTLD_GLOBAL is not or'd in with
* RTLD_NOW the external symbols will not be global
*/
handle = dlopen(path, RTLD_NOW);
if (handle == NULL) {
char const *err_str = dlerror();
LOGE("load: module=%s\n%s", path, err_str?err_str:"unknown");
status = -EINVAL;
goto done;
}
/* Get the address of the struct hal_module_info. */
const char *sym = HAL_MODULE_INFO_SYM_AS_STR;
hmi = (struct hw_module_t *)dlsym(handle, sym);
if (hmi == NULL) {
LOGE("load: couldn't find symbol %s", sym);
status = -EINVAL;
goto done;
}
/* Check that the id matches */
if (strcmp(id, hmi->id) != 0) {
LOGE("load: id=%s != hmi->id=%s", id, hmi->id);
status = -EINVAL;
goto done;
}
hmi->dso = handle;
/* success */
status = 0;
done:
if (status != 0) {
hmi = NULL;
if (handle != NULL) {
dlclose(handle);
handle = NULL;
}
} else {
LOGV("loaded HAL id=%s path=%s hmi=%p handle=%p",
id, path, *pHmi, handle);
}
*pHmi = hmi;
return status;
}
在這裡會開啟對應了so,比如lights.rk29sdk.so,然後獲得這個模組中定義的hw_module_t的地址。後面JNI就能通過這個介面和hal層進行溝通了。
其他文章網址:
http://blog.csdn.net/u011913612/article/details/52576831
http://www.embedu.org/Column/Column733.htm
http://www.bkjia.com/Androidjc/745741.html