
從setContentView方法分析Android載入佈局流程
PS一句:當初你所逃避的問題終會在未來的某一天重新出現在你面前,因此,當你第一次遇到它時,請不要逃避。
相信很多初學者對XML佈局怎麼載入到Activity上並且顯示在手機螢幕上很好奇吧?今天我們就從經常使用的方法
setContentView來從原始碼分析一下XML佈局是怎麼載入到當前Activity上的。
Activity#setContentView
我們知道,Activity是在onCreate方法中使用setContentView方法來載入佈局的,那麼它內部的原始碼是怎麼實現的呢?
Setp 1
處於好奇,我們進入了Activity的原始碼,找到setContentView方法如下:
public void setContentView(int layoutResID) {
        getWindow().setContentView(layoutResID);
        initWindowDecorActionBar();
    }
setContentView方法實現很簡單,裡面呼叫兩個方法,我們這裡分析第一個方法:
getWindow().setContentView(layoutResID);getWindow()得到一個Window物件 mWindow ,Window是一個抽象類,用來描述Activity檢視最頂端的視窗顯示和行為操作。Window是
一個抽象類,那麼裡面的setContentView(layoutResID)是一個抽象方法,並沒有具體的實現,既然Window是一個抽象類,那麼
在Activity裡面就有一個Window抽象類的實現,我們查詢程式碼發現 mWindow物件賦值方法如下:
mWindow = PolicyManager.makeNewWindow(this);Step 2
Look the fuck resoure code,繼續看看 PolicyManager類
public final class More PolicyManager {
30 private static final 地 57 行 sPolicy物件是有第 38,39行通過類路徑”com.android.internal.policy.impl.Policy“生成的,那麼我們在原始碼中找到 Policy類,在此類中找到了如下方法:
public Window makeNewWindow(Context context) {
        return new PhoneWindow(context);
    }
由此可見,我們終於找到Activity類中的 mWindow物件的實現類了,就是PhoneWindow類。
Setp 3
從原始碼發現,PhoneWindow類就是抽象類Window的實現類。那麼 setContentView方法的實現也在這個類裡面了,
到PhoneWindow類發現,setContentView方法實現如下:
 @Override
    public void setContentView(int layoutResID) {
        // Note: FEATURE_CONTENT_TRANSITIONS may be set in the process of installing the window
        // decor, when theme attributes and the like are crystalized. Do not check the feature
        // before this happens.
        if (mContentParent == null) {
            installDecor();
        } else if (!hasFeature(FEATURE_CONTENT_TRANSITIONS)) {
            mContentParent.removeAllViews();
        }

        if (hasFeature(FEATURE_CONTENT_TRANSITIONS)) {
            final Scene newScene = Scene.getSceneForLayout(mContentParent, layoutResID,
                    getContext());
            transitionTo(newScene);
        } else {
            mLayoutInflater.inflate(layoutResID, mContentParent);
        }
        final Callback cb = getCallback();
        if (cb != null && !isDestroyed()) {
            cb.onContentChanged();
        }
    }
首先判斷mContentParent是否為null,mContentParent是什麼呢?接下來會分析,一開始條件成立,進入installDecor()方法。
Setp 4
到installDecor()方法裡,實現如下:
    private void installDecor() {
        if (mDecor == null) {
            mDecor = generateDecor();
            mDecor.setDescendantFocusability(ViewGroup.FOCUS_AFTER_DESCENDANTS);
            mDecor.setIsRootNamespace(true);
            if (!mInvalidatePanelMenuPosted && mInvalidatePanelMenuFeatures != 0) {
                mDecor.postOnAnimation(mInvalidatePanelMenuRunnable);
            }
        }
        if (mContentParent == null) {
            mContentParent = generateLayout(mDecor);

            // Set up decor part of UI to ignore fitsSystemWindows if appropriate.
            mDecor.makeOptionalFitsSystemWindows();

            final DecorContentParent decorContentParent = (DecorContentParent) mDecor.findViewById(
                    R.id.decor_content_parent);

            if (decorContentParent != null) {
                mDecorContentParent = decorContentParent;
                mDecorContentParent.setWindowCallback(getCallback());
                if (mDecorContentParent.getTitle() == null) {
                    mDecorContentParent.setWindowTitle(mTitle);
                }

                final int localFeatures = getLocalFeatures();
                for (int i = 0; i < FEATURE_MAX; i++) {
                    if ((localFeatures & (1 << i)) != 0) {
                        mDecorContentParent.initFeature(i);
                    }
                }

                mDecorContentParent.setUiOptions(mUiOptions);

                if ((mResourcesSetFlags & FLAG_RESOURCE_SET_ICON) != 0 ||
                        (mIconRes != 0 && !mDecorContentParent.hasIcon())) {
                    mDecorContentParent.setIcon(mIconRes);
                } else if ((mResourcesSetFlags & FLAG_RESOURCE_SET_ICON) == 0 &&
                        mIconRes == 0 && !mDecorContentParent.hasIcon()) {
                    mDecorContentParent.setIcon(
                            getContext().getPackageManager().getDefaultActivityIcon());
                    mResourcesSetFlags |= FLAG_RESOURCE_SET_ICON_FALLBACK;
                }
                if ((mResourcesSetFlags & FLAG_RESOURCE_SET_LOGO) != 0 ||
                        (mLogoRes != 0 && !mDecorContentParent.hasLogo())) {
                    mDecorContentParent.setLogo(mLogoRes);
                }

                // Invalidate if the panel menu hasn't been created before this.
                // Panel menu invalidation is deferred avoiding application onCreateOptionsMenu
                // being called in the middle of onCreate or similar.
                // A pending invalidation will typically be resolved before the posted message
                // would run normally in order to satisfy instance state restoration.
                PanelFeatureState st = getPanelState(FEATURE_OPTIONS_PANEL, false);
                if (!isDestroyed() && (st == null || st.menu == null)) {
                    invalidatePanelMenu(FEATURE_ACTION_BAR);
                }
            } else {
                mTitleView = (TextView)findViewById(R.id.title);
                if (mTitleView != null) {
                    mTitleView.setLayoutDirection(mDecor.getLayoutDirection());
                    if ((getLocalFeatures() & (1 << FEATURE_NO_TITLE)) != 0) {
                        View titleContainer = findViewById(
                                R.id.title_container);
                        if (titleContainer != null) {
                            titleContainer.setVisibility(View.GONE);
                        } else {
                            mTitleView.setVisibility(View.GONE);
                        }
                        if (mContentParent instanceof FrameLayout) {
                            ((FrameLayout)mContentParent).setForeground(null);
                        }
                    } else {
                        mTitleView.setText(mTitle);
                    }
                }
            }

            if (mDecor.getBackground() == null && mBackgroundFallbackResource != 0) {
                mDecor.setBackgroundFallback(mBackgroundFallbackResource);
            }

            // Only inflate or create a new TransitionManager if the caller hasn't
            // already set a custom one.
            if (hasFeature(FEATURE_ACTIVITY_TRANSITIONS)) {
                if (mTransitionManager == null) {
                    final int transitionRes = getWindowStyle().getResourceId(
                            R.styleable.Window_windowContentTransitionManager,
                            0);
                    if (transitionRes != 0) {
                        final TransitionInflater inflater = TransitionInflater.from(getContext());
                        mTransitionManager = inflater.inflateTransitionManager(transitionRes,
                                mContentParent);
                    } else {
                        mTransitionManager = new TransitionManager();
                    }
                }

                mEnterTransition = getTransition(mEnterTransition, null,
                        R.styleable.Window_windowEnterTransition);
                mReturnTransition = getTransition(mReturnTransition, USE_DEFAULT_TRANSITION,
                        R.styleable.Window_windowReturnTransition);
                mExitTransition = getTransition(mExitTransition, null,
                        R.styleable.Window_windowExitTransition);
                mReenterTransition = getTransition(mReenterTransition, USE_DEFAULT_TRANSITION,
                        R.styleable.Window_windowReenterTransition);
                mSharedElementEnterTransition = getTransition(mSharedElementEnterTransition, null,
                        R.styleable.Window_windowSharedElementEnterTransition);
                mSharedElementReturnTransition = getTransition(mSharedElementReturnTransition,
                        USE_DEFAULT_TRANSITION,
                        R.styleable.Window_windowSharedElementReturnTransition);
                mSharedElementExitTransition = getTransition(mSharedElementExitTransition, null,
                        R.styleable.Window_windowSharedElementExitTransition);
                mSharedElementReenterTransition = getTransition(mSharedElementReenterTransition,
                        USE_DEFAULT_TRANSITION,
                        R.styleable.Window_windowSharedElementReenterTransition);
                if (mAllowEnterTransitionOverlap == null) {
                    mAllowEnterTransitionOverlap = getWindowStyle().getBoolean(
                            R.styleable.Window_windowAllowEnterTransitionOverlap, true);
                }
                if (mAllowReturnTransitionOverlap == null) {
                    mAllowReturnTransitionOverlap = getWindowStyle().getBoolean(
                            R.styleable.Window_windowAllowReturnTransitionOverlap, true);
                }
                if (mBackgroundFadeDurationMillis < 0) {
                    mBackgroundFadeDurationMillis = getWindowStyle().getInteger(
                            R.styleable.Window_windowTransitionBackgroundFadeDuration,
                            DEFAULT_BACKGROUND_FADE_DURATION_MS);
                }
                if (mSharedElementsUseOverlay == null) {
                    mSharedElementsUseOverlay = getWindowStyle().getBoolean(
                            R.styleable.Window_windowSharedElementsUseOverlay, true);
                }
            }
        }
    }
在程式碼的第 3 行我們看到 mDecor = generateDecor();方法呼叫,繼續跳進 generateDecor()方法:
protected DecorView generateDecor() {
        return new DecorView(getContext(), -1);
    }
這裡生成一個DecorView物件,DecorView是PhoneWindow類的內部類,繼承自FrameLayout。到目前為止,setContentView
方法裡生成一個FrameLayout型別的DecorView元件。
Step 5
繼續分析程式碼,看第 11 行:
mContentParent = generateLayout(mDecor);把 DecorView 物件 mDecor 作為引數傳遞給 generateLayout方法得到 mContentParent。generateLayout()方法中的程式碼實現如下:
protected ViewGroup generateLayout(DecorView decor) {
        // Apply data from current theme.

        TypedArray a = getWindowStyle();

        .........

        /**以下這些是Activity 視窗屬性特徵的設定*/
        //視窗是否浮動,一般用於Dialog視窗是否浮動:是否顯示在佈局的正中間。
        mIsFloating = a.getBoolean(R.styleable.Window_windowIsFloating, false);
        int flagsToUpdate = (FLAG_LAYOUT_IN_SCREEN|FLAG_LAYOUT_INSET_DECOR)
                & (~getForcedWindowFlags());
        if (mIsFloating) {
            setLayout(WRAP_CONTENT, WRAP_CONTENT);
            setFlags(0, flagsToUpdate);
        } else {
            setFlags(FLAG_LAYOUT_IN_SCREEN|FLAG_LAYOUT_INSET_DECOR, flagsToUpdate);
        }
        //設定視窗是否支援標題欄,隱藏顯示標題欄操作在此處。
        if (a.getBoolean(R.styleable.Window_windowNoTitle, false)) {
            requestFeature(FEATURE_NO_TITLE);
        } else if (a.getBoolean(R.styleable.Window_windowActionBar, false)) {
            // Don't allow an action bar if there is no title.
            requestFeature(FEATURE_ACTION_BAR);
        }
        //ActionBar導航欄是否不佔佈局空間疊加顯示在當前視窗之上。
        if (a.getBoolean(R.styleable.Window_windowActionBarOverlay, false)) {
            requestFeature(FEATURE_ACTION_BAR_OVERLAY);
        }

        if (a.getBoolean(R.styleable.Window_windowActionModeOverlay, false)) {
            requestFeature(FEATURE_ACTION_MODE_OVERLAY);
        }

        if (a.getBoolean(R.styleable.Window_windowSwipeToDismiss, false)) {
            requestFeature(FEATURE_SWIPE_TO_DISMISS);
        }
        //當前Activity是否支援全屏
        if (a.getBoolean(R.styleable.Window_windowFullscreen, false)) {
            setFlags(FLAG_FULLSCREEN, FLAG_FULLSCREEN & (~getForcedWindowFlags()));
        }

       ................

       //設定狀態列的顏色
        if (!mForcedStatusBarColor) {
            mStatusBarColor = a.getColor(R.styleable.Window_statusBarColor, 0xFF000000);
        }
        //設定導航欄的顏色
        if (!mForcedNavigationBarColor) {
            mNavigationBarColor = a.getColor(R.styleable.Window_navigationBarColor, 0xFF000000);
        }

        if (mAlwaysReadCloseOnTouchAttr || getContext().getApplicationInfo().targetSdkVersion
                >= android.os.Build.VERSION_CODES.HONEYCOMB) {
            if (a.getBoolean(
                    R.styleable.Window_windowCloseOnTouchOutside,
                    false)) {
                setCloseOnTouchOutsideIfNotSet(true);
            }
        }

        WindowManager.LayoutParams params = getAttributes();
        //設定輸入法的狀態
        if (!hasSoftInputMode()) {
            params.softInputMode = a.getInt(
                    R.styleable.Window_windowSoftInputMode,
                    params.softInputMode);
        }

        if (a.getBoolean(R.styleable.Window_backgroundDimEnabled,
                mIsFloating)) {
            /* All dialogs should have the window dimmed */
            if ((getForcedWindowFlags()&WindowManager.LayoutParams.FLAG_DIM_BEHIND) == 0) {
                params.flags |= WindowManager.LayoutParams.FLAG_DIM_BEHIND;
            }
            if (!haveDimAmount()) {
                params.dimAmount = a.getFloat(
                        android.R.styleable.Window_backgroundDimAmount, 0.5f);
            }
        }
        //設定當前Activity的出現動畫效果
        if (params.windowAnimations == 0) {
            params.windowAnimations = a.getResourceId(
                    R.styleable.Window_windowAnimationStyle, 0);
        }

        // The rest are only done if this window is not embedded; otherwise,
        // the values are inherited from our container.
        if (getContainer() == null) {
            if (mBackgroundDrawable == null) {
                if (mBackgroundResource == 0) {
                    mBackgroundResource = a.getResourceId(
                            R.styleable.Window_windowBackground, 0);
                }
                if (mFrameResource == 0) {
                    mFrameResource = a.getResourceId(R.styleable.Window_windowFrame, 0);
                }
                mBackgroundFallbackResource = a.getResourceId(
                        R.styleable.Window_windowBackgroundFallback, 0);
                if (false) {
                    System.out.println("Background: "
                            + Integer.toHexString(mBackgroundResource) + " Frame: "
                            + Integer.toHexString(mFrameResource));
                }
            }
            mElevation = a.getDimension(R.styleable.Window_windowElevation, 0);
            mClipToOutline = a.getBoolean(R.styleable.Window_windowClipToOutline, false);
            mTextColor = a.getColor(R.styleable.Window_textColor, Color.TRANSPARENT);
        }

        //以下程式碼為當前Activity視窗新增 decor根佈局。
        // Inflate the window decor.

        int layoutResource;
        int features = getLocalFeatures();
        // System.out.println("Features: 0x" + Integer.toHexString(features));
        if ((features & (1 << FEATURE_SWIPE_TO_DISMISS)) != 0) {
            layoutResource = R.layout.screen_swipe_dismiss;
        } else if ((features & ((1 << FEATURE_LEFT_ICON) | (1 << FEATURE_RIGHT_ICON))) != 0) {
            if (mIsFloating) {
                TypedValue res = new TypedValue();
                getContext().getTheme().resolveAttribute(
                        R.attr.dialogTitleIconsDecorLayout, res, true);
                layoutResource = res.resourceId;
            } else {
                layoutResource = R.layout.screen_title_icons;
            }
            // XXX Remove this once action bar supports these features.
            removeFeature(FEATURE_ACTION_BAR);
            // System.out.println("Title Icons!");
        } else if ((features & ((1 << FEATURE_PROGRESS) | (1 << FEATURE_INDETERMINATE_PROGRESS))) != 0
                && (features & (1 << FEATURE_ACTION_BAR)) == 0) {
            // Special case for a window with only a progress bar (and title).
            // XXX Need to have a no-title version of embedded windows.
            layoutResource = R.layout.screen_progress;
            // System.out.println("Progress!");
        } else if ((features & (1 << FEATURE_CUSTOM_TITLE)) != 0) {
            // Special case for a window with a custom title.
            // If the window is floating, we need a dialog layout
            if (mIsFloating) {
                TypedValue res = new TypedValue();
                getContext().getTheme().resolveAttribute(
                        R.attr.dialogCustomTitleDecorLayout, res, true);
                layoutResource = res.resourceId;
            } else {
                layoutResource = R.layout.screen_custom_title;
            }
            // XXX Remove this once action bar supports these features.
            removeFeature(FEATURE_ACTION_BAR);
        } else if ((features & (1 << FEATURE_NO_TITLE)) == 0) {
            // If no other features and not embedded, only need a title.
            // If the window is floating, we need a dialog layout
            if (mIsFloating) {
                TypedValue res = new TypedValue();
                getContext().getTheme().resolveAttribute(
                        R.attr.dialogTitleDecorLayout, res, true);
                layoutResource = res.resourceId;
            } else if ((features & (1 << FEATURE_ACTION_BAR)) != 0) {
                layoutResource = a.getResourceId(
                        R.styleable.Window_windowActionBarFullscreenDecorLayout,
                        R.layout.screen_action_bar);
            } else {
                layoutResource = R.layout.screen_title;
            }
            // System.out.println("Title!");
        } else if ((features & (1 << FEATURE_ACTION_MODE_OVERLAY)) != 0) {
            layoutResource = R.layout.screen_simple_overlay_action_mode;
        } else {
            // Embedded, so no decoration is needed.
            layoutResource = R.layout.screen_simple;
            // System.out.println("Simple!");
        }

        mDecor.startChanging();

        //通過佈局新增器LayoutInflater獲取layoutResource佈局,
        View in = mLayoutInflater.inflate(layoutResource, null);
        //將XML資源為layoutResource的佈局新增到decor容器裡面,至此PhoneWindow 內部類DecorView就添加了之佈局
        decor.addView(in, new ViewGroup.LayoutParams(MATCH_PARENT, MATCH_PARENT));
        mContentRoot = (ViewGroup) in;

        //此處很重要,通過findViewById找到 contentParent容器,也是該方法的返回值。
        ViewGroup contentParent = (ViewGroup)findViewById(ID_ANDROID_CONTENT);
        if (contentParent == null) {
            throw new RuntimeException("Window couldn't find content container view");
        }

        if ((features & (1 << FEATURE_INDETERMINATE_PROGRESS)) != 0) {
            ProgressBar progress = getCircularProgressBar(false);
            if (progress != null) {
                progress.setIndeterminate(true);
            }
        }

        if ((features & (1 << FEATURE_SWIPE_TO_DISMISS)) != 0) {
            registerSwipeCallbacks();
        }

        // Remaining setup -- of background and title -- that only applies
        // to top-level windows.
        //以下程式碼設定Activity視窗的背景,標題等
        if (getContainer() == null) {
            final Drawable background;
            if (mBackgroundResource != 0) {
                background = getContext().getDrawable(mBackgroundResource);
            } else {
                background = mBackgroundDrawable;
            }
            mDecor.setWindowBackground(background);

            final Drawable frame;
            if (mFrameResource != 0) {
                frame = getContext().getDrawable(mFrameResource);
            } else {
                frame = null;
            }
            mDecor.setWindowFrame(frame);

            mDecor.setElevation(mElevation);
            mDecor.setClipToOutline(mClipToOutline);

            if (mTitle != null) {
                setTitle(mTitle);
            }

            if (mTitleColor == 0) {
                mTitleColor = mTextColor;
            }
            setTitleColor(mTitleColor);
        }

        mDecor.finishChanging();

        return contentParent;
    }
以上程式碼代比較複雜,主要做了以下幾件事情。
- 從第 8 行到第110行,主要是初始化視窗的特徵,是否顯示標題欄,是否全屏,是否支援ActionBar浮動等等。
- 第112-187行,主要是給容器DecorView新增id為layoutResource佈局的根佈局。待會分析layoutResource佈局。
- 第178行,通過LayoutInflater 將xml佈局轉換成VIEW.
- 第180行將找到的View新增到DecorView根佈局當中。
- 第184行,從根佈局中找到id為R.id.content的 contentParent 容器。也就是當前方法的返回值。
接下來,看看 id為layoutResource的佈局到底實現了什麼?我們來看看171行的R.layout.screen_simple;資源
<LinearLayout xmlns:android="http://schemas.android.com/apk/res/android"
    android:layout_width="match_parent"
    android:layout_height="match_parent"
    android:fitsSystemWindows="true"
    android:orientation="vertical">
    <ViewStub android:id="@+id/action_mode_bar_stub"
              android:inflatedId="@+id/action_mode_bar"
              android:layout="@layout/action_mode_bar"
              android:layout_width="match_parent"
              android:layout_height="wrap_content"
              android:theme="?attr/actionBarTheme" />
    <FrameLayout
         android:id="@android:id/content"
         android:layout_width="match_parent"
         android:layout_height="match_parent"
         android:foregroundInsidePadding="false"
         android:foregroundGravity="fill_horizontal|top"
         android:foreground="?android:attr/windowContentOverlay" />
</LinearLayout>
原來我們的DecorView根佈局裡面添加了類似上面的佈局,線性佈局LinearLaout裡包含兩個元件,ViewStub是懶載入,預設不顯示,FrameLayout是什麼呢?看看id=content,就是我們184行找到的父容器 contentParent。那麼這個父容器 contentParent有什麼作用呢?
我們回到 Step4 的第 11行,mContentParent = generateLayout(mDecor); 獲得 父容器 mContentParent。我們再次回到 Step3步的第17行, mLayoutInflater.inflate(layoutResID, mContentParent); 這裡通過LayoutInflater將 setContentView(layoutResID)傳進來的佈局id載入到 父容器mContentParent中,至此,setContentView就將佈局新增到Activity裡面了。
現在我們來梳理一下流程:
Activity setContentView—>Window setContentView—>PhoneWindow setContentView—->PhoneWindow installDecor—–>PhoneWindow generateLayout——>PhoneWindow mLayoutInflater.inflate(layoutResID, mContentParent);
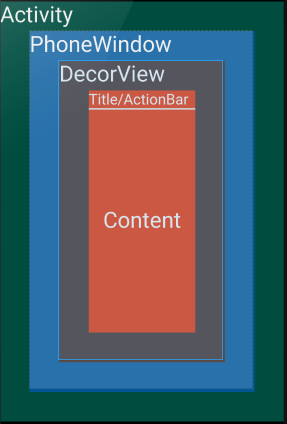
Activity 類中有一個Window抽象類的實現PhoneWindow類,該類中有個內部類DecorView,繼承自FrameLayout,在DecorView容器中添加了根佈局,根佈局中包含了一個id為 contnet的FrameLayout 內容佈局,我們的Activity載入的佈局xml最後新增到 id為content的FrameLayout佈局當中了。用一個圖來描述,如下:
總結:
1.關於requestWindowFeature(Window.FEATURE_NO_TITLE); 去除標題欄的疑問,如果你自己的xxxActivity是繼承自Activity,那麼恭喜你使用以上方法可以去除標題欄,如果你自己的xxxActivity是繼承自AppCompatActivity或者ActionBarActivity,那麼很遺憾告訴你,此次系統預設的標題欄已經在主題中去除,此時顯示的標題欄是ActionBar導航欄,如果需要去除導航欄,你可以通過如下程式碼:getSupportActionBar().hide();來隱藏導航欄。
2.requestWindowFeature(Window.FEATURE_NO_TITLE);方法需要在 setContentView方法之前使用,由上面 Step5分析可得,設定Activity Window 特徵是在setContentView方法中設定的,因此,如果需要改變Activity Window視窗特徵,需要在setContentView方法之前。其實這裡有疑問???為什麼設定全屏的方法
getWindow().setFlags(WindowManager.LayoutParams.FLAG_FULLSCREEN, WindowManager.LayoutParams.FLAG_FULLSCREEN);可以在setContentView之後呢???求解。