
Java集合類庫 LinkedList 原始碼解析
基於JDK 1.7,和ArrayList進行比較分析
Java已經有了ArrayList,用來存放元素,對元素的操作都很方便。為什麼還會有LinkedList呢?我們都知道ArrayList獲取元素很快,但是插入一個元素很慢,因為ArrayList底層維護的是一個數組,往陣列中的某個位置插入一個元素,是很消耗資源的。
而LinkedList插入元素很快,獲取任意位置的元素卻很慢。這是為什麼呢?底層又是怎樣實現的呢?
1.繼承關係
LinkedList的繼承關係圖:
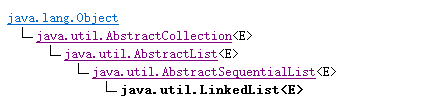
LinkedList繼承的是AbstractSequentialList抽象類,而ArrayList繼承的是AbstractList抽象類,也就是AbstractSequentialList類的上一層。
那麼我們就去看看AbstractSequentialList抽象類到底做了哪些操作:
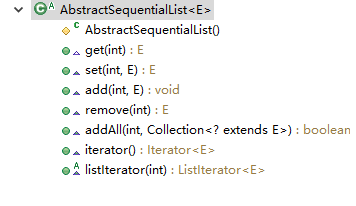
發現這個類其實很簡單,一個無參的構造方法和7個方法,其實每個方法的實現都很簡單,簡單描述一下原理:通過迭代器來對列表進行增刪改查。首先得到ListIterator,ListIterator的next()方法得到當前元素,set()方法修改元素,remove()方法刪除元素。
// 這是set()方法的實現
public E set(int index, E element) {
try {
ListIterator<E> e = listIterator(index);
E oldVal = e.next();
e.set(element);
return 2.實現介面
我們意外的發現LinkedList實現了Deque< E >介面,這個介面是用來幹嘛的?從字面上的意思分析deque是雙向佇列的意思,拿到Deque< E >裡面是佇列的預設方法,馬上去追蹤一下。
public interface Deque<E> extends Queue<E 馬上明白了,Deque< E >繼承自Queue< E >,那Queue肯定是隊列了,不信就進去看一看。
public interface Queue<E> extends Collection<E> {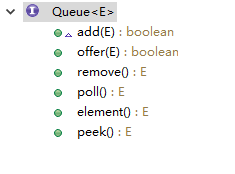
Queue< E >繼承Collection介面,並新增特有方法,介紹一些這幾個方法。
add(E e) – 將指定的元素插入此佇列(如果立即可行且不會違反容量限制),在成功時返回 true,如果當前沒有可用的空間,則丟擲 IllegalStateException。
offer(E e) – 將指定的元素插入此佇列(如果立即可行且不會違反容量限制),當使用有容量限制的佇列時,此方法通常要優於 add(E e),後者可能無法插入元素,而只是丟擲一個異常。
remove() – 獲取並移除此佇列的頭。
poll() – 獲取並移除此佇列的頭,如果此佇列為空,則返回 null。
element() – 獲取但是不移除此佇列的頭。
peek() – 獲取但不移除此佇列的頭,如果此佇列為空,則返回 null。
3.LinkedList的介紹
LinkedList是一個連結列表,實現List所有可選的列表操作,並且允許操作所有元素(包括 null)。除了實現 List 介面外,LinkedList 類還為在列表的開頭及結尾 get、remove 和 insert 元素提供了統一的命名方法。這些操作允許將連結列表用作堆疊、佇列或雙端佇列。
由於LinkedList實現 Deque 介面,為 add、poll 提供先進先出佇列操作,以及其他堆疊和雙端佇列操作。
所有操作都是按照雙重連結列表的需要執行的。在列表中編索引的操作將從開頭或結尾遍歷列表(從靠近指定索引的一端)。
注意:LinkedList是執行緒不同步的。
在資料結構中,我們都知道有連結串列這種資料型別,典型的先進先出操作FIFO,像火車進站一樣,先進的先出來。連結串列也分單向連結串列和雙向連結串列,又分迴圈連結串列和非迴圈連結串列。只要明白了連結串列的實現原理,LinkedList是怎樣實現的就一目瞭然了。
首先看一下最簡單的單向連結串列的實現
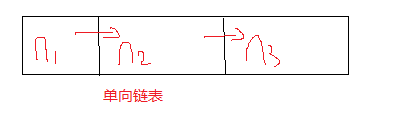
元素n1指向n2,n2指向n3,如果有無窮多個元素,就這樣一直迴圈下去。
package com.zhou.collection_11;

public class SingleLinkedListDemo {

    public static void main(String[] args) {
        Node n1 = new Node("n1");
        Node n2 = new Node("n2");
        Node n3 = new Node("n3");
        // 構造一個單向連結串列
        n1.next = n2;
        n2.next = n3;
        System.out.println(n1);

        // 插入一個元素 n4,放在 n1 和 n2 之間
        Node n4 = new Node("n4");
        n1.next = n4;
        n4.next = n2;
        System.out.println(n1);

        // 刪除元素 n2
        n4.next = n3;
        System.out.println(n1);
    }

}

class Node {

    public String data; // 存放的元素
    public Node next;   // 指向下一個節點的引用

    public Node(String data) {
        super();
        this.data = data;
    }

    @Override
    public String toString() {
        return "Node [data=" + data + ", next=" + next + "]";
    }

}
控制檯輸出結果:

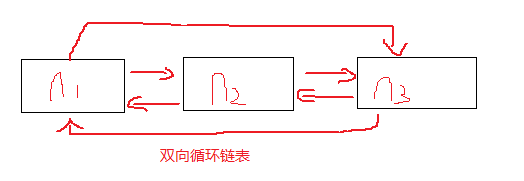
這就是單向連結串列,至於迴圈連結串列,就是把最後一個元素指向第一個元素,下面我們再來看下雙向迴圈連結串列的實現。
雙向迴圈連結串列的實現
package com.zhou.collection_11;

public class DoubleLoopLinkedListDemo {

    public static void main(String[] args) {
        Node1 n1 = new Node1("n1");
        Node1 n2 = new Node1("n2");
        Node1 n3 = new Node1("n3");
        // 構造一個雙向迴圈連結串列
        n1.next = n2;
        n1.previous = n3;

        n2.next = n3;
        n2.previous = n1;

        n3.next = n1;
        n3.previous = n2;

        // 插入一個元素 n4,放在 n1 和 n2 之間
        Node1 n4 = new Node1("n4");
        n1.next = n4;
        n4.previous = n1;
        n4.next = n2;
        n2.previous = n4;

        // 刪除元素 n2
        n4.next = n3;
        n3.previous = n4;
        n2.next = null;
        n2.previous = null;
    }

}

class Node1 {

    public Node1 previous; // 指向前一個節點,前驅
    public Node1 next;     // 指向下一個節點,後繼
    public String data;    // 存放資料

    public Node1(String data) {
        super();
        this.data = data;
    }

}
這就是雙向迴圈連結串列的實現,我們不能通過複寫toString()方法來把所以元素打印出來,因為連結串列本身是一個死迴圈。既然我們明白的連結串列的實現原理,那麼LinkedList是否也是類似,去追蹤一下LinkedList實現原始碼。
4.原始碼實現分析
全域性變數
     transient int size = 0;

    /**
     * Pointer to first node.
     * Invariant: (first == null && last == null) ||
     *            (first.prev == null && first.item != null)
     */
    transient Node<E> first;

    /**
     * Pointer to last node.
     * Invariant: (first == null && last == null) ||
     *            (last.next == null && last.item != null)
     */
    transient Node<E> last;
其中的size肯定就是LinkedList的大小,first就是指向第一個元素,last就是指向最後一個元素。在來看下Node< E >這個類的實現。
  private static class Node<E> {
        E item;
        Node<E> next;
        Node<E> prev;

        Node(Node<E> prev, E element, Node<E> next) {
            this.item = element;
            this.next = next;
            this.prev = prev;
        }
    }
它是一個私有的內部類,裡面就是一個泛型型別的變數item,指向前一個元素的變數prev,指向後一個元素的變數next。其中泛型item就是我們向LinkedList中新增的元素,然後Node又構造好了向前與向後的引用prev,next,最後將生成的這個Node物件加入到了連結串列當中。這跟我們前面實現的雙向連結串列迴圈連結串列是一樣的結構,換句話說,LinkedList中所維護的是一個個的Node物件。
構造方法
    /**
     * Constructs an empty list.
     */
    public LinkedList() {
    }

    /**
     * Constructs a list containing the elements of the specified
     * collection, in the order they are returned by the collection's
     * iterator.
     *
     * @param  c the collection whose elements are to be placed into this list
     * @throws NullPointerException if the specified collection is null
     */
    public LinkedList(Collection<? extends E> c) {
        this();
        addAll(c);
    }
只有2個構造方法,一個無參的空實現,一個是傳入集合來構造有大小的LinkedList,呼叫的addAll()方法,我們來看下這個方法的實現。
    public boolean addAll(Collection<? extends E> c) {
       return addAll(size, c);
    }

    public boolean addAll(int index, Collection<? extends E> c) {
        checkPositionIndex(index);

        Object[] a = c.toArray();
        int numNew = a.length;
        if (numNew == 0)
            return false;

        Node<E> pred, succ;
        if (index == size) {
            succ = null;
            pred = last;
        } else {
            succ = node(index);
            pred = succ.prev;
        }

        for (Object o : a) {
            @SuppressWarnings("unchecked") E e = (E) o;
            Node<E> newNode = new Node<>(pred, e, null);
            if (pred == null)
                first = newNode;
            else
                pred.next = newNode;
            pred = newNode;
        }

        if (succ == null) {
            last = pred;
        } else {
            pred.next = succ;
            succ.prev = pred;
        }

        size += numNew;
        modCount++;
        return true;
    }
其實最終呼叫的是addAll(int index, Collection< ? extends E > c)方法,初始化的時候size為0,所以index是0。
checkPositionIndex(index);

private void checkPositionIndex(int index) {
        if (!isPositionIndex(index))
            throw new IndexOutOfBoundsException(outOfBoundsMsg(index));
    }

 private boolean isPositionIndex(int index) {
        return index >= 0 && index <= size;
    }
首先通過checkPositionIndex()方法進行範圍檢查,大小超出範圍丟擲IndexOutOfBoundsException異常。
    Object[] a = c.toArray();
    int numNew = a.length;
    if (numNew == 0)
        return false;
接下來將傳入的集合轉化為陣列,如果大小為0,就直接返回。也就是如果傳入的集合大小為0,也是構造一個空的LinkedList。
        Node<E> pred, succ;
        if (index == size) {
            succ = null;
            pred = last;
        } else {
            succ = node(index);
            pred = succ.prev;
        }
初始化的size為0,傳入的index也為0,變數last為null,所以走第一個判斷條件,succ為null,pred也為null。
        for (Object o : a) {
            @SuppressWarnings("unchecked") E e = (E) o;
            Node<E> newNode = new Node<>(pred, e, null);
            if (pred == null)
                first = newNode;
            else
                pred.next = newNode;
            pred = newNode;
        }
這段程式碼就是構造了整個linkedList的元素,first指向第一個元素,pred指向最後一個元素。
        if (succ == null) {
            last = pred;
        } else {
            pred.next = succ;
            succ.prev = pred;
        }

        size += numNew;
        modCount++;
        return true;
由於succ為null,把pred賦值給last,所以last也指向最後一個元素,再更改列表的大小。
新增/增加元素
新增元素主要就是add()方法和addAll()方法,在加上addFirst()和addLast()方法,下面我們就來看一下實現程式碼。
public boolean add(E e) {
linkLast(e);
return true;
}
public void add(int index, E element) {
checkPositionIndex(index);
if (index == size)
linkLast(element);
else
linkBefore(element, node(index));
}
public void addFirst(E e) {
linkFirst(e);
}
public void addLast(E e) {
linkLast(e);
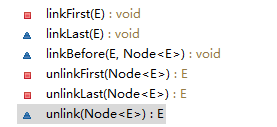
}分析上面程式碼,主要就是linkLast()、linkBefore()、linkFirst()這幾個方法來實現新增元素的。
    // 在連結串列的頭部新增一個元素
    private void linkFirst(E e) {
        final Node<E> f = first;
        // 構造一個前驅為null,後繼為f的Node物件
        final Node<E> newNode = new Node<>(null, e, f);
        // 第一個元素指向剛剛構造出來的物件
        first = newNode;
        // 如果這個連結串列是空的,則第一個元素也是最後一個元素
        // 否則把以前的前驅指向剛剛構造出的元素
        if (f == null)
            last = newNode;
        else
            f.prev = newNode;
        // 列表大小+1
        size++;
        modCount++;
    }
同理,其他的新增方法都是類似的,linkFirst()每次在頭部新增元素,linkLast()每次在尾部新增元素,linkBefore()在任意位置新增元素。所以我們每次呼叫add(E e),都是在最後新增一個元素。這個其中有一個很重要的方法 Node< E > node(int index),返回指定位置的元素。
    Node<E> node(int index) {
        // assert isElementIndex(index);

        if (index < (size >> 1)) {
            Node<E> x = first;
            for (int i = 0; i < index; i++)
                x = x.next;
            return x;
        } else {
            Node<E> x = last;
            for (int i = size - 1; i > index; i--)
                x = x.prev;
            return x;
        }
    }
判斷指定位置的和列表大小一半的大小,如果index小於size/2,把列表第一個元素提取出來賦值給x,如果需要的不是第一個元素,迴圈遍歷它的後繼元素,找到最終的x。
如果index大於size/2,取出最後一個元素賦值給x,如果需要的不是最後一個元素,迴圈遍歷它的前驅元素,找到最終的x。
可想而知,這個方法應該是貫穿整個LinkedList的方法。增刪改查肯定都需要呼叫到。
查詢元素
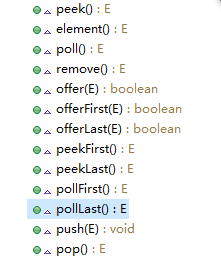
主要的查詢方法有:getFirst()、getLast()、get()
    public E getFirst() {
        final Node<E> f = first;
        if (f == null)
            throw new NoSuchElementException();
        return f.item;
    }

    public E getLast() {
        final Node<E> l = last;
        if (l == null)
            throw new NoSuchElementException();
        return l.item;

    public E get(int index) {
        checkElementIndex(index);
        return node(index).item;
    }
查詢方法很簡單,對於getFirst()、getLast()來說,直接返回頭元素和尾元素的資料,如果為空則丟擲一個NoSuchElementException異常。
get()方法則直接呼叫了node()方法,所以它查詢元素的效率高的原因我們也就知道了。
修改元素
可以說List集合都是通過set()方法來修改元素的。
  public E set(int index, E element) {
        checkElementIndex(index);
        Node<E> x = node(index);
        E oldVal = x.item;
        x.item = element;
        return oldVal;
    }
就是通過node()方法找到指定位置的元素,修改其中的item。
刪除元素
是通過remove()、remove(Object o)、remove(int index)方法來刪除元素的。
    public E remove() {
        return removeFirst();
    }

    public E remove(int index) {
        checkElementIndex(index);
        return unlink(node(index));
    }

    public boolean remove(Object o) {
        if (o == null) {
            for (Node<E> x = first; x != null; x = x.next) {
                if (x.item == null) {
                    unlink(x);
                    return true;
                }
            }
        } else {
            for (Node<E> x = first; x != null; x = x.next) {
                if (o.equals(x.item)) {
                    unlink(x);
                    return true;
                }
            }
        }
        return false;
    }
通過程式碼發現刪除主要呼叫的還是E unlink(Node< E > x)方法,下面我們來看下unlink()的實現。
    E unlink(Node<E> x) {
        // assert x != null;
        final E element = x.item;
        final Node<E> next = x.next;
        final Node<E> prev = x.prev;

        if (prev == null) {
            first = next;
        } else {
            prev.next = next;
            x.prev = null;
        }

        if (next == null) {
            last = prev;
        } else {
            next.prev = prev;
            x.next = null;
        }

        x.item = null;
        size--;
        modCount++;
        return element;
    }
如果傳入的元素x為第一個元素的話,則說明要刪除的是第一個元素,則把x的後繼後繼賦值給first,x的後繼就指向null,x的前驅也指向null,x後繼的前驅指向前驅(null),這樣就把x刪除了。
如果傳入的元素x為最後一個元素的話,則說明要刪除的是最後一個元素,則把x的前驅賦值給last,x的後繼就指向null,x的前驅也指向null,x前驅的後繼指向後繼(null),這樣就把x刪除了。
如果刪除非頭尾元素,則把x的後繼就指向null,x的前驅也指向null,x前驅的後繼指向後繼,x後繼的前驅指向前驅,這樣就把x刪除了。
可能有點繞口,語言表達能力有限,需要自己體會一下。
Node< E > node(int index)
其實LinkedList的主要操作都在這個幾個方法中,已經分析了幾個主要的方法,其他的實現都很簡單,跟我們上面雙向迴圈連結串列的Demo都很相似,只是它屬於雙向連結串列,不是迴圈的而已。它們大部分都是私有的,外部不可呼叫,直接操作Node物件裡面的資料的。下面這是幾個方法的實現,可以看下:
    private void linkFirst(E e) {
        final Node<E> f = first;
        final Node<E> newNode = new Node<>(null, e, f);
        first = newNode;
        if (f == null)
            last = newNode;
        else
            f.prev = newNode;
        size++;
        modCount++;
    }

    void linkLast(E e) {
        final Node<E> l = last;
        final Node<E> newNode = new Node<>(l, e, null);
        last = newNode;
        if (l == null)
            first = newNode;
        else
            l.next = newNode;
        size++;
        modCount++;
    }

    void linkBefore(E e, Node<E> succ) {
        // assert succ != null;
        final Node<E> pred = succ.prev;
        final Node<E> newNode = new Node<>(pred, e, succ);
        succ.prev = newNode;
        if (pred == null)
            first = newNode;
        else
            pred.next = newNode;
        size++;
        modCount++;
    }

    private E unlinkFirst(Node<E> f) {
        // assert f == first && f != null;
        final E element = f.item;
        final Node<E> next = f.next;
        f.item = null;
        f.next = null; // help GC
        first = next;
        if (next == null)
            last = null;
        else
            next.prev = null;
        size--;
        modCount++;
        return element;
    }

    private E unlinkLast(Node<E> l) {
        // assert l == last && l != null;
        final E element = l.item;
        final Node<E> prev = l.prev;
        l.item = null;
        l.prev = null; // help GC
        last = prev;
        if (prev == null)
            first = null;
        else
            prev.next = null;
        size--;
        modCount++;
        return element;
    }
5.其他方法的分析
通過原始碼,你會發現,這些方法的實現,都是通過上面講的一個first變數、一個last變數,加上上面的幾個重要的操作Node資料的方法,這些變數和方法來實現的。例如peek()方法,判斷first是否為null,是返回null,不是返回first.item物件。
    public E peek() {
        final Node<E> f = first;
        return (f == null) ? null : f.item;
    }
我們來看下clear()和toArray()方法。
    public void clear() {
        // Clearing all of the links between nodes is "unnecessary", but:
        // - helps a generational GC if the discarded nodes inhabit
        //   more than one generation
        // - is sure to free memory even if there is a reachable Iterator
        for (Node<E> x = first; x != null; ) {
            Node<E> next = x.next;
            x.item = null;
            x.next = null;
            x.prev = null;
            x = next;
        }
        first = last = null;
        size = 0;
        modCount++;
    }
這是一個所以變數置空的操作,這樣可以被gc回收,很有代表性。我們以後寫的程式碼,當銷燬物件時,也要有這樣的清除操作。迴圈置空,避免記憶體洩漏。
    public Object[] toArray() {
        Object[] result = new Object[size];
        int i = 0;
        for (Node<E> x = first; x != null; x = x.next)
            result[i++] = x.item;
        return result;
    }
LinkedList的toArray()方法和ArrayList的不一樣哦~原來構造出一個數組,把元素一個一個的新增進去,沒有用到Arrays類的方法。
6.和ArrayList的比較分析
1.ArrayList底層是採用陣列實現的,而LinkedList底層採用雙向連結串列實現的。
2.當執行插入或者刪除操作時,採用LinkedList比較好。
3.當執行搜尋操作時,採用ArrayList比較好。
4.對於ArrayList的刪除元素操作,需要將刪除元素的後續元素,整體向前移動,所以代價比較高。
5.集合中只能放置物件的引用,無法放置原生的資料型別。我們需要使用原生資料型別的包裝類才能加到集合中去。集合中放置的物件都是Object型別的,因此取出來的也都是Object型別的,那麼必須使用強制型別轉化將其轉化為真正的型別。
每個人的見解和分析都有可能不同,強烈建議自己可以在看下原始碼,然後我們交流討論。