
使用TypeScript開發ReactNative應用的簡單示例
最近小小嚐試了下 ReactNative + TypeScript 開發APP,爬了無數坑之後總算弄出來個結果,重要的地方記錄下,後面會附上示例程式碼:
1、開發工具的選擇
windows 平臺我接觸的開發工具主要三個,
WebStorm,Intellij IDEA 2016.2 版本,https://www.jetbrains.com/
這兩個我都試過,開發完全沒問題的,還有PHPStorm估計也行吧,沒試過。
另外還有一個是VisualStudioCode:https://code.visualstudio.com/b?utm_expid=101350005-27.GqBWbOBuSRqlazQC_nNSRg.1
對與 iOS 平臺應該是不用選的就是 Nuclide 了吧,我是沒用過哈,不知道怎麼用,不過用過 Atom 感覺還是很酷的。
平時習慣用 jetbrains 的 IDE ,每個都絕對神器,VisualCode 感覺實在太難用了,堅持了一段時間還是放棄了。
下面示例都是用的 Intellij IDEA 2016.2
預覽下:
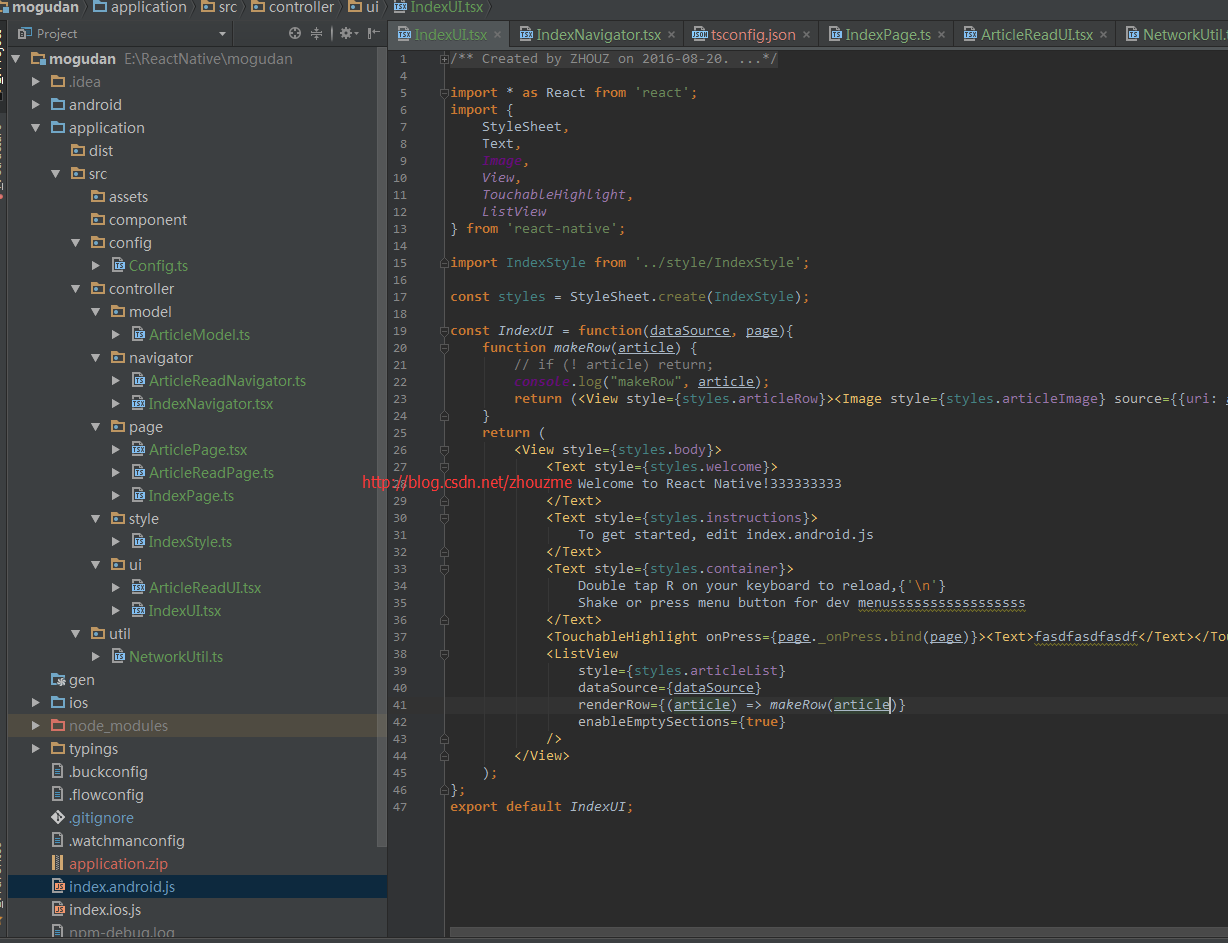
經過一番配置後,import 等匯入和程式碼提示等等都是沒問題的
2、基礎開發環境安裝
這個我就不說了,直接看這個網站就行了上面已經寫得很完善了 http://reactnative.cn/ ,照著文件安裝配置應該沒什麼問題的,文件看不懂的話網站的站長部落格裡面還有全套的視訊講解非常詳細了,地址:
3、安裝 TypeScript 開發環境
# 先 cd 到你的專案目錄,如 myproject 目錄下再執行下面命令
npm install -g typescript
npm install typescript
tsc --init

# 未安裝 tsd 則先安裝再進行專案初始化
npm install -g tsd

tsd init && tsd install react-native --save
tsd 初始化安裝後,會生成 tsconfig.json 檔案,貌似 react-native 初始化新專案的時候就有這麼個檔案來著,忘了,如果tsd初始化之前已存在該檔案可直接刪除。
檢視 tsconfig.json 檔案
{
"compilerOptions": {
"target": "es6",
"allowJs": true,
"jsx": "react",
//"outDir": "artifacts",
//"rootDir": "src",
"sourceMap": false,
"noImplicitAny": false
},
"filesGlob": [
"typings/**/*.d.ts",
"src/**/*.ts",
"src/**/*.tsx"
],
"exclude": [
"node_modules"
]
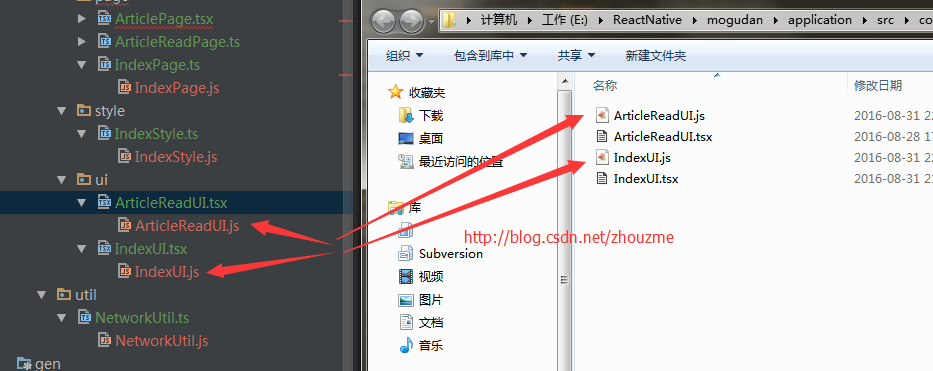
}個人建議是 outDir 引數建議不要設定,使用預設值就行,這樣每次修改 .ts 檔案後就會直接在當前目錄下生成同名的 es6語法編譯後 .js 檔案,當 index.android.js 入口檔案載入專案檔案時則很方便,如下圖:
以上配置完成就可以開始使用 TypeScript 開發了。
簡單做了個 List 載入文章列表的功能,實現起來很簡單方便,和原生Android開發比起來簡直快了太多太多。

不過一開始遇到了很多坑,主要還是由於對 TypeScript 不太熟悉
如 style 的設定,總是提示型別錯誤:
Error:(20, 15) TS2322:Type '{ flex: number; flexDirection: string; }' is not assignable to type 'ViewStyle'.
  Types of property 'flexDirection' are incompatible.
    Type 'string' is not assignable to type '"row" | "column" | "row-reverse" | "column-reverse"'.
      Type 'string' is not assignable to type '"column-reverse"'.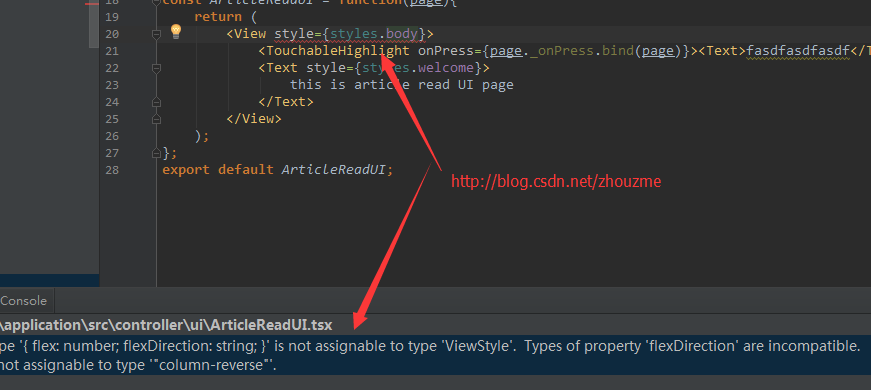
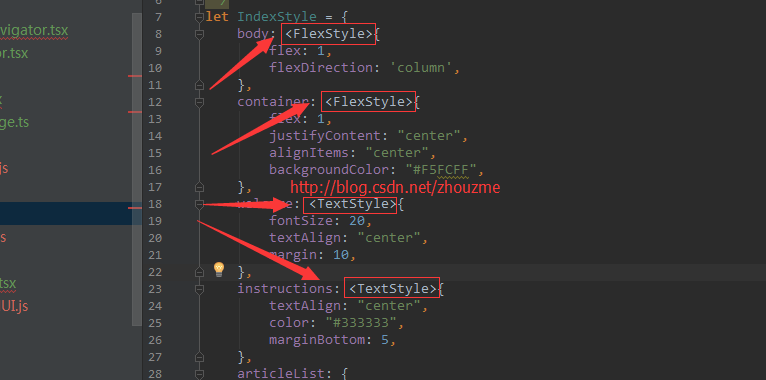
類似上面這種錯誤,很是莫名其妙,搞了好半天才明白原來樣式引數配置是需要進行型別轉換,這也是 TypeScript很特色的地方啦
如下面這樣:
4、TypeScript 跟 ReactNative 開發的關係
最後說一下這兩者是如何發生關係的,可能還有跟我一樣的小白還沒弄清楚,我就按照自己的理解來說啦,
你用 TypeScript 語法寫的 .ts .tsx 等字尾的程式是不能直接執行的,而是會被 tsconfig.json 配置中的 “target”: “es6”, 這項配置轉換為 es6 語法的 .js 檔案。
TypeScript 中的 import 只會載入 .ts .tsx 字尾的檔案,而 Javascript 中的 import 只能載入 .js 等字尾的檔案,
所以,當 ReactNative 啟動時,首先載入入口檔案,如 index.android.js ,程式碼如下:
import { AppRegistry } from 'react-native';
import IndexNavigator from './application/src/controller/navigator/IndexNavigator';
AppRegistry.registerComponent('mogudan', () => IndexNavigator);
其中 import IndexNavigator from … 這一行載入的不是 IndexNavigator.ts 而是編譯後生成的 IndexNavigator.js 檔案,下面對比兩個檔案的差異:
IndexNavigator.ts
/**
 * Created by ZHOUZ on 2016-08-26.
 */
import * as React from 'react';
import {Navigator}  from 'react-native';

import IndexPage from '../page/IndexPage'

export default class IndexNavigator extends React.Component<any, any> {
    render() {
        let defaultName = 'IndexPage3311113';
        let defaultComponent = IndexPage;
        return (
            <Navigator
                initialRoute={{ name: defaultName, component: defaultComponent }}
                configureScene={(route) => Navigator.SceneConfigs.VerticalDownSwipeJump }
                renderScene={(route: any, navigator) => {
                    let Component = route.component;
                    return <Component {...route.params} navigator={navigator} />
                }}
            />
        );
    }
}
IndexNavigator.js
為自動編譯後生成的es6語法的 javascript 程式碼
"use strict";
var __assign = (this && this.__assign) || Object.assign || function(t) {
    for (var s, i = 1, n = arguments.length; i < n; i++) {
        s = arguments[i];
        for (var p in s) if (Object.prototype.hasOwnProperty.call(s, p))
            t[p] = s[p];
    }
    return t;
};
/**
 * Created by ZHOUZ on 2016-08-26.
 */
const React = require('react');
const react_native_1 = require('react-native');
const IndexPage_1 = require('../page/IndexPage');
class IndexNavigator extends React.Component {
    render() {
        let defaultName = 'IndexPage3311113';
        let defaultComponent = IndexPage_1.default;
        return (React.createElement(react_native_1.Navigator, {initialRoute: { name: defaultName, component: defaultComponent }, configureScene: (route) => react_native_1.Navigator.SceneConfigs.VerticalDownSwipeJump, renderScene: (route, navigator) => {
            let Component = route.component;
            return React.createElement(Component, __assign({}, route.params, {navigator: navigator}));
        }}));
    }
}
Object.defineProperty(exports, "__esModule", { value: true });
exports.default = IndexNavigator;
大概就是這樣了,最最後放上我做的示例程式碼,只包含 application 目錄下的檔案,android,ios 目錄都是 react-native 自動生成的大家都一樣的。