canvas實現一個解鎖demo
問題1:
程式碼如下:
function Foo() {};
Foo.prototype.talk = function () {
    alert('hello~\n');
};

var a = new Foo;
a.talk(); // 輸出'hello~\n'
但是如果這樣:
Foo.talk() // 報錯:Object doesn't support property or method 'talk'
Foo.prototype.talk() // 沒有問題
解答:
因為這裡a是構造出來的物件,其[[proto]]屬性指向Foo.prototype。但Foo不是,Foo是一個函式物件,它的[[proto]]指向的是Function.prototype,因此有的是Foo.call Foo.apply這些函式物件上的方法(來自Function.prototypr)而不會有你定義的那個talk
問題2:
對一個函式物件新增屬性,用prototype何不用prototype有何不同
用prototype新增屬性的時候,當你例項化以後呼叫實際上只是呼叫了原型物件,只調用了一次,不管你例項化幾次最多隻是內容變了,而在記憶體中只會出現一次原型物件的函式。
js完成dom結構
tips: setAttribute和.style方法
setAttribute是給html元素屬性設定值的。html元素屬性就是指的標籤中的鍵值對的前者, 例如<div id="name" class="text"><div>中的id和class就是html元素屬性。 .style.property="值"是用來設定css樣式的。例如說 document.getElementById("#name").style.background="red"設定文字框的背景顏色為紅色。在標籤中我們也會內嵌樣式, 例如<div id="name" class="text" style="width:100px;"><div>,說明style也是html元素的一個屬性。 在設定的時候可以使用document.getElementById("#name").setAttribute("style","color:red;font:9px;"); 實際上平時用setAtrribute()這個方法就用的不多,也不太支援這種設定樣式屬性的寫法。 如果引用了jQuery的話,在設定CSS樣式的時候還可以使用.css("border","1px solid red");這種方式。
H5lock.prototype.initDom = function(){
    var wrap = document.createElement('div');
    var str = '<h4 id="title" class="title">繪製解鎖圖案</h4>'+
              '<a id="updatePassword" style="position: absolute;right: 5px;top: 5px;color:#fff;font-size: 10px;display:none;">重置密碼</a>';

    wrap.setAttribute('style','position: absolute;top:0;left:0;right:0;bottom:0;');
    var canvas = document.createElement('canvas');
    canvas.setAttribute('id','canvas');
    canvas.style.cssText = 'background-color: #305066;display: inline-block;margin-top: 15px;';
    wrap.innerHTML = str;
    wrap.appendChild(canvas);

    var width = this.width || 300;
    var height = this.height || 300;

    document.body.appendChild(wrap);

    // 高清屏鎖放
canvas.style.width = width + "px";
    canvas.style.height = height + "px";
    canvas.height = height * this.devicePixelRatio; //修改canvas預設寬高
canvas.width = width * this.devicePixelRatio;

}
畫外層大圓的函式
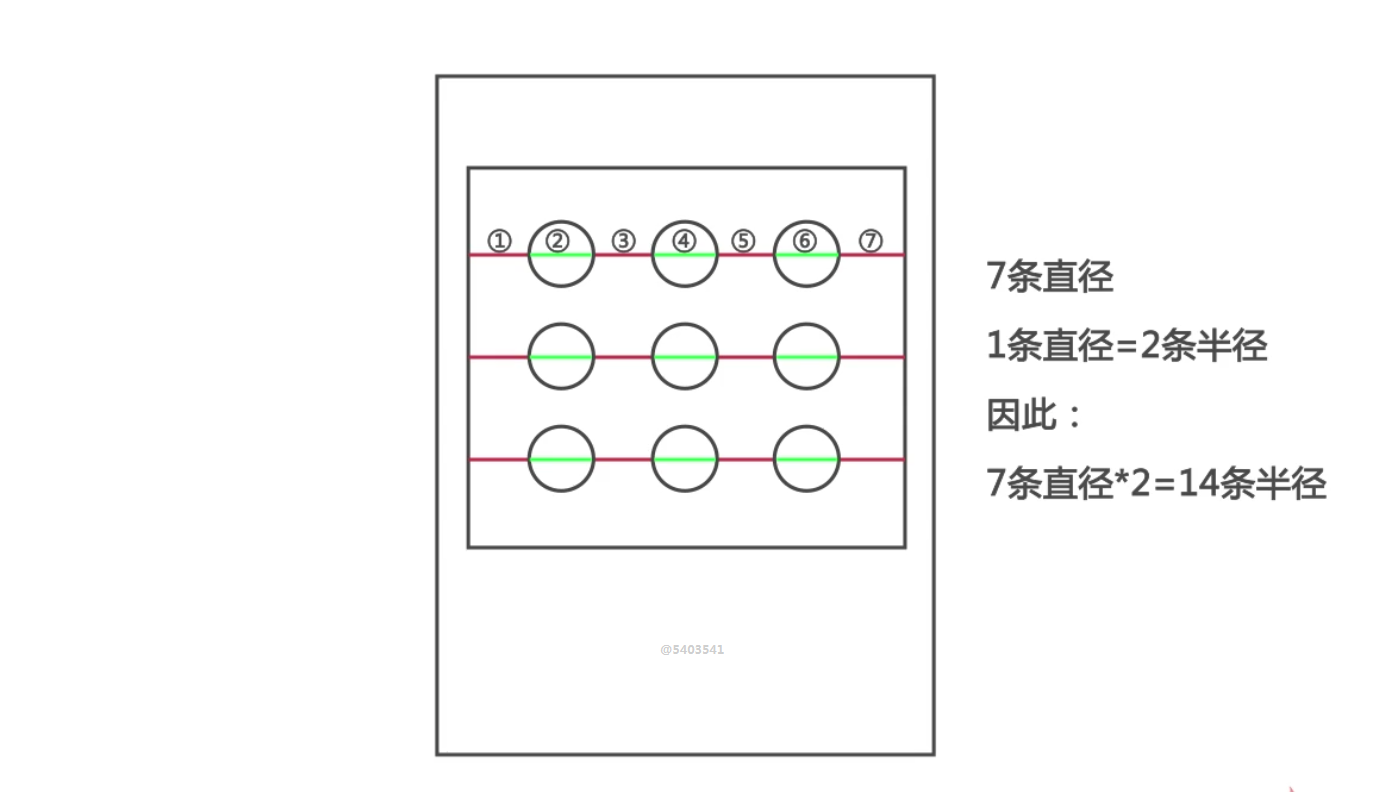
關於大圓半徑求法
如下圖為一行三個圓的時候
this.r = this.ctx.canvas.width / (2 + 4 * n);// 公式計算把大圓的直徑和大圓左側距離看成一個整體 也就是 4個半徑的長度 一行就是n個圓 4*n 加上最右剩餘的距離兩個半徑 所以計算半徑公式如上
實現存放大圓座標
H5lock.prototype.createCircle = function() {// 建立解鎖點的座標,根據canvas的大小來平均分配半徑
var n = this.chooseType;
    var count = 0;
    this.r = this.ctx.canvas.width / (2 + 4 * n);// 公式計算
    //確定圓心
this.lastPoint = [];
    this.arr = [];//9個圓的中心點座標
this.restPoint = [];//同樣是9個圓
var r = this.r;
    for (var i = 0 ; i < n ; i++) {//3*3
for (var j = 0 ; j < n ; j++) {
            count++;
            var obj = {
                x: j * 4 * r + 3 * r,
                y: i * 4 * r + 3 * r,
                index: count
};
            this.arr.push(obj);
            this.restPoint.push(obj);
        }
    }
    this.ctx.clearRect(0, 0, this.ctx.canvas.width, this.ctx.canvas.height);//開始畫
for (var i = 0 ; i < this.arr.length ; i++) {
        this.drawCle(this.arr[i].x, this.arr[i].y);
    }
    //return arr;
}
繪製圓 drawCle
H5lock.prototype.drawCle = function(x, y) { // 初始化解鎖密碼面板
this.ctx.strokeStyle = '#CFE6FF';
    this.ctx.lineWidth = 2;
    this.ctx.beginPath();
    this.ctx.arc(x, y, this.r, 0, Math.PI * 2, true);
    this.ctx.closePath();
    this.ctx.stroke();
}
繫結觸控事件
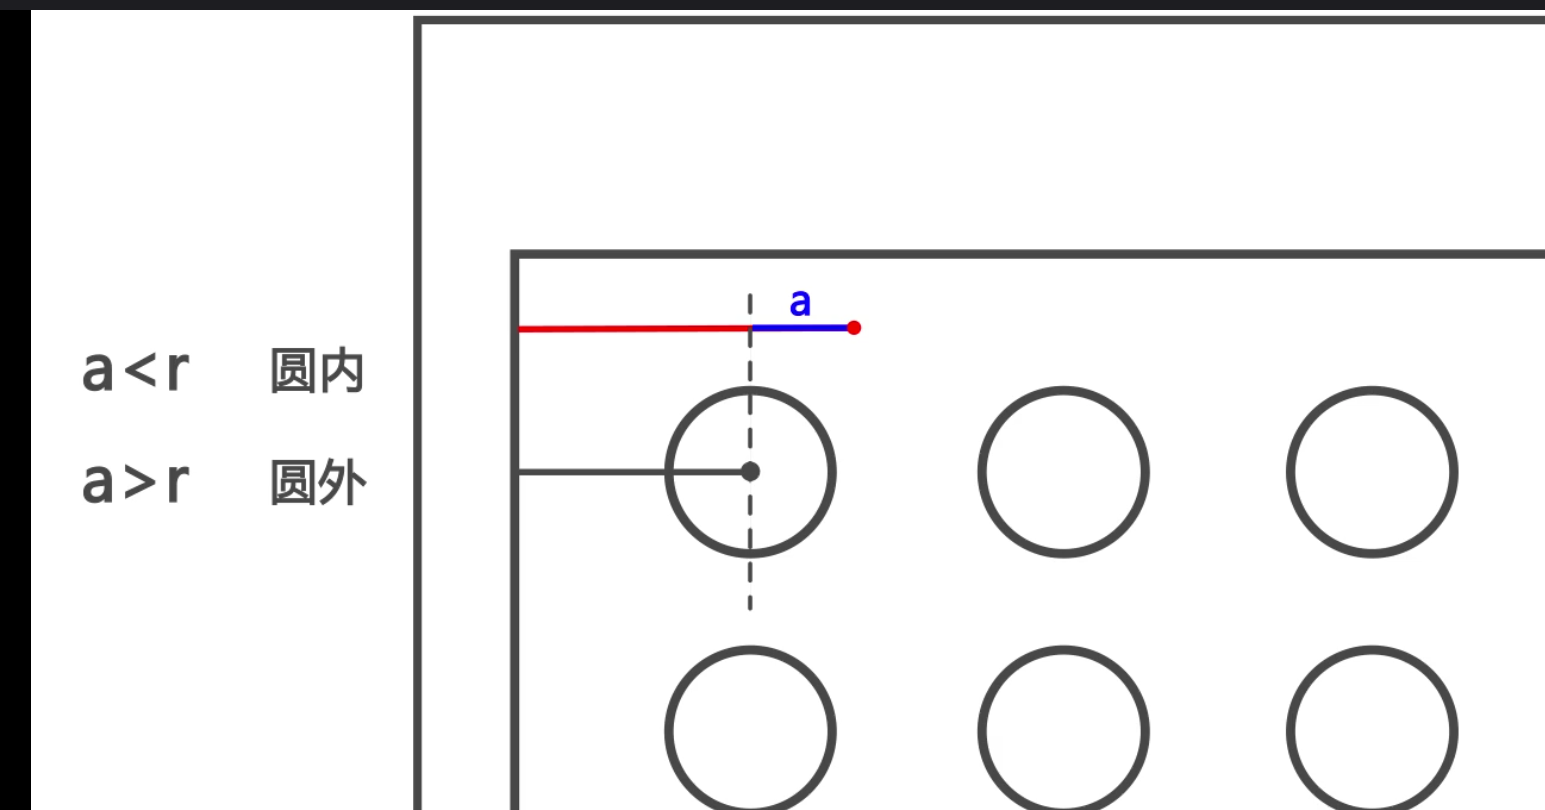
觸發觸控:判斷觸控點是否在大圓內
判斷方法 觸發點到畫布最左的距離 減去 大圓圓心到最左的距離 的絕對值小於半徑 那麼這個觸發點一定在某個圓內 有九個大圓 所以得遍歷比較每個圓 遇到滿足條件的就終止迴圈
this.canvas.addEventListener("touchstart", function (e) {//判斷觸發點是不是再大圓內
e.preventDefault();// 某些android 的 touchmove不宜觸發 所以增加此行程式碼
var po = self.getPosition(e);//判斷觸控點位置
console.log(po);
     //判斷條件 觸發點與圓心的位置到最左端的絕對值是否小於r   是的話就在圓內
for (var i = 0 ; i < self.arr.length ; i++) {
        if (Math.abs(po.x - self.arr[i].x) < self.r && Math.abs(po.y - self.arr[i].y) < self.r) {
            self.touchFlag = true;
            self.drawPoint(self.arr[i].x,self.arr[i].y);
            self.lastPoint.push(self.arr[i]);//點在哪個圓內就往lastpoint中push哪個圓的座標
self.restPoint.splice(i,1);
            break;//每次都要從第一個圓開始判斷直到最後一個圓  如果中間判斷出在某個圓內  就要終止迴圈
}
     }
 }, false);
獲取觸發點座標的函式getPosition
//判斷觸控點位置的函式
H5lock.prototype.getPosition = function(e) {// 獲取touch點相對於canvas的座標
var rect = e.currentTarget.getBoundingClientRect();//返回的是畫布距離螢幕的上下左右距離
var po = {
        x: (e.touches[0].clientX - rect.left)*this.devicePixelRatio,//一個手指操作 所以 下標為0  注意這裡是觸發點到螢幕左的距離減去畫布到螢幕左的距離
y: (e.touches[0].clientY - rect.top)*this.devicePixelRatio
};
    return po;
}
補充
getBoundingClientRect用於獲取某個元素相對於視窗的位置集合。集合中有top, right, bottom, left等屬性。
rectObject.top:元素上邊到視窗上邊的距離;
rectObject.right:元素右邊到視窗左邊的距離;
rectObject.bottom:元素下邊到視窗上邊的距離;
rectObject.left:元素左邊到視窗左邊的距離;
clientX 、 clientY
clientX 事件屬性返回當事件被觸發時滑鼠指標向對於瀏覽器頁面(或客戶區)的水平座標。
touches
這是應用於移動端觸控事件的,event.x是他在手機上點的X軸位置,event.touches,多點觸碰時的位置陣列,比如縮放手勢必須要用兩指的觸控點,就是一個數組
新增touchmove事件
this.canvas.addEventListener("touchmove", function (e) {//畫圓和畫線
if (self.touchFlag) {
       self.update(self.getPosition(e));
   }
}, false);
update函式
H5lock.prototype.update = function(po) {// 核心變換方法在touchmove時候呼叫
this.ctx.clearRect(0, 0, this.ctx.canvas.width, this.ctx.canvas.height);

    //重畫九個圓
for (var i = 0 ; i < this.arr.length ; i++) { // 每幀先把面板畫出來
this.drawCle(this.arr[i].x, this.arr[i].y);
    }

    this.drawPoint(this.lastPoint);// 每幀畫圓心
this.drawLine(po , this.lastPoint);// 每幀花軌跡
    //1.檢測手勢移動的位置是否處於下一個圓內
    //2.如果處於圓內則畫圓
    //3.已經劃過實心圓的圓  無需重複檢測
for (var i = 0 ; i < this.restPoint.length ; i++) {
        if (Math.abs(po.x - this.restPoint[i].x) < this.r && Math.abs(po.y - this.restPoint[i].y) < this.r) {
            this.drawPoint(this.restPoint[i].x, this.restPoint[i].y);
            this.lastPoint.push(this.restPoint[i]);

            //上面是找到畫過內圓的 大圓  然後從restPoint中刪除掉這個
this.restPoint.splice(i, 1);
            break;
        }
    }

}

畫內圓的函式   drawPoint
H5lock.prototype.drawPoint = function() { // 初始化圓心
for (var i = 0 ; i < this.lastPoint.length ; i++) {
        this.ctx.fillStyle = '#CFE6FF';
        this.ctx.beginPath();
        this.ctx.arc(this.lastPoint[i].x, this.lastPoint[i].y, this.r / 2, 0, Math.PI * 2, true);
        this.ctx.closePath();
        this.ctx.fill();
    }
}
畫線段的函式 drawLine
H5lock.prototype.drawLine = function(po, lastPoint) {// 解鎖軌跡
this.ctx.beginPath();
    this.ctx.lineWidth = 3;
    this.ctx.moveTo(this.lastPoint[0].x, this.lastPoint[0].y);//起始點為圓心
console.log(this.lastPoint.length);
    for (var i = 1 ; i < this.lastPoint.length ; i++) {
        this.ctx.lineTo(this.lastPoint[i].x, this.lastPoint[i].y);
    }
    this.ctx.lineTo(po.x, po.y);//畫到觸控點
this.ctx.stroke();
    this.ctx.closePath();

}
繼續新增touchend事件
this.canvas.addEventListener("touchend", function (e) {
    if (self.touchFlag) {
        self.touchFlag = false;
        self.storePass(self.lastPoint);
        setTimeout(function(){

           self.reset();
//不管密碼輸入正確與否 過了一會要將頁面重置為開始時的九個無狀態的大圓 }, 300); }}, false);
tips:
setTimeout(表示式,延時時間)在執行時,是在載入後延遲指定時間後,去執行一次表示式,記住,次數是一次
     而setInterval(表示式,互動時間)則不一樣,它從載入後,每隔指定的時間就執行一次表示式
儲存密碼函式 storePass
H5lock.prototype.storePass = function(psw) {// touchend結束之後對密碼和狀態的處理
if (this.pswObj.step == 1) {
        if (this.checkPass(this.pswObj.fpassword, psw)) {
            this.pswObj.step = 2;
            this.pswObj.spassword = psw;
            document.getElementById('title').innerHTML = '密碼儲存成功';
            this.drawStatusPoint('#2CFF26');
            window.localStorage.setItem('passwordxx', JSON.stringify(this.pswObj.spassword));
            window.localStorage.setItem('chooseType', this.chooseType);
        } else {
            document.getElementById('title').innerHTML = '兩次不一致,重新輸入';
            this.drawStatusPoint('red');
            delete this.pswObj.step;
        }
    } else if (this.pswObj.step == 2) {
        if (this.checkPass(this.pswObj.spassword, psw)) {
            document.getElementById('title').innerHTML = '解鎖成功';
            this.drawStatusPoint('#2CFF26');
        } else {
            this.drawStatusPoint('red');
            document.getElementById('title').innerHTML = '解鎖失敗';
        }
    } else {//第一次輸入的時候會直接執行這一段
this.pswObj.step = 1;
        this.pswObj.fpassword = psw;
        document.getElementById('title').innerHTML = '再次輸入';
    }

}
檢測密碼checkPass
/*檢測解鎖成功:
1.檢測路徑是否正確
2.正確就重置,圓圈變綠
3.不對也重置,圓圈變紅
4.重置
*/
 H5lock.prototype.checkPass = function(psw1, psw2) {// 檢測密碼
var p1 = '',//成功解鎖的密碼
p2 = '';
    for (var i = 0 ; i < psw1.length ; i++) {//index是九個點  分別為1 ~9
p1 += psw1[i].index + psw1[i].index;
    }
    for (var i = 0 ; i < psw2.length ; i++) {
        p2 += psw2[i].index + psw2[i].index;
    }
    return p1 === p2;//返回的是布林值
}
注意psw都是陣列

drawStatusPoint是重繪大圓顏色的
正確是綠色  錯誤是紅色
H5lock.prototype.drawStatusPoint = function(type) { // 初始化狀態線條
for (var i = 0 ; i < this.lastPoint.length ; i++) {
        this.ctx.strokeStyle = type;
        this.ctx.beginPath();
        this.ctx.arc(this.lastPoint[i].x, this.lastPoint[i].y, this.r, 0, Math.PI * 2, true);
        this.ctx.closePath();
        this.ctx.stroke();
    }
}
reset重置
H5lock.prototype.reset = function() {
    this.makeState();
    this.createCircle();//重新畫出最開的九個圓
}
makeState
H5lock.prototype.makeState = function() {//決定右上角的重置密碼這幾個字是否顯示
if (this.pswObj.step == 2) {//如果在設定密碼的時候 第二次輸入的密碼與第一次不符 根本不會有等於2的情況
document.getElementById('updatePassword').style.display = 'block';
        //document.getElementById('chooseType').style.display = 'none';
document.getElementById('title').innerHTML = '請解鎖';
    } else if (this.pswObj.step == 1) {
        //document.getElementById('chooseType').style.display = 'none';
document.getElementById('updatePassword').style.display = 'none';
    } else {
        document.getElementById('updatePassword').style.display = 'none'; //點選重置密碼的時候觸發這裡
        //document.getElementById('chooseType').style.display = 'block';
}
}
給重置密碼這個div繫結一個點選事件
document.getElementById('updatePassword').addEventListener('click', function(){
    self.updatePassword();
 });
updatePassword
H5lock.prototype.updatePassword = function(){
    window.localStorage.removeItem('passwordxx');
    window.localStorage.removeItem('chooseType');
    this.pswObj = {};//step被刪除
    document.getElementById('title').innerHTML = '繪製解鎖圖案';
    this.reset();
}
初始化
H5lock.prototype.init = function() {
    //1.確定半徑
    //2.確定每個圓的中心座標
    //3.    14個半徑
this.initDom();
    this.pswObj = window.localStorage.getItem('passwordxx') ? {
        step: 2,
        spassword: JSON.parse(window.localStorage.getItem('passwordxx'))
    } : {};
    this.lastPoint = [];
    this.makeState();//決定重置密碼這幾個字是否顯示
this.touchFlag = false;//初始化touchFlag
this.canvas = document.getElementById('canvas');
    this.ctx = this.canvas.getContext('2d');
    this.createCircle();//大圓繪製
this.bindEvent();//繫結事件函式
}


