底部導航欄實現頁面的切換(一):Fragment + LinearLayout + TextView
阿新 • • 發佈:2019-02-17
Fragment + LinearLayout + TextView 實現底部導航欄的切換(一)
知識點
先看效果圖:
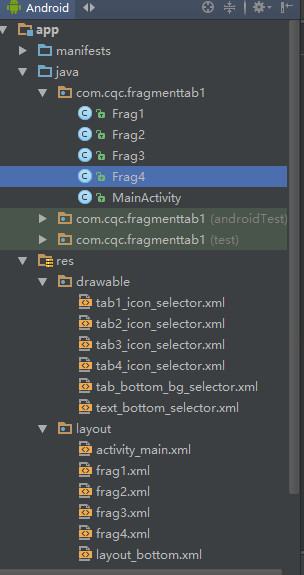
專案結構圖:
實現邏輯:
頂部是LinearLayout,裡面放了TextView;底部是LinearLayout,裡面水平放置了4個TextView,比例是1:1:1:1;其餘是FrameLayout填充滿剩餘空間。點選底部的tab,用4個Fragement替換FrameLayout,同時tab的文字+圖片+背景色改變
tab文字的改變:
用selector改變字型顏色
<?xml version="1.0" encoding="utf-8"?> tab背景色的改變:
用selector改變背景顏色
<?xml version="1.0" encoding="utf-8"?> tab圖片的改變:
用selector改變圖片
<?xml version="1.0" encoding="utf-8"?> 步驟:
- 通過findViewById()找到所有view,並給4個tab設定點選監聽,獲取FragmentManager
- 在監聽中先建立FragmentTransaction,hide()所有的fragment + tab的selector設定為false
- 在每個case中判斷對應的Fragment==null,是:建立並add();並顯示show()
- switch後記得commit()
下面上具體的程式碼:
onCreate(…)
@Override
protected void onCreate(Bundle savedInstanceState) {
    super.onCreate(savedInstanceState);
    supportRequestWindowFeature(Window.FEATURE_NO_TITLE);
    setContentView(R.layout.activity_main);
    fm = getSupportFragmentManager();
    findViews();
    initView();
    tab1.performClick();//Call this view's OnClickListener
}
findViews()
private void findViews() {
    tab1 = (TextView) findViewById(R.id.tab1);
    tab2 = (TextView) findViewById(R.id.tab2);
    tab3 = (TextView) findViewById(R.id.tab3);
    tab4 = (TextView) findViewById(R.id.tab4);

    framgLayout = (FrameLayout) findViewById(R.id.framgLayout);
}
initView();
private void initView() {
    tab1.setOnClickListener(this);
    tab2.setOnClickListener(this);
    tab3.setOnClickListener(this);
    tab4.setOnClickListener(this);
}
onClick()
@Override
public void onClick(View view) {
    transaction = fm.beginTransaction();
    hideAllFragment();
    switch (view.getId()) {
        case R.id.tab1:
            setSelectorAllFalse();//這個最好放在4個tab的每個case中,因為如果還有其他的點選,就會導致tab全變成灰色
            tab1.setSelected(true);
            if (frag1 == null) {
                frag1 = new Frag1();
                transaction.add(R.id.framgLayout, frag1, "Frag1");
            }
            transaction.show(frag1);
            break;
        case R.id.tab2:
            setSelectorAllFalse();
            tab2.setSelected(true);
            if (frag2 == null) {
                frag2 = new Frag2();
                transaction.add(R.id.framgLayout, frag2, "Frag2");
            }
            transaction.show(frag2);
            break;
        case R.id.tab3:
            setSelectorAllFalse();
            tab3.setSelected(true);
            if (frag3 == null) {
                frag3 = new Frag3();
                transaction.add(R.id.framgLayout, frag3, "Frag3");
            }
            transaction.show(frag3);
            break;
        case R.id.tab4:
            setSelectorAllFalse();
            tab4.setSelected(true);
            if (frag4 == null) {
                frag4 = new Frag4();
                transaction.add(R.id.framgLayout, frag4, "Frag4");
            }
            transaction.show(frag4);
            break;
    }
    transaction.commit();
}
hideAllFragment()
private void hideAllFragment() {
    if (frag1 != null) {
        transaction.hide(frag1);
    }
    if (frag2 != null) {
        transaction.hide(frag2);
    }
    if (frag3 != null) {
        transaction.hide(frag3);
    }
    if (frag4 != null) {
        transaction.hide(frag4);
    }
}
frag1.xml
其他3個都一樣
<?xml version="1.0" encoding="utf-8"?>
<RelativeLayout xmlns:android="http://schemas.android.com/apk/res/android"
                android:layout_width="match_parent"
                android:layout_height="match_parent">

    <TextView
        android:layout_width="match_parent"
        android:layout_height="match_parent"
        android:gravity="center"
        android:text="微信"
        android:textSize="30sp"/>
</RelativeLayout>


