
VC按鈕自繪的簡單實現
之前一直使用公司開發的介面庫來進行VC介面設計,今天偶然發現其中一個按鈕類不能實現特定需求,例如文字的位置不能隨意顯示在按鈕上。於是唯有重新定義了該按鈕類的自繪功能,新增新的屬性和操作。
通過這次修改,感覺控制元件自繪也還是蠻有意思的,本來不能實現的功能,通過類的派生和自繪就能實現,感覺真爽,符合人性慾望無限擴充套件的本性。
說起VC的介面設計,大家都應該很清楚,MFC提供了很多標準的控制元件,例如按鈕,下拉框等等,但是這些控制元件本身並不美觀。要想改變它們的形狀和外觀,就必須要進行控制元件的自繪。我們常常看到QQ,360的介面設計,之所以那麼狂吊炸天,就是因為他們有自己的介面庫,能實現控制元件的自繪。現以一個簡單的例子來介紹按鈕自繪的方法實現。(部分函式程式碼和實現原理還是要列出的,因為程式碼才是王道啊,步驟就略過哈。)
1. 功能需求
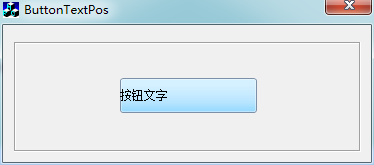
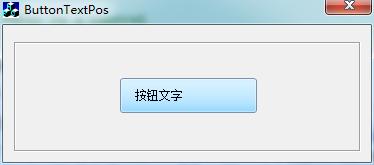
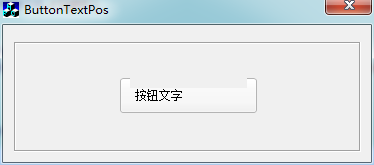
1) 實現按鈕文字任意位置的偏移。效果圖如下:
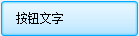
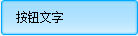
2) 實現按鈕的幾種狀態
Normal:

Over:
Down:
Disable:
2. 方法實現
首先定義一個CSkinButton類,它繼承於CButton類。
1) 自繪屬性
要想實現按鈕自繪,需要把按鈕風格修改為自繪屬性BS_OWNERDRAW,從而系統會發送WM_DRAWITEM訊息給CButton類,才會呼叫過載函式DrawItem實現自繪。可選擇在對話方塊屬性中或者在過載函式PreSubclassWindow中新增ModifyStyle(0,BS_OWNERDRAW);。
void CSkinButton::PreSubclassWindow()
{
    // TODO: Add your specialized code here and/or call the base class
    ModifyStyle(0,BS_OWNERDRAW);
    CButton::PreSubclassWindow();
}
2) 過載DrawItem()函式
DrawItem()函式主要是根據按鈕的狀態來繪製自身的形狀和外觀,按鈕控制元件自繪的功能就是在這裡實現的。它主要包含了一個LPDRAWITEMSTRUCT的指標。宣告如下:
typedef 具體實現如下:
void CSkinButton::DrawItem(LPDRAWITEMSTRUCT lpDrawItemStruct)
{
    // TODO: Add your code to draw the specified item
    CRect rcItem(lpDrawItemStruct->rcItem);
    CString strText,strPath;
    CString strWorkPath;

    //按鈕狀態
    int nStatus = CONTROL_STATUS_NORMAL;
    if ( !IsWindowEnabled() )
    {
        nStatus = CONTROL_STATUS_DISABLE;
    }
    else
    {
        if ( m_bTrackMouseEvent )
        {
            if ( m_bLButtonDown )
            {
                nStatus = CONTROL_STATUS_DOWN;
            }
            else
            {
                nStatus = CONTROL_STATUS_OVER;
            }
        }
        else
        {
//          if ( ::GetFocus()==m_hWnd )
//          {
//              nStatus = CONTROL_STATUS_FOCUS;
//          }
//          else
            {
                nStatus = CONTROL_STATUS_DISABLE/*CONTROL_STATUS_NORMAL*/;
            }
        }
    }

    if ( m_hBitmap[nStatus] )
    {
        //繪圖
        Draw9gridTransparent(lpDrawItemStruct->hDC, lpDrawItemStruct->rcItem, m_rcBorder9grid, m_hBitmap[nStatus]);
    }
    //使用透明的輸出,也就是文字的背景是不改變的
    ::SetBkMode(lpDrawItemStruct->hDC, TRANSPARENT);

    GetWindowText(strText);
    if (m_unDrawTextStyle==BTN_DRAW_TEXT_CENTER)
    {
        ::DrawText(lpDrawItemStruct->hDC, strText, strText.GetLength(), rcItem, DT_CENTER|DT_VCENTER|DT_SINGLELINE);
    }
    else if (m_unDrawTextStyle==BTN_DRAW_TEXT_LEFT)
    {
        //根據偏移值來繪製
        rcItem.left = rcItem.left+m_unDrawTextSize;
        ::DrawText(lpDrawItemStruct->hDC, strText, strText.GetLength(), rcItem, DT_LEFT|DT_VCENTER|DT_SINGLELINE);
    }
    else if (m_unDrawTextStyle==BTN_DRAW_TEXT_RIGHT)
    {
        rcItem.right = rcItem.right-m_unDrawTextSize;
        ::DrawText(lpDrawItemStruct->hDC, strText, strText.GetLength(), rcItem, DT_RIGHT|DT_VCENTER|DT_SINGLELINE);
    }
}
3) 文字繪製
文字的繪製使用DrawText函式,偏移值只要根據矩形區域的left和right來設定就行了,具體可參看DrawItem函式:
        //根據偏移值來繪製
        rcItem.right = rcItem.right-m_unDrawTextSize;
        ::DrawText(lpDrawItemStruct->hDC, strText, strText.GetLength(), rcItem, DT_RIGHT|DT_VCENTER|DT_SINGLELINE);
4) Mouse相關響應
想要按鈕隨著滑鼠移動來動態顯示狀態,需要觸發WM_MOUSEMOVE,WM_MOUSELEAVE和WM_MOUSEHOVER訊息。由於WM_MOUSEMOVE訊息是標準的Windows訊息,只需要在類嚮導中新增即可觸發,而WM_MOUSELEAVE和WM_MOUSEHOVER兩個訊息需要通過WM_MOUSEMOVE訊息來啟動觸發。
OnMouseLeave實現定義如下:
//CSkinButton.h定義
afx_msg LRESULT OnMouseLeave(WPARAM wParam, LPARAM lParam);
//CSkinButton.cpp定義訊息
ON_MESSAGE(WM_MOUSELEAVE, OnMouseLeave)
//CSkinButton.cpp實現
LRESULT CSkinButton::OnMouseLeave(WPARAM wParam, LPARAM lParam)
{
if ( m_bTrackMouseEvent )
    {
        m_bTrackMouseEvent = FALSE;
        Invalidate();
    }
    SetCursor(AfxGetApp()->LoadStandardCursor(IDC_ARROW));

    return 1;
}

OnMouseMove實現如下:
void CSkinButton::OnMouseMove(UINT nFlags, CPoint point)
{
// TODO: Add your message handler code here and/or call default
    CRect rect;
    GetWindowRect(rect);
    ScreenToClient(rect);

    if ( !m_bTrackMouseEvent )
    {
        m_bTrackMouseEvent = TRUE;

        TRACKMOUSEEVENT tme;
        tme.cbSize          = sizeof(TRACKMOUSEEVENT);
        tme.dwFlags         = TME_LEAVE;
        tme.dwHoverTime     = HOVER_DEFAULT;
        tme.hwndTrack       = m_hWnd;
        _TrackMouseEvent(&tme);
        Invalidate();
    }
    ::SetCursor(AfxGetApp()->LoadStandardCursor(MAKEINTRESOURCE(32649)));

    CButton::OnMouseMove(nFlags, point);
}
5) 圖片繪製
裝載點陣圖:
HBITMAP  hImageBitmap = (HBITMAP)::LoadImage(AfxGetInstanceHandle(),strImagePath, IMAGE_BITMAP, 0, 0, LR_CREATEDIBSECTION|LR_DEFAULTSIZE|LR_LOADFROMFILE);
按九個方向進行圖片繪製:
BOOL CSkinButton::Draw9gridTransparent(HDC hSrcDC, CRect rcItem, CRect rcBorder, HBITMAP hBitmap)
{
    if (hBitmap)
    {
        BITMAP bitmap;
        ::GetObject(hBitmap, sizeof(BITMAP), &bitmap);
        int m_nWidth    = bitmap.bmWidth;
        int m_nHeight   = bitmap.bmHeight;

        HDC memdc;
        memdc = CreateCompatibleDC(hSrcDC);
        ::SelectObject(memdc, hBitmap);

        //左上角
        CRect rcLeftTop;
        rcLeftTop.left      = rcItem.left;
        rcLeftTop.top       = rcItem.top;
        rcLeftTop.right     = rcLeftTop.left+m_rcBorder9grid.left;
        rcLeftTop.bottom    = rcLeftTop.top+m_rcBorder9grid.top;
        ::TransparentBlt(hSrcDC, rcLeftTop.left, rcLeftTop.top, rcLeftTop.Width(), rcLeftTop.Height(), memdc, 0, 0, m_rcBorder9grid.left, m_rcBorder9grid.top, RGB(255,0,255));

        //右上角
        CRect rcRightTop;
        rcRightTop.left     = rcItem.right-m_rcBorder9grid.right;
        rcRightTop.right    = rcItem.right;
        rcRightTop.top      = rcItem.top;
        rcRightTop.bottom   = rcRightTop.top+m_rcBorder9grid.top;
        ::TransparentBlt(hSrcDC, rcRightTop.left, rcRightTop.top, rcRightTop.Width(), rcRightTop.Height(), memdc, m_nWidth-m_rcBorder9grid.right, 0, m_rcBorder9grid.right, m_rcBorder9grid.top, RGB(255,0,255));

        //右下角
        CRect rcRightBottom;
        rcRightBottom.left  = rcItem.right-m_rcBorder9grid.right;
        rcRightBottom.right = rcItem.right;
        rcRightBottom.bottom= rcItem.bottom;
        rcRightBottom.top   = rcRightBottom.bottom-m_rcBorder9grid.bottom;
        ::TransparentBlt(hSrcDC, rcRightBottom.left, rcRightBottom.top, rcRightBottom.Width(), rcRightBottom.Height(), memdc, m_nWidth-m_rcBorder9grid.right, m_nHeight-m_rcBorder9grid.bottom, m_rcBorder9grid.right, m_rcBorder9grid.bottom, RGB(255,0,255));

        //左下角
        CRect rcLeftBottom;
        rcLeftBottom.left   = rcItem.left;
        rcLeftBottom.right  = rcLeftBottom.left+m_rcBorder9grid.left;
        rcLeftBottom.bottom = rcItem.bottom;
        rcLeftBottom.top    = rcLeftBottom.bottom-m_rcBorder9grid.bottom;
        ::TransparentBlt(hSrcDC, rcLeftBottom.left, rcLeftBottom.top, rcLeftBottom.Width(), rcLeftBottom.Height(), memdc, 0, m_nHeight-m_rcBorder9grid.bottom, m_rcBorder9grid.left, m_rcBorder9grid.bottom,RGB(255,0,255));

        //左邊
        CRect rcLeft;
        rcLeft.left         = rcItem.left;
        rcLeft.right        = rcLeft.left+m_rcBorder9grid.left;
        rcLeft.top          = rcItem.top+m_rcBorder9grid.top;
        rcLeft.bottom       = rcItem.bottom-m_rcBorder9grid.bottom;
        ::StretchBlt(hSrcDC, rcLeft.left, rcLeft.top, rcLeft.Width(), rcLeft.Height(), memdc, 0, m_rcBorder9grid.top, m_rcBorder9grid.left, m_nHeight-m_rcBorder9grid.top-m_rcBorder9grid.bottom, SRCCOPY);

        //頂邊
        CRect rcTop;
        rcTop.left          = rcItem.left+m_rcBorder9grid.left;
        rcTop.right         = rcItem.right-m_rcBorder9grid.right;
        rcTop.top           = rcItem.top;
        rcTop.bottom        = rcTop.top+m_rcBorder9grid.top;
        ::StretchBlt(hSrcDC, rcTop.left, rcTop.top, rcTop.Width(), rcTop.Height(), memdc, m_rcBorder9grid.left, 0, m_nWidth-m_rcBorder9grid.left-m_rcBorder9grid.right, m_rcBorder9grid.top, SRCCOPY);

        //右邊
        CRect rcRight;
        rcRight.right       = rcItem.right;
        rcRight.left        = rcRight.right-m_rcBorder9grid.right;
        rcRight.top         = rcItem.top+m_rcBorder9grid.top;
        rcRight.bottom      = rcItem.bottom-m_rcBorder9grid.bottom;
        ::StretchBlt(hSrcDC, rcRight.left, rcRight.top, rcRight.Width(), rcRight.Height(), memdc, m_nWidth-m_rcBorder9grid.right, m_rcBorder9grid.top, m_rcBorder9grid.right, m_nHeight-m_rcBorder9grid.top-m_rcBorder9grid.bottom, SRCCOPY);

        //底邊
        CRect rcBottom;
        rcBottom.left       = rcItem.left+m_rcBorder9grid.left;
        rcBottom.right      = rcItem.right-m_rcBorder9grid.right;
        rcBottom.bottom     = rcItem.bottom;
        rcBottom.top        = rcBottom.bottom-m_rcBorder9grid.bottom;
        ::StretchBlt(hSrcDC, rcBottom.left, rcBottom.top, rcBottom.Width(), rcBottom.Height(), memdc, m_rcBorder9grid.left, m_nHeight-m_rcBorder9grid.bottom, m_nWidth-m_rcBorder9grid.left-m_rcBorder9grid.right, m_rcBorder9grid.bottom, SRCCOPY);

        //中心
        CRect rcCenter;
        rcCenter.left       = rcItem.left+m_rcBorder9grid.left;
        rcCenter.right      = rcItem.right-m_rcBorder9grid.right;
        rcCenter.top        = rcItem.top+m_rcBorder9grid.top;
        rcCenter.bottom     = rcItem.bottom-m_rcBorder9grid.bottom;
        int nMode = ::SetStretchBltMode(hSrcDC,HALFTONE);
        ::StretchBlt(hSrcDC, rcCenter.left, rcCenter.top, rcCenter.Width(), rcCenter.Height(), memdc, m_rcBorder9grid.left, m_rcBorder9grid.top, m_nWidth-m_rcBorder9grid.left-m_rcBorder9grid.right, m_nHeight-m_rcBorder9grid.top-m_rcBorder9grid.bottom, SRCCOPY);
        ::SetStretchBltMode(hSrcDC,nMode);
        ::DeleteDC(memdc);
    }

    return TRUE;
}
為了更清楚,現把頂邊程式碼去掉看看:
通過控制元件自繪,你能夠按照自己的需要和想法來實現一些酷炫的介面外觀。人靠衣裝,佛靠金裝,一個好的軟體產品也需要精緻的外表,至少在審美上要滿足使用者的需求,提高使用者體驗。