
(九)Android 增量更新
一、概述
1.什麼是增量更新
對於平常的 Android 應用更新,大部分時候是在舊版本的程式碼上進行修改,打包釋出。這時候,新舊版本間的差異是比較小的,增量更新就是我們在舊的應用版本基礎上,只更新發生改變的,而不再是完全下載新的 apk,覆蓋安裝。
普通更新:
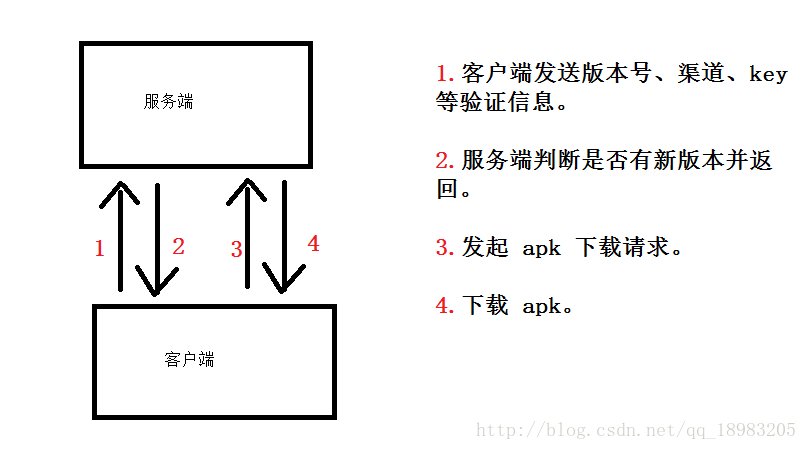
在這更新過程中,一般採用非同步更新,舊版本 apk 正常執行,後臺非同步進行下載,下載完成之後進行彈框提示安裝。
增量更新:
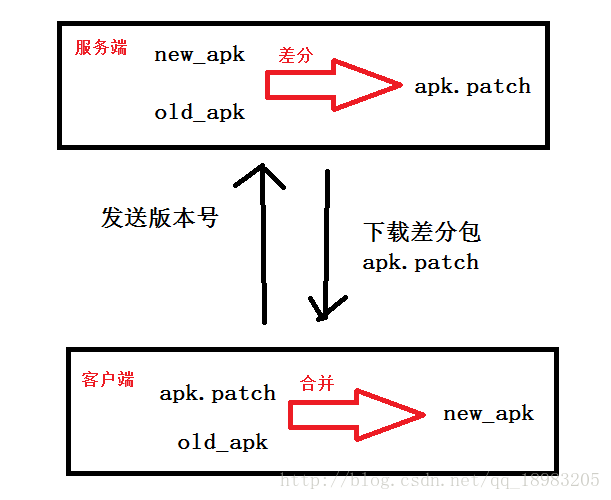
增量更新通過哈夫曼演算法,計算出舊的 apk 與新的 apk 之間不一樣的地方(差分),客戶端進行版本更新的時候,只需要下載差分包到本地與舊的 apk 進行合併,生成新的 apk,然後進行安裝。
2.增量更新優點
幾年前,當時網路環境不好,流量費較貴,當釋出新版本的時候,使用者升級的意願不高。為解決這個問題,谷歌提出了 Smart App Update,即增量更新(也叫做差分升級)。
現在網路環境雖然好了,但是各個應用 apk 也越來越大。目前來說,增量更新仍然是解決更新包過大的較好的方案。可能幾個 G 的應用,更新包只有幾百 M 甚至幾十 M,這不僅大大提高更新速度,而且對於服務端來說,也很大程度上減少了流量的費用。
3.增量更新缺點
客戶端和服務端都需要新增對增量更新的支援,而且正常情況下是無法保證使用者在用版本,所以需要對各個舊的版本生產對應的更新包,根據使用者上傳的版本號進行下載。
當 apk 很小的時候,比如只有幾 M,這時候增量包再小也有幾百 K 或者上 M。如果使用增量更新有點得不償失,增量更新較複雜,而且差分與合併過程較為耗時。另外,當進行大版本更新的時候,增量更新包也較大,這時候也不適合進行增量更新。
4.哈夫曼演算法

apk 在檔案儲存中也是以二進位制方式存在的,運用哈夫曼演算法進行對比新舊版本的 apk 的二進位制檔案。如果是相同內容,只儲存索引;如果不同,則儲存壓縮的內容和索引。
5.增量更新與熱更新、外掛化
熱更新是使用熱更新 service,只更新某些檔案,比如原先有個 ClassA 的類檔案,要進行更新為 ClassB 的類檔案,不進行整個應用的下載,屬於輕量級的。
外掛化使用了 pluginManager,以功能塊劃分外掛化進行開發,更新的時候對整個功能塊進行更新,比如有個 PluginA 模組要更新為 PluginB 模組,相比熱更新會更重量級一些。
相比於熱更新和外掛化,熱更新和外掛化更多的是體現要更新什麼,而增量更新是要怎麼更新。在熱更新和外掛化中仍可以使用增量更新,只更新 ClassA 與 ClassB 之間的類差分包,或者 PluginA 與 PluginB 的模組差分包。
二、差分
差分與合併主要是使用了 bsdiff/bspatch 進行實現的,需用用到依賴 bzip2,下面是這兩個下載地址,分別下載兩個壓縮包。
bsdiff/bspatch 官網
http://www.daemonology.net/bsdiff/
1.生成可執行檔案
在 bsdiff/bspatch 官網點選 Windows port 進行下載 bsdiff4.3-win32-src.zip,這是 win環境的包,也可點選 here 下載 Linux 環境下的包 bsdiff-4.3.tar.gz。
在 bsdiff4.3-win32-src.zip 解壓出來的資料夾下,資料夾 Release 中已經有打包好的 bsdiff.exe 和 bspatch.exe 兩個可執行檔案,在這邊我們不使用這個,自己新建 C 專案進行打包。
1.使用 Visual Studio 新建一個空專案 Diff,在 Diff 下新建兩個資料夾 include 與 src 分別存放標頭檔案和原始碼。

2.同時把 bsdiff4.3-win32-src.zip 中對應的 .h 檔案拷貝到 include 資料夾下,除 bspatch.cpp 外的 .c 和 .cpp 檔案拷貝到 src 資料夾下。(這邊只做差分,不需要 bspatch.cpp 檔案)

**3.**Visual Studio 右擊標頭檔案 –> 新增 –> 現有項,選擇 include 下面的兩個標頭檔案,新增到 Diff 專案中。

同樣的,把 src 下的檔案新增到原始檔下。
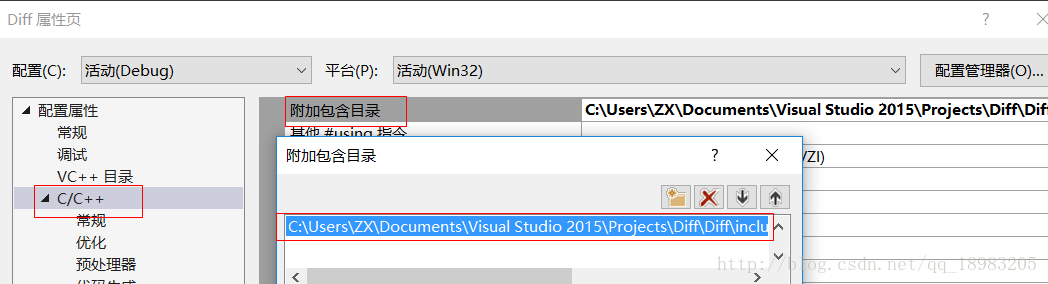
4.這時候專案會報錯,沒有找到標頭檔案,是因為原始碼與標頭檔案我們沒有放在同一個資料夾下。
右鍵工程 –> 屬性 –> c++ –> 附含包目錄,選擇 include 資料夾。
5.執行專案,報錯。
嚴重性 程式碼 說明 專案 檔案 行 禁止顯示狀態
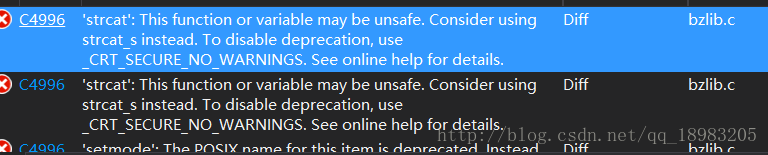
錯誤 C4996 ‘strcat’: This function or variable may be unsafe. Consider using strcat_s instead. To disable deprecation, use _CRT_SECURE_NO_WARNINGS. See online help for details. Diff c:\users\zx\documents\visual studio 2015\projects\diff\diff\src\bzlib.c 1416
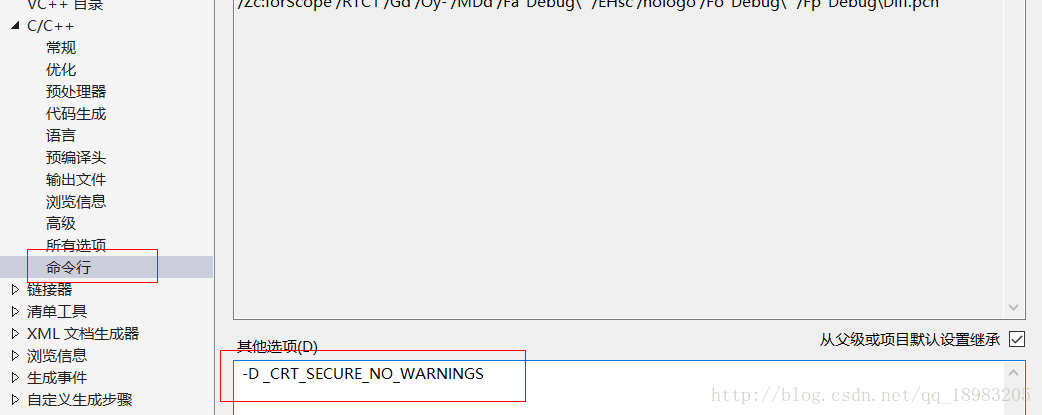
這是第三方庫的警告,右鍵工程 –> 屬性 –> c++ –> 命令列 新增 -D _CRT_SECURE_NO_WARNINGS
6.繼續執行專案,繼續報錯。(這個錯與上面的錯誤已經不一樣了)

嚴重性 程式碼 說明 專案 檔案 行 禁止顯示狀態
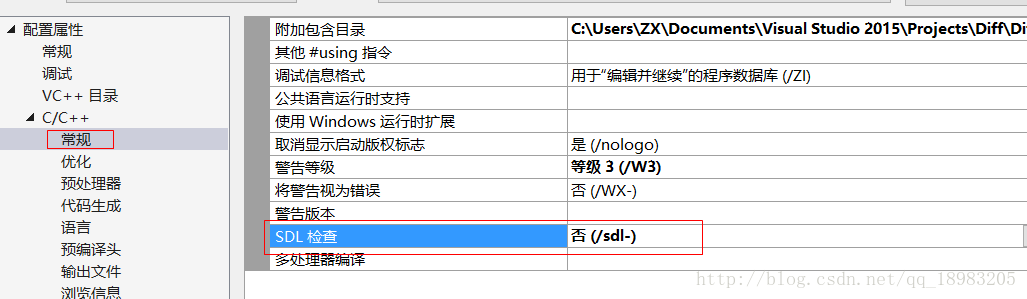
錯誤 C4996 ‘setmode’: The POSIX name for this item is deprecated. Instead, use the ISO C and C++ conformant name: _setmode. See online help for details. Diff c:\users\zx\documents\visual studio 2015\projects\diff\diff\src\bzlib.c 1422
這是安全檢查報錯,直接進行關閉安全檢查。右鍵工程 –> 屬性 –> c++ –> 常規 –> SDL檢查 否。
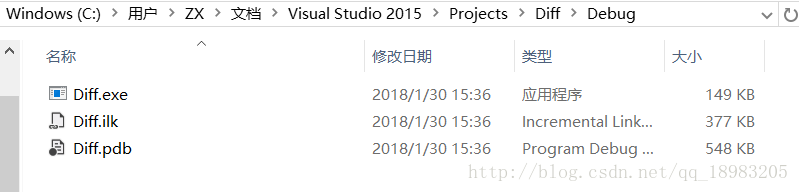
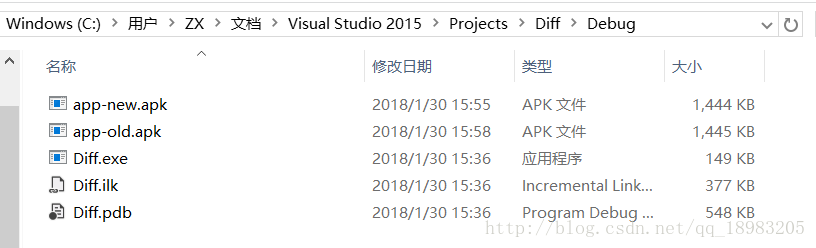
7.繼續執行專案,生成可執行檔案 Diff.exe。
注:當 Visual Studio 進行平臺切換的時候,需要進上面的步驟進行重新配置。
2.生成差分包
準備新舊兩個應用的安裝包,拷貝到 Diff.exe 所在的資料夾下。
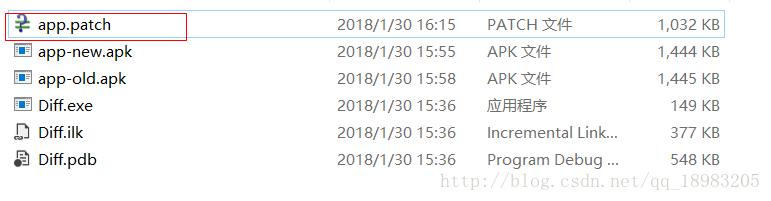
切換到 Diff.exe 所在的目錄,執行命令 Diff.exe app-old.exe app-new.apk app.patch 生成差分包,第一個引數是 Diff.exe 的路徑。第二個引數是舊的 apk 的路徑,第三個引數是新的 apk 的路徑,第四個引數是生成的差分包的儲存路徑。

這邊由於測試的原因,使用的新舊 apk 本身較小,所以與差分包的大小區別不是很明顯。這也說明 apk 很小的時候不適合進行增量更新。
3.生成庫檔案
上面是使用可執行檔案生成差分包,但實際應用中不可能使用這種方式進行生成差分包,當有多個版本要生成差分包的時候,明顯效率較低,一般是由 bsdiff 生成庫檔案,供後臺進行 JNI 呼叫生成差分包。
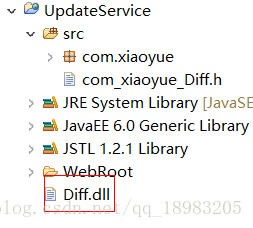
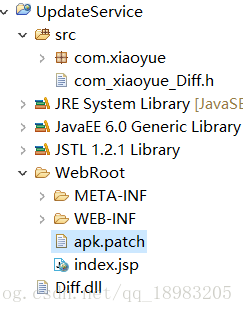
1.這邊使用的是 MyEclipse 作為後臺開發,新建一個 web 專案,建立 Diff.java 類。(沒有後臺開發工具可以用 java 專案替代,jni 方法調起來即可)
public class Diff {
    public static native void diff(String oldPath, String newPath, String patchPath);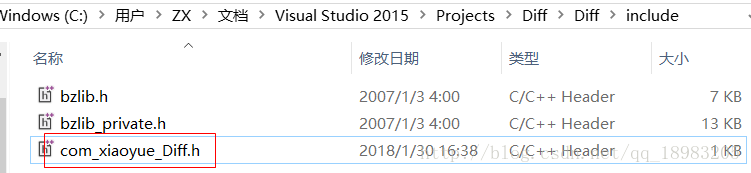
}2.接著就是 JNI 的基本流程,生成標頭檔案,拷貝到上面 Visual Studio 建立的 Diff 專案中,並進行配置。
把標頭檔案拷貝到 include 資料夾下。
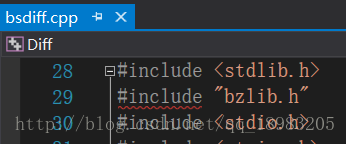
3.修改 bsdiff.cpp 中 main 函式的函式名為 diff_main。
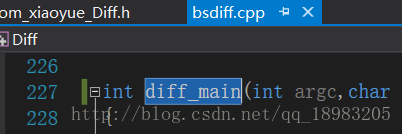
4.在 bsdiff.cpp 中引入標頭檔案 com_xiaoyue_Diff.h。
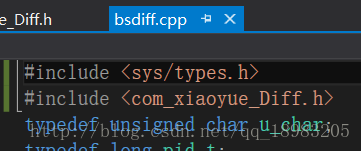
5.在 bsdiff.cpp 中實現 native 的方法,呼叫 diff_main 這個方法。
JNIEXPORT void JNICALL Java_com_xiaoyue_Diff_diff
(JNIEnv *env, jclass jclz, jstring old_path_jst, jstring new_path_jst, jstring patch_path_jst) {

    int argc = 4;
    char *argv[4];

    char *old_path = (char *)(*env).GetStringUTFChars(old_path_jst, NULL);
    char *new_path = (char *)(*env).GetStringUTFChars(new_path_jst, NULL);
    char *patch_path = (char *)(*env).GetStringUTFChars(patch_path_jst, NULL);

    argv[0] = "Diff";
    argv[1] = old_path;
    argv[2] = new_path;
    argv[3] = patch_path;

    diff_main(argc, argv);

    (*env).ReleaseStringUTFChars(old_path_jst, old_path);
    (*env).ReleaseStringUTFChars(new_path_jst, new_path);
    (*env).ReleaseStringUTFChars(patch_path_jst, patch_path);
}
diff_main 需要兩個引數,根據方法實現可知,第一個引數一定是 4,第二個引數是一個長度為 4 的字串陣列,4 個字串引數分別是標籤、舊的 apk 路徑、新的 apk 路徑和生成差分包的路徑。
6.根據 JNI 基本流程生成 dll 庫檔案,拷貝到 web 專案中。(生成 dll 的時候,注意選擇平臺,切換平臺需要重新進行配置)
4.JNI 呼叫生成差分
在 Diff.java 中新增載入。
Diff.java
public class Diff {

    public static native void diff(String oldPath, String newPath, String patchPath);

   static{
        System.loadLibrary("Diff");
    }
}
在 web 專案中編寫 main 函式進行測試。
DiffTest .java
public class DiffTest {
//路徑不能包含中文
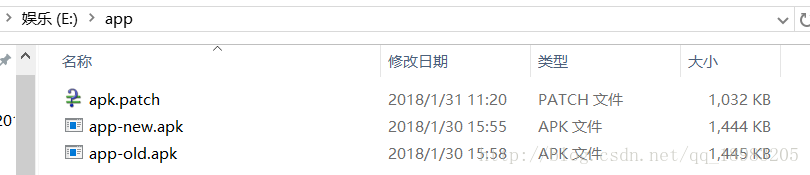
public static final String OLD_APK_PATH = "E:/app/app-old.apk";
public static final String NEW_APK_PATH = "E:/app/app-new.apk";
public static final String PATCH_PATH = "E:/app/apk.patch";
public static void main(String[] args) {
// TODO Auto-generated method stub
Diff.diff(OLD_APK_PATH, NEW_APK_PATH, PATCH_PATH);
}
}結果:
5.Linux 下生成差分包
1.把 Linux 環境的 bsdiff/bspatch 包下的 bsdiff.c 和 bzip2 下的所有 .c 和 .h 檔案拷貝到 Linux 平臺下(虛擬機器或百度雲等都可以)。
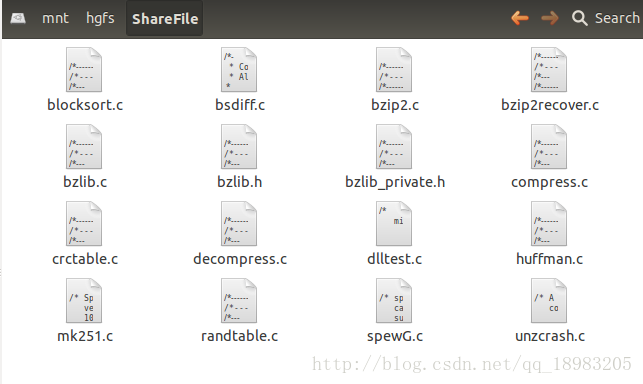
2.命令列切換到對應資料夾下,執行命令 gcc -fPIC -shared blocksort.c decompress.c bsdiff.c randtable.c bzip2.c huffman.c compress.c bzlib.c crctable.c -o Diff.so。
這時候會報錯,bsdiff.c 找不到 bzlib.h 標頭檔案。

3.修改 bsdiff.c 檔案中的 #include <bzlib.h> 為 #include "bzlib.h"。
注:由於個人採用的是虛擬機器共享檔案,碰見幾個問題這邊提一下:1.直接在 window 平臺修改共享檔案,並不會同步到虛擬機器的共享檔案。2.在 Linux 下直接進行修改共享檔案,許可權不夠,沒有試用 root 使用者,修改較為複雜。最後是在 Linux 下把共享檔案重新複製一份,然後進行修改檔案許可權。
繼續編譯,仍然出錯,這是由於其他檔案中也包含有 main 函式,而對於一個可執行檔案只能有一個 main 函式。

4.修改其他 .c 檔案下的 main 函式方法名(這邊個人是在 main 前面加上檔名),重新編譯即可。
三、合併
1.庫檔案的整合
應用的增量更新,合併是在安卓客戶端這邊來實現的。對於客戶端來說,這塊相對來說更重要一些。
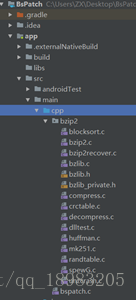
1. Android Studio 新建 C++ 支援專案,把 cpp 下預設生成的 .cpp 檔案刪除,以及 MainActivity 中相關的程式碼去除。
2.把 Linux 環境的 bsdiff/bspatch 包下的 bspatch.c 和 bzip2 下的所有 .c 和 .h 檔案拷貝到 cpp 下。
跟 Linux 下編譯差分庫一樣,修改 bspatch.c 檔案中的 #include <bzlib.h> 為 #include "bzip2/bzlib.h",以及對 bzip2 下的 .c 檔案修改 main 函式的函式名 。
3.修改編譯配置檔案 CMakeLists.txt。
# For more information about using CMake with Android Studio, read the
# documentation: https://d.android.com/studio/projects/add-native-code.html

# Sets the minimum version of CMake required to build the native library.

cmake_minimum_required(VERSION 3.4.1)

# Creates and names a library, sets it as either STATIC
# or SHARED, and provides the relative paths to its source code.
# You can define multiple libraries, and CMake builds them for you.
# Gradle automatically packages shared libraries with your APK.

#新增整個目錄的思路 指定一個變數 新增的時候使用變數值(my_c_path)
file(GLOB my_c_path src/main/cpp/bzip2/*.c)
add_library( # Sets the name of the library.
             BsPatch

             # Sets the library as a shared library.
             SHARED

             # Provides a relative path to your source file(s).
             ${my_c_path}
             src/main/cpp/bspatch.c)

# Searches for a specified prebuilt library and stores the path as a
# variable. Because CMake includes system libraries in the search path by
# default, you only need to specify the name of the public NDK library
# you want to add. CMake verifies that the library exists before
# completing its build.

find_library( # Sets the name of the path variable.
              log-lib

              # Specifies the name of the NDK library that
              # you want CMake to locate.
              log )

# Specifies libraries CMake should link to your target library. You
# can link multiple libraries, such as libraries you define in this
# build script, prebuilt third-party libraries, or system libraries.

target_link_libraries( # Specifies the target library.
                       BsPatch

                       # Links the target library to the log library
                       # included in the NDK.
                       ${log-lib} )
這邊新增 bizp2 下的 .c 檔案採用的是整個資料夾新增,也可以一個個進行新增。點選同步,然後 Clear Project。
4.修改 bspatch.c 檔案中的 main 函式的函式名為 path_main。這時候 Rebuild Project 是可以成功的。

5.根據 JNI 基本生成一個 native 的方法 patch,呼叫 bspatch.c 下的方法。
建立 BsPatch.java 類。
public class BsPatch {


    public native static int patch(String oldPath, String newPath, String patchPath);

    static {
        System.loadLibrary("BsPatch");
    }
}
使用 javah 命令生成標頭檔案,同時拷貝到 cpp 資料夾下。
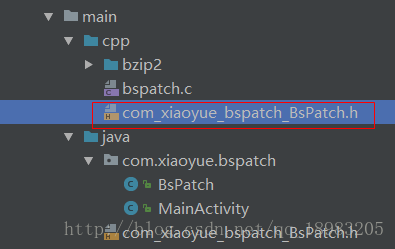
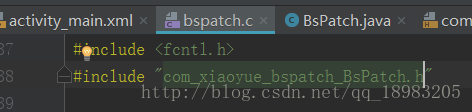
在 bspatch.c 中引入該標頭檔案 com_xiaoyue_bspatch_BsPatch.h,並實現 native 方法。
在 batch.c 中實現 native 方法 patch。
JNIEXPORT jint JNICALL Java_com_xiaoyue_bspatch_BsPatch_patch
        (JNIEnv *env, jclass jclz, jstring old_path_jst, jstring new_path_jst, jstring patch_path_jst) {

    int ret = -1;

    int argc = 4;
    char *argv[4];

    char *old_path = (char *)(*env)->GetStringUTFChars(env, old_path_jst, NULL);
    char *new_path = (char *)(*env)->GetStringUTFChars(env, new_path_jst, NULL);
    char *patch_path = (char *)(*env)->GetStringUTFChars(env, patch_path_jst, NULL);

    argv[0] = "Patch";
    argv[1] = old_path;
    argv[2] = new_path;
    argv[3] = patch_path;

    //成功返回 0
    ret = path_main(argc, argv);

    (*env)->ReleaseStringUTFChars(env, old_path_jst, old_path);
    (*env)->ReleaseStringUTFChars(env, new_path_jst, new_path);
    (*env)->ReleaseStringUTFChars(env, patch_path_jst, patch_path);

    return ret;
}
2.呼叫合併
這邊簡單的實現以下下載差分包進行合併,然後安裝的流程,方法不是很完善。實際下載跟安裝,可使用自己原有的方法,只需要在下載完成後新增非同步呼叫合併的 native 方法即可。
安卓端程式碼:
Contants :
public class Contants {

    //差分檔案伺服器路徑
    public static final String PATCH_FILE = "apk.patch";
    public static final String URL_PATCH_DOWNLOAD = "http://172.26.88.1:8080/UpdateService/" + PATCH_FILE;

    public static final String SD_CARD = Environment.getExternalStorageDirectory() + File.separator;

    //新版本apk的目錄
    public static final String NEW_APK_PATH = SD_CARD + "apk_new.apk";
    //差分檔案儲存路徑
    public static final String PATCH_FILE_PATH = SD_CARD + PATCH_FILE;
}
Contants 管理各個檔案的路徑。
DownLoadUtils :
public class DownLoadUtils {

    /**
     * 下載差分包
     * @param url
     * @return
     * @throws Exception
     */
    public static File download(String url){
        File file = null;
        InputStream is = null;
        FileOutputStream os = null;
        try {
            file = new File(Contants.PATCH_FILE_PATH);
            if (file.exists()) {
                file.delete();
            }
            HttpURLConnection conn = (HttpURLConnection) new URL(url).openConnection();
            conn.setDoInput(true);
            is = conn.getInputStream();
            os = new FileOutputStream(file);
            byte[] buffer = new byte[1*1024];
            int len = 0;
            while((len = is.read(buffer)) != -1){
                Log.d("Tim", String.valueOf(len));
                os.write(buffer, 0, len);
            }
        } catch(Exception e){
            e.printStackTrace();
        }finally{
            try {
                os.close();
            } catch (IOException e) {
                e.printStackTrace();
            }
            try {
                is.close();
            } catch (IOException e) {
                e.printStackTrace();
            }
        }
        return file;
    }
}
DownLoadUtils 是下載檔案的工具類。
ApkUtils :
public class ApkUtils {

    /**
     * 獲取APK版本號
     * @param context
     * @param packageName
     * @return
     */
    public static int getVersionCode (Context context, String packageName) {
        PackageManager pm = context.getPackageManager();
        try {
            PackageInfo info = pm.getPackageInfo(packageName, 0);
            Log.d("Tim","getVersionCode = "+info.versionCode);
            return info.versionCode;
        } catch (PackageManager.NameNotFoundException e) {
            e.printStackTrace();
            return 0;
        }
    }

    /**
     * 獲取已安裝Apk檔案的源Apk檔案
     * 如:/data/app/my.apk
     *
     * @param context
     * @param packageName
     * @return
     */
    public static String getSourceApkPath(Context context, String packageName) {
        if (TextUtils.isEmpty(packageName))
            return null;

        try {
            ApplicationInfo appInfo = context.getPackageManager()
                    .getApplicationInfo(packageName, 0);
            return appInfo.sourceDir;
        } catch (PackageManager.NameNotFoundException e) {
            e.printStackTrace();
        }
        return null;
    }

    /**
     * 安裝Apk
     *
     * @param context
     * @param apkPath
     */
    public static void installApk(Context context, String apkPath) {

        Intent intent = new Intent(Intent.ACTION_VIEW);
        intent.setDataAndType(Uri.parse("file://" + apkPath),
                "application/vnd.android.package-archive");

        context.startActivity(intent);
    }
}
ApkUtils 是 apk 的幫助類,主要提供獲取 apk 版本號、獲取已安裝 apk 檔案的源 apk 檔案和安裝 apk 三個方法,可採用自己實現的方法。
MainActivity :
public class MainActivity extends AppCompatActivity {

    private static final String TAG = "MainActivity";

    @Override
    protected void onCreate(Bundle savedInstanceState) {
        super.onCreate(savedInstanceState);
        setContentView(R.layout.activity_main);

        Button button = findViewById(R.id.button);
        button.setOnClickListener(new View.OnClickListener() {
            @Override
            public void onClick(View v) {
                new ApkUpdateTask().execute();
            }
        });

    }

    class ApkUpdateTask extends AsyncTask<Void, Void, Boolean> {

        @Override
        protected Boolean doInBackground(Void... params) {

            Log.d(TAG,"開始下載 。。。");

            File patchFile = DownLoadUtils.download(Contants.URL_PATCH_DOWNLOAD) ;
            Log.d(TAG,"下載完成 。。。");

            String oldfile = ApkUtils.getSourceApkPath(MainActivity.this, getPackageName());

            String newFile = Contants.NEW_APK_PATH;

            String patchFileString = patchFile.getAbsolutePath();

            Log.d(TAG,"開始合併");
            int ret = BsPatch.patch(oldfile, newFile, patchFileString);
            Log.d(TAG,"合併完成");

            if (ret == 0) {
                return true;
            } else {
                return false;
            }
        }

        @Override
        protected void onPostExecute(Boolean aBoolean) {
            if (aBoolean) {
                Log.d(TAG,"合併成功 開始安裝新apk");
                ApkUtils.installApk(MainActivity.this, Contants.NEW_APK_PATH);
            }
        }
    }
}
MainActivity 中,使用了一個非同步任務,簡單的實現了一下下載差分包,整合與安裝。
activity_main.xml:
<?xml version="1.0" encoding="utf-8"?>
<android.support.constraint.ConstraintLayout xmlns:android="http://schemas.android.com/apk/res/android"
    xmlns:app="http://schemas.android.com/apk/res-auto"
    xmlns:tools="http://schemas.android.com/tools"
    android:layout_width="match_parent"
    android:layout_height="match_parent"
    tools:context="com.xiaoyue.bspatch.MainActivity">

    <TextView
        android:id="@+id/sample_text"
        android:layout_width="wrap_content"
        android:layout_height="wrap_content"
        android:text="第一版 old apk"
        app:layout_constraintBottom_toBottomOf="parent"
        app:layout_constraintLeft_toLeftOf="parent"
        app:layout_constraintRight_toRightOf="parent"
        app:layout_constraintTop_toTopOf="parent" />

    <Button
        android:id="@+id/button"
        android:layout_width="wrap_content"
        android:layout_height="wrap_content"
        android:text="更新"/>

</android.support.constraint.ConstraintLayout>
另外需要在 AndroidManifest.xml 中新增許可權。
    <uses-permission android:name="android.permission.WRITE_EXTERNAL_STORAGE"/>
    <uses-permission android:name="android.permission.READ_EXTERNAL_STORAGE"/>
    <uses-permission android:name="android.permission.INTERNET"/>
服務端
修改安卓端的介面和版本號,生成新舊兩個 apk,應用前面的生成差分包程式碼進行生成差分包,直接放置於 web 專案的 WebRoot 目錄下,部署在 tomcat 伺服器即可。
注:如果沒有伺服器的話,直接生成差分包,把差分包拷貝到安卓對應目錄下,修改程式碼,跳過下載這一步,直接進行差份,然後安裝。
3.驗證
驗證差分包是否合併成功,一個是看合併後的差分包能否正常安裝,另外可以通過檢視 apk 安裝包的 MD5 值進行對比。
在命令列輸入: certutil -hashfile xxx.apk MD5 即可檢視對應 apk 安裝包的 MD5 值。