Android經典底部選項卡整合方式之一
阿新 • • 發佈:2019-02-19
先上效果圖:
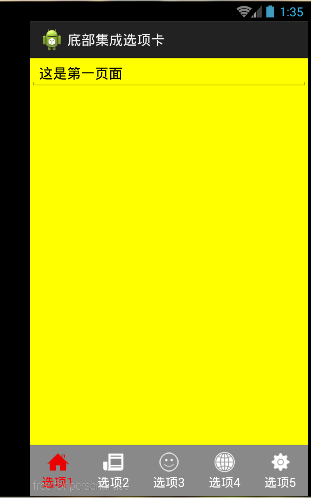
許多應用都會帶有這種底部選項卡,應用非常廣泛,所以現總結一套模式,方便以後使用:
其設計模式非常簡單:RadioGroup+RadioButton+FrameLayout+Fragment
1.MainActivity的佈局:
<LinearLayout xmlns:android="http://schemas.android.com/apk/res/android"
xmlns:tools="http://schemas.android.com/tools"
android:layout_width="match_parent"
android:layout_height="match_parent"
android:orientation="vertical"
tools:context=".MainActivity" >
<FrameLayout
android:id="@+id/fl"
android:layout_width="fill_parent"
android:layout_height="0dp"
android:layout_weight="1" >
</FrameLayout>
<RadioGroup
android:id="@+id/rg "
android:layout_width="fill_parent"
android:layout_height="wrap_content"
android:background="@drawable/bottom_tab_bg"
android:gravity="center_vertical"
android:orientation="horizontal" >
<RadioButton
android:id="@+id/rb1"
android:layout_width=" 0dp"
android:layout_height="wrap_content"
android:layout_weight="1"
android:button="@null"
android:drawableTop="@drawable/selector_home"
android:gravity="center"
android:text="選項1"
android:textColor="@color/selector_color_text" />
<RadioButton
android:id="@+id/rb2"
android:layout_width="0dp"
android:layout_height="wrap_content"
android:layout_weight="1"
android:button="@null"
android:drawableTop="@drawable/selector_center"
android:gravity="center"
android:text="選項2"
android:textColor="@color/selector_color_text" />
<RadioButton
android:id="@+id/rb3"
android:layout_width="0dp"
android:layout_height="wrap_content"
android:layout_weight="1"
android:button="@null"
android:drawableTop="@drawable/selector_smartservice"
android:gravity="center"
android:text="選項3"
android:textColor="@color/selector_color_text" />
<RadioButton
android:id="@+id/rb4"
android:layout_width="0dp"
android:layout_height="wrap_content"
android:layout_weight="1"
android:button="@null"
android:drawableTop="@drawable/selector_gov"
android:gravity="center"
android:text="選項4"
android:textColor="@color/selector_color_text" />
<RadioButton
android:id="@+id/rb5"
android:layout_width="0dp"
android:layout_height="wrap_content"
android:layout_weight="1"
android:button="@null"
android:drawableTop="@drawable/selector_setting"
android:gravity="center"
android:text="選項5"
android:textColor="@color/selector_color_text" />
</RadioGroup>
</LinearLayout>
注意:RadioButton 中有一個屬性:android:button=”@null” 可以去掉RadioButton上的一個小圈圈
2.MainActivity中的程式碼:
public class MainActivity extends FragmentActivity {
private ArrayList<Fragment> fragmentsList = new ArrayList<Fragment>();
private RadioGroup group;
@Override
protected void onCreate(Bundle arg0) {
super.onCreate(arg0);
setContentView(R.layout.activity_main);
group = (RadioGroup) findViewById(R.id.rg);
// 給group設定監聽事件,在監聽事件實現fragment之間的切換
OnCheckedChangeListener listener = new MyOnCheckedChangeListener();
group.setOnCheckedChangeListener(listener);
// 選中首頁,否則開始啟動的時候畫面展示白板
group.check(R.id.rb1);
}
private class MyOnCheckedChangeListener implements OnCheckedChangeListener {
// 在構造方法中創造fragment
public MyOnCheckedChangeListener() {
// 將new出來的fragment放置在集合中,以便後續取用
fragmentsList.add(new Fragment1());
fragmentsList.add(new Fragment2());
fragmentsList.add(new Fragment3());
fragmentsList.add(new Fragment4());
fragmentsList.add(new Fragment5());
}
@Override
public void onCheckedChanged(RadioGroup group, int checkedId) {
// 當選中某一個radio的時候,就展現某一個fragment,用到fragment的事務
FragmentTransaction ft = getSupportFragmentManager()
.beginTransaction();
switch (checkedId) {
case R.id.rb1:
ft.replace(R.id.fl, fragmentsList.get(0));
break;
case R.id.rb2:
ft.replace(R.id.fl, fragmentsList.get(1));
break;
case R.id.rb3:
ft.replace(R.id.fl, fragmentsList.get(2));
break;
case R.id.rb4:
ft.replace(R.id.fl, fragmentsList.get(3));
break;
case R.id.rb5:
ft.replace(R.id.fl, fragmentsList.get(4));
break;
default:
break;
}
// 最後事務一定要提交
ft.commit();
}
}
}