
SpringBoot的簡單登陸開發例子
1:這個例子用spirngboot整合mybatis,jdbc等技術開發的
2:步驟
2.1:新建一個工程

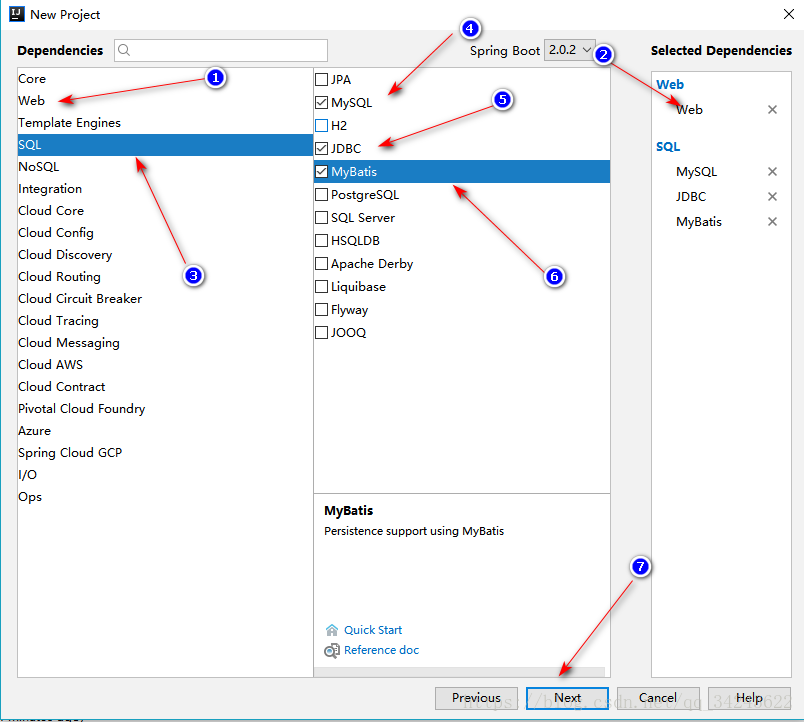
主要的兩個步驟已經貼圖了,第二張圖是直接在pom.xml檔案中加入依賴
2.2:新建完專案,就建立一個數據表
CREATE TABLE `tuser` (
  `id` int(11) NOT NULL AUTO_INCREMENT,
  `loginname` varchar(20) DEFAULT NULL,
  `password` varchar(20) DEFAULT NULL,
  PRIMARY KEY (`id`)
) ENGINE=InnoDB AUTO_INCREMENT=2 DEFAULT CHARSET=utf8
建立一個名為tuser的資料表
2.3:把專案所需的包和資料夾補充完整

2.4整合jdbc,在application.yml中加入jdbc的支援
spring:
  datasource:
    url: jdbc:mysql://127.0.0.1:3306/springboot?useUnicode=true&characterEncoding=utf-8
    driver-class-name: com.mysql.jdbc.Driver
    username: root
    password: 123456
2.5整合springmvc的前端控制器,在application.yml中加入
spring:
  mvc:
    view:
      prefix: /WEB-INF/jsp/
      suffix: .jsp
2.6整合mybatis,新增mapper.xml的目錄
mybatis:
  mapper-locations: classpath:mapper/*.xml
2.7整個yml檔案如下
spring:
  datasource:
    url: jdbc:mysql://127.0.0.1:3306/springboot?useUnicode=true&characterEncoding=utf-8
    driver-class-name: com.mysql.jdbc.Driver
    username: root
    password: 123456
  mvc:
    view:
      prefix: /WEB-INF/jsp/
      suffix: .jsp
mybatis:
  mapper-locations: classpath:mapper/*.xml
2.8實體類的編寫,也就是model
和資料表對應的User類
public class User {

    private int id;
    private String loginname;
    private String password;
//省略構造方法和get/set方法}返回資料給頁面的封裝類ResultEntity
public class ResultEntity {

    private int code;
    private String message;
    //省略構造方法和get/set方法

}
2.9 控制層的編寫,controller
@Controller
@SessionAttributes("user")
public class LoginController {

    @Autowired
    private LoginService loginService;

    @RequestMapping("/index")
    public String index() {
        return "login";
    }

    @RequestMapping("/success")
    public String success() {
        return "success";
    }

    @RequestMapping("/login")
    @ResponseBody
    public ResultEntity login(User user, Model model) {
        ResultEntity resultEntity = loginService.login(user);
        if (resultEntity.getCode() == 200)
            model.addAttribute("user", user);//將user存放到session
        return resultEntity;
    }

}
2.10Service實現層的編寫
@Service
class LoginServiceImpl implements LoginService {

    @Autowired
    private UserMapper userMapper;

    private ResultEntity resultEntity;

    @Override
    public ResultEntity login(User user) {
        User login = userMapper.login(user);
        if (login != null) {
            resultEntity = new ResultEntity(200, "登陸成功");
        } else {
            resultEntity = new ResultEntity(201, "使用者名稱或密碼錯誤");
        }
        return resultEntity;
    }
}
介面層就忽略啦 我懶。。就一個 ResultEntity login(User user);
2.11 mapper.xml
<?xml version="1.0" encoding="UTF-8"?>
<!DOCTYPE mapper PUBLIC "-//mybatis.org//DTD Mapper 3.0//EN" "http://mybatis.org/dtd/mybatis-3-mapper.dtd">
<mapper namespace="net.stxy.boot.dome.mapper.UserMapper">

    <select id="login" parameterType="net.stxy.boot.dome.model.User" resultType="net.stxy.boot.dome.model.User">
		select * from tuser where loginname = #{loginname} and password = #{password}
	</select>

</mapper>
mapper介面也不寫了。。。QAQ..
2.12 到頁面了,採用jsp開發,所以要在pom.xml中新增對jsp的支援
        <!--springboot tomcat jsp 支援開啟-->
        <dependency>
            <groupId>org.apache.tomcat.embed</groupId>
            <artifactId>tomcat-embed-jasper</artifactId>
        </dependency>
        <dependency>
            <groupId>javax.servlet</groupId>
            <artifactId>jstl</artifactId>
            <scope>compile</scope>
        </dependency>
因為在yml中指定了前端控制器,所以直接在WEB-INF的jsp下讀取jsp頁面,靜態資原始檔就可以在路徑前面新增,例如jquery檔案放在static/js/jquery.min.js,讀取直接讀js/jquery.min.js即可,因為預設靜態資源路徑為/static/
2.13 登陸頁面用ajax提交表單,判斷返回的code是否==200,等於200則跳轉登陸成功頁面,否則,提示失敗.
ajax程式碼:
            //提交表單
            $.ajax({
                url: "/login",
                type: "post",
                dataType: "json",
                data: {
                    loginname: account,
                    password: password
                },
                success: function (result) {
                    console.log(result);
                    if (result.code == 200) {
                        window.location.href = "success";
                    } else {
                        alert(result.message);
                    }
                }
            })
3.效果
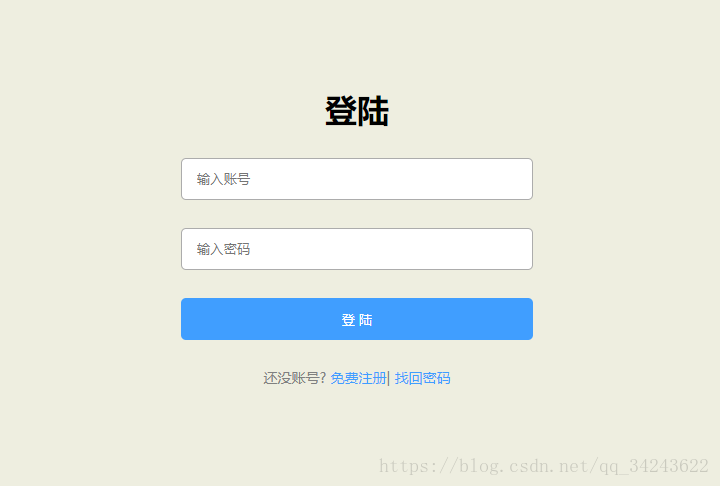
3.1位址列輸入 localhost:8080/index,出現登陸頁面
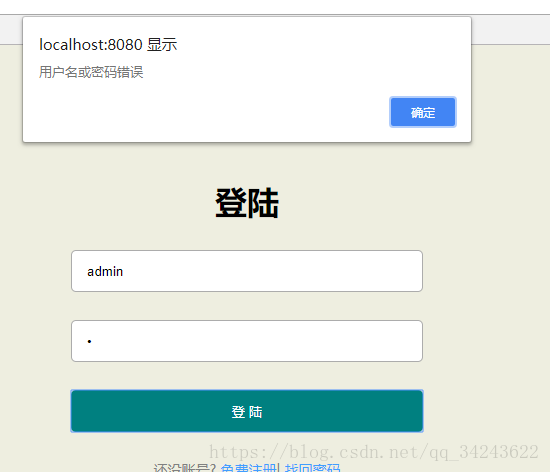
3.2登陸失敗
3.3登陸成功

這是一個非常簡單的springboot登陸例子,新手一枚,勿噴i....QAQ...