一起來做屬於自己的PHP專案
阿新 • • 發佈:2019-02-19
前言:一直以來就想做一套屬於自己的PHP專案,這次採用最流行的Laravel框架,前端採用非常酷的H+框架。專案部署在wamp環境中。
Laravel的下載到官網上直接找就可以。
H+前端框架,提供下載地址:點選下載
1、安裝外掛
安裝php artisan的generate外掛。
修改composer.json中增加:
"require-dev": {
    "way/generators": "~2.0"
},
然後直接,composer update就可以。
完成後在app/config/app.php的providers中增加:
'Way\Generators\GeneratorsServiceProvider 2、建立資料庫
把app/config/database.php中connections下的mysql改成你自己的配置:
'mysql' => array(
'driver' => 'mysql',
'host' => 'localhost',
'database' => 'blog',
'username' => 'root',
'password' => '',
'charset' => 'utf8',
'collation' => 'utf8_unicode_ci' 配置完成後,建立users表和projects表
首先建立遷移檔案:
$ php artisan migrate:make create_users_table --create=users
$ php artisan migrate:make create_projects_table --create=projects
我們會發現在app\database\migrations下多了一個*_create_users_table.php檔案,在這個檔案中修改:
Schema::create('users', function(Blueprint $table public function up()
{
Schema::create('projects', function(Blueprint $table)
{
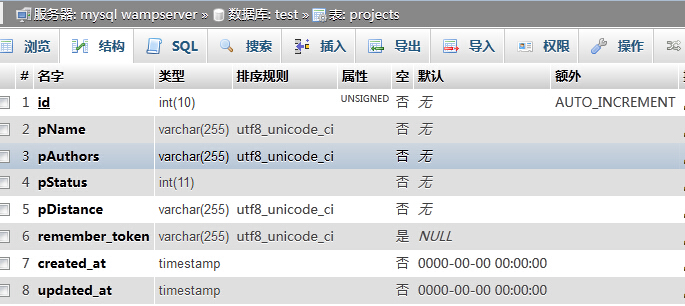
$table->increments('id');
$table->string('pName');
$table->string('pAuthors');
$table->integer('pStatus');
$table->string('pDistance');
$table->string('remember_token')->nullable();
$table->timestamps();
});
}然後執行資料庫遷移:
$ php artisan migrate然後表就建立成功了。