基於Pconv的影象修復部分例項解析
簡介
號稱秒殺PS的AI影象修復神器,來自於Nvidia 研究團隊。引入了局部卷積,能夠修復任意非中心、不規則區域),程式碼還沒有放出來,但是github上已經有大神復現論文了,今天主要基於github原始碼進行部分操作和結果展示。
論文解讀可以參見我的這篇文章
原始碼1
Environment
- python3.5.3
- chainer4.0alpha
- opencv (only for cv.imread, you can replace it with PIL)
- PIL
How to try
Download dataset (place2)
Set dataset path
Edit common/paths.py
train_place2 = "/yourpath/place2/data_256"
val_place2 = "/yourpath/place2/val_256"
test_place2 = "/yourpath/test_256"
比如我的:
train_place2 = "/home/gavin/Dataset/place2/data_256/"
val_place2 =  "/home/gavin/Dataset/place2/val_256/"
test_place2 = "/home/gavin/Dataset/place2/test_256/"
然後生成mask
# masks are automatically generated in advance.
python3 generate_windows.py image_size generate_num

#1. To try default setting
python3 generate_windows.py 256 1000
最後執行
# 2. run
python3 train.py -g 0  --batch_size 8 --eval_interval 800 --resize_to 256 --crop_to 256
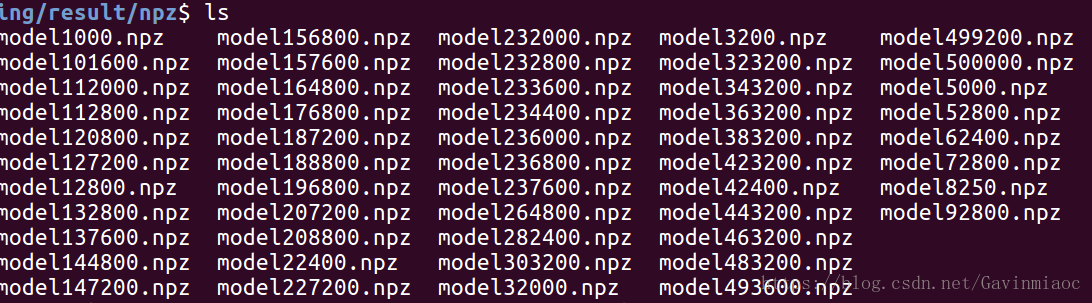
正常訓練基本沒什麼要改的,生成的模型儲存在result目錄下,對應的圖片在test目錄下
注意修改儲存頻率,原始碼10步儲存一次,太頻繁了會爆盤,所以我改成800step儲存一次npz
model_save_interval = (800, 'iteration') # 10 save npz
另外,資料集我選擇的place2,下載的是256大小的圖片
目錄如下

訓練batch_size根據需要調整,看機器配置了,我這裡設定的8,基本上一個禮拜跑完500000次
整理後選取了部分保留
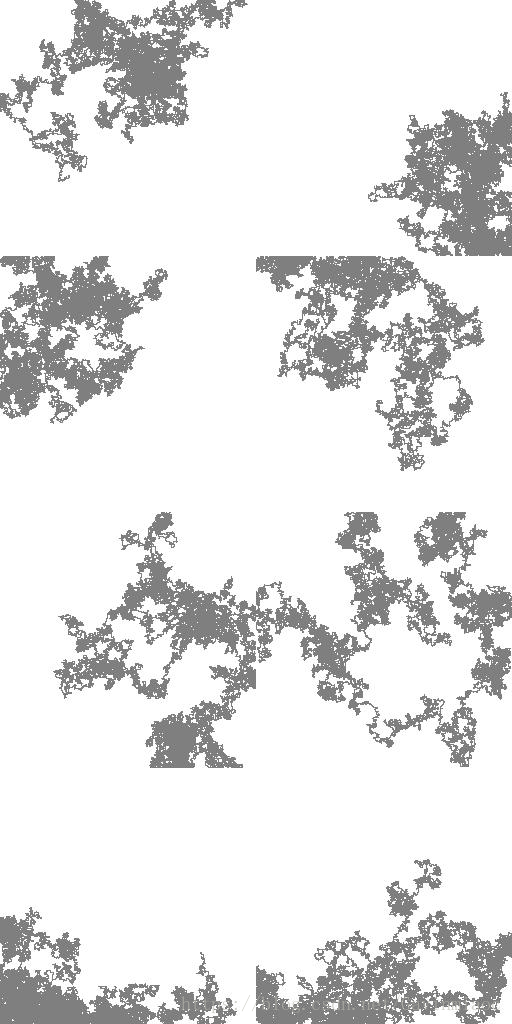
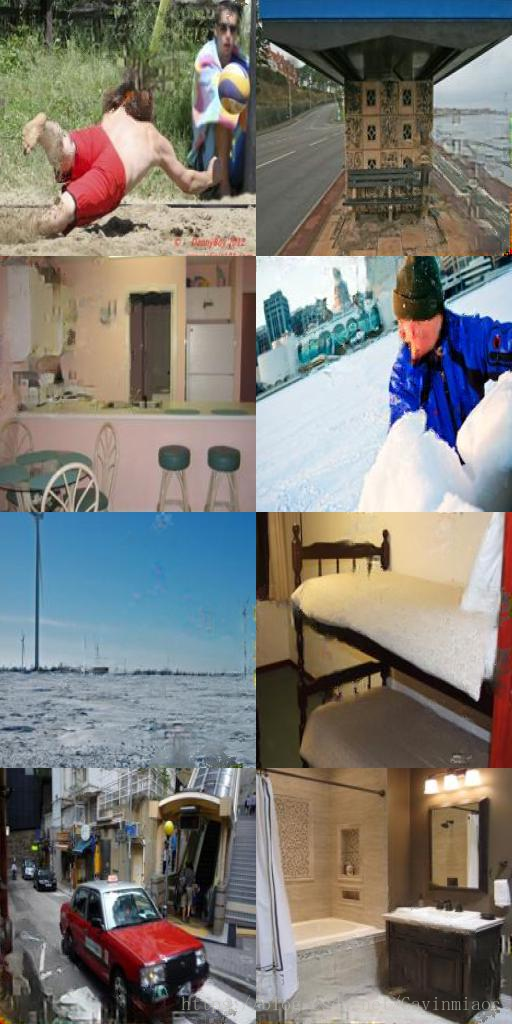
訓練過程中儲存的影象如下:
iter_1000_mask
iter_1000_Icomp:
iter_1000_out:
一萬次的時候:
mask:

out:
Icomp:
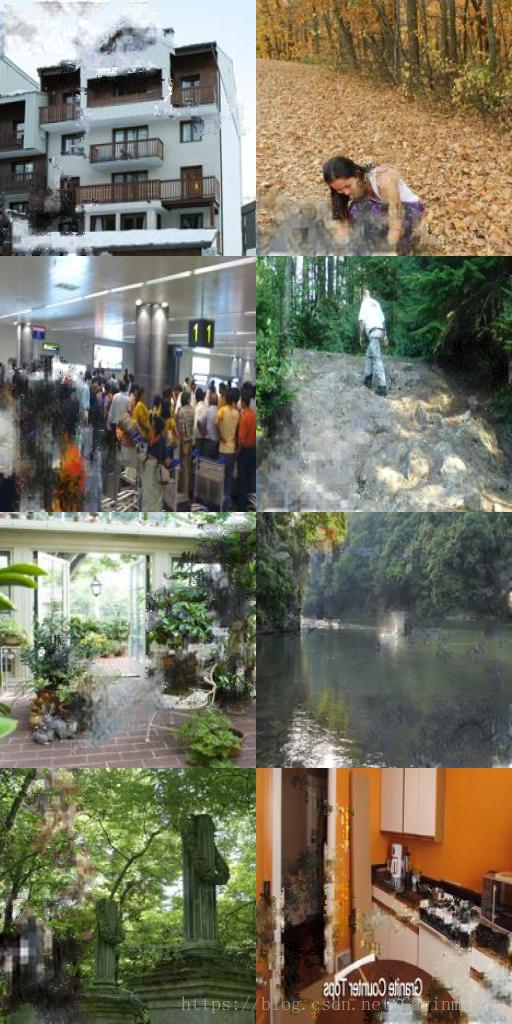
十萬次的時候:
mask
comp
out:

後面基本上都差不多長這個樣子,不再多貼圖了
下面進入重點,如何利用訓練的模型進行測試呢?
分兩步走,首先在原資料集上測試,不修改程式碼其實是可以的,但是為了便於更直觀的展示,需要將comp影象儘量和論文一致,mask區域設定成白色可以看得明顯。
只需要將generate_result.py 修改下即可
修改前:
I_comp = F.where(M_b,I_gt,I_out)
修改後:
I_comp = F.where(M_b, I_gt, Variable(xp.ones((batchsize, 3, image_size, image_size)).astype("f"))) # gavin++ 使得合成輸出白色mask
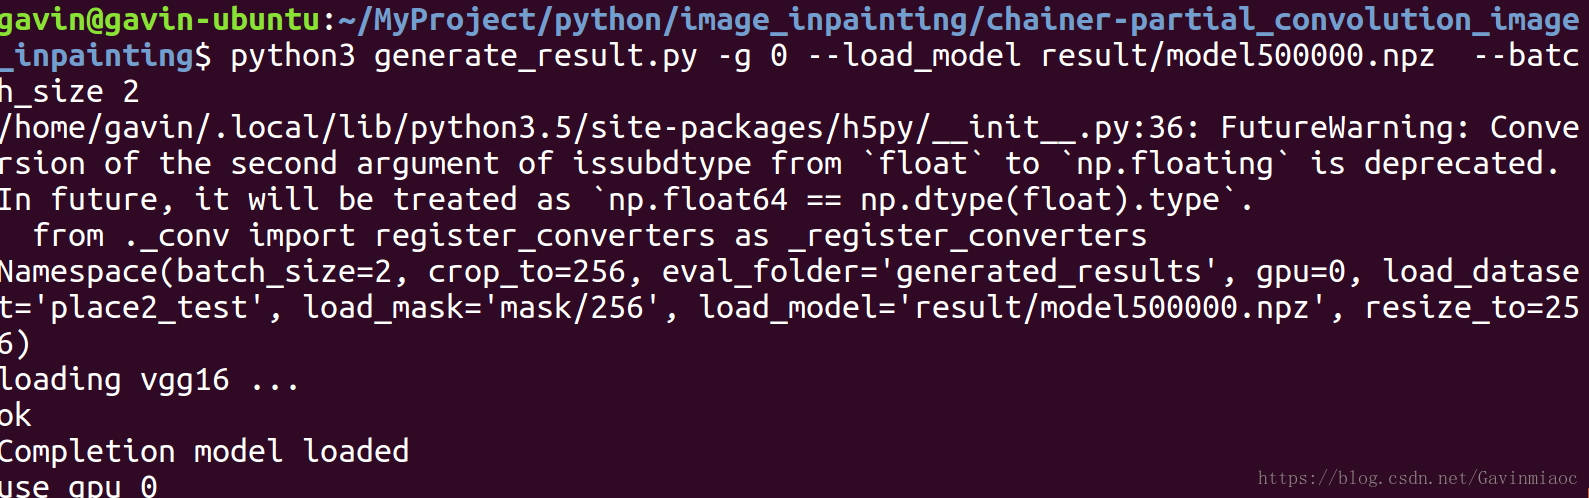
執行:
python3 generate_result.py -g 0 --load_model result/model500000.npz
結果如下:
mask,out,comp


可以看出在原資料集上修復效果還是不錯的。
預測單張只需要加上
--batch_size 1
那麼,真正測試的時候,任意給一張待修復的圖,怎樣修復呢?需要改網路輸入了
首先net.py裡,
class PConv(chainer.Chain):中,設定mask=None的情況,並且將
h = self.c(x * mask) # (B,C,H,W) 改成
如下:
if mask is None:
    h = self.c(x)  # (B,C,H,W)
else:
    h = self.c(x*mask) #(B,C,H,W)
    def __call__(self, x, mask=None): #x denotes broken image array  =None
        self.m.W.data = self.xp.array(self.maskW) #mask windows are set by 1

        if mask is None:
            h = self.c(x)  # (B,C,H,W)
        else:
            h = self.c(x*mask) #(B,C,H,W)

        #h = self.c(x * mask)  # (B,C,H,W)
        B,C,H,W = h.shape
        b = F.transpose(F.broadcast_to(self.c.b,(B,H,W,C)),(0,3,1,2))
        h = h - b
        mask_sums = self.m(mask)
        mask_new = (self.xp.sign(mask_sums.data-0.5)+1.0)*0.5
        mask_new_b = mask_new.astype("bool")

        mask_sums = F.where(mask_new_b,mask_sums,0.01*Variable(self.xp.ones(mask_sums.shape).astype("f")))
        h = h/mask_sums + b

        mask_new = Variable(mask_new)
        h = F.where(mask_new_b, h, Variable(self.xp.zeros(h.shape).astype("f")))

        if self.bn:
            h = self.batchnorm(h)
        if self.noise:
            h = add_noise(h)
        if self.dropout:
            h = F.dropout(h)
        if not self.activation is None:
            h = self.activation(h)
        return h, mask_new
由於模型修復預測過程以x*mask作為broken image的,原資料集並沒有broken image.
original images and masks are element-wise multiplied to get broken images "x*mask."
You can replace this "x*mask" with your broken input. To do this, an easy way is to set x by your broken image and mask by ones array.
第二步就是將mask設定成ones array,直接在generate_result裡新增一句
m = xp.ones((batchsize, 3, image_size, image_size)).astype("f")
全部程式碼如下:
#!/usr/bin/env python
import argparse
import os
import chainer
from chainer import training
from chainer import cuda, serializers
from chainer.training import extension
from chainer.training import extensions
import sys
import common.net as net
import datasets
from updater import *
from evaluation import *
from chainer.links import VGG16Layers
import common.paths as paths

def main():
    parser = argparse.ArgumentParser(
        description='Train Completion Network')
    parser.add_argument('--batch_size', '-b', type=int, default=8)
    parser.add_argument('--gpu', '-g', type=int, default=0,
                        help='GPU ID (negative value indicates CPU)')
    parser.add_argument('--eval_folder', '-e', default='generated_results',
                        help='Directory to output the evaluation result')

    parser.add_argument("--load_model", help='completion model path')

    parser.add_argument("--resize_to", type=int, default=256, help='resize the image to')
    parser.add_argument("--crop_to", type=int, default=256, help='crop the resized image to')
    parser.add_argument("--load_dataset", default='place2_test', help='load dataset')
    parser.add_argument("--load_mask", default='mask/256', help='mask_path') #mask/256
    #parser.add_argument("--layer_n", type=int, default=7, help='number of layers')

    args = parser.parse_args()
    print(args)

    if args.gpu >= 0:
        chainer.cuda.get_device(args.gpu).use()

    #load completion model
    model = getattr(net, "PartialConvCompletion")(ch0=3,input_size=args.crop_to)

    #load vgg_model
    print("loading vgg16 ...")
    vgg = VGG16Layers()
    print("ok")

    if args.load_model != '':
        serializers.load_npz(args.load_model, model)
        print("Completion model loaded")

    if not os.path.exists(args.eval_folder):
         os.makedirs(args.eval_folder)

    # select GPU
    if args.gpu >= 0:
        model.to_gpu()
        vgg.to_gpu()
        print("use gpu {}".format(args.gpu))

    val_dataset = getattr(datasets, args.load_dataset)(paths.val_place2, mask_path=args.load_mask, resize_to=args.resize_to, crop_to=args.crop_to)
    val_iter = chainer.iterators.SerialIterator(
        val_dataset, args.batch_size)

    #test_dataset = horse2zebra_Dataset_train(flip=args.flip, resize_to=args.resize_to, crop_to=args.crop_to)

    #test_iter = chainer.iterators.SerialIterator(train_dataset, 8)


    #generate results
    xp = model.xp
    batch = val_iter.next()
    batchsize = len(batch)

    image_size = args.crop_to
    x = xp.zeros((batchsize, 3, image_size, image_size)).astype("f")
    m = xp.zeros((batchsize, 3, image_size, image_size)).astype("f")

    for i in range(batchsize):
        x[i, :] = xp.asarray(batch[i][0])
        m[i, :] = xp.asarray(batch[i][1])
    mask_b = xp.array(m.astype("bool"))
    # gavin++ test
    m = xp.ones((batchsize, 3, image_size, image_size)).astype("f")

    I_gt = Variable(x)
    M = Variable(m)
    M_b = Variable(mask_b)

    I_out = model(x, m)

    #I_comp = F.where(M_b, I_gt, Variable(xp.ones((batchsize, 3, image_size, image_size)).astype("f"))) # gavin++ 使得合成輸出白色mask
    I_comp = F.where(M_b,I_gt,I_out)

    img = x.get()

    img = batch_postprocess_images(img, batchsize, 1) #
    Image.fromarray(img).save(args.eval_folder+"/generated_3_Igt.jpg")

    img = I_comp.data.get()

    img = batch_postprocess_images(img, batchsize, 1)
    Image.fromarray(img).save(args.eval_folder+"/generated_2_Icomp.jpg")

    img = I_out.data.get()

    img = batch_postprocess_images(img, batchsize, 1)
    Image.fromarray(img).save(args.eval_folder+"/generated_1_Iout.jpg")

    img = M.data.get()

    img = batch_postprocess_images(img, batchsize, 1)
    Image.fromarray(img).save(args.eval_folder+"/generated_0_mask.jpg")

if __name__ == '__main__':
    main()
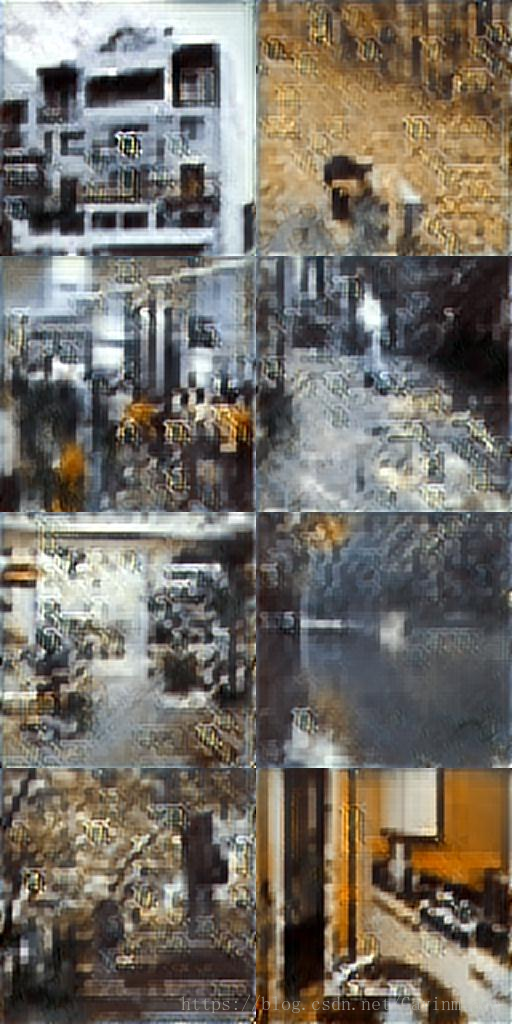
結果如下:
mask,out,comp
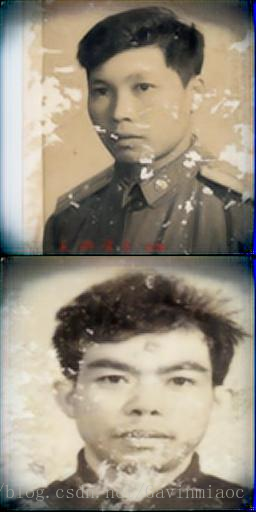

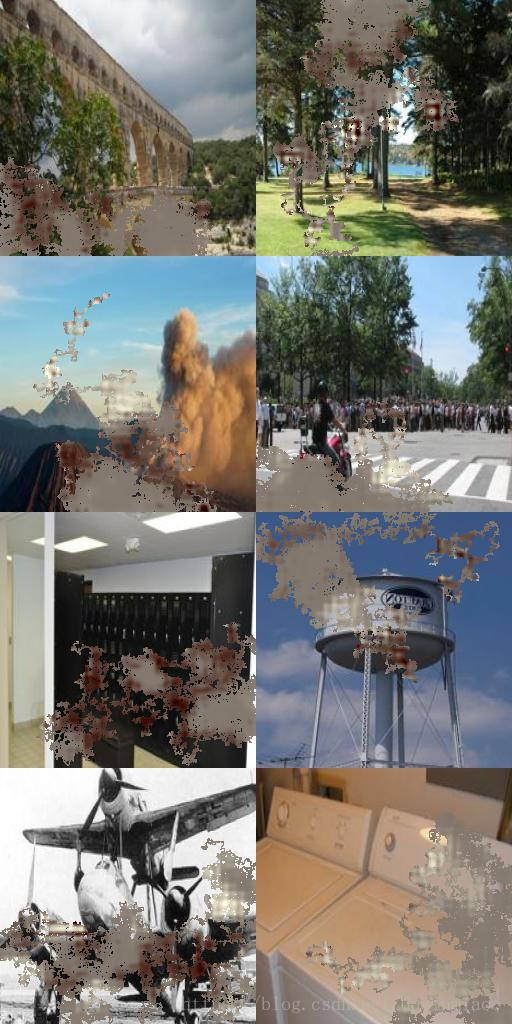
可以看出有一定的效果,但是不是很好,測試圖片是我隨便在網上找的圖,broken part區域遠大於我們訓練時設定的mask:
set the mask window as 1
The reason why I set the mask window as 1 is to calculate (1) and (2) in the original paper.
https://arxiv.org/abs/1804.07723
In "3.2 Network Architecture and Implementation--Implementation," the authors says,
"The straightforward implementation is to define binary masks of size C×H×W, the same size with their associated images/features, and then to implement mask updating is implemented using a fixed convolution layer, with the same kernel size as the partial convolution operation, but with weights identically set to 1 and bias set to 0."
Namely, maskW represents the fixed weight to calculate sum(M).
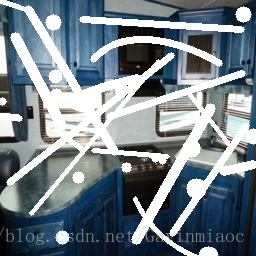
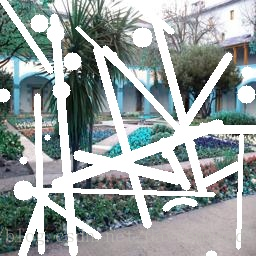
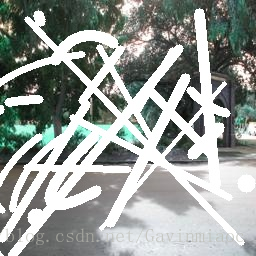
那麼,我們有沒有辦法解決上述問題呢?答案是肯定的,我們可以將一個broken image直接作為輸入,並且將mask初始化全為1的矩陣array,重新訓練模型即可。
批量生成broken image,我這裡採用的opencv簡單處理的,可以看下效果,但是並未進行訓練模型。我們有更好的解決辦法。
'''
利用opencv隨機給影象生成帶mask區域的圖
author:gavin
'''

import itertools
import matplotlib
import matplotlib.pyplot as plt
from copy import deepcopy
from random import randint
import numpy as np
import cv2
import os
import sys

import tensorflow as tf

import argparse

parser = argparse.ArgumentParser()
parser.add_argument('--input_dirimg', default='./datasets/mask_img/src_img/', type=str,
                    help='The input folder path')
parser.add_argument('--output_dirmask', default='./datasets/mask_img/mask/', type=str,
                    help='The output file path of mask.')
parser.add_argument('--output_dirmasked', default='./datasets/mask_img/masked/', type=str,
                    help='The output file path of masked.')
parser.add_argument('--MAX_MASK_NUMS', default='16', type=int,
                    help='max numbers of masks')

parser.add_argument('--MAX_DELTA_HEIGHT', default='32', type=int,
                    help='max height of delta')
parser.add_argument('--MAX_DELTA_WIDTH', default='32', type=int,
                    help='max width of delta')

parser.add_argument('--HEIGHT', default='128', type=int,
                    help='max height of delta')
parser.add_argument('--WIDTH', default='128', type=int,
                    help='max width of delta')

parser.add_argument('--IMG_SHAPES', type=eval, default=(256, 256, 3))


# 隨機生成不規則掩膜
def random_mask(height, width, config,channels=3):
    """Generates a random irregular mask with lines, circles and elipses"""
    img = np.zeros((height, width, channels), np.uint8)

    # Set size scale
    size = int((width + height) * 0.02)
    if width < 64 or height < 64:
        raise Exception("Width and Height of mask must be at least 64!")

    # Draw random lines
    for _ in range(randint(1, config.MAX_MASK_NUMS)):
        x1, x2 = randint(1, width), randint(1, width)
        y1, y2 = randint(1, height), randint(1, height)
        thickness = randint(3, size)
        cv2.line(img, (x1, y1), (x2, y2), (1, 1, 1), thickness)


    # Draw random circles
    for _ in range(randint(1, config.MAX_MASK_NUMS)):
        x1, y1 = randint(1, width), randint(1, height)
        radius = randint(3, size)
        cv2.circle(img, (x1, y1), radius, (1, 1, 1), -1)

    # Draw random ellipses
    for _ in range(randint(1, config.MAX_MASK_NUMS)):
        x1, y1 = randint(1, width), randint(1, height)
        s1, s2 = randint(1, width), randint(1, height)
        a1, a2, a3 = randint(3, 180), randint(3, 180), randint(3, 180)
        thickness = randint(3, size)
        cv2.ellipse(img, (x1, y1), (s1, s2), a1, a2, a3, (1, 1, 1), thickness)

    return 1 - img


'''
# this for test
#  %matplotlib inline   ==> plt.show()
# Plot the results
_, axes = plt.subplots(5, 5, figsize=(20, 20))
axes = list(itertools.chain.from_iterable(axes))

for i in range(len(axes)):
    # Generate image
    img = random_mask(500, 500)

    # Plot image on axis
    axes[i].imshow(img * 255)

plt.show()

'''


def random_bbox(config):
    """Generate a random tlhw with configuration.

    Args:
        config: Config should have configuration including IMG_SHAPES,
            VERTICAL_MARGIN, HEIGHT, HORIZONTAL_MARGIN, WIDTH.

    Returns:
        tuple: (top, left, height, width)

    """
    img_shape = config.IMG_SHAPES
    img_height = img_shape[0]
    img_width = img_shape[1]
    maxt = img_height  - config.HEIGHT
    maxl = img_width  - config.WIDTH
    t = tf.random_uniform(
        [], minval=0, maxval=maxt, dtype=tf.int32)
    l = tf.random_uniform(
        [], minval=0, maxval=maxl, dtype=tf.int32)
    h = tf.constant(config.HEIGHT)
    w = tf.constant(config.WIDTH)
    return (t, l, h, w)

def bbox2mask(bbox, config, name='mask'):
    """Generate mask tensor from bbox.

    Args:
        bbox: configuration tuple, (top, left, height, width)
        config: Config should have configuration including IMG_SHAPES,
            MAX_DELTA_HEIGHT, MAX_DELTA_WIDTH.

    Returns:
        tf.Tensor: output with shape [1, H, W, 1]

    """
    def npmask(bbox, height, width, delta_h, delta_w):
        mask = np.zeros((1, height, width, 1), np.float32)
        h = np.random.randint(delta_h//2+1)
        w = np.random.randint(delta_w//2+1)
        mask[:, bbox[0]+h:bbox[0]+bbox[2]-h,
             bbox[1]+w:bbox[1]+bbox[3]-w, :] = 1.
        return mask
    with tf.variable_scope(name), tf.device('/cpu:0'):
        img_shape = config.IMG_SHAPES
        height = img_shape[0]
        width = img_shape[1]
        mask = tf.py_func(
            npmask,
            [bbox, height, width,
             config.MAX_DELTA_HEIGHT, config.MAX_DELTA_WIDTH],
            tf.float32, stateful=False)
        mask.set_shape([1] + [height, width] + [1])
    return mask

'''
# 對於矩形mask隨機生成
def random_mask_rect(img_path,config,bsave=True):

    # Load image
    img_data = cv2.imread(img_path)
    img_data = cv2.cvtColor(img_data, cv2.COLOR_BGR2RGB)

    # generate mask, 1 represents masked point
    bbox = random_bbox(config)
    mask = bbox2mask(bbox, config, name='mask_c')
    # masked_img = img_pos * (1. - mask)

    # Image + mask
    masked_img = deepcopy(img_data)
    masked_img[mask == 0] = 255

    mask = mask * 255

    if bsave:
        save_name_mask = os.path.join(config.output_dirmask, img_path.split('/')[-1])
        cv2.imwrite(save_name_mask,mask)

        save_name_masked = os.path.join(config.output_dirmasked, img_path.split('/')[-1])
        cv2.imwrite(save_name_masked, masked_img)

    return masked_img,mask
'''

def get_path(config):
    if not os.path.exists(config.input_dirimg):
        os.mkdir(config.input_dirimg)
    if not os.path.exists(config.output_dirmask):
        os.mkdir(config.output_dirmask)
    if not os.path.exists(config.output_dirmasked):
        os.mkdir(config.output_dirmasked)


# 給單個影象生成帶mask區域的圖
def load_mask(img_path,config,bsave=False):

    # Load image
    img = cv2.imread(img_path)
    img = cv2.cvtColor(img, cv2.COLOR_BGR2RGB)
    shape = img.shape
    print("Shape of image is: ",shape)
    # Load mask
    mask = random_mask(shape[0], shape[1],config)

    # Image + mask
    masked_img = deepcopy(img)
    masked_img[mask == 0] = 255

    mask = mask * 255

    if bsave:
        save_name_mask = os.path.join(config.output_dirmask, img_path.split('/')[-1])
        cv2.imwrite(save_name_mask,mask)

        save_name_masked = os.path.join(config.output_dirmasked, img_path.split('/')[-1])
        cv2.imwrite(save_name_masked, masked_img)

    return masked_img,mask


# 批量生成帶mask區域的影象
def img2maskedImg(dataset_dir):
    files = []
    image_list = os.listdir(dataset_dir)
    files = [os.path.join(dataset_dir, _) for _ in image_list]
    length = len(files)
    for index,jpg in enumerate(files):
        try:
            sys.stdout.write('\r>>Converting image %d/%d ' % (index,length))
            sys.stdout.flush()
            load_mask(jpg,config,True)
            # 將已經轉換的圖片移動到指定位置
            #shutil.move(png, output_dirHR)
        except IOError as e:
            print('could not read:',jpg)
            print('error:',e)
            print('skip it\n')

    sys.stdout.write('Convert Over!\n')
    sys.stdout.flush()


if __name__ == '__main__':
    config = parser.parse_args()
    get_path(config)
    # 單張影象生成mask
    img = './data/test.jpg'
    masked_img,mask = load_mask(img,config,True)

    # 批量影象處理==>圓形,橢圓,直線
    #img2maskedImg(config.input_dirimg)

    # 矩形特殊處理 處理同樣shape的圖片(256,256,3) fix me
    # masked_img, mask = random_mask_rect(img,config)

    '''
    # Show side by side
    _, axes = plt.subplots(1, 3, figsize=(20, 5))
    axes[0].imshow(img)
    axes[1].imshow(mask*255)
    axes[2].imshow(masked_img)
    plt.show()
    '''
效果如下: