
(二)matlab數字影象處理實驗-影象的幾何變換
阿新 • • 發佈:2019-02-20
數字影象處理實驗1-9點選下列連結有原始碼和連結:
3、上下左右平移的程式碼:
4、放大縮小程式碼:通過imresize()函式對影象進行映象轉換
5、映象程式碼:通過mirror()函式對影象進行映象轉換
(2)使用轉置函式
8、影象擷取某一部分:(這裡是可以通過捕捉滑鼠移動的方式來做一個簡單截圖軟體的)
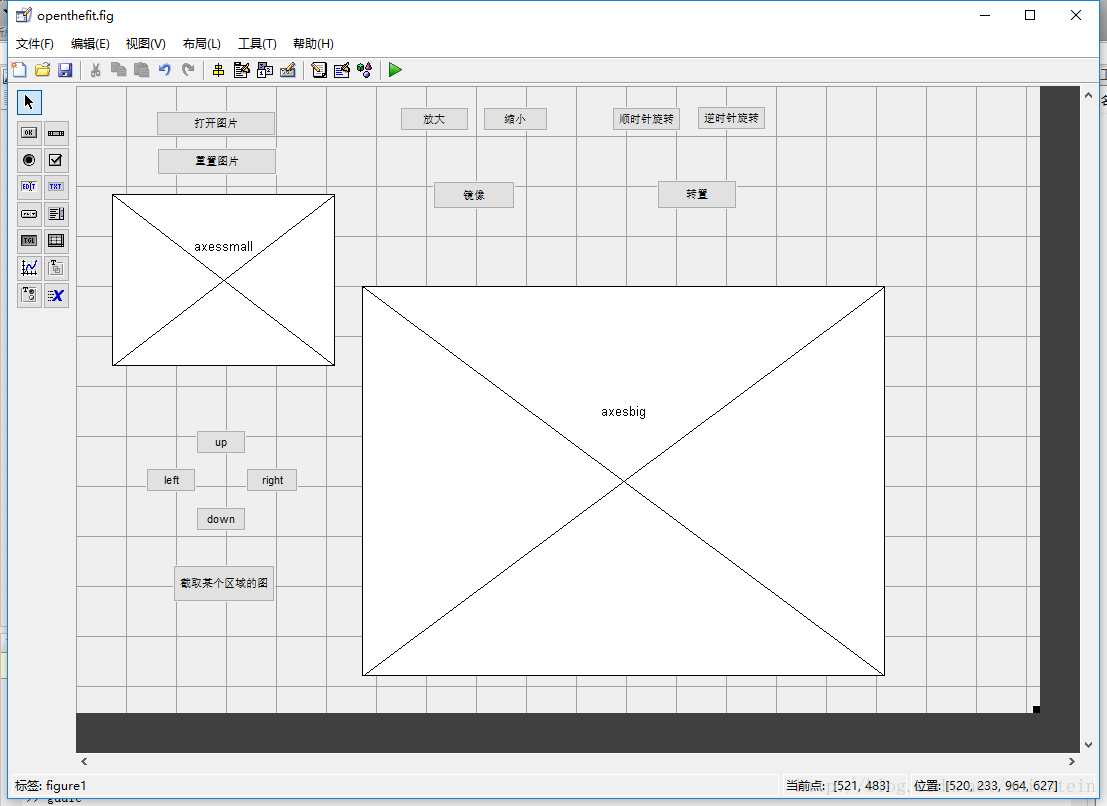
上一節已經簡單介紹guide的使用,我們直接用,建立了這麼一個介面:
1、開啟圖片程式碼:
2、重置圖片的程式碼:% --- Executes on button press in openFile. function openFile_Callback(hObject, eventdata, handles) [filename,pathname]=uigetfile({'*.jpg'},'選擇圖片');%檔案選擇 str=[pathname filename];%被選擇的檔案路徑 [handles.I,handles.map]=imread(str);%讀取圖片 in_image=[handles.I,handles.map]; handles.simage=handles.I; guidata(hObject,handles);%影象序列化 axes(handles.axessmall);%把顯示範圍限定在axessmall imshow(in_image);%顯示圖片 axes(handles.axesbig);%把顯示範圍限定在axesbig imshow(in_image);%顯示圖片
% --- Executes on button press in reset_photo.
function reset_photo_Callback(hObject, eventdata, handles)
handles=guidata(hObject);
handles.I=handles.simage;
guidata(hObject,handles);%影象序列化
3、上下左右平移的程式碼:
(1)我們先寫一個move函式:
(2)使用move函式%move平移函式,I為影象,a和b組成一個平移向量 function J=move(I,a,b) [M,N,G]=size(I); I=im2double(I); J=ones(M,N,G); for i=1:M for j=1:N if((i+a)>=1&&(i+a)<=M&&(j+b)>=1&&(j+b)<=N);%這裡可以寫判斷影象超出範圍的程式碼 J(i+a,j+b,:)=I(i,j,:); end end end
% --- Executes on button press in 向上平移.
function translationup_Callback(hObject, eventdata, handles)
handles=guidata(hObject);
in_image=[handles.I,handles.map];
in_image=move(in_image,-10,0);
handles.I=in_image;
guidata(hObject,handles);%影象序列化
axes(handles.axesbig);%把顯示範圍限定在axesbig
imshow(in_image);%顯示圖片

% --- Executes on button press in 向下平移.
function translationdown_Callback(hObject, eventdata, handles)
handles=guidata(hObject);
in_image=[handles.I,handles.map];
in_image=move(in_image,10,0);
handles.I=in_image;
guidata(hObject,handles);%影象序列化
axes(handles.axesbig);%把顯示範圍限定在axesbig
imshow(in_image);%顯示圖片


% --- Executes on button press in 向左平移.
function translationleft_Callback(hObject, eventdata, handles)
handles=guidata(hObject);
in_image=[handles.I,handles.map];
in_image=move(in_image,0,-10);
handles.I=in_image;
guidata(hObject,handles);%影象序列化
axes(handles.axesbig);%把顯示範圍限定在axesbig
imshow(in_image);%顯示圖片


% --- Executes on button press in 向右平移.
function translationright_Callback(hObject, eventdata, handles)
handles=guidata(hObject);
in_image=[handles.I,handles.map];
in_image=move(in_image,0,10);
handles.I=in_image;
guidata(hObject,handles);%影象序列化
axes(handles.axesbig);%把顯示範圍限定在axesbig
imshow(in_image);%顯示圖片
4、放大縮小程式碼:通過imresize()函式對影象進行映象轉換
% --- Executes on button press in 放大.
function enlarge_Callback(hObject, eventdata, handles)
handles=guidata(hObject);
in_image=[handles.I,handles.map];
in_image2=imresize(in_image,2);
handles.I=in_image2;
guidata(hObject,handles);%影象序列化
figure,imshow(in_image);
figure,imshow(in_image2);


% --- Executes on button press in 縮小.
function narrow_Callback(hObject, eventdata, handles)
handles=guidata(hObject);
in_image=[handles.I,handles.map];
in_image2=imresize(in_image,0.5);
handles.I=in_image2;
guidata(hObject,handles);%影象序列化
figure,imshow(in_image);
figure,imshow(in_image2);
5、映象程式碼:通過mirror()函式對影象進行映象轉換
(1)我們需要先寫一個mirror函式
function OutImage=mirror(InImage,n)
%mirror函式實現影象映象變換功能
%引數n為1時,實現水平映象變換
%引數n為2時,實現垂直映象變換
%引數n為3時,實現水平垂直映象變換
I=InImage;
[M,N,G]=size(I);%獲取輸入影象I的大小
J=I;  %初始化新影象矩陣全為1,大小與輸入影象相
if (n==1)
    for i=1:M
        for j=1:N
            J(i,j,:)=I(M-i+1,j,:);%n=1,水平映象
        end
    end;
elseif (n==2)
     for i=1:M
        for j=1:N
            J(i,j,:)=I(i,N-j+1,:);%n=2,垂直映象
        end
     end
elseif (n==3)
     for i=1:M
        for j=1:N
            J(i,j,:)=I(M-i+1,N-j+1,:);%n=3,水平垂直映象
        end
     end
else
    error('引數n輸入不正確,n取值1、2、3')%n輸入錯誤時提示
end
OutImage=J;% --- Executes on button press in 映象.
function mirror_Callback(hObject, eventdata, handles)
handles=guidata(hObject);
in_image=[handles.I,handles.map];
in_image2=mirror(in_image,1);% 映象函式是一個比較古老的函式,雖然現在還可以用,但是這個函式已經被matlab淘汰了
handles.I=in_image2;
guidata(hObject,handles);%影象序列化
figure,
subplot(1,2,1),imshow(in_image);
subplot(1,2,2),imshow(in_image2);(1)我們需要先寫一個轉置函式
function J=transp(I)
%I表示輸入的原始影象
%J表示經過轉置以後的影象
[M,N,G]=size(I);%獲取輸入影象I的大小
I=im2double(I); %將影象資料型別轉換成雙精度
J=ones(N,M,G);  %初始化新影象矩陣全為1,大小與輸入影象相同
for i=1:M
    for j=1:N
      J(j,i,:)=I(i,j,:);%進行影象轉置
    end
end
(2)使用轉置函式
% --- Executes on button press in overturn.
function overturn_Callback(hObject, eventdata, handles)
handles=guidata(hObject);
in_image=[handles.I,handles.map];
in_image2=transp(in_image);
handles.I=in_image2;
guidata(hObject,handles);%影象序列化
figure,
subplot(1,2,1),imshow(in_image);
subplot(1,2,2),imshow(in_image2);% --- Executes on button press in 順時針旋轉.
function rotateCW_Callback(hObject, eventdata, handles)
handles=guidata(hObject);
in_image=[handles.I,handles.map];
in_image2=imrotate(in_image,-20,'nearest','crop');%順時針逆時針只是第二個引數的符號不同
handles.I=in_image2;
guidata(hObject,handles);%影象序列化
figure,
subplot(1,2,1),imshow(in_image);
subplot(1,2,2),imshow(in_image2);
% --- Executes on button press in 逆時針旋轉.
function rotateACW_Callback(hObject, eventdata, handles)
handles=guidata(hObject);
in_image=[handles.I,handles.map];
in_image2=imrotate(in_image,20,'nearest','crop');%順時針逆時針只是第二個引數的符號不同
handles.I=in_image2;
guidata(hObject,handles);%影象序列化
figure,
subplot(1,2,1),imshow(in_image);
subplot(1,2,2),imshow(in_image2);8、影象擷取某一部分:(這裡是可以通過捕捉滑鼠移動的方式來做一個簡單截圖軟體的)
% --- Executes on button press in 影象的剪下.
function cut_Callback(hObject, eventdata, handles)
handles=guidata(hObject);
in_image=[handles.I,handles.map];
rect=[0 300 200 300];           %定義剪下區域
in_image2=imcrop(in_image,rect);              %進行影象剪下
set(0,'defaultFigurePosition',[100,100,1000,500]);%修改圖形影象位置的預設設定
set(0,'defaultFigureColor',[1 1 1])%修改圖形背景顏色的設定
axes(handles.axesbig);%把顯示範圍限定在axesbig
imshow(in_image2);%顯示圖片