
ClickableSpan點選連結事件 改超連結顏色
- private SpannableStringBuilder dealWeiboContent(String weiboContent,
- TextView textView) {
- Pattern pattern = Pattern
- .compile("((http://|https://){1}[\\w\\.\\-/:]+)|(#(.+?)#)|(@[\\u4e00-\\u9fa5\\w\\-]+)");
- temp = weiboContent;
-
Matcher matcher = pattern.matcher(temp);
- List<String> list = new LinkedList<String>();
- while (matcher.find()) {
- if (!list.contains(matcher.group())) {
- temp = temp.replace(
- matcher.group(),
- "<a href=\"" + matcher.group() + "\">"
-
+ matcher.group() + "</a>");
- /*temp = temp.replace(
- matcher.group(),
- "<font color='#365C7C'><a href='" + matcher.group() + "'>"
- + matcher.group() + "</a></font>");*/
- }
- list.add(matcher.group());
-
}
- textView.setText(Html.fromHtml(temp));
- System.out.println("temp" + temp);
- textView.setMovementMethod(LinkMovementMethod.getInstance());
- CharSequence text = textView.getText();
- if (text instanceof Spannable) {
- int end = text.length();
- Spannable sp = (Spannable) textView.getText();
- URLSpan[] urls = sp.getSpans(0, end, URLSpan.class);
- SpannableStringBuilder style = new SpannableStringBuilder(text);
- style.clearSpans();
- for (URLSpan url : urls) {
- style.setSpan(((ThinksnsWeiboContent) activityContent)
- .typeClick(url.getURL()), sp.getSpanStart(url), sp
- .getSpanEnd(url), Spannable.SPAN_EXCLUSIVE_EXCLUSIVE);
- }
- return style;
- }
- returnnull;
- }
自定義方法
- public ClickableSpan typeClick(final String value) {
- char type = value.charAt(0);
- switch (type) {
- case'@':
- returnnew ClickableSpan() {
- @Override
- publicvoid onClick(View widget) {
- // TODO Auto-generated method stub
- String uname = "";
- uname = value.substring(1, value.length());
- System.out.println("weiboContent---uanme---"+uname);
- }
- @Override
- publicvoid updateDrawState(TextPaint ds) {
- ds.setColor(Color.argb(255, 54, 92, 124));
- ds.setUnderlineText(true);
- }
- };
下文轉自:
和HTML中的一樣,預設超連結都帶下劃線的,下面的方案可以在TextView中去掉超連結的下劃線:
1、重寫ClickableSpan類來去掉下劃線樣式(系統預設使用ClickableSpan來封裝超連結)
//無下劃線超連結,使用textColorLink、textColorHighlight分別修改超連結前景色和按下時的顏色
private class NoLineClickSpan extends ClickableSpan {
	String text;

	public NoLineClickSpan(String text) {
	    super();
	    this.text = text;
	}

	@Override
	public void updateDrawState(TextPaint ds) {
	    ds.setColor(ds.linkColor);
	    ds.setUnderlineText(false); //去掉下劃線
	}

	@Override
	public void onClick(View widget) {
	    processHyperLinkClick(text); //點選超連結時呼叫
	}
}
2、把超連結文字封裝為NoLineClickSpan物件,並新增到TextView中
TextView tv = findViewById(R.id.tv_click);
SpannableString spStr = new SpannableString("蘿蔔白菜部落格-->http://orgcent.com");
ClickSpan clickSpan = new NoLineClickSpan(vo); //設定超連結
spStr.setSpan(clickSpan, 0, str.length(), Spanned.SPAN_INCLUSIVE_EXCLUSIVE);
tv.append(spStr);
tv.setMovementMethod(LinkMovementMethod.getInstance());
PS:不用把TextView的屬性autoLink設為”all”.
3、設定超連結為可點選狀態
tv.setMovementMethod(LinkMovementMethod.getInstance());
PS:在NoLineClickSpan類中實現onClick()回撥方法.
背景介紹
在開發應用過程中經常會遇到顯示一些不同的字型風格的資訊猶如預設的LockScreen上面的時間和充電資訊。對於類似的情況,可能第一反應就是用不同的多個TextView來實現,對於每個TextView設定不同的字型風格以滿足需求。
這裡推薦的做法是使用android.text.*;和 android.text.style.*;下面的元件來實現RichText:也即在同一個TextView中設定不同的字型風格。對於某些應用,比如文字編輯,記事本,彩信,簡訊等地方,還必須使用這些元件才能達到想到的顯示效果。
主要的基本工具類有android.text.Spanned; android.text.SpannableString; android.text.SpannableStringBuilder;使用這些類來代替常規String。SpannableString和 SpannableStringBuilder可以用來設定不同的Span,這些Span便是用於實現Rich Text,比如粗體,斜體,前景色,背景色,字型大小,字型風格等等,android.text.style.*中定義了很多的Span型別可供使用。
這是相關的API的Class General Hierarchy: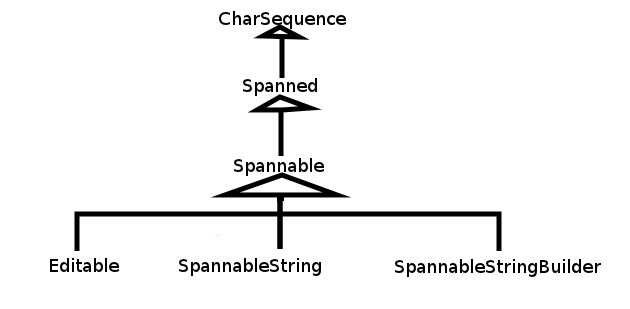
因為Spannable等最終都實現了CharSequence介面,所以可以直接把SpannableString和SpannableStringBuilder通過TextView.setText()設定給TextView。
使用方法
當要顯示Rich Text資訊的時候,可以使用建立一個SpannableString或SpannableStringBuilder,它們的區別在於 SpannableString像一個String一樣,構造物件的時候傳入一個String,之後再無法更改String的內容,也無法拼接多個 SpannableString;而SpannableStringBuilder則更像是StringBuilder,它可以通過其append()方法來拼接多個String:
SpannableString word = new SpannableString("The quick fox jumps over the lazy dog");

SpannableStringBuilder multiWord = new SpannableStringBuilder();
multiWord.append("The Quick Fox");
multiWord.append("jumps over");
multiWord.append("the lazy dog");
建立完Spannable物件後,就可以為它們設定Span來實現想要的Rich Text了,常見的Span有:
- AbsoluteSizeSpan(int size) ---- 設定字型大小,引數是絕對數值,相當於Word中的字型大小
- RelativeSizeSpan(float proportion) ---- 設定字型大小,引數是相對於預設字型大小的倍數,比如預設字型大小是x, 那麼設定後的字型大小就是x*proportion,這個用起來比較靈活,proportion>1就是放大(zoom in), proportion<1就是縮小(zoom out)
- ScaleXSpan(float proportion) ---- 縮放字型,與上面的類似,預設為1,設定後就是原來的乘以proportion,大於1時放大(zoon in),小於時縮小(zoom out)
- BackgroundColorSpan(int color) ----背景著色,引數是顏色數值,可以直接使用android.graphics.Color裡面定義的常量,或是用Color.rgb(int, int, int)
- ForegroundColorSpan(int color) ----前景著色,也就是字的著色,引數與背景著色一致
- TypefaceSpan(String family) ----字型,引數是字型的名字比如“sans", "sans-serif"等
- StyleSpan(Typeface style) -----字型風格,比如粗體,斜體,引數是android.graphics.Typeface裡面定義的常量,如Typeface.BOLD,Typeface.ITALIC等等。
- StrikethroughSpan----如果設定了此風格,會有一條線從中間穿過所有的字,就像被劃掉一樣
對於這些Sytle span在使用的時候通常只傳上面所說明的構造引數即可,不需要設定其他的屬性,如果需要的話,也可以對它們設定其他的屬性,詳情可以參見文件。
SpannableString和SpannableStringBuilder都有一個設定上述Span的方法:

/**
 * Set the style span to Spannable, such as SpannableString or SpannableStringBuilder
 * @param what --- the style span, such as StyleSpan
 * @param start --- the starting index of characters to which the style span to apply
 * @param end --- the ending index of characters to which the style span to apply
 * @param flags --- the flag specified to control
 */
setSpan(Object what, int start, int end, int flags);
其中引數what是要設定的Style span,start和end則是標識String中Span的起始位置,而 flags是用於控制行為的,通常設定為0或Spanned中定義的常量,常用的有:
- Spanned.SPAN_EXCLUSIVE_EXCLUSIVE --- 不包含兩端start和end所在的端點
- Spanned.SPAN_EXCLUSIVE_INCLUSIVE --- 不包含端start,但包含end所在的端點
- Spanned.SPAN_INCLUSIVE_EXCLUSIVE --- 包含兩端start,但不包含end所在的端點
- Spanned.SPAN_INCLUSIVE_INCLUSIVE--- 包含兩端start和end所在的端點
這裡理解起來就好像數學中定義區間,開區間還是閉區間一樣的。還有許多其他的Flag,可以參考這裡。這裡要重點說明下關於引數0,有很多時候,如果設定了上述的引數,那麼Span會從start應用到Text結尾,而不是在start和end二者之間,這個時候就需要使用Flag 0。
Linkify
另外,也可以對通過TextView.setAutoLink(int)設定其Linkify屬性,其用處在於,TextView會自動檢查其內容,會識別出phone number, web address or email address,並標識為超連結,可點選,點選後便跳轉到相應的應用,如Dialer,Browser或Email。Linkify有幾個常用選項,更多的請參考文件:
- Linkify.EMAIL_ADDRESS -- 僅識別出TextView中的Email在址,標識為超連結,點選後會跳到Email,傳送郵件給此地址
- Linkify.PHONE_NUMBERS -- 僅識別出TextView中的電話號碼,標識為超連結,點選後會跳到Dialer,Call這個號碼
- Linkify.WEB_URLS-- 僅識別出TextView中的網址,標識為超連結,點選後會跳到Browser開啟此URL
- Linkify.ALL -- 這個選項是識別出所有系統所支援的特殊Uri,然後做相應的操作
權衡選擇
個人認為軟體開發中最常見的問題不是某個技巧怎麼使用的問題,而是何時該使用何技巧的問題,因為實現同一個目標可能有N種不同的方法,就要權衡利弊,選擇最合適的一個,正如常言所云,沒有最好的,只有最適合的。如前面所討論的,要想用不同的字型展現不同的資訊可能的解法,除了用Style Span外還可以用多個TextView。那麼就需要總結下什麼時候該使用StyleSpan,什麼時候該使用多個TextView:
- 如果顯示的是多個不同類別的資訊,就應該使用多個TextView,這樣也方便控制和改變各自的資訊,例子就是預設LockScreen上面的日期和充電資訊,因為它們所承載不同的資訊,所以應該使用多個TextView來分別呈現。
- 如果顯示的是同一類資訊,或者同一個資訊,那麼應該使用StyleSpan。比如,簡訊息中,要把聯絡人的相關資訊突出顯示;或是想要Highlight某些資訊等。
- 如果要實現Rich text,沒辦法,只能使用Style span。
- 如果要實現某些特效,也可以考慮使用StyleSpan。設定不同的字型風格只是Style span的初級應用,如果深入研究,可以發現很多奇妙的功效。