
Ubuntu中安裝Elasticsearch

1.安裝jre
elasticsearch是使用java開發的搜尋引擎,因此其執行依賴於java runtime environment,我們在這裡不使用Oracel的官方jre,改為使用open-jre。
執行環境:
- ubuntu:18.04
- jre:openjdk-11-jre
執行一下的命令進行安裝:
apt update
apt install default-jre
安裝完成後,執行java -version進行驗證,輸出如下表示安裝成功:

2.安裝Elasticsearch
2.1 下載並啟動Elasticsearch
首先從Elasticsearch的官網下載GA版本的Elasticsearch,目前GA版本是6.6.2,我們使用wget進行下載:
wget https://artifacts.elastic.co/downloads/elasticsearch/elasticsearch-6.6.2.tar.gz
下載完成後進行解壓:
tar -xzvf elasticsearch-6.6.2.tar.gz
然後我們進入elasticsearch-6.6.2\bin
elasticsearch就可以執行起來,命令列中會輸出大量的啟動資訊,當我們看到以下輸出時,就表明elasticsearch啟動成功:

其中H9iEvJw就是我們當前節點Node的名稱。
注意:elasticsearch不能使用root使用者進行啟動,在Ubuntu中必須是用adduser命令新增使用者後,然後使用該使用者啟動elasticsearch。
2.2 修復啟動過程中的warn訊息
我們在啟動過程中看到了以下的warn資訊:
[2019-03-21T23:00:05,193][WARN ][o.e.b.BootstrapChecks    ] [H9iEvJw] max file descriptors [65535] for elasticsearch process is too low, increase to at least [65536]

[2019-03-21T23:00:05,193][WARN ][o.e.b.BootstrapChecks    ] [H9iEvJw] max virtual memory areas vm.max_map_count [65530] is too low, increase to at least [262144]
我們可以看到是max file descriptors和max virtual memory的值太小導致Elasticsearch報出這兩個warn訊息。
2.2.1 修改 max_map_count
使用下面的命令修改Linux系統的 max_map_count值:
su root
vim /etc/sysctl.conf
在檔案中加入:
vm.max_map_count=262144
然後執行以下命令使其生效:
sysctl -p
具體可以參考:https://www.elastic.co/guide/en/elasticsearch/reference/current/vm-max-map-count.html
2.2.2 修改nofile
開啟/etc/security/limits.conf檔案:
su root
vim /etc/security/limits.conf
新增以下兩項內容(如果存在相應內容,則修改其值):
* soft nofile 65536
* hard nofile 65536
備註:前面的*號表示匹配所有使用者,soft和hard分別代表soft limit和hard limit,nofile表示最大開啟檔案數量
修改後需要重啟才能生效。
2.3 繫結IP地址
預設情況下,elasticsearch只允許本地訪問,如果要允許其他機器訪問,那麼需要繫結IP地址,修改方法如下:
vim elasticsearch-6.6.2/config/elasticsearch.yml
修改elasticsearch安裝目錄下的config資料夾中的elasticsearch.yml檔案:
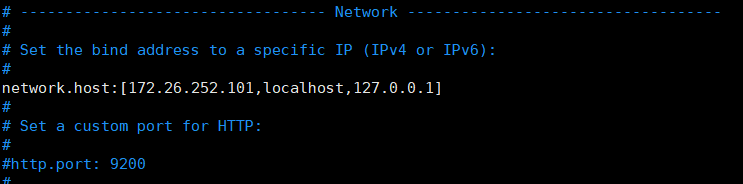
重啟Elasticsearch使得新配置生效,這樣就可以實現三個地址都能訪問Elasticsearch。
至此,Elasticsea