
SpringBoot第五篇:整合Mybatis
作者:追夢1819
原文:https://www.cnblogs.com/yanfei1819/p/10869315.html
版權宣告:本文為博主原創文章,轉載請附上博文連結!
引言
ORM框架有很多,比如Mybatis、hibernate、JPA、JDBCTemplate等,各自有各自的優點。Mybatis作為一個半自動的框架,靈活易上手等特點,收到了很多人的青睞。
本文介紹springboot 整合 Mybatis框架。
Mybatis介紹
基本概念
什麼是 Mybatis?
官方給的解釋是:MyBatis 是一款優秀的持久層框架,它支援定製化 SQL、儲存過程以及高階對映。MyBatis 避免了幾乎所有的 JDBC 程式碼和手動設定引數以及獲取結果集。MyBatis 可以使用簡單的 XML 或註解來配置和對映原生型別、介面和 Java 的 POJO(Plain Old Java Objects,普通老式 Java 物件)為資料庫中的記錄。
優缺點
Mybatis 可能是用的最廣泛的一個 ORM 框架了,下面簡單列舉其優缺點。
優點:
- 易上手;
- sql 靈活,與程式碼解耦;
- 支援物件與資料庫對映;
- 半自動框架,靈活性較高;
缺點:
需要維護 sql ;
綁定了sql,移植性差;
二級快取機制不佳;
開發模式
準備工作
在Mybatis 中,有兩種方式開發方式:配置檔案開發和註解開發,以下分別介紹兩種模式。
我們先來做一下準備工作。不管是哪一種開發模式,下面幾步都是相同的:
- 都需要對 Mybatis 代理介面進行掃描。在 SpringBoot 專案中,掃描方式有兩種:
1) 在啟動類上加 @MapperScan(value = {"com.sunwin.db.*","com.yanfei1819.mybatisdemo.db"})
2) 分別在介面 mapper 上新增 @Mapper 註解;
上面掃描Mybatis 代理介面的兩種方式的效果一樣,只不過第一種方式是一次性掃描整個包,第二種方式是單獨掃描每個介面。
初始化資料庫:
SET NAMES utf8mb4;
SET FOREIGN_KEY_CHECKS = 0;
-- ----------------------------
-- Table structure for user
-- ----------------------------
DROP TABLE IF EXISTS `user`;
CREATE TABLE `user`  (
  `id` int(11) NOT NULL AUTO_INCREMENT,
  `name` varchar(40) CHARACTER SET utf8 COLLATE utf8_general_ci NOT NULL,
  `age` int(3) NOT NULL,
  PRIMARY KEY (`id`) USING BTREE
) ENGINE = InnoDB AUTO_INCREMENT = 50 CHARACTER SET = utf8 COLLATE = utf8_general_ci ROW_FORMAT = Dynamic;
-- ----------------------------
-- Records of user
-- ----------------------------
INSERT INTO `user` VALUES (14, 'admin', 21);
INSERT INTO `user` VALUES (48, 'teacher', 20);
INSERT INTO `user` VALUES (49, 'student', 22);

SET FOREIGN_KEY_CHECKS = 1;
引入maven 依賴:
<dependency>
    <groupId>org.mybatis.spring.boot</groupId>
    <artifactId>mybatis-spring-boot-starter</artifactId>
    <version>2.0.1</version>
</dependency>
<dependency>
    <groupId>org.springframework.boot</groupId>
    <artifactId>spring-boot-starter-web</artifactId>
</dependency>

<dependency>
    <groupId>mysql</groupId>
    <artifactId>mysql-connector-java</artifactId>
    <scope>runtime</scope>
</dependency>
配置資料庫資訊:
spring.datasource.driver-class-name=com.mysql.jdbc.Driver
spring.datasource.url=jdbc:mysql://192.168.1.88:3306/win_health?serverTimezone=GMT%2B8
spring.datasource.username=root
spring.datasource.password=pass123
註解開發
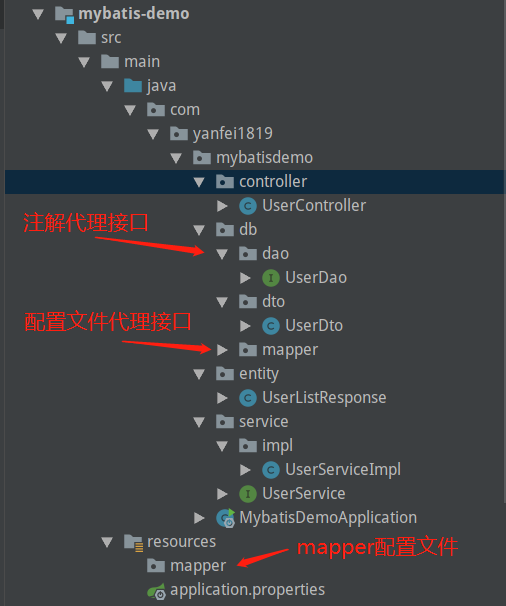
開發之前,先大體瞭解一下專案的結構(這個結構都是自定義的,這裡只是為了演示方便):
首先,建立一個實體類:
package com.yanfei1819.mybatisdemo.db.dto;

/**
 * Created by 追夢1819 on 2019-05-05.
 */
public class UserDto {
    private Long id;
    private String name;
    private int age;
    //  set/get 省略
}
建立以下實體類是為了試返回的值展示更加友好。
package com.yanfei1819.mybatisdemo.entity;
import com.yanfei1819.mybatisdemo.db.dto.UserDto;
import java.util.List;

/**
 * Created by 追夢1819 on 2019-05-05.
 */
public class UserListResponse {
    private int code;
    private String msg;
    private List<UserDto> users;
    // set/get 省略
}
其次,建立代理介面:
package com.yanfei1819.mybatisdemo.db.dao;
import com.yanfei1819.mybatisdemo.db.dto.UserDto;
import org.apache.ibatis.annotations.Select;

import java.util.List;
/**
 * Created by 追夢1819 on 2019-05-05.
 */
public interface UserDao {
    @Select("select * from user ")
    List<UserDto> queryList();
}
再者,建立service層:
package com.yanfei1819.mybatisdemo.service;
import com.yanfei1819.mybatisdemo.entity.UserListResponse;

/**
 * Created by 追夢1819 on 2019-05-05.
 */
public interface UserService {
    UserListResponse queryUsers();
}
package com.yanfei1819.mybatisdemo.service.impl;
import com.yanfei1819.mybatisdemo.db.dao.UserDao;
import com.yanfei1819.mybatisdemo.db.dto.UserDto;
import com.yanfei1819.mybatisdemo.entity.UserListResponse;
import com.yanfei1819.mybatisdemo.service.UserService;
import org.springframework.beans.factory.annotation.Autowired;
import org.springframework.stereotype.Service;
import java.util.List;
/**
* Created by 追夢1819 on 2019-05-05.
*/
@Service
public class UserServiceImpl implements UserService {
@Autowired
private UserDao userDao;
@Override
public UserListResponse queryUsers() {
List<UserDto> userDtos = userDao.queryList();
UserListResponse response = new UserListResponse();
response.setUsers(userDtos);
response.setCode(0);
response.setMsg("success");
return response;
}
}然後,建立controller層:
package com.yanfei1819.mybatisdemo.controller;
import com.yanfei1819.mybatisdemo.entity.UserListResponse;
import com.yanfei1819.mybatisdemo.service.UserService;
import org.springframework.beans.factory.annotation.Autowired;
import org.springframework.stereotype.Controller;
import org.springframework.web.bind.annotation.GetMapping;
import org.springframework.web.bind.annotation.ResponseBody;

/**
 * Created by 追夢1819 on 2019-05-05.
 */
@Controller
public class UserController {
    @Autowired
    private UserService userService;
    @ResponseBody
    @GetMapping("/queryUsers")
    public UserListResponse queryUsers(){
        return userService.queryUsers();
    }
}
最後,啟動main 方法:
package com.yanfei1819.mybatisdemo;
import org.mybatis.spring.annotation.MapperScan;
import org.springframework.boot.SpringApplication;
import org.springframework.boot.autoconfigure.SpringBootApplication;
@SpringBootApplication
@MapperScan("com.yanfei1819.mybatisdemo.db") // 注意這個註解
public class MybatisDemoApplication {
public static void main(String[] args) {
SpringApplication.run(MybatisDemoApplication.class, args);
}
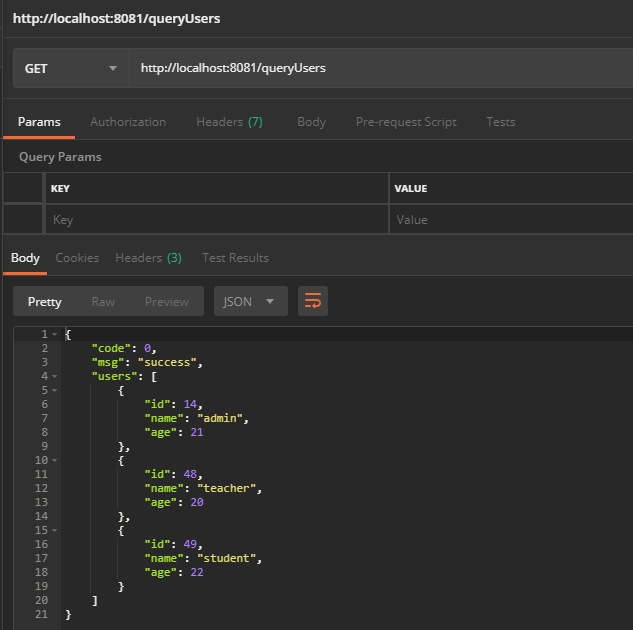
}用postman測試:
配置檔案開發
配置檔案模式開發比註解開發稍稍複雜一點。因為這種模式多了維護 sql 的 mapper.xml 檔案。我將其歸結為下面三步:
建立代理介面:
建立介面對映的 xxxMapper.xml 檔案
在主配置檔案 application.properties 中指定 xxxMapper.xml 的位置:
mybatis.mapper-locations=classpath:mapper/*.xml;
在以上專案的基礎上,新增以下程式碼。
首先,新建實體類:
package com.yanfei1819.mybatisdemo.entity;
import com.yanfei1819.mybatisdemo.db.dto.UserDto;

/**
 * Created by 追夢1819 on 2019-05-05.
 */
public class UserResponse {
    private int code;
    private String msg;
    private UserDto user;
}
其次,建立mapper介面:
package com.yanfei1819.mybatisdemo.db.mapper;
import com.yanfei1819.mybatisdemo.db.dto.UserDto;
import org.apache.ibatis.annotations.Param;
/**
 * Created by 追夢1819 on 2019-05-05.
 */
public interface UserMapper {
    UserDto queryUserByName(@Param("name") String name);
}
然後,建立UserMapper檔案:
<?xml version="1.0" encoding="UTF-8"?>
<!DOCTYPE mapper PUBLIC "-//mybatis.org//DTD Mapper 3.0//EN" "http://mybatis.org/dtd/mybatis-3-mapper.dtd">
<mapper namespace="com.yanfei1819.mybatisdemo.db.mapper.UserMapper">
  <select id="queryUserByName" resultType="com.yanfei1819.mybatisdemo.db.dto.UserDto" parameterType="java.lang.String">
    select * from user where `name` = #{name}
  </select>
</mapper>
下面,UserService 介面新增方法:
UserResponse queryUserByName(String name);UserServiceImpl 類實現:
    @Override
    public UserResponse queryUserByName(String name){
        UserDto userDto = userMapper.queryUserByName(name);
        UserResponse response = new UserResponse();
        response.setUser(userDto);
        response.setCode(0);
        response.setMsg("success");
        return response;
    }
最後,在 controller 層新增方法:
@ResponseBody
@GetMapping("/queryUserByName")
public UserResponse queryUserByName(String name){
return userService.queryUserByName(name);
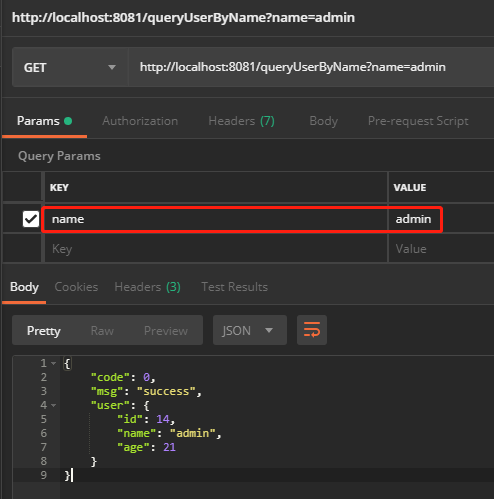
}測試結果
總結
針對上面兩種方式,各有優勢。註解開發基本上只要@Insert 、@Select、@Update、 @Delete 四個註解就可以搞定。配置檔案開發只需要在 xxxMapper.xml 維護 sql 即可。
我個人的喜好是,如果是單表操作,或者是工具包,就選擇註解方式,因為比較簡潔,沒有配置檔案;如果是多表操作,則選擇配置檔案的方式,對sql的操作更靈活,擴充套件性更好。
<全文完>
更多精彩,請關注公眾號:【技術與人生】

相關推薦
SpringBoot第五篇:整合Mybatis
作者:追夢1819 原文:https://www.cnblogs.com/yanfei1819/p/10869315.html 版權宣告:本文為博主原創文章,轉載請附上博文連結! 引言 ORM框架有很多,比如Mybatis、hibernate、JPA、JDBCTemplate等,各自有各自的優點。Myb
SpringBoot第七篇:整合Mybatis-Plus
作者:追夢1819 原文:https://www.cnblogs.com/yanfei1819/p/10881666.html 版權宣告:本文為博主原創文章,轉載請附上博文連結! 引言 一看這個名字,就能看出與 MyBatis 有關。沒錯,它就是一款 MyBatis 的增強工具。 下面我們先介紹這款
一起來學 SpringBoot 2.x | 第七篇:整合 Mybatis
點選上方“芋道原始碼”,選擇“置頂公眾號”技術文章第一時間送達!原始碼精品專欄 摘要: 原創出處
精通SpringBoot——第七篇:整合Redis實現快取
專案中用到快取是很常見的事情, 快取能夠提升系統訪問的速度,減輕對資料庫的壓力等好處。今天我們來講講怎麼在spring boot 中整合redis 實現對資料庫查詢結果的快取。 首先第一步要做的就是在pom.xml檔案新增spring-boot-starter-data-redis。 要整合快取,必
SpringBoot第四篇:整合JDBCTemplate
values 都是 ice upd ava docs cati cnblogs ble 作者:追夢1819 原文:https://www.cnblogs.com/yanfei1819/p/10868954.html 版權聲明:本文為博主原創文章,轉載請附上博文鏈接! 引言
SpringBoot第六篇:整合通用Mapper
作者:追夢1819 原文:https://www.cnblogs.com/yanfei1819/p/10876339.html 版權宣告:本文為博主原創文章,轉載請附上博文連結! 引言 在以往的專案中,對於dao層的常規 CRUD 操作,我們通常使用 JPA、JDBC 時會做一個所謂的BaseDaoMa
SpringBoot第九篇:整合Spring Data JPA
作者:追夢1819 原文:https://www.cnblogs.com/yanfei1819/p/10910059.html 版權宣告:本文為博主原創文章,轉載請附上博文連結! 前言 前面幾章,我們介紹了 JDBCTemplate、MyBatis 等 ORM 框架。下面我們來介紹極簡模式的 Sprin
第五篇:Spring Boot整合Redis
Redis 是一個高效能的key-value資料庫,它支援儲存的value型別相對更多,包括string(字串)、list(連結串列)、set(集合)、zset(sorted set --有序集合)和hash(雜湊型別)。使用redis作為快取技術方案,主要是因為Redis快取技
Spring Boot 基礎系列教程 | 第十六篇:整合MyBatis
推薦 Spring Boot/Cloud 視訊: 最近專案原因可能會繼續開始使用MyBatis,已經習慣於spring-data的風格,再回頭看xml的對映配置總覺得不是特別舒服,介面定義與對映離散在不同檔案中,使得閱讀起來並不是特別方便。 Spring中整合
SpringBoot 2.x(五):整合Mybatis-Plus
簡介 Mybatis-Plus是在Mybatis的基礎上,國人開發的一款持久層框架。 並且榮獲了2018年度開源中國最受歡迎的中國軟體TOP5 同樣以簡化開發為宗旨的Spring Boot與Mybatis-Plus放在一起會產生什麼樣的化學反應呢?下面我們來領略一下兩者配合帶來的效率上的提升。 Myba
易筋SpringBoot 2.1 | 第五篇:RestTemplate請求https(3)
寫作時間:2018-12-28 Spring Boot: 2.1 ,JDK: 1.8, IDE: IntelliJ IDEA, 說明 截至2018年6月,Alexa排名前100萬的網站中有34.6%使用HTTPS作為預設值[1],網際網路141387個最受歡迎網站的43.1%具有安全
SpringBoot學習---第五篇:動態資料來源(多資料來源自動切換)
目錄 五、測試 參考文獻 一、應用場景 專案需要從自己的資料庫上讀取和管理資料外,還有一部分業務涉及到其他多個數據庫。 為了能夠靈活地指定具體的資料庫,本文基於註解和AOP的方法實現多資料來源自動切換。在使用過
SpringBoot 2.X課程學習 | 第五篇:yml語法讓配置檔案更加簡潔易讀
簡介 YAML 是一種簡潔的非標記語言(YAML Ain’t Markup Lang
SpringCloud實戰 | 第五篇:SpringCloud整合OpenFeign實現微服務之間的呼叫
## **一. 前言** 微服務實戰系列是基於開源微服務專案 [有來商城youlai-mall](https://github.com/hxrui/youlai-mall) 版本升級為背景來開展的,本篇則是講述SpringCloud整合OpenFeign實現微服務之間的相互呼叫,有興趣的朋友可以進去給個sta
第五篇:數據預處理(二) - 異常值處理
ges 方向 分享 site 方式 得到 ros 聚類 測試 前言 數據中如果有某個值偏離該列其他值比較離譜,那麽就有可能是一個異常的值。在數據預處理中,自然需要把這個異常值檢測出來,然後剔除掉,或者光滑掉,或者其他各種方法進行處理。 需要註
Linux實戰第五篇:RHEL7.3下Nginx虛擬主機配置實戰(基於別名)
虛擬主機 nginx個人筆記分享(在線閱讀):http://note.youdao.com/noteshare?id=05daf711c28922e50792c4b09cf63c58PDF版本下載http://down.51cto.com/data/2323313本文出自 “人才雞雞” 博客,請務必保留此出處
第五篇:模塊
pytho 擴展名 提升 特殊屬性 基本 們的 imp rand 屬性 定義模塊 一、模塊基本概念 1、模塊是從邏輯上組織python代碼的形式 2、當代碼量變得相當大的時候,最好把代碼分成一些有 3、組織的代碼段
第五篇:函數
hello name module 操作 創建 n) 由於 cti most 函數基本操作 一、函數基本概念1、函數是對程序邏輯進行結構化或過程化的一種編程方法 2、將整塊代碼巧妙地隔離成易於管理的小塊 3、把重復代碼放到函數中而不是進行大量的拷貝,這樣既能節省空間,
第五篇:python基礎_5
執行過程 ini 間接 ray 復雜 func 時間 基於 time 本篇內容 協程函數 遞歸 二分法 import語句 from...import語句 模塊搜索路徑 包的導入 軟件開發規範 logging模塊的使用 一、 協程函數 1.定義 協程函數就是使用了y
第五篇:Centos7上配置docker容器ssh登錄
方式 service col 客戶端連接 httpd 添加 遠程 初步 images 1.查看httpd容器是否運行2.啟動httpd容器3.默認情況下,我們只能在宿主機上通過如下方式連接容器說明:這是在宿主機連接容器直接有效的方法 我們能夠通過容器的IP地址連接容器呢?需