SpringBoot第七篇:整合Mybatis-Plus
作者:追夢1819
原文:https://www.cnblogs.com/yanfei1819/p/10881666.html
版權宣告:本文為博主原創文章,轉載請附上博文連結!
引言
一看這個名字,就能看出與 MyBatis 有關。沒錯,它就是一款 MyBatis 的增強工具。
下面我們先介紹這款工具,然後再介紹在 SpringBoot 中的使用。這樣符合博主的習慣:在學習一個新的技術或者新的框架之前,一定會思考這個技術或者框架為什麼會出現?解決了什麼問題?有沒有別的取代方案?
Mybatis Plus簡介
1、概念
MyBatis-Plus(簡稱 MP)是一個 MyBatis 的增強工具,在 MyBatis 的基礎上只做增強不做改變,為簡化開發、提高效率而生。
2、特性
官網列舉了很多特性。不過總的來說,無非就是封裝好了常規的 CRUD 操作,無需配置,同時內嵌了很多外掛(熱載入、程式碼生成、分頁、效能分析等),減少了程式碼量。
3、關於版本說明
MyBatis Plus2.0 是基於 JDK1.7 及以下版本的。MyBatis Plus3.0 是基於 JDK1.8 及以上版本的(因為外掛內部使用了JDK8 的新特性 lambda 表示式)。本系列文章的JDK版本是1.8的,故選擇的外掛版本是3.0版本的。
使用
MyBatis Plus 的核心功能有三個:
- CRUD 操作;
- 程式碼生成器;
- 條件生成器。
下面逐一介紹。
CRUD操作
我們來看看 MyBatis 在 SpringBoot 專案中的應用。
準備工作,初始化資料庫:
SET NAMES utf8mb4;
SET FOREIGN_KEY_CHECKS = 0;

-- ----------------------------
-- Table structure for user
-- ----------------------------
DROP TABLE IF EXISTS `user`;
CREATE TABLE `user`  (
  `id` int(11) NOT NULL AUTO_INCREMENT,
  `age` int(3) NOT NULL,
  `name` varchar(30) CHARACTER SET utf8 COLLATE utf8_general_ci NOT NULL,
  PRIMARY KEY (`id`) USING BTREE
) ENGINE = MyISAM AUTO_INCREMENT = 3 CHARACTER SET = utf8 COLLATE = utf8_general_ci ROW_FORMAT = Dynamic;

-- ----------------------------
-- Records of user
-- ----------------------------
INSERT INTO `user` VALUES (1, 21, 'admin');
INSERT INTO `user` VALUES (2, 22, 'test');

SET FOREIGN_KEY_CHECKS = 1;
首先,建立 SpringBoot 專案,引入 maven 依賴:
<dependency>
    <groupId>org.springframework.boot</groupId>
    <artifactId>spring-boot-starter-web</artifactId>
</dependency>
<dependency>
    <groupId>org.mybatis.spring.boot</groupId>
    <artifactId>mybatis-spring-boot-starter</artifactId>
    <version>2.0.1</version>
</dependency>

<!-- https://mvnrepository.com/artifact/com.baomidou/mybatis-plus-boot-starter -->
<dependency>
    <groupId>com.baomidou</groupId>
    <artifactId>mybatis-plus-boot-starter</artifactId>
    <version>3.1.0</version>
</dependency>

<dependency>
    <groupId>mysql</groupId>
    <artifactId>mysql-connector-java</artifactId>
    <scope>runtime</scope>
</dependency>
然後,配置資料庫資訊和資料庫方言:
server.port=8087

spring.datasource.driver-class-name=com.mysql.jdbc.Driver
spring.datasource.url=jdbc:mysql://xx.xx.xx.xx:3306/test
spring.datasource.username=root
spring.datasource.password=root
package com.yanfei1819.mybatisplusdemo.config;
import com.baomidou.mybatisplus.extension.plugins.PaginationInterceptor;
import org.springframework.context.annotation.Bean;
import org.springframework.context.annotation.Configuration;
/**
* MyBatis Plus 的方言配置
* Created by 追夢1819 on 2019-05-17.
*/
@Configuration
public class MybatisPlusConfig {
@Bean
public PaginationInterceptor paginationInterceptor(){
PaginationInterceptor page = new PaginationInterceptor();
//設定方言型別
page.setDialectType("mysql");
return page;
}
}下面再建立一個實體類,以對映資料庫欄位:
package com.yanfei1819.mybatisplusdemo.entity;

/**
 * Created by 追夢1819 on 2019-05-17.
 */
public class User {
    private Long id;
    private String name;
    private int age;
    // get/set 省略
}
然後,建立代理介面:
package com.yanfei1819.mybatisplusdemo.mapper;

import com.baomidou.mybatisplus.core.mapper.BaseMapper;
import com.yanfei1819.mybatisplusdemo.entity.User;

/**
 * Created by 追夢1819 on 2019-05-17.
 */
//@Mapper
public interface UserMapper extends BaseMapper<User> {
}
這裡需要注意,需要通過啟動類的 @MapperScan 註解或者代理介面上的 @Mapper 註解(本示例中用的是前者)。
看到這一步,是不是很眼熟?很像前一篇的通用Mapper?
這裡說一句題外話,其實只要瞭解 MyBatis 的原理,自己都可以寫出想要的外掛。後續在 MyBatis 的專欄中,我將分析 Mybatis 的使用和原理。敬請關注。
最後建立一個測試介面方法:
package com.yanfei1819.mybatisplusdemo.web.controller;

import com.yanfei1819.mybatisplusdemo.entity.User;
import com.yanfei1819.mybatisplusdemo.mapper.UserMapper;
import org.springframework.beans.factory.annotation.Autowired;
import org.springframework.web.bind.annotation.GetMapping;
import org.springframework.web.bind.annotation.RestController;
import java.util.List;

/**
 * Created by 追夢1819 on 2019-05-17.
 */
@RestController
public class UserController {
    @Autowired
    private UserMapper userMapper;

    @GetMapping("/queryUsers")
    public List<User> queryUsers(){
        return userMapper.selectList(null);
    }
}
啟動程式:
package com.yanfei1819.mybatisplusdemo;

import org.mybatis.spring.annotation.MapperScan;
import org.springframework.boot.SpringApplication;
import org.springframework.boot.autoconfigure.SpringBootApplication;

@SpringBootApplication
@MapperScan("com.yanfei1819.mybatisplusdemo.mapper")
public class MybatisPlusDemoApplication {
    public static void main(String[] args) {
        SpringApplication.run(MybatisPlusDemoApplication.class, args);
    }
}
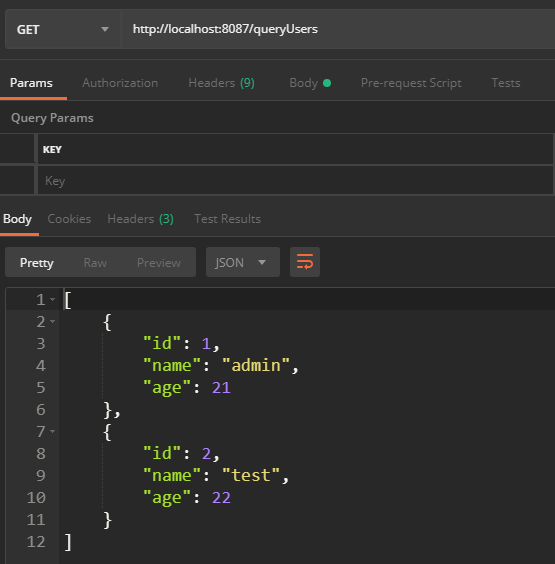
通過 postman 測試的結果:

常用API
該外掛封裝好的方法有很多,以上只是演示了其中的查詢列表的方法。下面是列舉幾個常用的方法。
當然,如果感興趣,想要了解更多,可以研究一下外掛中的原始碼:com.baomidou.mybatisplus.core.mapper.BaseMapper 。
/**
 * 插入一條記錄
 * @param entity 實體物件
 */
int insert(T entity);
/**
 * 根據 ID 刪除
 * @param id 主鍵ID
 */
int deleteById(Serializable id);
/**
 * 根據 columnMap 條件,刪除記錄
 *
 * @param columnMap 表字段 map 物件
 */
int deleteByMap(@Param(Constants.COLUMN_MAP) Map<String, Object> columnMap);
/**
 * 根據 ID 修改
 * @param entity 實體物件
 */
int updateById(@Param(Constants.ENTITY) T entity);
/**
 * 根據 ID 查詢
 * @param id 主鍵ID
 */
T selectById(Serializable id);

/**
 * 根據 entity 條件,查詢全部記錄
 * @param queryWrapper 實體物件封裝操作類(可以為 null)
 */
List<T> selectList(@Param(Constants.WRAPPER) Wrapper<T> queryWrapper);
程式碼生成器
這是這個外掛比較好用的一個功能。
為了更好的演示該功能,在本小節中重新新建一個工程:

首選,引入 maven 依賴:
<dependency>
    <groupId>com.baomidou</groupId>
    <artifactId>mybatis-plus-boot-starter</artifactId>
    <version>3.1.0</version>
</dependency>

<dependency>
    <groupId>mysql</groupId>
    <artifactId>mysql-connector-java</artifactId>
    <scope>runtime</scope>
</dependency>
<dependency>
    <groupId>com.baomidou</groupId>
    <artifactId>mybatis-plus-boot-starter</artifactId>
    <version>2.2.0</version>
</dependency>

<!-- freemarker -->
<dependency>
    <groupId>org.freemarker</groupId>
    <artifactId>freemarker</artifactId>
</dependency> 此處要注意版本問題,mybatis-plus-boot-starter 用的是 3.0 以上的版本,mybatis-plus-boot-starter 用了 3.0 以下的版本。因為MyBatis-Plus 從 3.0.3 之後移除了程式碼生成器與模板引擎的預設依賴,需要手動新增相關依賴。此處為了簡化演示,故用了 3.0 以下的版本。
另外,MyBatis-Plus 支援 Velocity(預設)、Freemarker、Beetl,使用者可以選擇自己熟悉的模板引擎,也可以自定義自定義模板引擎。本篇用的是 Freemarker 。
下面,就是最程式碼生成工具了:
package com.yanfei1819.mybatisplusgeneratordemo.util;

import com.baomidou.mybatisplus.generator.AutoGenerator;
import com.baomidou.mybatisplus.generator.config.DataSourceConfig;
import com.baomidou.mybatisplus.generator.config.GlobalConfig;
import com.baomidou.mybatisplus.generator.config.PackageConfig;
import com.baomidou.mybatisplus.generator.config.StrategyConfig;
import com.baomidou.mybatisplus.generator.config.converts.MySqlTypeConvert;
import com.baomidou.mybatisplus.generator.config.rules.DbColumnType;
import com.baomidou.mybatisplus.generator.config.rules.DbType;
import com.baomidou.mybatisplus.generator.config.rules.NamingStrategy;
import com.baomidou.mybatisplus.generator.engine.FreemarkerTemplateEngine;

/**
 * <p>
 * 程式碼生成器演示
 * </p>
 */
public class CodeGenerator {

    public static void main(String[] args) {
//        assert (false) : "程式碼生成屬於危險操作,請確定配置後取消斷言執行程式碼生成!";
        AutoGenerator mpg = new AutoGenerator();
        // 選擇 freemarker 引擎,預設 Velocity
        mpg.setTemplateEngine(new FreemarkerTemplateEngine());

        // 全域性配置
        GlobalConfig gc = new GlobalConfig();
        gc.setAuthor("追夢1819");
        gc.setOutputDir("F://私人文件/springboot/springboot-example/mybatis-plus-generator-demo/src/main/java");
        gc.setFileOverride(false);// 是否覆蓋同名檔案,預設是false
        gc.setActiveRecord(true);// 不需要ActiveRecord特性的請改為false
        gc.setEnableCache(false);// XML 二級快取
        gc.setBaseResultMap(true);// XML ResultMap
        gc.setBaseColumnList(false);// XML columList
        /* 自定義檔案命名,注意 %s 會自動填充表實體屬性! */
        // gc.setMapperName("%sDao");
        // gc.setXmlName("%sDao");
        // gc.setServiceName("MP%sService");
        // gc.setServiceImplName("%sServiceDiy");
        // gc.setControllerName("%sAction");
        mpg.setGlobalConfig(gc);

        // 資料來源配置
        DataSourceConfig dsc = new DataSourceConfig();
        dsc.setDbType(DbType.MYSQL);
        dsc.setTypeConvert(new MySqlTypeConvert() {
            // 自定義資料庫表字段型別轉換【可選】
            @Override
            public DbColumnType processTypeConvert(String fieldType) {
                System.out.println("轉換型別:" + fieldType);
                // 注意!!processTypeConvert 存在預設型別轉換,如果不是你要的效果請自定義返回、非如下直接返回。
                return super.processTypeConvert(fieldType);
            }
        });
        dsc.setDriverName("com.mysql.jdbc.Driver");
        dsc.setUsername("root");
        dsc.setPassword("pass123");
        dsc.setUrl("jdbc:mysql://192.168.1.88:3306/test?serverTimezone=GMT%2B8");
        mpg.setDataSource(dsc);

        // 策略配置
        StrategyConfig strategy = new StrategyConfig();
        // strategy.setCapitalMode(true);// 全域性大寫命名 ORACLE 注意
        strategy.setTablePrefix(new String[] { "user_" });// 此處可以修改為您的表字首
        strategy.setNaming(NamingStrategy.nochange);// 表名生成策略
        strategy.setInclude(new String[] { "user" }); // 需要生成的表
        // strategy.setExclude(new String[]{"test"}); // 排除生成的表
        // 自定義實體父類
        // strategy.setSuperEntityClass("com.baomidou.demo.TestEntity");
        // 自定義實體,公共欄位
        // strategy.setSuperEntityColumns(new String[] { "test_id", "age" });
        // 自定義 mapper 父類
        // strategy.setSuperMapperClass("com.baomidou.demo.TestMapper");
        // 自定義 service 父類
        // strategy.setSuperServiceClass("com.baomidou.demo.TestService");
        // 自定義 service 實現類父類
        // strategy.setSuperServiceImplClass("com.baomidou.demo.TestServiceImpl");
        // 自定義 controller 父類
        // strategy.setSuperControllerClass("com.baomidou.demo.TestController");
        // 【實體】是否生成欄位常量(預設 false)
        // public static final String ID = "test_id";
        // strategy.setEntityColumnConstant(true);
        // 【實體】是否為構建者模型(預設 false)
        // public User setName(String name) {this.name = name; return this;}
        // strategy.setEntityBuilderModel(true);
        mpg.setStrategy(strategy);

        // 包配置
        PackageConfig pc = new PackageConfig();
        pc.setParent("com.yanfei1819.mybatisplusgeneratordemo");
        // pc.setModuleName("test");
        mpg.setPackageInfo(pc);

        // 注入自定義配置,可以在 VM 中使用 cfg.abc 【可無】
        // InjectionConfig cfg = new InjectionConfig() {
        // @Override
        // public void initMap() {
        // Map<String, Object> map = new HashMap<String, Object>();
        // map.put("abc", this.getConfig().getGlobalConfig().getAuthor() +
        // "-mp");
        // this.setMap(map);
        // }
        // };
        //
        // // 自定義 xxList.jsp 生成
        // List<FileOutConfig> focList = new ArrayList<>();
        // focList.add(new FileOutConfig("/template/list.jsp.vm") {
        // @Override
        // public String outputFile(TableInfo tableInfo) {
        // // 自定義輸入檔名稱
        // return "D://my_" + tableInfo.getEntityName() + ".jsp";
        // }
        // });
        // cfg.setFileOutConfigList(focList);
        // mpg.setCfg(cfg);
        //
        // // 調整 xml 生成目錄演示
        // focList.add(new FileOutConfig("/templates/mapper.xml.vm") {
        // @Override
        // public String outputFile(TableInfo tableInfo) {
        // return "/develop/code/xml/" + tableInfo.getEntityName() + ".xml";
        // }
        // });
        // cfg.setFileOutConfigList(focList);
        // mpg.setCfg(cfg);
        //
        // // 關閉預設 xml 生成,調整生成 至 根目錄
        // TemplateConfig tc = new TemplateConfig();
        // tc.setXml(null);
        // mpg.setTemplate(tc);

        // 自定義模板配置,可以 copy 原始碼 mybatis-plus/src/main/resources/templates 下面內容修改,
        // 放置自己專案的 src/main/resources/templates 目錄下, 預設名稱一下可以不配置,也可以自定義模板名稱
        // TemplateConfig tc = new TemplateConfig();
        // tc.setController("...");
        // tc.setEntity("...");
        // tc.setMapper("...");
        // tc.setXml("...");
        // tc.setService("...");
        // tc.setServiceImpl("...");
        // 如上任何一個模組如果設定 空 OR Null 將不生成該模組。
        // mpg.setTemplate(tc);

        // 執行生成
        mpg.execute();

        // 列印注入設定【可無】
        // System.err.println(mpg.getCfg().getMap().get("abc"));
    }
}
可以看到,所有的配置都在這個類中(當然不是每一項配置都是必須的,“按需所取”)。
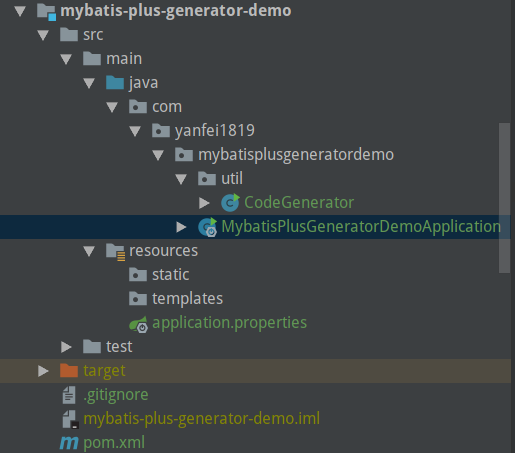
執行該類,能夠得到結果:

條件構造器
簡單說,就是通過方法把條件封裝好,直接寫入引數即可。個人並不推薦這種方式,因為可讀性並不強,有點封裝過度。如果感興趣的小夥伴,可以看看 官方文件 ,寫得很詳細。
參考
- MyBatis Plus 官網:https://mp.baomidou.com/
- 原始碼:com.baomidou.mybatisplus.core.mapper.BaseMapper
總結
其實就個人來說,我並不喜歡這個工具。因為它給我的感覺是封裝過度了,從某種程度上來說,把簡單問題複雜化了。
常規的 CRUD 操作,對應問題的解決方案有很多,比就如上一篇文章【SpringBoot第六篇:整合通用Mapper】中說到的通用Mapper,就是我比較喜歡的解決方案。
針對程式碼生成器和條件生成器,那就是“蘿蔔白菜,各有所愛”了。
當然,這只是個人的觀點。技術與框架的選擇,是多個因素的綜合考慮的結果。
<全文完>

相關推薦
SpringBoot第七篇:整合Mybatis-Plus
作者:追夢1819 原文:https://www.cnblogs.com/yanfei1819/p/10881666.html 版權宣告:本文為博主原創文章,轉載請附上博文連結! 引言 一看這個名字,就能看出與 MyBatis 有關。沒錯,它就是一款 MyBatis 的增強工具。 下面我們先介紹這款
一起來學 SpringBoot 2.x | 第七篇:整合 Mybatis
點選上方“芋道原始碼”,選擇“置頂公眾號”技術文章第一時間送達!原始碼精品專欄 摘要: 原創出處
精通SpringBoot——第七篇:整合Redis實現快取
專案中用到快取是很常見的事情, 快取能夠提升系統訪問的速度,減輕對資料庫的壓力等好處。今天我們來講講怎麼在spring boot 中整合redis 實現對資料庫查詢結果的快取。 首先第一步要做的就是在pom.xml檔案新增spring-boot-starter-data-redis。 要整合快取,必
SpringBoot第五篇:整合Mybatis
作者:追夢1819 原文:https://www.cnblogs.com/yanfei1819/p/10869315.html 版權宣告:本文為博主原創文章,轉載請附上博文連結! 引言 ORM框架有很多,比如Mybatis、hibernate、JPA、JDBCTemplate等,各自有各自的優點。Myb
SpringBoot第四篇:整合JDBCTemplate
values 都是 ice upd ava docs cati cnblogs ble 作者:追夢1819 原文:https://www.cnblogs.com/yanfei1819/p/10868954.html 版權聲明:本文為博主原創文章,轉載請附上博文鏈接! 引言
SpringBoot第六篇:整合通用Mapper
作者:追夢1819 原文:https://www.cnblogs.com/yanfei1819/p/10876339.html 版權宣告:本文為博主原創文章,轉載請附上博文連結! 引言 在以往的專案中,對於dao層的常規 CRUD 操作,我們通常使用 JPA、JDBC 時會做一個所謂的BaseDaoMa
SpringBoot第九篇:整合Spring Data JPA
作者:追夢1819 原文:https://www.cnblogs.com/yanfei1819/p/10910059.html 版權宣告:本文為博主原創文章,轉載請附上博文連結! 前言 前面幾章,我們介紹了 JDBCTemplate、MyBatis 等 ORM 框架。下面我們來介紹極簡模式的 Sprin
第七篇:Spring Boot整合Spring Cache
為了提高效能,減少資料庫的壓力,使用快取是非常好的手段之一。因此本文講解 Spring Boot 如何整合快取管理。 宣告式快取 Spring 定義 CacheManager 和 Cache 介面用來統一不同的快取技術。例如 JCache、 EhCache、 Hazelcast、
Spring Boot 基礎系列教程 | 第十六篇:整合MyBatis
推薦 Spring Boot/Cloud 視訊: 最近專案原因可能會繼續開始使用MyBatis,已經習慣於spring-data的風格,再回頭看xml的對映配置總覺得不是特別舒服,介面定義與對映離散在不同檔案中,使得閱讀起來並不是特別方便。 Spring中整合
Docker $ 第七篇 :Docker部署SpringBoot+Mysql
一.Dockerfile常用指令 FROM 目的 指定基礎映象 特點 需要寫在其他指令之前,之後的指令都依賴於該指令指定的映象。 語法 FROM <image> FROM
SpringBoot 2.x(五):整合Mybatis-Plus
簡介 Mybatis-Plus是在Mybatis的基礎上,國人開發的一款持久層框架。 並且榮獲了2018年度開源中國最受歡迎的中國軟體TOP5 同樣以簡化開發為宗旨的Spring Boot與Mybatis-Plus放在一起會產生什麼樣的化學反應呢?下面我們來領略一下兩者配合帶來的效率上的提升。 Myba
SpringBoot第七集:異常處理與整合JSR303校驗(2020最新最易懂)
SpringBoot第七集:異常處理與整合JSR303校驗(2020最新最易懂) 一.SpringBoot全域性異常 先講下什麼是全域性異常處理器? 全域性異常處理器就是把整個系統的異常統一自動處理,程式設計師可以做到不用寫try... catch。SpringBoot內建有預設全域性異常
第七篇:數據預處理(四) - 數據歸約(PCA/EFA為例)
通過 mage 如果 解釋 最大似然法 能力 似然 模擬 ont 前言 這部分也許是數據預處理最為關鍵的一個階段。 如何對數據降維是一個很有挑戰,很有深度的話題,很多理論書本均有詳細深入的講解分析。 本文僅介紹主成分分析法(P
R語言學習 第七篇:列表
方法 靈活的數據類型 引號 bounds 參考 最大的 post 長度 索引操作 列表(List)是R中最復雜的數據類型,一般來說,列表是數據對象的有序集合,但是,列表的各個元素(item)的數據類型可以不同,每個元素的長度可以不同,是R中最靈活的數據類型。列表項可以是列表
第七篇:Python3連接MySQL
定義 執行 對象 delet l數據庫 hal gin sele fault 第七篇:Python3連接MySQL 連接數據庫 註意事項 在進行本文以下內容之前需要註意: 你有一個MySQL數據庫,並且已經啟動。 你有可以連接該數據庫的用戶名和密碼 你有一個有權限操作的d
第七篇:Jmeter連接MySQL的測試
jmeter 數據表 準備 技術 con image sql數據庫 添加 參數配置 .準備一個有數據表格的MySQL數據庫; 2.在測試計劃面板上點擊瀏覽按鈕,把你的JDBC驅動添加進來; mysql-connector-java-5.1.26-bin.jar 3
第七篇:Linux系統啟動流程
.com 標誌位 linu http 操作系統 流程 mbr 我們 png 1.bios:是在主板上的一段程序,決定計算機從哪一塊啟動介質中讀操作系統。2.硬盤最小單位是扇區,一個扇區512byte,計算機啟動第一個讀的扇區叫“主引導記錄”(MBR),446B:引導信息 6
第七篇:遞迴插入,修改版
專案場景: 將一個樹上的節點插入到資料庫,節點之間有父子關係,每個節點有一個id和pId,父子關係表述為:父節點的id為子節點的pId值。在上一個日誌中,所有節點的值已經全部打包完傳給了後臺。現在執行插入操作。難點:
Python金融系列第七篇:市場風險
作者:chen_h 微訊號 & QQ:862251340 微信公眾號:coderpai 第一篇:計算股票回報率,均值和方差 第二篇:簡單線性迴歸 第三篇:隨機變數和分佈 第四篇:置信區間和假設檢驗 第五篇:多元線性迴歸和殘差分析 第六篇:現代投資組合
史上最簡單的SpringCloud教程 | 第七篇: 高可用的分散式配置中心(Spring Cloud Config)
最新Finchley版本請訪問: https://www.fangzhipeng.com/springcloud/2018/08/30/sc-f7-config/ 或者 http://blog.csdn.net/forezp/article/details/81041
