SpringCloud學習系列之五-----配置中心(Config)和訊息匯流排(Bus)完美使用版
前言
在上篇中介紹了SpringCloud Config的使用,本篇則介紹基於SpringCloud(基於SpringBoot2.x,.SpringCloud Finchley版)中的分散式配置中心(SpringCloud Config)的配置重新整理和訊息匯流排(RabbitMQ和Kafka)使用教程。
SpringCloud Config Refresh
在上一篇中我們介紹了springcloud配置中心的本地使用和Git使用的用法,但是當重新修改配置檔案提交後,客戶端獲取的仍然是修改前的資訊,需要客戶端重啟才可以獲取最新的資訊。因此我們需要客戶端能夠動態進行更新,幸好springcloud官方已經給出方案,所以我們只需要使用就行了。
開發準備
開發環境
- JDK:1.8
- SpringBoot:2.0.6.RELEASE
- SpringCloud:Finchley.SR2
注:不一定非要用上述的版本,可以根據情況進行相應的調整。需要注意的是SpringBoot2.x以後,jdk的版本必須是1.8以上!
確認了開發環境之後,我們再來新增相關的pom依賴。
<dependencies>
   	<dependency>
		<groupId>org.springframework.cloud</groupId>
		<artifactId>spring-cloud-starter-config</artifactId>
	</dependency>
	<dependency>
		<groupId>org.springframework.cloud</groupId>
		<artifactId>spring-cloud-starter-netflix-eureka-server</artifactId>
	</dependency>
</dependencies>
服務端
服務端以及註冊中心這塊配置和程式碼和之前springcloud-config配置基本一樣即可。註冊中心新專案的的名稱為springcloud-config-bus-eureka,服務端新專案的的名稱為springcloud-config-bus-server。
註冊中心pom配置、application.properties配置和程式碼如下:
pom:
 <dependencies>
	<dependency>
		<groupId>org.springframework.cloud</groupId>
		<artifactId>spring-cloud-starter-netflix-eureka-server</artifactId>
	</dependency>
</dependencies>
application.properties:
spring.application.name=springcloud-config-bus-eureka
server.port=8006
eureka.client.register-with-eureka=false
eureka.client.fetch-registry=false
eureka.client.serviceUrl.defaultZone=http://localhost:${server.port}/eureka/
程式碼:
	@SpringBootApplication
	@EnableEurekaServer
	public class ConfigBusEurekaApplication {

		public static void main(String[] args) {
			SpringApplication.run(ConfigBusEurekaApplication.class, args);
			 System.out.println("config bus 註冊中心服務啟動...");
		}
	}
服務端pom配置、application.properties配置和程式碼如下:
pom:
<dependencies>
	<dependency>
		<groupId>org.springframework.cloud</groupId>
		<artifactId>spring-cloud-config-server</artifactId>
	</dependency>
	<dependency>
		<groupId>org.springframework.cloud</groupId>
		<artifactId>spring-cloud-starter-netflix-eureka-server</artifactId>
	</dependency>
</dependencies>
application.properties:
 spring.application.name=springcloud-config-server
 server.port=9005
 eureka.client.serviceUrl.defaultZone=http://localhost:8005/eureka/
 spring.cloud.config.server.git.uri = https://github.com/xuwujing/springcloud-study/
 spring.cloud.config.server.git.search-paths = /springcloud-config/config-repo
 spring.cloud.config.server.git.username =
 spring.cloud.config.server.git.password =
程式碼:
	@EnableDiscoveryClient
	@EnableConfigServer
	@SpringBootApplication
	public class ConfigServerApplication {

		public static void main(String[] args) {
			SpringApplication.run(ConfigServerApplication.class, args);
			System.out.println("配置中心服務端啟動成功!");
		}
	}
客戶端
客戶端這邊在之前springcloud-config-client專案中進行改造,新專案的的名稱為springcloud-config-bus-client,在pom檔案中新增如下配置:
  <dependency>
		<groupId>org.springframework.boot</groupId>
		<artifactId>spring-boot-starter-actuator</artifactId>
	</dependency>
spring-boot-starter-actuator表示對該程式進行監控,可以通過http介面得到該程式的各種資訊,詳細的使用可以檢視我的這個專案springboot-actuator,可以在註釋中查詢各種介面的使用。
然後再到配置檔案application.properties中新增如下配置:
management.endpoints.web.exposure.include=refresh
該配置表示暴露重新整理的地址為refresh。
注:如果是SpringBoot1.x的版本,那麼配置改成management.security.enabled=false即可。
最後在客戶端的Controller增加一個@RefreshScope註解,該註解表示在接到SpringCloud配置中心配置重新整理的時候,自動將新的配置更新到該類對應的欄位中。
	@RestController
	@RefreshScope
	public class ClientController {

		@Value("${word}")
		private String word;

	    @RequestMapping("/hello")
	    public String index(@RequestParam String name) {
	        return name+","+this.word;
	    }
	}
測試
完成上述的程式碼開發後,我們來進行測試Spring-Config是否可以進行配置實時更新。
首先依次啟動springcloud-config-bus-eureka、springcloud-config-bus-server和springcloud-config-bus-client這三個專案。其中9005是服務端springcloud-config-bus-server的埠,9006是第一個客戶端springcloud-config-bus-client的埠。
啟動成功之後,在瀏覽器輸入:
介面返回:
pancm,hello world!!
可以正常得到服務端configtest-pro.properties的配置資訊。
然後在把configtest-pro.properties的配置更改為:
word=hello
然後我們再瀏覽器輸入:
介面返回:
pancm,hello world!!
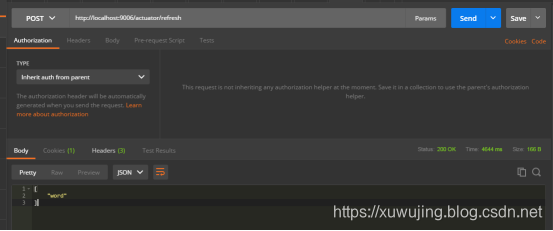
可以發現配置並沒有實時的重新整理,查閱官方文件得知,需要客戶端通過POST方法觸發各自的/refresh,所以這裡我們就用Postman工具模擬post請求重新整理,然後再檢視資訊。
使用POST請求如下地址:
返回:
[
 "word"
]
說明完成了word配置的重新整理,我們再瀏覽器輸入:
介面返回:
pancm,hello
發現已經成功實現配置重新整理了!
示例圖:


SpringCloud Config Bus
上述的示例中,我們客戶端發現每次獲取最新配置都需要手動進行重新整理,如果少的的話還可以使用,但是多的話就比較繁瑣了,雖然我們可以使用類似Github的WebHook的工具。
WebHook是當某個事件發生時,通過傳送http post請求的方式來通知資訊接收方。
但是當客戶端越來越多的時候WebHook已經不好使用了,每次新增客戶端都需要更改WebHook會顯得很麻煩,springcloud官方給出了非常好的解決方案,Spring Cloud Bus。
Spring cloud bus通過輕量訊息代理連線各個分佈的節點。這會用在廣播狀態的變化(例如配置變化)或者其他的訊息指令。Spring bus的一個核心思想是通過分散式的啟動器對spring boot應用進行擴充套件,也可以用來建立一個多個應用之間的通訊頻道。目前唯一實現的方式是用AMQP訊息代理作為通道,同樣特性的設定(有些取決於通道的設定)在更多通道的文件中。
為什麼使用Spring Cloud Bus就可以解決這個問題了呢?
我們不一定非要透徹的理解其原理才可以知道,我們只需要知道它的實現步驟,就可以知道了為什麼可以解決了。
步驟如下:
- 首先,在配置中進行更新配置檔案資訊,它就會自動觸發post傳送bus/refresh;
- 然後服務端就會將更新的配置並且傳送給Spring Cloud Bus;
- 繼而Spring Cloud bus接到訊息之後並通知給使用該配置的客戶端;
- 最後使用該配置的客戶端收到通知後,就會獲取最新的配置進行更新;
這裡我也簡單的畫了下使用Spring Cloud Bus之前和之後的流程圖,方便進行理解。
不使用Spring Cloud Bus獲取配置資訊流程圖:

使用Spring Cloud Bus獲取配置資訊流程圖:

開發準備
和上述的環境一樣即可。
RabbitMQ 的安裝教程可以看我之前寫的這篇文章:RabbitMQ的環境安裝及配置。
Kafka 的安裝教程可以看我之前寫的這篇文章:kafka安裝使用教程。
服務端
Spring Cloud Bus 主要的使用的MQ主要使用的是,RabbitMQ和Kafka。至於使用的話就可以根據情況來進行選擇,主要使用的是哪個MQ就用哪一個就行了。這裡我們就用RabbitMQ作為示例來進行講解,Kafka的使用也差不多,也無在乎配置更改而已。
首先在springcloud-config-bus-server服務端的pom檔案新增如下配置:
<dependencies>
	<dependency>
		<groupId>org.springframework.cloud</groupId>
		<artifactId>spring-cloud-config-server</artifactId>
	</dependency>
	<dependency>
		<groupId>org.springframework.cloud</groupId>
		<artifactId>spring-cloud-starter-netflix-eureka-server</artifactId>
	</dependency>

	<dependency>
		<groupId>org.springframework.boot</groupId>
		<artifactId>spring-boot-starter-actuator</artifactId>
	</dependency>
	<dependency>
		<groupId>org.springframework.cloud</groupId>
		<artifactId>spring-cloud-starter-bus-amqp</artifactId>
	</dependency>
</dependencies>
注: spring-boot-starter-actuator這個是必須的,不然是無法在服務端進行配置重新整理請求的。如果是使用的kafka的話,只需將spring-cloud-starter-bus-amqp改成spring-cloud-starter-bus-kafka即可。
然後再到配置檔案中新增如下配置:
配置資訊:
spring.application.name=springcloud-config-bus-server
server.port=9005
eureka.client.serviceUrl.defaultZone=http://localhost:8006/eureka/


spring.cloud.config.server.git.uri = https://github.com/xuwujing/springcloud-study/
spring.cloud.config.server.git.search-paths = /springcloud-config/config-repo
spring.cloud.config.server.git.username =
spring.cloud.config.server.git.password =

management.endpoints.web.exposure.include= bus-refresh
spring.cloud.bus.enabled = true
spring.cloud.bus.trace.enabled = true

spring.rabbitmq.host:127.0.0.1
spring.rabbitmq.port:5672
spring.rabbitmq.username:guest
spring.rabbitmq.password:guest
配置說明:
- spring.application.name : 這個是指定服務名稱。
- server.port:服務指定的埠。
- eureka.client.serviceUrl.defaultZone: 這個是設定與Eureka Server互動的地址,客戶端的查詢服務和註冊服務都需要依賴這個地址。
- spring.cloud.config.server.git.uri: 配置的Git長褲的地址。
- spring.cloud.config.server.git.search-paths: git倉庫地址下的相對地址 多個用逗號","分割。
- spring.cloud.config.server.git.username:git倉庫的賬號。
- spring.cloud.config.server.git.password:git倉庫的密碼。
- management.endpoints.web.exposure.include:SpringBoot2.x之後必須新增次配置,和上述的客戶端
springcloud-config-bus-client增加的的配置一樣,名稱不一樣是為了做區分。 - spring.cloud.bus.enabled:是否啟用springcloud config bus。
- spring.cloud.bus.trace.enabled:開啟跟蹤匯流排事件。
- spring.rabbitmq.host: rabbitmq的地址。
- spring.rabbitmq.port: rabbitmq的埠。
- spring.rabbitmq.username: rabbitmq的使用者名稱。
- spring.rabbitmq.password: rabbitmq的密碼。
注:如果是kafka的話,新增kafka的配置資訊spring.kafka.bootstrap-servers,填寫kafka的地址和埠即可。
服務端程式碼和之前一樣即可,在程式主類中,額外新增@EnableConfigServer註解,該註解表示啟用config配置中心功能。程式碼如下:
	@EnableDiscoveryClient
	@EnableConfigServer
	@SpringBootApplication
	public class ConfigServerApplication {

		public static void main(String[] args) {
			SpringApplication.run(ConfigServerApplication.class, args);
			System.out.println("配置中心服務端啟動成功!");
		}
	}
完成上述程式碼之後,我們的配置中心服務端已經構建完成了。
註冊中心和之前保持一致就可以了。
客戶端
客戶端這邊的變動基本不大,增加一個rabbitmq的jar包和相應的配置檔案即可。
在springcloud-config-bus-clinet的pom檔案新增如下配置:
<dependencies>
	<dependency>
		<groupId>org.springframework.boot</groupId>
		<artifactId>spring-boot-starter-web</artifactId>
	</dependency>
	<dependency>
		<groupId>org.springframework.cloud</groupId>
		<artifactId>spring-cloud-starter-netflix-eureka-client</artifactId>
	</dependency>
	<dependency>
		<groupId>org.springframework.cloud</groupId>
		<artifactId>spring-cloud-starter-config</artifactId>
	</dependency>
	<dependency>
		<groupId>org.springframework.boot</groupId>
		<artifactId>spring-boot-starter-actuator</artifactId>
	</dependency>
	<dependency>
		<groupId>org.springframework.cloud</groupId>
		<artifactId>spring-cloud-starter-bus-amqp</artifactId>
	</dependency>
</dependencies>
bootstrap.properties檔案的配置資訊和之前的基本一樣,完整的配置如下:
配置資訊:
spring.cloud.config.name=configtest
spring.cloud.config.profile=pro
spring.cloud.config.label=master
spring.cloud.config.discovery.enabled=true
spring.cloud.config.discovery.serviceId=springcloud-config-bus-server
eureka.client.serviceUrl.defaultZone=http://localhost:8006/eureka/
配置說明:
- spring.cloud.config.name: 獲取配置檔案的名稱。
- spring.cloud.config.profile: 獲取配置的策略。
- spring.cloud.config.label:獲取配置檔案的分支,預設是master。如果是是本地獲取的話,則無用。
- spring.cloud.config.discovery.enabled: 開啟配置資訊發現。
- spring.cloud.config.discovery.serviceId: 指定配置中心的service-id,便於擴充套件為高可用配置叢集。
- eureka.client.serviceUrl.defaultZone: 這個是設定與Eureka Server互動的地址,客戶端的查詢服務和註冊服務都需要依賴這個地址。
注:上面這些與spring-cloud相關的屬性必須配置在bootstrap.properties中,config部分內容才能被正確載入。因為bootstrap.properties的相關配置會先於application.properties,而bootstrap.properties的載入也是先於application.properties。需要注意的是eureka.client.serviceUrl.defaultZone要配置在bootstrap.properties,不然客戶端是無法獲取配置中心引數的,會啟動失敗!
application.properties配置檔案新增的配置基本和服務端的一樣,完整的配置如下:
spring.application.name=springcloud-config-bus-client
server.port=9006
management.endpoints.web.exposure.include=refresh
spring.cloud.config.failFast=true
spring.cloud.bus.trace.enabled = true

spring.rabbitmq.host:127.0.0.1
spring.rabbitmq.port:5672
spring.rabbitmq.username:guest
spring.rabbitmq.password:guest
配置說明:
- spring.application.name: 這個是指定服務名稱。
- server.port:服務指定的埠。
- management.endpoints.web.exposure.include:暴露重新整理的地址。
- spring.cloud.bus.enabled:是否啟用springcloud config bus。
- spring.cloud.bus.trace.enabled:開啟跟蹤匯流排事件。
- spring.rabbitmq.host: rabbitmq的地址。
- spring.rabbitmq.port: rabbitmq的埠。
- spring.rabbitmq.username: rabbitmq的使用者名稱。
- spring.rabbitmq.password: rabbitmq的密碼。
程式主類程式碼,和之前的基本一致。程式碼如下:
主程式程式碼示例:
	@EnableDiscoveryClient
	@SpringBootApplication
	public class ConfigClientApplication {

		public static void main(String[] args) {
			SpringApplication.run(ConfigClientApplication.class, args);
			System.out.println("配置中心客戶端啟動成功!");
		}
	}
控制層程式碼:
	@RestController
	@RefreshScope
	public class ClientController {

		@Value("${word}")
		private String word;

	    @RequestMapping("/hello")
	    public String index(@RequestParam String name) {
	        return name+","+this.word;
	    }
	}
完成上述的專案開發之後,我們把上面的專案複製一下,專案名稱為springcloud-config-bus-client2,然後把它的埠改為9007即可。
到此,客戶端的專案也就構建完成了。
功能測試
完成如上的工程開發之後,我們來進行測試。
我們首先啟動RabbitMQ服務,然後再依次啟動springcloud-config-bus-eureka、springcloud-config-bus-server、springcloud-config-bus-client和springcloud-config-bus-client2這四個專案。其中9005是服務端springcloud-config-bus-server的埠,9006是第一個客戶端springcloud-config-bus-client的埠,9007是是第二個客戶端springcloud-config-bus-client2的埠。
全域性重新整理測試
啟動成功之後,在瀏覽器輸入:
介面返回:
pancm,hello
在瀏覽器輸入:
介面返回:
xuwujing,hello
可以正常得到服務端configtest-pro.properties的配置資訊。
然後在把configtest-pro.properties的配置更改為:
word=hello!!
然後在使用Postman工具進行發起POST請求,只不過這次的地址是服務端的地址和埠。
使用POST請求如下地址:
然後我們再瀏覽器輸入:
介面返回:
pancm,hello!!
瀏覽器輸入:
介面返回:
xuwujing,hello!!
示例圖:


區域性重新整理測試
完成上述全域性重新整理測試之後,有時我們只想重新整理部分微服務的配置,那麼便可以使用/actuator/bus-refresh/{destination}端點的 destination 引數來定位要重新整理的應用程式。
我們繼續更改configtest-pro.properties的配置為:
word=hello!!!
然後依舊使用Postman工具傳送post請求,地址為:
http://localhost:9005/actuator/bus-refresh/springcloud-config-bus-client2
然後我們再瀏覽器輸入:
介面返回:
pancm,hello!!
瀏覽器輸入:
介面返回:
xuwujing,hello!!!
發現只有springcloud-config-bus-client2客戶端的配置更新,另一個springcloud-config-bus-client沒有進行重新整理,達到了我們的目的。
示例圖:


上述示例完成之後,我們把SpringCloud Config Refresh的測試在進行一遍,發現依舊可以實現,因此我們發現只要開啟Spring Cloud Bus 後,不管是對服務端還是客戶端,執行/actuator/bus-refresh都是可以更新配置的。
如果我們想進行跟蹤匯流排事件的話,只需要在重新整理配置之後,在地址後面新增/trace或/actuator/httptrace即可。
其他
專案地址
基於SpringBoot2.x、SpringCloud的Finchley版本開發的地址:https://github.com/xuwujing/springcloud-study
如果感覺專案不錯,希望能給個star,謝謝!
音樂推薦
<iframe frameborder="no" border="0" marginwidth="0" marginheight="0" width=330 height=86 src="//music.163.com/outchain/player?type=2&id=730859&auto=0&height=66"></iframe>
原創不易,如果感覺不錯,希望留言推薦!您的支援是我寫作的最大動力! 版權宣告: 作者:虛無境 部落格園出處:http://www.cnblogs.com/xuwujing CSDN出處:http://blog.csdn.net/qazwsxpcm 個人部落格出處:http://www
