vue-cli3.x中使用axios傳送請求,配合webpack中的devServer編寫本地mock資料介面(get/post/put/delete)
阿新 • • 發佈:2019-07-23
vue-cli3.x中使用axios傳送請求,配合webpack中的devServer編寫本地mock資料介面(get/post/put/delete)
手把手式筆記
Axios配置
- 安裝 axios
npm install axios- main.js同級目錄新建axios配置檔案setaxios.js
import axios from 'axios'
// import store from './store' //vuex
// import router from './router' //路由

export default function setAxios() {
    //攔截request請求
    axios.interceptors.request.use(
        config=>{
            console.log(config.data);
            return config;
        }
    )

    //攔截response回撥
    axios.interceptors.response.use(
        response=>{
            if(response.status===200){
                const data=response.data
                // if (data.code === 400){
                //     //登入過期,許可權不足
                //     console.warn("登陸過期");
                //     //清除token
                //     store.commit('setToken','')
                //     window.localStorage.removeItem('token')
                //     //跳轉登入
                //     router.replace({
                //         path:"/login"
                //     })
                // }
                return data;
            }
            return response;
        }
    )
}
- main.js中引入axios與其配置檔案
import axios from 'axios'
import setaxios from './setaxios'

//Vue全域性掛載axios
Vue.prototype.$http=axios
//設定baseUrl
axios.defaults.baseURL = '/api'
devServer中配置本地mock資料介面(vue.config.js檔案中)參考webpack中文文件
module.exports = {
    publicPath: './',
    outputDir: 'dist',
    assetsDir: 'static',
    configureWebpack: {
        devServer: {
            contentBase: './build',//專案基本訪問目錄
            host: 'localhost',//伺服器ip地址
            port: 8088,//埠
            open: true, //自動開啟頁面
            hot: true,//模組熱替換
            hotOnly: true,//只有熱更新不會重新整理頁面
            //mock資料介面部分 關鍵部分
            before(app) {
                const bodyParser = require('body-parser')
                app.use(bodyParser.json())  //通過bodyParser獲取req.body)

                /**
                *   testGet
                */
                app.get('/api/test/get',(req,resp)=>{
                    console.log(req.query);

                    resp.json({
                        "code":111,
                        "msg":"get測試成功"
                    })
                })


                /**
                 * testPost
                 */
                app.post('/api/test/post', (req, resp) => {
                    console.log(req.body);

                    resp.json({
                        "code": 123,
                        "msg": "post測試成功"
                    })
                })

                /**
                 * testPut
                 */
                app.put('/api/test/put', (req, resp) => {
                    console.log(req.body)
                    resp.json({
                        "code": 123,
                        "msg": "put測試成功"
                    })
                })

                /**
                 * testDelete
                 */
                app.delete("/api/test/delete",(req,resp)=>{
                    console.log(req.body);

                    resp.json({
                        "code":666,
                        "msg":"delete測試成功"
                    })
                })
            }
        }
    }
}
通過上述配置操作即可完成本地mock資料介面編寫,接下來是axios傳送http請求測試示例
restful風格介面axios傳送請求示例 參考axios中文文件
  methods: {
    sendGet: function() {
      this.$http
        .get("/test/get", {
          params: {
            param1: "get字串",
            param2: 13131
          }
        })
        .then(res => {
          console.log(res);
        });
    },
    sendPost: function() {
      this.$http
        .post("/test/post", {
          param1: "post字串",
          param2: 13131
        })
        .then(res => {
          console.log(res);
        });
    },
    sendPut: function() {
      this.$http
        .put("/test/put", {
          param1: "put字串",
          param2: 13131
        })
        .then(res => {
          console.log(res);
        })
        .catch(err => {
          console.log(err);
        });
    },
    sendDelete: function() {
      this.$http
        .delete("/test/delete", {
          data: {
            param1: "delete字串",
            param2: 13131
          }
        })
        .then(res => {
          console.log(res);
        })
        .catch(err => {
          console.log(err);
        });
    }
  }
完整測試demo(Test.vue)
<template>
<div>
<h2>HTTP-Request</h2>
<button @click="sendGet()">GET</button>
<span>  </span>
<button @click="sendPost()">POST</button>
<span>  </span>
<button @click="sendPut()">PUT</button>
<span>  </span>
<button @click="sendDelete()">DELETE</button>
<hr />
</div>
</template>
<script>
export default {
name: "testPage",
data() {
return {};
},
methods: {
sendGet: function() {
this.$http
.get("/test/get", {
params: {
param1: "get字串",
param2: 13131
}
})
.then(res => {
console.log(res);
});
},
sendPost: function() {
this.$http
.post("/test/post", {
param1: "post字串",
param2: 13131
})
.then(res => {
console.log(res);
});
},
sendPut: function() {
this.$http
.put("/test/put", {
param1: "put字串",
param2: 13131
})
.then(res => {
console.log(res);
})
.catch(err => {
console.log(err);
});
},
sendDelete: function() {
this.$http
.delete("/test/delete", {
data: {
param1: "delete字串",
param2: 13131
}
})
.then(res => {
console.log(res);
})
.catch(err => {
console.log(err);
});
}
}
};
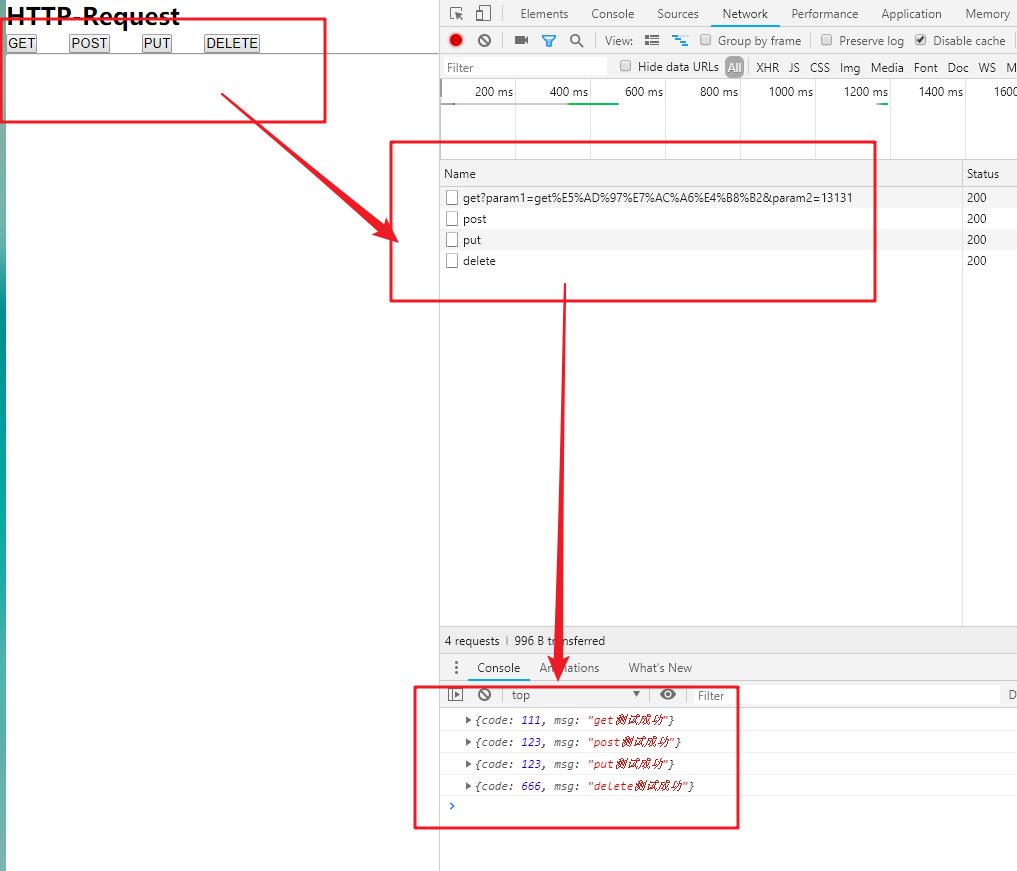
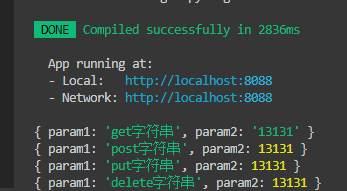
</script>示例效果圖


參考文件
webpack中文文件
Axios中文文件
如有不妥,不解之處,請滴滴我,或在評論區留
