探索form元件和cookie,session元件
一. 實現註冊功能
後端程式碼:
from django.shortcuts import render,HttpResponse,redirect
from app01 import models
Create your views here.
def reg(request):
    errors = {'username':'','password':''}
    if request.method == 'POST':
        username = request.POST.get('username')
        password = request.POST.get('password')
        if 'sb' in username:
            errors['username'] = '使用者名稱裡面不能有sb,你這個dsb'
        if password == '123':
            errors['password'] = '密碼太簡單了,你怕是個傻子哦'
    return render(request,'reg.html',locals())
前端程式碼:
<body>
<h1>註冊頁面</h1>
<form action="" method="post">
    <p>username:
        <input type="text" name="username">
        <span>{{ errors.username }}</span>
    </p>
    <p>password:
        <input type="password" name="password">
    <span>{{ errors.password }}</span>
    </p>#}
    <input type="submit">
註冊功能:
1. 渲染前端標籤獲取使用者輸入=====>渲染標籤
2. 獲取使用者輸入傳遞到後端校驗===>校驗資料
3. 校驗未通過展示錯誤資訊=======>展示資訊
校驗資料(前後端都可以校驗)
校驗前後端都可以做,但是前端可以不做,後端必須做!!!
二. Django form元件
1. 渲染標籤
2. 校驗資料
3. 展示資訊
資料校驗如下分析:
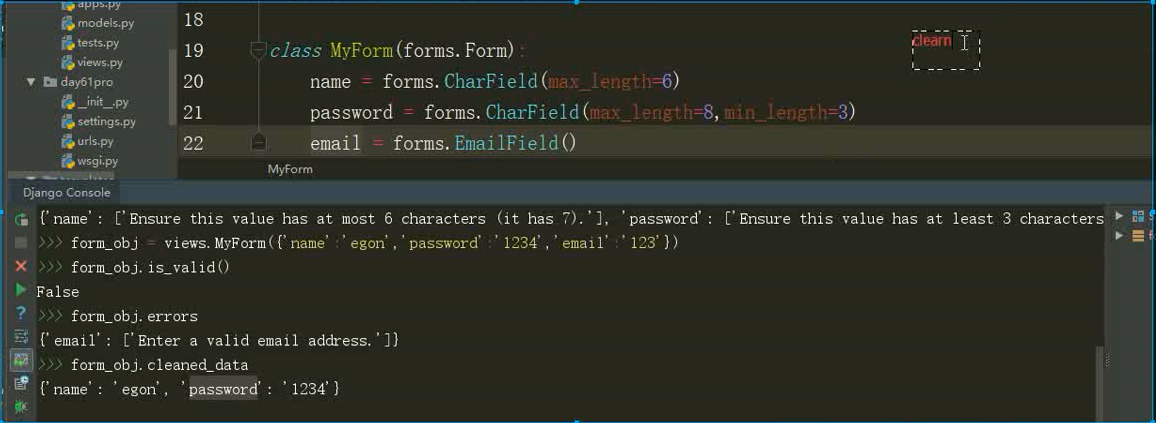
姓名最大是6位,當我們輸入大於6位字元的話,就會把錯誤的姓名丟進errors裡面去,當姓名合法的情況下時, 就會將姓名丟進clearn_data裡面去,字典裡面是和的關係,只要有一項不合格,就會丟擲一個錯誤,我們可以用物件.errors來檢視錯誤的資訊,用物件.is_valid來校驗字典裡的資訊是否輸入符合格式,符合情況下列印True,字典裡面有一項資訊錯誤都會列印False,EmailField表示的是郵箱格式,如果往字典裡面多傳入資訊也就是多加鍵值對形式的資訊時,並不會列印False,而是True,我們再次回來用物件.clearn_data,你會發現打印出的結果跟我們模型層中的欄位名一樣多,並不會打印出多寫入的那個鍵值對.如果我們輸入的資訊中缺少某個需要我們輸入的鍵值,就會出現報錯的現象.
ps:form元件校驗資料的規則是從上往下依次校驗,校驗通過的放在clearn_data,校驗失敗的放到errors
注意: form中所有的欄位都是必須預設傳值的(required=True),校驗資料的時候預設可以多傳值(多傳的值不會做任何的校驗====>不會影響form校驗規則)
渲染標籤:
前端程式碼:
<h1>第一種渲染方式(可擴充套件性較差)</h1>
{{ form_obj.as_p }}
{{ form_obj.as_ul }}
後端程式碼: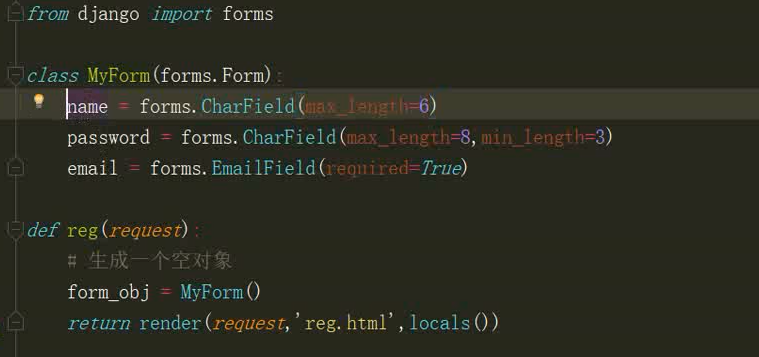
第一種渲染方法不適用,簡單瞭解
form元件只幫我們渲染使用者輸入的標籤,不會幫我們渲染提交按鈕,需要手動新增
前端程式碼:
<h1>第二種渲染方式</h1>
<form action="">
    <p>{{ form_obj.name.label }}{{ form_obj.name }}</p>
    <p>{{ form_obj.password.label }}{{ form_obj.password }}</p>
    <p>{{ form_obj.email.label }}{{ form_obj.email }}</p>
    <input type="submit">
</form>
後端程式碼:
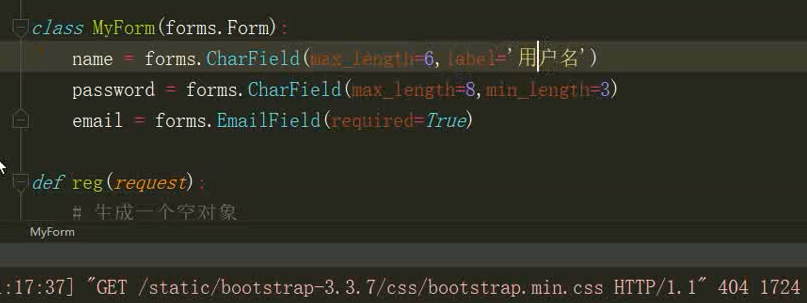
若欄位名裡面沒有lable標籤,渲染到頁面的資訊就是欄位名
前端程式碼:
<h1>第三種渲染標籤的方式</h1>
<form action="" method="post" novalidate>
    {% for foo in form_obj %}
        <p>
            {{ foo.label }}{{ foo }}

        </p>
    {% endfor %}
    <input type="submit">
</form>
後端程式碼:
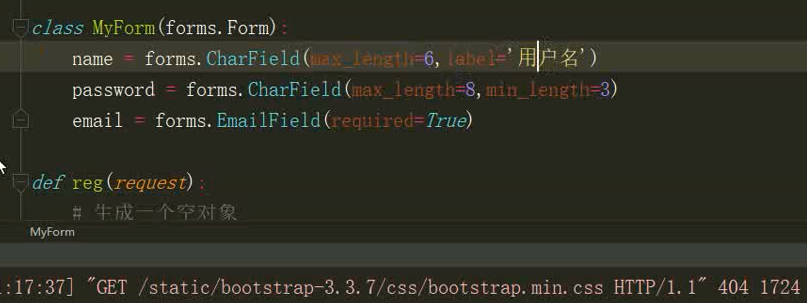
提倡用第三種渲染方式
校驗資訊與渲染頁面組合使用
後端程式碼:
from django import forms
from django.forms import widgets
class MyForm(forms.Form):
    name = forms.CharField(max_length=6,label='使用者名稱',error_messages={
        'max_length':'使用者名稱最長6位',
        'required':'使用者名稱不能為空'
    })
    password = forms.CharField(max_length=8,min_length=3,error_messages={
        'max_length': '密碼最長8位',
        'required': '密碼不能為空',
        'min_length':'密碼最少3位'
    },widget=widgets.PasswordInput(attrs={'class':'c1 form-control'}))  # 設定標籤樣式
    confirm_password = forms.CharField(max_length=8, min_length=3, error_messages={
        'max_length': '確認密碼最長8位',
        'required': '確認密碼不能為空',
        'min_length': '確認密碼最少3位'
    },widget=widgets.PasswordInput())  # 密文形式
    email = forms.EmailField(error_messages={
        'invalid':'郵箱格式不正確',
        'required':'郵箱不能為空'
    })


def reg(request):
    # 生成一個空物件
    form_obj = MyForm()
    if request.method == 'POST':
        print(request.POST)
        form_obj = MyForm(request.POST)   # 保留前端使用者輸入的資訊在input框裡面
        if form_obj.is_valid():
            print(form_obj.cleaned_data)   # 打印出驗證成功的資料
            models.User.objects.create(**form_obj.cleaned_data)  # 儲存資料在資料庫中  保證MyForm中的欄位名與模型層的User中的欄位名相同
    return render(request,'reg.html',locals())
前端程式碼:
<h1>第三種渲染標籤的方式</h1>
<form action="" method="post" novalidate>
    {% for foo in form_obj %}
        <p>
            {{ foo.label }}{{ foo }}
            <span>{{ foo.errors.0 }}</span>   // 提示錯誤資訊,所有的錯誤資訊都會在errors裡面,如果我想獲取當前的錯誤資訊,在errors後面新增0,取錯誤資訊的第一個
        </p>
    {% endfor %}
    <input type="submit">
</form>
模型層程式碼:
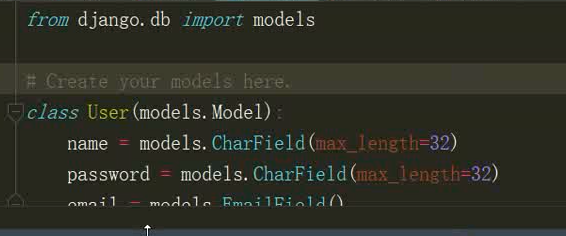
form元件提交資料如果資料不合法, 頁面上會保留之前使用者輸入的資訊,
在使用form元件對模型表進行資料校驗的時候,只需要保證欄位一致,那麼在建立物件時就可以直接**form_obj.cleaned_data
三. 鉤子函式
區域性鉤子函式: 單個欄位校驗利用區域性鉤子函式
全域性鉤子函式: 多個欄位的校驗利用全域性鉤子函式 (比如頁面上的密碼,一次輸入密碼,一次確認密碼)
鉤子函式執行機制: 當欄位名全都校驗成功後儲存在cleaned_data中才會執行鉤子函式
 # 區域性鉤子函式  (單個欄位的校驗利用區域性鉤子函式)
    def clean_name(self):
        name = self.cleaned_data.get('name')
        if '666' in name:
            self.add_error('name','光喊666是不行的,要有真實力!')
        return name  # return還是要加上的,相容性考慮

    # 全域性鉤子函式  (多個欄位的校驗利用全域性鉤子函式)
    def clean(self):
        password = self.cleaned_data.get('password')
        confirm_password = self.cleaned_data.get('confirm_password')
        if not password == confirm_password:
            self.add_error('confirm_password',"兩次密碼不一致,你這個dsb!")
        return self.cleaned_data
四. form的那些事
常用欄位與外掛
建立Form類時,主要涉及到 【欄位】 和 【外掛】,欄位用於對使用者請求資料的驗證,外掛用於自動生成HTML;
initial
初始值,input框裡面的初始值。
class LoginForm(forms.Form):
    username = forms.CharField(
        min_length=8,
        label="使用者名稱",
        initial="張三"  # 設定預設值
    )
    pwd = forms.CharField(min_length=6, label="密碼")
error_messages
重寫錯誤資訊。
class LoginForm(forms.Form):
    username = forms.CharField(
        min_length=8,
        label="使用者名稱",
        initial="張三",
        error_messages={
            "required": "不能為空",
            "invalid": "格式錯誤",
            "min_length": "使用者名稱最短8位"
        }
    )
    pwd = forms.CharField(min_length=6, label="密碼")
password
class LoginForm(forms.Form):
    ...
    pwd = forms.CharField(
        min_length=6,
        label="密碼",
        widget=forms.widgets.PasswordInput(attrs={'class': 'c1'}, render_value=True)
    )
radioSelect
單radio值為字串
class LoginForm(forms.Form):
    username = forms.CharField(
        min_length=8,
        label="使用者名稱",
        initial="張三",
        error_messages={
            "required": "不能為空",
            "invalid": "格式錯誤",
            "min_length": "使用者名稱最短8位"
        }
    )
    pwd = forms.CharField(min_length=6, label="密碼")
    gender = forms.fields.ChoiceField(
        choices=((1, "男"), (2, "女"), (3, "保密")),
        label="性別",
        initial=3,
        widget=forms.widgets.RadioSelect()
    )
單選Select
class LoginForm(forms.Form):
    ...
    hobby = forms.ChoiceField(
        choices=((1, "籃球"), (2, "足球"), (3, "雙色球"), ),
        label="愛好",
        initial=3,
        widget=forms.widgets.Select()
    )
多選Select
class LoginForm(forms.Form):
    ...
    hobby = forms.MultipleChoiceField(
        choices=((1, "籃球"), (2, "足球"), (3, "雙色球"), ),
        label="愛好",
        initial=[1, 3],
        widget=forms.widgets.SelectMultiple()
    )
單選checkbox
class LoginForm(forms.Form):
    ...
    keep = forms.ChoiceField(
        label="是否記住密碼",
        initial="checked",
        widget=forms.widgets.CheckboxInput()
    )
多選checkbox
class LoginForm(forms.Form):
    ...
    hobby = forms.MultipleChoiceField(
        choices=((1, "籃球"), (2, "足球"), (3, "雙色球"),),
        label="愛好",
        initial=[1, 3],
        widget=forms.widgets.CheckboxSelectMultiple()
    )
choice欄位注意事項
在使用選擇標籤時,需要注意choices的選項可以配置從資料庫中獲取,但是由於是靜態欄位 獲取的值無法實時更新,需要重寫構造方法從而實現choice實時更新。
方式一:
from django.forms import Form
from django.forms import widgets
from django.forms import fields


class MyForm(Form):

    user = fields.ChoiceField(
        # choices=((1, '上海'), (2, '北京'),),
        initial=2,
        widget=widgets.Select
    )

    def __init__(self, *args, **kwargs):
        super(MyForm,self).__init__(*args, **kwargs)
        # self.fields['user'].choices = ((1, '上海'), (2, '北京'),)
        # 或
        self.fields['user'].choices = models.Classes.objects.all().values_list('id','caption')
方式二:
from django import forms
from django.forms import fields
from django.forms import models as form_model


class FInfo(forms.Form):
    authors = form_model.ModelMultipleChoiceField(queryset=models.NNewType.objects.all())  # 多選
    # authors = form_model.ModelChoiceField(queryset=models.NNewType.objects.all())  # 單選
Django Form所有內建欄位
Field
    required=True,               是否允許為空
    widget=None,                 HTML外掛
    label=None,                  用於生成Label標籤或顯示內容
    initial=None,                初始值
    help_text='',                幫助資訊(在標籤旁邊顯示)
    error_messages=None,         錯誤資訊 {'required': '不能為空', 'invalid': '格式錯誤'}
    validators=[],               自定義驗證規則
    localize=False,              是否支援本地化
    disabled=False,              是否可以編輯
    label_suffix=None            Label內容字尾


CharField(Field)
    max_length=None,             最大長度
    min_length=None,             最小長度
    strip=True                   是否移除使用者輸入空白

IntegerField(Field)
    max_value=None,              最大值
    min_value=None,              最小值

FloatField(IntegerField)
    ...

DecimalField(IntegerField)
    max_value=None,              最大值
    min_value=None,              最小值
    max_digits=None,             總長度
    decimal_places=None,         小數位長度

BaseTemporalField(Field)
    input_formats=None          時間格式化

DateField(BaseTemporalField)    格式:2015-09-01
TimeField(BaseTemporalField)    格式:11:12
DateTimeField(BaseTemporalField)格式:2015-09-01 11:12

DurationField(Field)            時間間隔:%d %H:%M:%S.%f
    ...

RegexField(CharField)
    regex,                      自定製正則表示式
    max_length=None,            最大長度
    min_length=None,            最小長度
    error_message=None,         忽略,錯誤資訊使用 error_messages={'invalid': '...'}

EmailField(CharField)
    ...

FileField(Field)
    allow_empty_file=False     是否允許空檔案

ImageField(FileField)
    ...
    注:需要PIL模組,pip3 install Pillow
    以上兩個字典使用時,需要注意兩點:
        - form表單中 enctype="multipart/form-data"
        - view函式中 obj = MyForm(request.POST, request.FILES)

URLField(Field)
    ...


BooleanField(Field)
    ...

NullBooleanField(BooleanField)
    ...

ChoiceField(Field)
    ...
    choices=(),                選項,如:choices = ((0,'上海'),(1,'北京'),)
    required=True,             是否必填
    widget=None,               外掛,預設select外掛
    label=None,                Label內容
    initial=None,              初始值
    help_text='',              幫助提示


ModelChoiceField(ChoiceField)
    ...                        django.forms.models.ModelChoiceField
    queryset,                  # 查詢資料庫中的資料
    empty_label="---------",   # 預設空顯示內容
    to_field_name=None,        # HTML中value的值對應的欄位
    limit_choices_to=None      # ModelForm中對queryset二次篩選

ModelMultipleChoiceField(ModelChoiceField)
    ...                        django.forms.models.ModelMultipleChoiceField


TypedChoiceField(ChoiceField)
    coerce = lambda val: val   對選中的值進行一次轉換
    empty_value= ''            空值的預設值

MultipleChoiceField(ChoiceField)
    ...

TypedMultipleChoiceField(MultipleChoiceField)
    coerce = lambda val: val   對選中的每一個值進行一次轉換
    empty_value= ''            空值的預設值

ComboField(Field)
    fields=()                  使用多個驗證,如下:即驗證最大長度20,又驗證郵箱格式
                               fields.ComboField(fields=[fields.CharField(max_length=20), fields.EmailField(),])

MultiValueField(Field)
    PS: 抽象類,子類中可以實現聚合多個字典去匹配一個值,要配合MultiWidget使用

SplitDateTimeField(MultiValueField)
    input_date_formats=None,   格式列表:['%Y--%m--%d', '%m%d/%Y', '%m/%d/%y']
    input_time_formats=None    格式列表:['%H:%M:%S', '%H:%M:%S.%f', '%H:%M']

FilePathField(ChoiceField)     檔案選項,目錄下檔案顯示在頁面中
    path,                      資料夾路徑
    match=None,                正則匹配
    recursive=False,           遞迴下面的資料夾
    allow_files=True,          允許檔案
    allow_folders=False,       允許資料夾
    required=True,
    widget=None,
    label=None,
    initial=None,
    help_text=''

GenericIPAddressField
    protocol='both',           both,ipv4,ipv6支援的IP格式
    unpack_ipv4=False          解析ipv4地址,如果是::ffff:192.0.2.1時候,可解析為192.0.2.1, PS:protocol必須為both才能啟用

SlugField(CharField)           數字,字母,下劃線,減號(連字元)
    ...

UUIDField(CharField)           uuid型別


Django Form內建欄位
欄位校驗
RegexValidator驗證器
from django.forms import Form
from django.forms import widgets
from django.forms import fields
from django.core.validators import RegexValidator

class MyForm(Form):
    user = fields.CharField(
        validators=[RegexValidator(r'^[0-9]+$', '請輸入數字'), RegexValidator(r'^159[0-9]+$', '數字必須以159開頭')],
    )
自定義驗證函式
import re
from django.forms import Form
from django.forms import widgets
from django.forms import fields
from django.core.exceptions import ValidationError


# 自定義驗證規則
def mobile_validate(value):
    mobile_re = re.compile(r'^(13[0-9]|15[012356789]|17[678]|18[0-9]|14[57])[0-9]{8}$')
    if not mobile_re.match(value):
        raise ValidationError('手機號碼格式錯誤')


class PublishForm(Form):


    title = fields.CharField(max_length=20,
                            min_length=5,
                            error_messages={'required': '標題不能為空',
                                            'min_length': '標題最少為5個字元',
                                            'max_length': '標題最多為20個字元'},
                            widget=widgets.TextInput(attrs={'class': "form-control",
                                                          'placeholder': '標題5-20個字元'}))


    # 使用自定義驗證規則
    phone = fields.CharField(validators=[mobile_validate, ],
                            error_messages={'required': '手機不能為空'},
                            widget=widgets.TextInput(attrs={'class': "form-control",
                                                          'placeholder': u'手機號碼'}))

    email = fields.EmailField(required=False,
                            error_messages={'required': u'郵箱不能為空','invalid': u'郵箱格式錯誤'},
                            widget=widgets.TextInput(attrs={'class': "form-control", 'placeholder': u'郵箱'}))
五. cookie與session
cookie: 儲存在客戶端瀏覽器上的鍵值對
session: 儲存在服務端上的鍵值對 (服務端產生隨機的字串返回給客戶端,服務端找一個地方將字串與對應的資訊儲存起來)
設定cookie: obj.set_cookie() # 給瀏覽器設定cookie
獲取cookie: request.COOKIE.get('name')
: request.COOKIE['name']
刪除cookie: delect_cookie
from functools import wraps
		def login_auth(func):
			@wraps(func)
			def inner(request,*args,**kwargs):
				# 校驗cookie
				# print(request.get_full_path())   # 獲取使用者上次訪問的路徑
				old_path = request.get_full_path()
				if request.COOKIES.get('name'):
					return func(request,*args,**kwargs)
				return redirect('/login/?next=%s'%old_path) # 獲取全路徑
			return inner


def login(request):
			if request.method == 'POST':
				username = request.POST.get('username')
				password = request.POST.get('password')
				if username == 'jason' and password == '123':
					old_path = request.GET.get('next')
					if old_path:
						obj = redirect(old_path)
					else:
						obj = redirect('/home/')  # 首頁
					# 使用者登入成功 朝瀏覽器設定一個cookie
					obj.set_cookie('name','jason',expires=7*24*3600)  # 設定時間
					return obj
			return render(request,'login.html')
程式的大概思路:使用者登入一個頁面,登入成功之後儲存使用者的使用者名稱在客戶端的cookie中,方便下次登入,安全起見,為cookie設定一個時間,這個時間一過就會自動清除cookie裡面的資訊.現在有這個情況,假如我們還沒有登入,但我們輸了其他網頁的網址,等我們登入之後就跳到我們原來輸入的網址那個頁面,這個情況就是我們的裝飾器搞的鬼了,為什麼這樣說,原因就是裝飾器是一個登入驗證功能,我們能在裝飾器的內部獲取上次登入的全部路徑,然後在登入的頁面中做個判斷就可以實現上面的需求了.
session:
設定session: request.session['name']='jason'
這個設定一共幹了三件事: 1. 先生成一個隨機的字串 2. 在Django session表中儲存該隨機字串與資料的記錄 3. 將隨機的字串傳送給客戶端瀏覽器
獲取session: request.session.get()
1 . django自動獲取瀏覽器隨機字串取Django session表裡面比對
2. 如果比對成功, 會將當前隨機字串對應的資料賦值給request.session
3. 通過request.session操作該資料(資料不存在也不會影響我們的業務邏輯)
瀏覽器會設定一個鍵為session來存放session值
Django預設的session存活時間為2周(14天)
刪除當前會話的所有session資料: request.session.delete()
刪除當前的會話資料並刪除會話的cookie: request.session.flush() 這個用於確保前面的會話資料不可以被使用者的;瀏覽器訪問
&n
