02.第二階段、實戰Java高併發程式設計模式-5.JDK併發包1
1.
各種同步控制工具的使用 ..........................................................................................3
1.1. ReentrantLock .......................................................................................................3
-
1.1.1. 可重入 ...........................................................................................................3
-
1.1.2. 可中斷 ...........................................................................................................3
-
1.1.3. 可限時 ...........................................................................................................3
-
1.1.4. 公平鎖 ...........................................................................................................3
1.2. Condition ...............................................................................................................3
-
1.2.1. 概述 ...............................................................................................................3
-
1.2.2. 主要介面 .......................................................................................................3
-
1.2.3. API詳解 ..........................................................................................................3
1.3. Semaphore ............................................................................................................4
-
1.3.1. 概述 ...............................................................................................................4
-
1.3.2. 主要介面 .......................................................................................................4
1.4. ReadWriteLock ......................................................................................................4
-
1.4.1. 概述 ...............................................................................................................4
-
1.4.2. 訪問情況 .......................................................................................................4
-
1.4.3. 主要介面 .......................................................................................................4
1.5. CountDownLatch...................................................................................................4
-
1.5.1. 概述 ...............................................................................................................5
-
1.5.2. 主要介面 .......................................................................................................5
-
1.5.3. 示意圖 ...........................................................................................................5
1.6. CyclicBarrier ..........................................................................................................5
-
1.6.1. 概述 ...............................................................................................................5
-
1.6.2. 主要介面 .......................................................................................................5
-
1.6.3. 示意圖 ...........................................................................................................6
1.7. LockSupport ..........................................................................................................6
-
1.7.1. 概述 ...............................................................................................................6
-
1.7.2. 主要介面 .......................................................................................................6
-
1.7.3. 與suspend()比較 ...........................................................................................6
-
1.7.4. 中斷響應 .......................................................................................................6
1.8. ReentrantLock 的實現 ..........................................................................................6
-
1.8.1. CAS狀態 .........................................................................................................6
-
1.8.2. 等待佇列 .......................................................................................................6
-
1.8.3. park()..............................................................................................................7
併發容器及典型原始碼分析 .........................................................................................7
2.
2.1. 集合包裝...............................................................................................................7
-
2.1.1. HashMap ........................................................................................................7
-
2.1.2. List ..................................................................................................................7
-
2.1.3. Set ..................................................................................................................7
-
2.2. ConcurrentHashMap .............................................................................................7
-
2.3. BlockingQueue ......................................................................................................7
-
2.4. ConcurrentLinkedQueue .......................................................................................8
1. 各種同步控制工具的使用
1.1. ReentrantLock
1.1.1. 可重入 單執行緒可以重複進入,但要重複退出
1.1.2. 可中斷 lockInterruptibly()
1.1.3. 可限時 超時不能獲得鎖,就返回false,不會永久等待構成死鎖
1.1.4. 公平鎖
先來先得
public ReentrantLock(boolean fair)
public static ReentrantLock fairLock = new ReentrantLock(true);
1.2. Condition
1.2.1. 概述
類似於 Object.wait()和Object.notify() 與ReentrantLock結合使用
1.2.2. 主要介面
void await() throws InterruptedException;
void awaitUninterruptibly();
long awaitNanos(long nanosTimeout) throws InterruptedException; boolean await(long time, TimeUnit unit) throws InterruptedException; boolean awaitUntil(Date deadline) throws InterruptedException;
void signal();
void signalAll();
1.2.3. API詳解 await()方法會使當前執行緒等待,同時釋放當前鎖,當其他執行緒中使用signal()時或者signalAll()方法時,線
程會重新獲得鎖並繼續執行。或者當執行緒被中斷時,也能跳出等待。這和Object.wait()方法很相似。
awaitUninterruptibly()方法與await()方法基本相同,但是它並不會再等待過程中響應中斷。
singal()方法用於喚醒一個在等待中的執行緒。相對的singalAll()方法會喚醒所有在等待中的執行緒。這和Obej ct.notify()方法很類似。
ReentrantLock(重入鎖)功能詳解和應用演示
目錄
- 1. ReentrantLock簡介
- 2. ReentrantLock和synchronized的相同點
- 3. ReentrantLock相比synchronized的額外功能
- 4. 結合Condition實現等待通知機制
- 5. 總結
1. ReentrantLock簡介
jdk中獨佔鎖的實現除了使用關鍵字synchronized外,還可以使用ReentrantLock。雖然在效能上ReentrantLock和synchronized沒有什麼區別,但ReentrantLock相比synchronized而言功能更加豐富,使用起來更為靈活,也更適合複雜的併發場景。
2. ReentrantLock和synchronized的相同點
2.1 ReentrantLock是獨佔鎖且可重入的
- 例子
public class ReentrantLockTest {

    public static void main(String[] args) throws InterruptedException {

        ReentrantLock lock = new ReentrantLock();

        for (int i = 1; i <= 3; i++) {
            lock.lock();
        }

        for(int i=1;i<=3;i++){
            try {

            } finally {
                lock.unlock();
            }
        }
    }
}上面的程式碼通過lock()方法先獲取鎖三次,然後通過unlock()方法釋放鎖3次,程式可以正常退出。從上面的例子可以看出,ReentrantLock是可以重入的鎖,當一個執行緒獲取鎖時,還可以接著重複獲取多次。在加上ReentrantLock的的獨佔性,我們可以得出以下ReentrantLock和synchronized的相同點。
-
1.ReentrantLock和synchronized都是獨佔鎖,只允許執行緒互斥的訪問臨界區。但是實現上兩者不同:synchronized加鎖解鎖的過程是隱式的,使用者不用手動操作,優點是操作簡單,但顯得不夠靈活。一般併發場景使用synchronized的就夠了;ReentrantLock需要手動加鎖和解鎖,且解鎖的操作儘量要放在finally程式碼塊中,保證執行緒正確釋放鎖。ReentrantLock操作較為複雜,但是因為可以手動控制加鎖和解鎖過程,在複雜的併發場景中能派上用場。
-
2.ReentrantLock和synchronized都是可重入的。synchronized因為可重入因此可以放在被遞迴執行的方法上,且不用擔心執行緒最後能否正確釋放鎖;而ReentrantLock在重入時要卻確保重複獲取鎖的次數必須和重複釋放鎖的次數一樣,否則可能導致其他執行緒無法獲得該鎖。
3. ReentrantLock相比synchronized的額外功能
3.1 ReentrantLock可以實現公平鎖。
公平鎖是指當鎖可用時,在鎖上等待時間最長的執行緒將獲得鎖的使用權。而非公平鎖則隨機分配這種使用權。和synchronized一樣,預設的ReentrantLock實現是非公平鎖,因為相比公平鎖,非公平鎖效能更好。當然公平鎖能防止飢餓,某些情況下也很有用。在建立ReentrantLock的時候通過傳進引數true建立公平鎖,如果傳入的是false或沒傳引數則建立的是非公平鎖
ReentrantLock lock = new ReentrantLock(true);繼續跟進看下原始碼
/**
 * Creates an instance of {@code ReentrantLock} with the
 * given fairness policy.
 *
 * @param fair {@code true} if this lock should use a fair ordering policy
 */
public ReentrantLock(boolean fair) {
    sync = fair ? new FairSync() : new NonfairSync();
}可以看到公平鎖和非公平鎖的實現關鍵在於成員變數sync的實現不同,這是鎖實現互斥同步的核心。以後有機會我們再細講。
- 一個公平鎖的例子
public class ReentrantLockTest {

    static Lock lock = new ReentrantLock(true);

    public static void main(String[] args) throws InterruptedException {

        for(int i=0;i<5;i++){
            new Thread(new ThreadDemo(i)).start();
        }

    }

    static class ThreadDemo implements Runnable {
        Integer id;

        public ThreadDemo(Integer id) {
            this.id = id;
        }

        @Override

      public void run() {
            try {
                TimeUnit.MILLISECONDS.sleep(10);
            } catch (InterruptedException e) {
                e.printStackTrace();
            }
            for(int i=0;i<2;i++){
                lock.lock();
                System.out.println("獲得鎖的執行緒:"+id);
                lock.unlock();
            }
        }
    }
}- 公平鎖結果

我們開啟5個執行緒,讓每個執行緒都獲取釋放鎖兩次。為了能更好的觀察到結果,在每次獲取鎖前讓執行緒休眠10毫秒。可以看到執行緒幾乎是輪流的獲取到了鎖。如果我們改成非公平鎖,再看下結果
- 非公平鎖結果

執行緒會重複獲取鎖。如果申請獲取鎖的執行緒足夠多,那麼可能會造成某些執行緒長時間得不到鎖。這就是非公平鎖的“飢餓”問題。
- 公平鎖和非公平鎖該如何選擇
大部分情況下我們使用非公平鎖,因為其效能比公平鎖好很多。但是公平鎖能夠避免執行緒飢餓,某些情況下也很有用。
3.2 .ReentrantLock可響應中斷
當使用synchronized實現鎖時,阻塞在鎖上的執行緒除非獲得鎖否則將一直等待下去,也就是說這種無限等待獲取鎖的行為無法被中斷。而ReentrantLock給我們提供了一個可以響應中斷的獲取鎖的方法lockInterruptibly()。該方法可以用來解決死鎖問題。
- 響應中斷的例子
public class ReentrantLockTest {
    static Lock lock1 = new ReentrantLock();
    static Lock lock2 = new ReentrantLock();
    public static void main(String[] args) throws InterruptedException {

        Thread thread = new Thread(new ThreadDemo(lock1, lock2));//該執行緒先獲取鎖1,再獲取鎖2
        Thread thread1 = new Thread(new ThreadDemo(lock2, lock1));//該執行緒先獲取鎖2,再獲取鎖1
        thread.start();
        thread1.start();
        thread.interrupt();//是第一個執行緒中斷
    }

    static class ThreadDemo implements Runnable {
        Lock firstLock;
        Lock secondLock;
        public ThreadDemo(Lock firstLock, Lock secondLock) {
            this.firstLock = firstLock;
            this.secondLock = secondLock;
        }
        @Override
        public void run() {
            try {
                firstLock.lockInterruptibly();
                TimeUnit.MILLISECONDS.sleep(10);//更好的觸發死鎖
                secondLock.lockInterruptibly();
            } catch (InterruptedException e) {
                e.printStackTrace();
            } finally {
                firstLock.unlock();
                secondLock.unlock();
                System.out.println(Thread.currentThread().getName()+"正常結束!");
            }
        }
    }
}- 結果

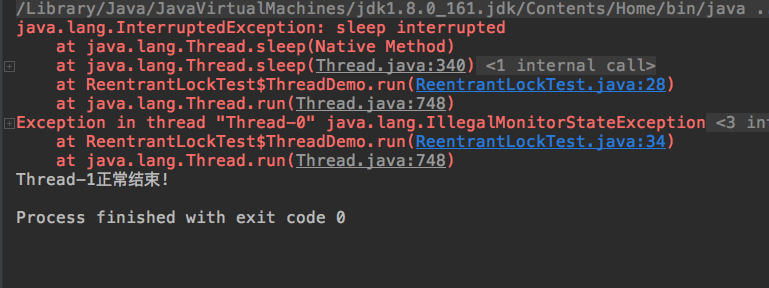
構造死鎖場景:建立兩個子執行緒,子執行緒在執行時會分別嘗試獲取兩把鎖。其中一個執行緒先獲取鎖1在獲取鎖2,另一個執行緒正好相反。如果沒有外界中斷,該程式將處於死鎖狀態永遠無法停止。我們通過使其中一個執行緒中斷,來結束執行緒間毫無意義的等待。被中斷的執行緒將丟擲異常,而另一個執行緒將能獲取鎖後正常結束。
3.3 獲取鎖時限時等待
ReentrantLock還給我們提供了獲取鎖限時等待的方法tryLock(),可以選擇傳入時間引數,表示等待指定的時間,無參則表示立即返回鎖申請的結果:true表示獲取鎖成功,false表示獲取鎖失敗。我們可以使用該方法配合失敗重試機制來更好的解決死鎖問題。
- 更好的解決死鎖的例子
public class ReentrantLockTest {
    static Lock lock1 = new ReentrantLock();
    static Lock lock2 = new ReentrantLock();
    public static void main(String[] args) throws InterruptedException {

        Thread thread = new Thread(new ThreadDemo(lock1, lock2));//該執行緒先獲取鎖1,再獲取鎖2
        Thread thread1 = new Thread(new ThreadDemo(lock2, lock1));//該執行緒先獲取鎖2,再獲取鎖1
        thread.start();
        thread1.start();
    }

    static class ThreadDemo implements Runnable {
        Lock firstLock;
        Lock secondLock;
        public ThreadDemo(Lock firstLock, Lock secondLock) {
            this.firstLock = firstLock;
            this.secondLock = secondLock;
        }
        @Override
        public void run() {
            try {
                while(!lock1.tryLock()){
                    TimeUnit.MILLISECONDS.sleep(10);
                }
                while(!lock2.tryLock()){
                    lock1.unlock();
                    TimeUnit.MILLISECONDS.sleep(10);
                }
            } catch (InterruptedException e) {
                e.printStackTrace();
            } finally {
                firstLock.unlock();
                secondLock.unlock();
                System.out.println(Thread.currentThread().getName()+"正常結束!");
            }
        }
    }
}- 結果

執行緒通過呼叫tryLock()方法獲取鎖,第一次獲取鎖失敗時會休眠10毫秒,然後重新獲取,直到獲取成功。第二次獲取失敗時,首先會釋放第一把鎖,再休眠10毫秒,然後重試直到成功為止。執行緒獲取第二把鎖失敗時將會釋放第一把鎖,這是解決死鎖問題的關鍵,避免了兩個執行緒分別持有一把鎖然後相互請求另一把鎖。
4. 結合Condition實現等待通知機制
使用synchronized結合Object上的wait和notify方法可以實現執行緒間的等待通知機制。ReentrantLock結合Condition介面同樣可以實現這個功能。而且相比前者使用起來更清晰也更簡單。
4.1 Condition使用簡介
Condition由ReentrantLock物件建立,並且可以同時建立多個
static Condition notEmpty = lock.newCondition();

static Condition notFull = lock.newCondition();
Condition介面在使用前必須先呼叫ReentrantLock的lock()方法獲得鎖。之後呼叫Condition介面的await()將釋放鎖,並且在該Condition上等待,直到有其他執行緒呼叫Condition的signal()方法喚醒執行緒。使用方式和wait,notify類似。
- 一個使用condition的簡單例子
public class ConditionTest {

    static ReentrantLock lock = new ReentrantLock();
    static Condition condition = lock.newCondition();
    public static void main(String[] args) throws InterruptedException {

        lock.lock();
        new Thread(new SignalThread()).start();
        System.out.println("主執行緒等待通知");
        try {
            condition.await();
        } finally {
            lock.unlock();
        }
        System.out.println("主執行緒恢復執行");
    }
    static class SignalThread implements Runnable {

        @Override
        public void run() {
            lock.lock();
            try {
                condition.signal();
                System.out.println("子執行緒通知");
            } finally {
                lock.unlock();
            }
        }
    }
}- 執行結果

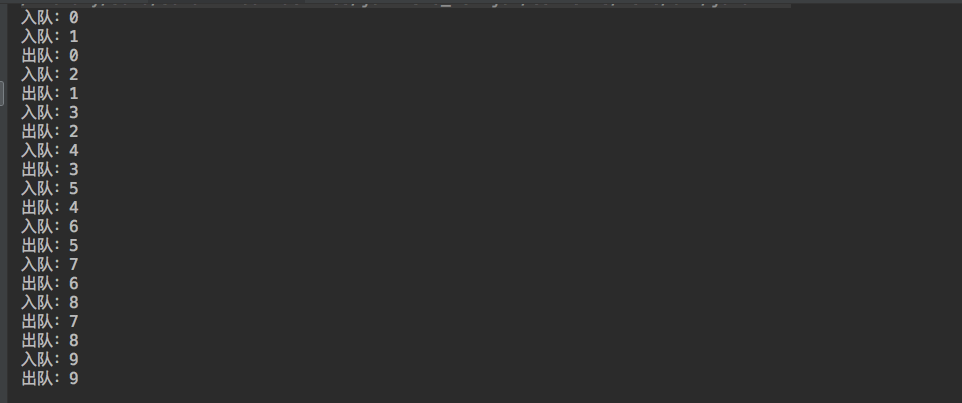
4.2 使用Condition實現簡單的阻塞佇列
阻塞佇列是一種特殊的先進先出佇列,它有以下幾個特點
1.入隊和出隊執行緒安全
2.當佇列滿時,入隊執行緒會被阻塞;當佇列為空時,出隊執行緒會被阻塞。
- 阻塞佇列的簡單實現
public class MyBlockingQueue<E> {

    int size;//阻塞佇列最大容量

    ReentrantLock lock = new ReentrantLock();

    LinkedList<E> list=new LinkedList<>();//佇列底層實現

    Condition notFull = lock.newCondition();//佇列滿時的等待條件
    Condition notEmpty = lock.newCondition();//佇列空時的等待條件

    public MyBlockingQueue(int size) {
        this.size = size;
    }

    public void enqueue(E e) throws InterruptedException {
        lock.lock();
        try {
            while (list.size() ==size)//佇列已滿,在notFull條件上等待
                notFull.await();
            list.add(e);//入隊:加入連結串列末尾
            System.out.println("入隊:" +e);
            notEmpty.signal(); //通知在notEmpty條件上等待的執行緒
        } finally {
            lock.unlock();
        }
    }

    public E dequeue() throws InterruptedException {
        E e;
        lock.lock();
        try {
            while (list.size() == 0)//佇列為空,在notEmpty條件上等待
                notEmpty.await();
            e = list.removeFirst();//出隊:移除連結串列首元素
            System.out.println("出隊:"+e);
            notFull.signal();//通知在notFull條件上等待的執行緒
            return e;
        } finally {
            lock.unlock();
        }
    }
}
- 測試程式碼
public static void main(String[] args) throws InterruptedException {

    MyBlockingQueue<Integer> queue = new MyBlockingQueue<>(2);
    for (int i = 0; i < 10; i++) {
        int data = i;
        new Thread(new Runnable() {
            @Override
            public void run() {
                try {
                    queue.enqueue(data);
                } catch (InterruptedException e) {

                }
            }
        }).start();

    }
    for(int i=0;i<10;i++){
        new Thread(new Runnable() {
            @Override
            public void run() {
                try {
                    Integer data = queue.dequeue();
                } catch (InterruptedException e) {
                    e.printStackTrace();
                }
            }
        }).start();
    }

}
- 執行結果

5. 總結
ReentrantLock是可重入的獨佔鎖。比起synchronized功能更加豐富,支援公平鎖實現,支援中斷響應以及限時等待等等。可以配合一個或多個Condition條件方便的實現等待通知機制。
1.3. Semaphore 1.3.1. 概述
共享鎖 執行多個執行緒同時臨界區
1.3.2. 主要介面
public void acquire()
public void acquireUninterruptibly()
public boolean tryAcquire()
public boolean tryAcquire(long timeout, TimeUnit unit) public void release()
import java.util.concurrent.ExecutorService;
import java.util.concurrent.Executors;
import java.util.concurrent.Semaphore;
/**
 * description:
 *
 * @author: dawn.he QQ:       905845006
 * @email: [email protected]
 * @email: [email protected]
 * @date: 2019/10/3    6:36 PM
 */
public class SemaphoreTest implements Runnable{
    private Semaphore semaphore = new Semaphore(5);// 同步關鍵類,構造方法傳入的數字是多少,則同一個時刻,只執行多少個程序同時執行制定程式碼

    public static void main(String args[]) {
        SemaphoreTest semp = new SemaphoreTest();
        ExecutorService exec = Executors.newFixedThreadPool(20);
        for(int i = 0;i<20;i++){
            exec.submit(semp);
        }
        exec.shutdown();
    }

    @Override
    public void run() {
        try {
            semaphore.acquire(); // 2 表示進入此程式碼,就會消耗2個通路,2個通路從6箇中扣除
            System.out.println(Thread.currentThread().getId() + ":doSomething start-" );
            Thread.sleep(2000);
            System.out.println(Thread.currentThread().getId() + ":doSomething end-" );
        } catch (InterruptedException e) {
            e.printStackTrace();
        } finally {
            semaphore.release(); // release 放到 finally 中
        }
    }

}
1.4. ReadWriteLock
1.4.1. 概述
ReadWriteLock是JDK5中提供的讀寫分離鎖
1.4.2. 訪問情況
讀-讀不互斥:讀讀之間不阻塞。
讀-寫互斥:讀阻塞寫,寫也會阻塞讀。
寫-寫互斥:寫寫阻塞。
1.4.3. 主要介面
private static ReentrantReadWriteLock readWriteLock=new ReentrantReadWriteLock();
private static Lock readLock = readWriteLock.readLock();
private static Lock writeLock = readWriteLock.writeLock();
Java併發包中ReadWriteLock是一個介面,主要有兩個方法,如下:
public interface ReadWriteLock {
    /**
     * Returns the lock used for reading.
     *
     * @return the lock used for reading
     */
    Lock readLock();

    /**
     * Returns the lock used for writing.
     *
     * @return the lock used for writing
     */
    Lock writeLock();
}
ReadWriteLock管理一組鎖,一個是隻讀的鎖,一個是寫鎖。
Java併發庫中ReetrantReadWriteLock實現了ReadWriteLock介面並添加了可重入的特性。
在具體講解ReetrantReadWriteLock的使用方法前,我們有必要先對其幾個特性進行一些深入學習瞭解。
1. ReetrantReadWriteLock特性說明
1.1 獲取鎖順序
- 非公平模式(預設)
當以非公平初始化時,讀鎖和寫鎖的獲取的順序是不確定的。非公平鎖主張競爭獲取,可能會延緩一個或多個讀或寫執行緒,但是會比公平鎖有更高的吞吐量。 - 公平模式
當以公平模式初始化時,執行緒將會以佇列的順序獲取鎖。噹噹前執行緒釋放鎖後,等待時間最長的寫鎖執行緒就會被分配寫鎖;或者有一組讀執行緒組等待時間比寫執行緒長,那麼這組讀執行緒組將會被分配讀鎖。
1.2 可重入
什麼是可重入鎖,不可重入鎖呢?"重入"字面意思已經很明顯了,就是可以重新進入。可重入鎖,就是說一個執行緒在獲取某個鎖後,還可以繼續獲取該鎖,即允許一個執行緒多次獲取同一個鎖。比如synchronized內建鎖就是可重入的,如果A類有2個synchornized方法method1和method2,那麼method1呼叫method2是允許的。顯然重入鎖給程式設計帶來了極大的方便。假如內建鎖不是可重入的,那麼導致的問題是:1個類的synchornized方法不能呼叫本類其他synchornized方法,也不能呼叫父類中的synchornized方法。與內建鎖對應,JDK提供的顯示鎖ReentrantLock也是可以重入的,這裡通過一個例子著重說下可重入鎖的釋放需要的事兒。
package test;

import java.util.concurrent.locks.ReentrantReadWriteLock;

public class Test1 {

    public static void main(String[] args) throws InterruptedException {
        final ReentrantReadWriteLock  lock = new ReentrantReadWriteLock ();
        Thread t = new Thread(new Runnable() {
            @Override
            public void run() {
                lock.writeLock().lock();
                System.out.println("Thread real execute");
                lock.writeLock().unlock();
            }
        });

        lock.writeLock().lock();
        lock.writeLock().lock();
        t.start();
        Thread.sleep(200);

        System.out.println("realse one once");
        lock.writeLock().unlock();
    }

}

執行結果.png
從執行結果中,可以看到,程式並未執行執行緒的run方法,由此我們可知,上面的程式碼會出現死鎖,因為主執行緒2次獲取了鎖,但是卻只釋放1次鎖,導致執行緒t永遠也不能獲取鎖。一個執行緒獲取多少次鎖,就必須釋放多少次鎖。這對於內建鎖也是適用的,每一次進入和離開synchornized方法(程式碼塊),就是一次完整的鎖獲取和釋放。

再次新增一次unlock之後的執行結果.png
1.3 鎖降級
要實現一個讀寫鎖,需要考慮很多細節,其中之一就是鎖升級和鎖降級的問題。什麼是升級和降級呢?ReadWriteLock的javadoc有一段話:
Can the write lock be downgraded to a read lock without allowing an intervening writer? Can a read lock be upgraded to a write lock, in preference to other waiting readers or writers?
翻譯過來的結果是:在不允許中間寫入的情況下,寫入鎖可以降級為讀鎖嗎?讀鎖是否可以升級為寫鎖,優先於其他等待的讀取或寫入操作?簡言之就是說,鎖降級:從寫鎖變成讀鎖;鎖升級:從讀鎖變成寫鎖,ReadWriteLock是否支援呢?讓我們帶著疑問,進行一些Demo 測試程式碼驗證。
Test Code 1
/**
 *Test Code 1
 **/
package test;

import java.util.concurrent.locks.ReentrantReadWriteLock;

public class Test1 {

    public static void main(String[] args) {
        ReentrantReadWriteLock rtLock = new ReentrantReadWriteLock();
        rtLock.readLock().lock();
        System.out.println("get readLock.");
        rtLock.writeLock().lock();
        System.out.println("blocking");
    }
}
Test Code 1 Result

TestCode1 Result.png
結論:上面的測試程式碼會產生死鎖,因為同一個執行緒中,在沒有釋放讀鎖的情況下,就去申請寫鎖,這屬於鎖升級,ReentrantReadWriteLock是不支援的。
Test Code 2
/**
 *Test Code 2
 **/
package test;

import java.util.concurrent.locks.ReentrantReadWriteLock;

public class Test2 {

    public static void main(String[] args) {
        ReentrantReadWriteLock rtLock = new ReentrantReadWriteLock();
        rtLock.writeLock().lock();
        System.out.println("writeLock");

        rtLock.readLock().lock();
        System.out.println("get read lock");
    }
}
Test Code 2 Result

TestCode2 Result.png
結論:ReentrantReadWriteLock支援鎖降級,上面程式碼不會產生死鎖。這段程式碼雖然不會導致死鎖,但沒有正確的釋放鎖。從寫鎖降級成讀鎖,並不會自動釋放當前執行緒獲取的寫鎖,仍然需要顯示的釋放,否則別的執行緒永遠也獲取不到寫鎖。
2. ReetrantReadWriteLock對比使用
2.1 Synchronized實現
在使用ReetrantReadWriteLock實現鎖機制前,我們先看一下,多執行緒同時讀取檔案時,用synchronized實現的效果
package test;

/**
 *
 * synchronized實現
 * @author itbird
 *
 */
public class ReadAndWriteLockTest {

    public synchronized static void get(Thread thread) {
        System.out.println("start time:" + System.currentTimeMillis());
        for (int i = 0; i < 5; i++) {
            try {
                Thread.sleep(20);
            } catch (InterruptedException e) {
                e.printStackTrace();
            }
            System.out.println(thread.getName() + ":正在進行讀操作……");
        }
        System.out.println(thread.getName() + ":讀操作完畢!");
        System.out.println("end time:" + System.currentTimeMillis());
    }

    public static void main(String[] args) {
        new Thread(new Runnable() {
            @Override
            public void run() {
                get(Thread.currentThread());
            }
        }).start();

        new Thread(new Runnable() {
            @Override
            public void run() {
                get(Thread.currentThread());
            }
        }).start();
    }

}
讓我們看一下執行結果:

synchronized實現的效果結果.png
從執行結果可以看出,兩個執行緒的讀操作是順序執行的,整個過程大概耗時200ms。
2.2 ReetrantReadWriteLock實現
package test;

import java.util.concurrent.locks.ReentrantReadWriteLock;

/**
 *
 * ReetrantReadWriteLock實現
 * @author itbird
 *
 */
public class ReadAndWriteLockTest {

    public static void get(Thread thread) {
        ReentrantReadWriteLock lock = new ReentrantReadWriteLock();
        lock.readLock().lock();
        System.out.println("start time:" + System.currentTimeMillis());
        for (int i = 0; i < 5; i++) {
            try {
                Thread.sleep(20);
            } catch (InterruptedException e) {
                e.printStackTrace();
            }
            System.out.println(thread.getName() + ":正在進行讀操作……");
        }
        System.out.println(thread.getName() + ":讀操作完畢!");
        System.out.println("end time:" + System.currentTimeMillis());
        lock.readLock().unlock();
    }

    public static void main(String[] args) {
        new Thread(new Runnable() {
            @Override
            public void run() {
                get(Thread.currentThread());
            }
        }).start();

        new Thread(new Runnable() {
            @Override
            public void run() {
                get(Thread.currentThread());
            }
        }).start();
    }

}
讓我們看一下執行結果:

ReetrantReadWriteLock實現.png
從執行結果可以看出,兩個執行緒的讀操作是同時執行的,整個過程大概耗時100ms。
通過兩次實驗的對比,我們可以看出來,ReetrantReadWriteLock的效率明顯高於Synchronized關鍵字。
3. ReetrantReadWriteLock讀寫鎖互斥關係
通過上面的測試程式碼,我們也可以延伸得出一個結論,ReetrantReadWriteLock讀鎖使用共享模式,即:同時可以有多個執行緒併發地讀資料。但是另一個問題來了,寫鎖之間是共享模式還是互斥模式?讀寫鎖之間是共享模式還是互斥模式呢?下面讓我們通過Demo進行一一驗證吧。
3.1 ReetrantReadWriteLock讀寫鎖關係
package test;

import java.util.concurrent.ExecutorService;
import java.util.concurrent.Executors;
import java.util.concurrent.locks.ReentrantReadWriteLock;

/**
 *
 * ReetrantReadWriteLock實現
 * @author itbird
 *
 */
public class ReadAndWriteLockTest {

    public static ReentrantReadWriteLock lock = new ReentrantReadWriteLock();

    public static void main(String[] args) {
        //同時讀、寫
        ExecutorService service = Executors.newCachedThreadPool();
        service.execute(new Runnable() {
            @Override
            public void run() {
                readFile(Thread.currentThread());
            }
        });
        service.execute(new Runnable() {
            @Override
            public void run() {
                writeFile(Thread.currentThread());
            }
        });
    }

    // 讀操作
    public static void readFile(Thread thread) {
        lock.readLock().lock();
        boolean readLock = lock.isWriteLocked();
        if (!readLock) {
            System.out.println("當前為讀鎖!");
        }
        try {
            for (int i = 0; i < 5; i++) {
                try {
                    Thread.sleep(20);
                } catch (InterruptedException e) {
                    e.printStackTrace();
                }
                System.out.println(thread.getName() + ":正在進行讀操作……");
            }
            System.out.println(thread.getName() + ":讀操作完畢!");
        } finally {
            System.out.println("釋放讀鎖!");
            lock.readLock().unlock();
        }
    }

    // 寫操作
    public static void writeFile(Thread thread) {
        lock.writeLock().lock();
        boolean writeLock = lock.isWriteLocked();
        if (writeLock) {
            System.out.println("當前為寫鎖!");
        }
        try {
            for (int i = 0; i < 5; i++) {
                try {
                    Thread.sleep(20);
                } catch (InterruptedException e) {
                    e.printStackTrace();
                }
                System.out.println(thread.getName() + ":正在進行寫操作……");
            }
            System.out.println(thread.getName() + ":寫操作完畢!");
        } finally {
            System.out.println("釋放寫鎖!");
            lock.writeLock().unlock();
        }
    }
}
執行結果:

執行結果.png
結論:讀寫鎖的實現必須確保寫操作對讀操作的記憶體影響。換句話說,一個獲得了讀鎖的執行緒必須能看到前一個釋放的寫鎖所更新的內容,讀寫鎖之間為互斥。
3.2 ReetrantReadWriteLock寫鎖關係
package test;

import java.util.concurrent.ExecutorService;
import java.util.concurrent.Executors;
import java.util.concurrent.locks.ReentrantReadWriteLock;

/**
 *
 * ReetrantReadWriteLock實現
 * @author itbird
 *
 */
public class ReadAndWriteLockTest {

    public static ReentrantReadWriteLock lock = new ReentrantReadWriteLock();

    public static void main(String[] args) {
        //同時寫
        ExecutorService service = Executors.newCachedThreadPool();
        service.execute(new Runnable() {
            @Override
            public void run() {
                writeFile(Thread.currentThread());
            }
        });
        service.execute(new Runnable() {
            @Override
            public void run() {
                writeFile(Thread.currentThread());
            }
        });
    }

    // 讀操作
    public static void readFile(Thread thread) {
        lock.readLock().lock();
        boolean readLock = lock.isWriteLocked();
        if (!readLock) {
            System.out.println("當前為讀鎖!");
        }
        try {
            for (int i = 0; i < 5; i++) {
                try {
                    Thread.sleep(20);
                } catch (InterruptedException e) {
                    e.printStackTrace();
                }
                System.out.println(thread.getName() + ":正在進行讀操作……");
            }
            System.out.println(thread.getName() + ":讀操作完畢!");
        } finally {
            System.out.println("釋放讀鎖!");
            lock.readLock().unlock();
        }
    }

    // 寫操作
    public static void writeFile(Thread thread) {
        lock.writeLock().lock();
        boolean writeLock = lock.isWriteLocked();
        if (writeLock) {
            System.out.println("當前為寫鎖!");
        }
        try {
            for (int i = 0; i < 5; i++) {
                try {
                    Thread.sleep(20);
                } catch (InterruptedException e) {
                    e.printStackTrace();
                }
                System.out.println(thread.getName() + ":正在進行寫操作……");
            }
            System.out.println(thread.getName() + ":寫操作完畢!");
        } finally {
            System.out.println("釋放寫鎖!");
            lock.writeLock().unlock();
        }
    }
}
執行結果:

執行結果.png
4. 總結
1.Java併發庫中ReetrantReadWriteLock實現了ReadWriteLock介面並添加了可重入的特性
2.ReetrantReadWriteLock讀寫鎖的效率明顯高於synchronized關鍵字
3.ReetrantReadWriteLock讀寫鎖的實現中,讀鎖使用共享模式;寫鎖使用獨佔模式,換句話說,讀鎖可以在沒有寫鎖的時候被多個執行緒同時持有,寫鎖是獨佔的
4.ReetrantReadWriteLock讀寫鎖的實現中,需要注意的,當有讀鎖時,寫鎖就不能獲得;而當有寫鎖時,除了獲得寫鎖的這個執行緒可以獲得讀鎖外,其他執行緒不能獲得讀鎖
1.5. CountDownLatch
1.5.1. 概述
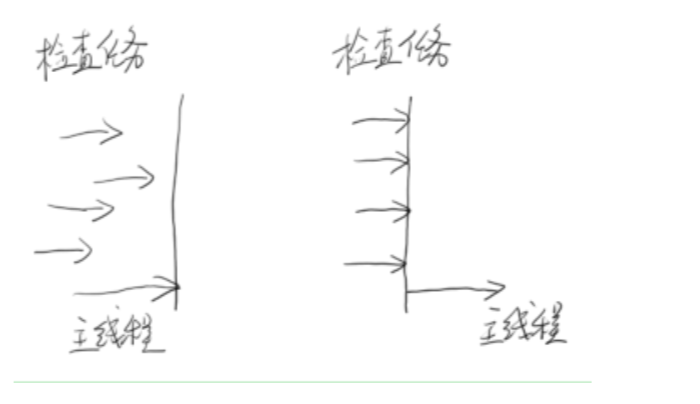
倒數計時器 一種典型的場景就是火箭發射。在火箭發射前,為了保證萬無一失,往往還要進行各項裝置、儀器的檢查。 只有等所有檢查完畢後,引擎才能點火。這種場景就非常適合使用CountDownLatch。它可以使得點火執行緒 ,等待所有檢查執行緒全部完工後,再執行
1.5.2. 主要介面
static final CountDownLatch end = new CountDownLatch(10);
end.countDown();
end.await();
1.5.3 示意圖

import java.util.Random;
import java.util.concurrent.CountDownLatch;
import java.util.concurrent.ExecutorService;
import java.util.concurrent.Executors;

/**
 * description:
 *
 * @author: dawn.he QQ:       905845006
 * @email: [email protected]
 * @email: [email protected]
 * @date: 2019/10/2    5:45 PM
 */
public class CountDownLatchDemo implements  Runnable {
    static  final CountDownLatch end  = new CountDownLatch(10);
    static  final CountDownLatchDemo demo = new CountDownLatchDemo();
    @Override
    public void run() {

        try {
            //模擬檢查任務
            Thread.sleep(new Random().nextInt(10)*1000);
            System.out.println("check cpmplete");
            end.countDown();
        } catch (InterruptedException e) {
            e.printStackTrace();
        }
    }

    public static void main(String[] args) throws InterruptedException {
        ExecutorService exec = Executors.newFixedThreadPool(10);
        for(int i = 0;i<10;i++){
            exec.submit(demo);
        }
        //等待檢查
        end.await();
        //發射火箭
        System.out.println("Fire!");
        exec.shutdown();
    }
}
1.6. CyclicBarrier
1.6.1. 概述
迴圈柵欄 Cyclic意為迴圈,也就是說這個計數器可以反覆使用。比如,假設我們將計數器設定為10。那麼湊齊第一批1 0個執行緒後,計數器就會歸零,然後接著湊齊下一批10個執行緒
1.6.2. 主要介面
public CyclicBarrier(int parties, Runnable barrierAction)
barrierAction就是當計數器一次計數完成後,系統會執行的動作 await()
1.6.3. 示意圖

import java.util.concurrent.CyclicBarrier;

/**
 * description:
 *
 * @author: dawn.he QQ:       905845006
 * @email: [email protected]
 * @email: [email protected]
 * @date: 2019/10/3    9:14 PM
 */
public class CyclicBarrierDemo {

    static class TaskThread extends Thread {

        CyclicBarrier barrier;

        public TaskThread(CyclicBarrier barrier) {
            this.barrier = barrier;
        }

        @Override
        public void run() {
            try {
                Thread.sleep(1000);
                System.out.println(getName() + " 到達柵欄 A");
                barrier.await();
                System.out.println(getName() + " 衝破柵欄 A");

                Thread.sleep(2000);
                System.out.println(getName() + " 到達柵欄 B");
                barrier.await();
                System.out.println(getName() + " 衝破柵欄 B");
            } catch (Exception e) {
                e.printStackTrace();
            }
        }
    }

    public static void main(String[] args) {
        int threadNum = 5;
        CyclicBarrier barrier = new CyclicBarrier(threadNum, new Runnable() {

            @Override
            public void run() {
                System.out.println(Thread.currentThread().getName() + " 完成最後任務");
            }
        });

        for(int i = 0; i < threadNum; i++) {
            new TaskThread(barrier).start();
        }
    }

}
Thread-3 到達柵欄 A
Thread-1 到達柵欄 A
Thread-4 到達柵欄 A
Thread-0 到達柵欄 A
Thread-2 到達柵欄 A
Thread-2 完成最後任務
Thread-2 衝破柵欄 A
Thread-1 衝破柵欄 A
Thread-3 衝破柵欄 A
Thread-0 衝破柵欄 A
Thread-4 衝破柵欄 A
Thread-2 到達柵欄 B
Thread-3 到達柵欄 B
Thread-4 到達柵欄 B
Thread-1 到達柵欄 B
Thread-0 到達柵欄 B
Thread-0 完成最後任務
Thread-0 衝破柵欄 B
Thread-2 衝破柵欄 B
Thread-1 衝破柵欄 B
Thread-4 衝破柵欄 B
Thread-3 衝破柵欄 B
1.7. LockSupport 1.7.1. 概述
提供執行緒阻塞原語 1.7.2. 主要介面
LockSupport.park(); LockSupport.unpark(t1);
1.7.3. 與suspend()比較 不容易引起執行緒凍結
1.7.4. 中斷響應 能夠響應中斷,但不丟擲異常。
中斷響應的結果是,park()函式的返回,可以從Thread.interrupted()得到中斷標誌
import java.util.concurrent.locks.LockSupport;

/**
 * description:
 *
 * @author: dawn.he QQ:       905845006
 * @email: [email protected]
 * @email: [email protected]
 * @date: 2019/10/3    9:36 PM
 */
public class ThreadParkTest {
    public static void main(String[] args) {
        MyThread mt = new MyThread();
        mt.setName("mt");
        mt.start();
        try {
            Thread.currentThread().sleep(10);
            mt.park();
            Thread.currentThread().sleep(10000);
            mt.unPark();
            Thread.currentThread().sleep(10000);
            mt.park();
        } catch (InterruptedException e) {
            e.printStackTrace();
        }
    }

    static class MyThread extends Thread {
        private boolean isPark = false;

        public void run() {
            System.out.println(" Enter Thread running.....");
            while (true) {
                if (isPark) {
                    System.out.println(Thread.currentThread().getName() + "Thread is Park.....");
                    LockSupport.park();
                }                //do something
                System.out.println(Thread.currentThread().getName() + ">> is running");
                try {
                    Thread.currentThread().sleep(1000);
                } catch (InterruptedException e) {                    // TODO Auto-generated catch block
                    e.printStackTrace();
                }
            }
        }

        public void park() {
            isPark = true;
        }

        public void unPark() {
            isPark = false;
            LockSupport.unpark(this);
            System.out.println("Thread is unpark.....");
        }
    }
}
2.3. BlockingQueue
阻塞佇列

1:BlockingQueue繼承關係
java.util.concurrent 包裡的 BlockingQueue是一個介面, 繼承Queue介面,Queue介面繼承 Collection
BlockingQueue----->Queue-->Collection
圖:

佇列的特點是:先進先出(FIFO)
2:BlockingQueue的方法
BlockingQueue 具有 4 組不同的方法用於插入、移除以及對佇列中的元素進行檢查。如果請求的操作不能得到立即執行的話,每個方法的表現也不同。這些方法如下:
| 丟擲異常 | 特殊值 | 阻塞 | 超時 | |
| 插入 | add(e) |
offer(e) |
put(e) |
offer(e, time, unit) |
| 移除 | remove() |
poll() |
take() |
poll(time, unit) |
| 檢查 | element() |
peek() |
不可用 | 不可用 |
四組不同的行為方式解釋:
1(異常)
如果試圖的操作無法立即執行,拋一個異常。
2(特定值)
如果試圖的操作無法立即執行,返回一個特定的值(常常是 true / false)。
3(阻塞)
如果試圖的操作無法立即執行,該方法呼叫將會發生阻塞,直到能夠執行。
4(超時)
如果試圖的操作無法立即執行,該方法呼叫將會發生阻塞,直到能夠執行,但等待時間不會超過給定值。返回一個特定值以告知該操作是否成功(典型的是 true / false)。
不能向BlockingQueue插入一個空物件,否則會丟擲NullPointerException,相應的實現類校驗程式碼
-
private static void checkNotNull(Object v) { -
if (v == null) -
throw new NullPointerException(); -
}
BlockingQueue :不接受 null 元素。試圖 add、put 或 offer 一個 null 元素時,某些實現會丟擲 NullPointerException。null 被用作指示 poll 操作失敗的警戒值。
BlockingQueue: 可以是限定容量的。它在任意給定時間都可以有一個 remainingCapacity,超出此容量,便無法無阻塞地 put 附加元素。沒有任何內部容量約束的 BlockingQueue 總是報告Integer.MAX_VALUE 的剩餘容量。
BlockingQueue :實現主要用於生產者-使用者佇列,但它另外還支援 Collection 介面。因此,舉例來說,使用 remove(x) 從佇列中移除任意一個元素是有可能的。然而,這種操作通常不 會有效執行,只能有計劃地偶爾使用,比如在取消排隊資訊時。
BlockingQueue :實現是執行緒安全的。所有排隊方法都可以使用內部鎖或其他形式的併發控制來自動達到它們的目的。然而,大量的 Collection 操作(addAll、containsAll、retainAll 和removeAll)沒有 必要自動執行,除非在實現中特別說明。因此,舉例來說,在只添加了 c 中的一些元素後,addAll(c) 有可能失敗(丟擲一個異常)。
BlockingQueue 實質上不 支援使用任何一種“close”或“shutdown”操作來指示不再新增任何項。這種功能的需求和使用有依賴於實現的傾向。例如,一種常用的策略是:對於生產者,插入特殊的 end-of-stream 或 poison 物件,並根據使用者獲取這些物件的時間來對它們進行解釋。

3:BlockingQueue實現類和繼承介面
ArrayBlockingQueue
DelayQueue
LinkedBlockingQueue
PriorityBlockingQueue
SynchronousQueue
繼承他的介面:
public interface BlockingDeque extends BlockingQueue, Deque 1.6新增
public interface TransferQueue extends BlockingQueue 1.7新增
4:BlockingQueue用法
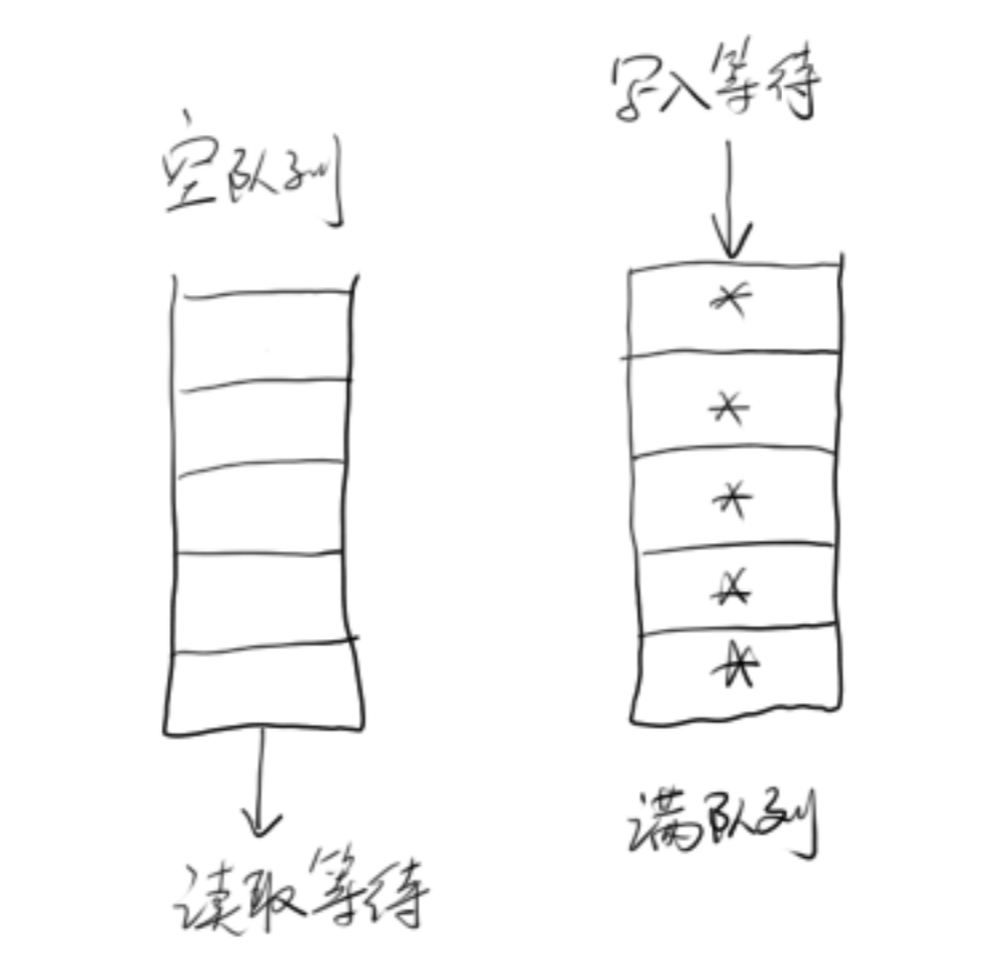
BlockingQueue 通常用於一個執行緒生產物件,而另外一個執行緒消費這些物件的場景。下圖是對這個原理的闡述:

一個執行緒往裡邊放,另外一個執行緒從裡邊取的一個 BlockingQueue。
一個執行緒將會持續生產新物件並將其插入到佇列之中,直到佇列達到它所能容納的臨界點。也就是說,它是有限的。如果該阻塞佇列到達了其臨界點,負責生產的執行緒將會在往裡邊插入新物件時發生阻塞。它會一直處於阻塞之中,直到負責消費的執行緒從佇列中拿走一個物件。
負責消費的執行緒將會一直從該阻塞佇列中拿出物件。如果消費執行緒嘗試去從一個空的佇列中提取物件的話,這個消費執行緒將會處於阻塞之中,直到一個生產執行緒把一個物件丟進佇列。
5:BlockingQueue Example
public class BlockingQueueExample {

    public static void main(String[] args) throws Exception {

        BlockingQueue queue = new ArrayBlockingQueue(1024);

        Producer producer = new Producer(queue);
        Consumer consumer = new Consumer(queue);

        new Thread(producer).start();
        new Thread(consumer).start();

        Thread.sleep(4000);
    }
}
public class Producer implements Runnable{

    protected BlockingQueue queue = null;

    public Producer(BlockingQueue queue) {
        this.queue = queue;
    }

    public void run() {
        try {
            queue.put("1");
            Thread.sleep(1000);
            queue.put("2");
            Thread.sleep(1000);
            queue.put("3");
        } catch (InterruptedException e) {
            e.printStackTrace();
        }
    }
}
public class Consumer implements Runnable{

    protected BlockingQueue queue = null;

    public Consumer(BlockingQueue queue) {
        this.queue = queue;
    }

    public void run() {
        try {
            System.out.println(queue.take());
            System.out.println(queue.take());
            System.out.println(queue.take());
        } catch (InterruptedException e) {
            e.printStackTrace();
        }
    }
}
6:BlockingQueue實現類詳解
1 陣列阻塞佇列 ArrayBlockingQueue
一個由陣列支援的有界阻塞佇列。此佇列按 FIFO(先進先出)原則對元素進行排序。佇列的頭部 是在佇列中存在時間最長的元素。佇列的尾部 是在佇列中存在時間最短的元素。新元素插入到佇列的尾部,佇列獲取操作則是從佇列頭部開始獲得元素。
這是一個典型的“有界快取區”,固定大小的陣列在其中保持生產者插入的元素和使用者提取的元素。一旦建立了這樣的快取區,就不能再增加其容量。試圖向已滿佇列中放入元素會導致操作受阻塞;試圖從空佇列中提取元素將導致類似阻塞。
此類支援對等待的生產者執行緒和使用者執行緒進行排序的可選公平策略。預設情況下,不保證是這種排序。然而,通過將公平性 (fairness) 設定為 true 而構造的佇列允許按照 FIFO 順序訪問執行緒。公平性通常會降低吞吐量,但也減少了可變性和避免了“不平衡性”
-
BlockingQueue queue = new ArrayBlockingQueue(1024); -
queue.put("1");String string = queue.take();
2:延遲佇列DelayQueue
Delayed 元素的一個無界阻塞佇列,只有在延遲期滿時才能從中提取元素。該佇列的頭部 是延遲期滿後儲存時間最長的 Delayed 元素。如果延遲都還沒有期滿,則佇列沒有頭部,並且 poll 將返回 null。當一個元素的 getDelay(TimeUnit.NANOSECONDS) 方法返回一個小於等於 0 的值時,將發生到期。即使無法使用 take 或 poll 移除未到期的元素,也不會將這些元素作為正常元素對待。例如,size 方法同時返回到期和未到期元素的計數。此佇列不允許使用 null 元素
3. 鏈阻塞佇列 LinkedBlockingQueue
LinkedBlockingQueue 類實現了 BlockingQueue 介面。
LinkedBlockingQueue 內部以一個鏈式結構(連結節點)對其元素進行儲存。如果需要的話,這一鏈式結構可以選擇一個上限。如果沒有定義上限,將使用 Integer.MAX_VALUE 作為上限。
LinkedBlockingQueue 內部以 FIFO(先進先出)的順序對元素進行儲存。佇列中的頭元素在所有元素之中是放入時間最久的那個,而尾元素則是最短的那個。
-
BlockingQueue unbounded = new LinkedBlockingQueue(); -
BlockingQueue bounded = new LinkedBlockingQueue(1024);bounded.put("Value");
