
Springboot 系列(十五)如何編寫自己的 Springboot starter

1. 前言
Springboot 中的自動配置確實方便,減少了我們開發上的複雜性,那麼自動配置原理是什麼呢?之前我也寫過了一篇文章進行了分析。
Springboot 系列(三)Spring Boot 自動配置。
由於自動配置用到了配置檔案的繫結,如果你還不知道常見的配置檔案的用法,可以參考這篇文章。
Springboot 系列(二)Spring Boot 配置檔案。
在這一次,通過學習 Springboot 自動配置模式,編寫一個自己的 starter,用來加深對自動配置的理解。
熟悉模式,有助於提升編寫的 starter 的規範性,編寫自己的 starter 之前先來學習 Springboot
starter 以及常見框架的整合 starter 的編寫方式 ,可以領略到其中的奧祕。
2. Springboot 官方模式
選擇一個官方的自動配置進行分析,這裡就選擇常見的配置埠號配置。
2.1. 引入依賴
使用埠號之前我們需要先引入 web 依賴。
<dependency>
    <groupId>org.springframework.boot</groupId>
    <artifactId>spring-boot-starter-web</artifactId>
</dependency>
如果你觀察 starter
Springboot 官方的 starter的名字都是 spring-boot-starter-xxxx命名的。
檢視 spring-boot-starter-web 會發現,其實這個依賴只是一個空盒子,除了依賴其他 pom 之外,沒有一行程式碼。

這時,發現了另外一個模式:starter 只依賴其他 pom,不做程式碼實現。
那麼 spring-boot-starter-web 到底依賴了哪些內容?
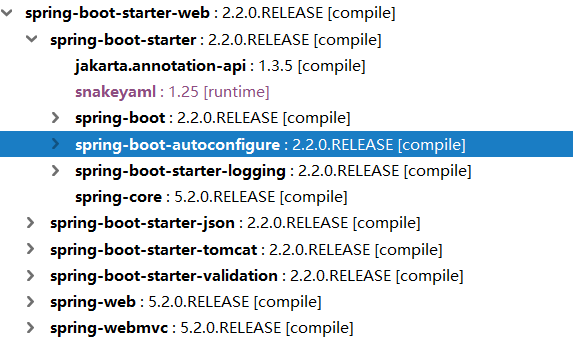
觀察這個依賴資訊,然後再參照其他的官方 starter ,可以找到幾個固定的引入,可以被稱之為模式的依賴引入。
- 依賴
spring-boot-starter。 - 依賴
spring-boot-autoconfigure。
2.2. 自動配置
引入依賴只有配置埠號,像這樣。
server.port=8090IDEA 中可以通過點選 server.port 找到這個配置繫結的類檔案。可以看到配置最終會注入到類ServerProperties 類的 port 屬性上。

那麼這個 ServerProperties 到底是哪裡使用的呢?繼續查詢,找到一個和 Servlet 的有關的呼叫。

發現是被 ServletWebServerFactoryCustomizer類進行了呼叫,這個類裡面定義了
private final ServerProperties serverProperties;用來使用配置的屬性。
繼續檢視這個類的呼叫,發現只有一個類使用這個類,這個類是ServletWebServerFactoryAutoConfiguration。
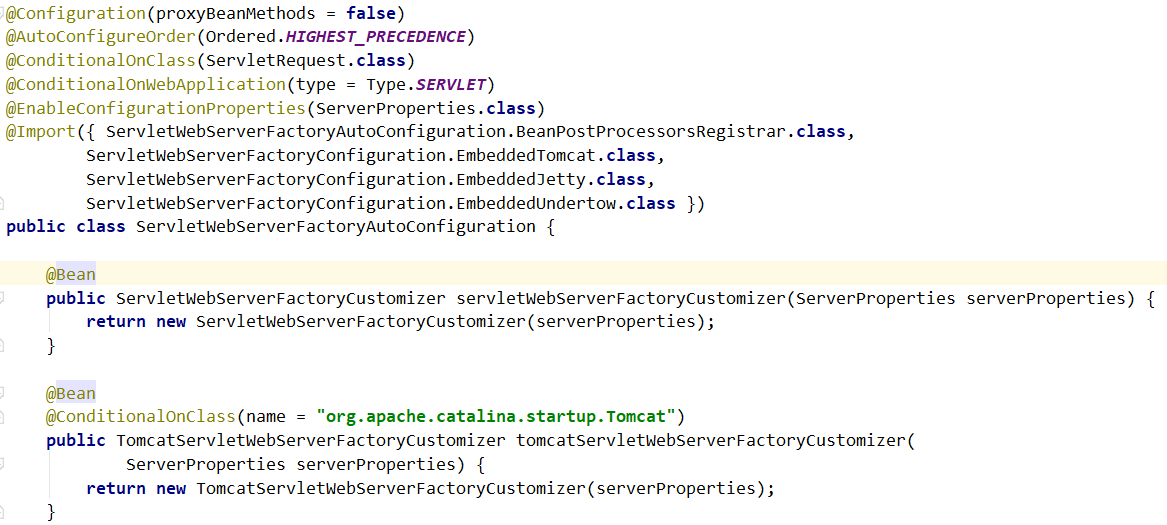
根據我們對註解的理解,這個類就是自動配置主要類了。同時自動配置類都是以 AutoConfiguration 結尾。
看這個類的幾個註解的意思。
- 優先級別較高。
@AutoConfigureOrder(Ordered.HIGHEST_PRECEDENCE)- 只有在
ServletRequest類存在和是 Web 應用時生效。
@ConditionalOnClass(ServletRequest.class)
@ConditionalOnWebApplication(type = Type.SERVLET)- 開啟了
ServerProperties的配置繫結。
@EnableConfigurationProperties(ServerProperties.class)- 匯入了幾個類。
@Import({ ServletWebServerFactoryAutoConfiguration.BeanPostProcessorsRegistrar.class,
        ServletWebServerFactoryConfiguration.EmbeddedTomcat.class,
        ServletWebServerFactoryConfiguration.EmbeddedJetty.class,
        ServletWebServerFactoryConfiguration.EmbeddedUndertow.class })
同時注入配置到 Bean 工廠以供其他地方呼叫。
@Bean
public ServletWebServerFactoryCustomizer servletWebServerFactoryCustomizer(ServerProperties serverProperties) {
return new ServletWebServerFactoryCustomizer(serverProperties);
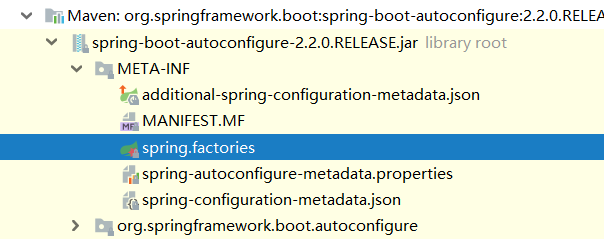
}自動配置僅僅是這些東西嗎?根據之前文章裡的分析,我們知道不止程式碼,至少還有一個指定自動配置類的配置檔案需要讀取。也就是 spring.factories 檔案。
如果你不知道,可以先看這篇文章。Springboot 系列(三)Spring Boot 自動配置 。
事實確實如此,可以在 spring.factories 中找到上面跟蹤到的類。
也就是 ServletWebServerFactoryAutoConfiguration.
根據上面的分析,可以發現 Springboot 官方 starter 的幾個模式。
- 使用
XXXProperties自動繫結XXX開頭的配置資訊,如:ServerProperties。 - 把
XXXProperties定義到要使用的類中,如:ServletWebServerFactoryCustomizer。 - 編寫一個
XXXAutoConfiguration,開啟XXXProperties的自動配置,限定生效場景,建立需要的類到Bean工廠。如:ServletWebServerFactoryAutoConfiguration。
3. 第三方整合模式
Springboot 官方如果把所有的框架都編寫成 starter,是不現實的。因此很多第三方框架需要主動整合到 springboot,所以我們選擇一個常用的框架分析它的 starter 實現。因為已經看過了 springboot 官方 starter 是如何配置的, 第三方框架也是類似,所以在下面觀察的過程中會直接指出相同點,而不再做對比詳細對比。
這裡選擇 mybatis-spring-boot-starter 進行學習分析。
3.1 引入依賴
<dependency>
    <groupId>org.mybatis.spring.boot</groupId>
    <artifactId>mybatis-spring-boot-starter</artifactId>
    <version>1.3.2</version>
</dependency>
這裡 mybatis 框架的 starter 依賴符合一定的規則,即 xxx-spring-boot-starter.
觀察這個 starter,發現它也沒有做任何的程式碼實現,這一點和 springboot 官方一致。

檢視 mybatis-spring-boot-starter 的依賴項,有很多,其中和自動配置有關的主要是。
<dependency>
    <groupId>org.mybatis.spring.boot</groupId>
    <artifactId>mybatis-spring-boot-autoconfigure</artifactId>
</dependency>
3.2 自動配置
檢視 mybatis-spring-boot-autoconfigure 的內容發現和 springboot 官方的 autoconfigure結構上是差不多的。
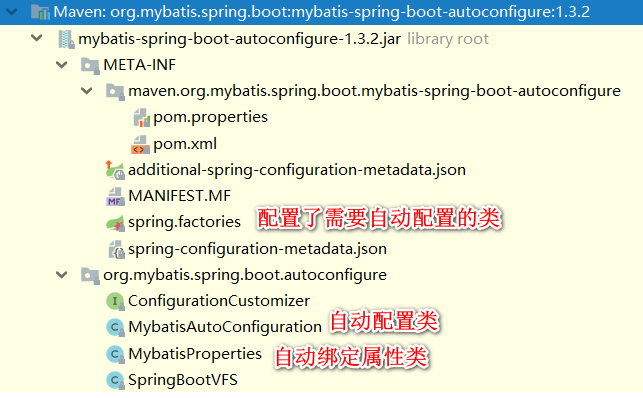
mybatis 的自動配置也是通過 spring.factories 來指明自動配置,然後通過 XxxAutoConfiguration 繫結 XxxProperties 來進行自動配置.
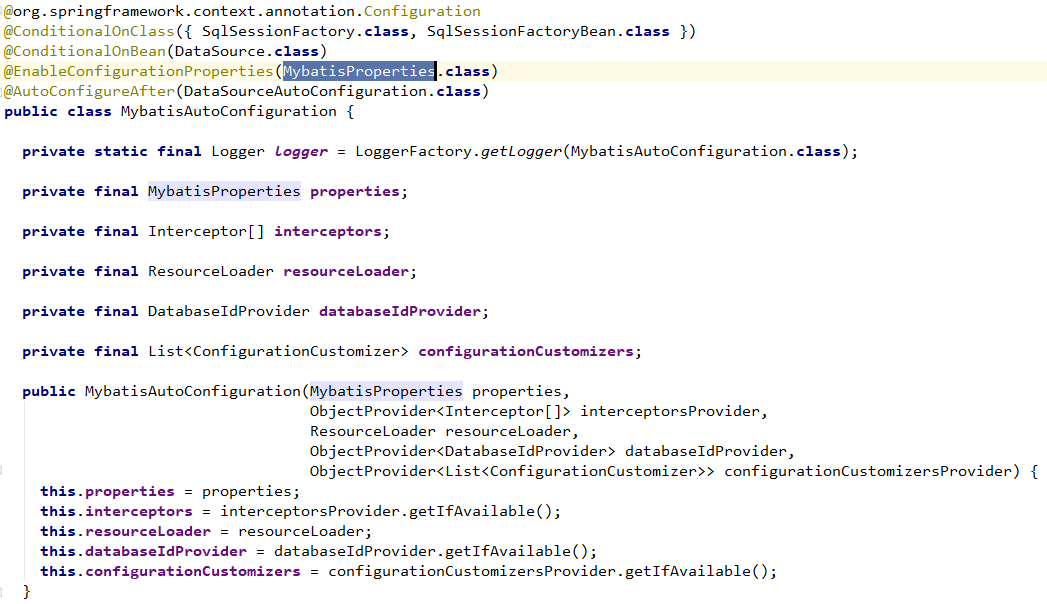
在原理上,和上面 springboot 官方的 starter是相同的,所以不做過多的介紹了。
4. 編寫自己的 starter
說了那麼多,終於到了實操環節,通過上面的介紹,我們可以大致得出編寫自己的 starter步驟。
- 建立名字為
xxx-spring-boot-starter的啟動器專案。 - 建立名字為
xxx-spring-boot-autoconfigure的專案。- 編寫屬性繫結類
xxxProperties. - 編寫服務類,引入
xxxProperties. - 編寫自動配置類
XXXAutoConfiguration注入配置。 - 建立
spring.factories檔案,用於指定要自動配置的類。
- 編寫屬性繫結類
- 啟動器專案為空專案,用來引入
xxx-spring-boot-autoconfigure等其他依賴。 - 專案引入
starter,配置需要配置的資訊。
4.1 建立啟動器專案
由於啟動器不需要程式碼實現,只需要依賴其他專案,所以直接建立一個空的 maven 專案。但是名字要規範。
這裡建立的 starter 是 myapp-spring-boot-starter。

pom 檔案非常簡單,只需要引入接下來要建立的 myapp-spring-boot-autoconfigure.
<?xml version="1.0" encoding="UTF-8"?>
<project xmlns="http://maven.apache.org/POM/4.0.0"
         xmlns:xsi="http://www.w3.org/2001/XMLSchema-instance"
         xsi:schemaLocation="http://maven.apache.org/POM/4.0.0 http://maven.apache.org/xsd/maven-4.0.0.xsd">
    <modelVersion>4.0.0</modelVersion>

    <groupId>net.codingme.starter</groupId>
    <artifactId>myapp-spring-boot-starter</artifactId>
    <version>1.0-SNAPSHOT</version>
    <!-- 啟動器 -->
    <dependencies>
        <!--  引入自動配置專案 -->
        <dependency>
            <groupId>net.codingme.starter</groupId>
            <artifactId>myapp-spring-boot-autoconfigure</artifactId>
            <version>0.0.1-SNAPSHOT</version>
        </dependency>
    </dependencies>
</project>
4.2 建立自動配置專案
結合上面對 starter 的分析,直接建立一個名字為 myapp-spring-boot-autoconfigure 的專案。專案中只引入 springboot 父專案以及 spring-boot-starter。
<?xml version="1.0" encoding="UTF-8"?>
<project xmlns="http://maven.apache.org/POM/4.0.0" xmlns:xsi="http://www.w3.org/2001/XMLSchema-instance"
         xsi:schemaLocation="http://maven.apache.org/POM/4.0.0 https://maven.apache.org/xsd/maven-4.0.0.xsd">
    <modelVersion>4.0.0</modelVersion>
    <parent>
        <groupId>org.springframework.boot</groupId>
        <artifactId>spring-boot-starter-parent</artifactId>
        <version>2.2.0.RELEASE</version>
        <relativePath/> <!-- lookup parent from repository -->
    </parent>
    <groupId>net.codingme.starter</groupId>
    <artifactId>myapp-spring-boot-autoconfigure</artifactId>
    <version>0.0.1-SNAPSHOT</version>
    <name>myapp-spring-boot-autoconfigure</name>
    <description>Demo project for Spring Boot</description>
    <properties>
        <java.version>1.8</java.version>
    </properties>

    <dependencies>
        <dependency>
            <groupId>org.springframework.boot</groupId>
            <artifactId>spring-boot-starter</artifactId>
        </dependency>
    </dependencies>
</project>
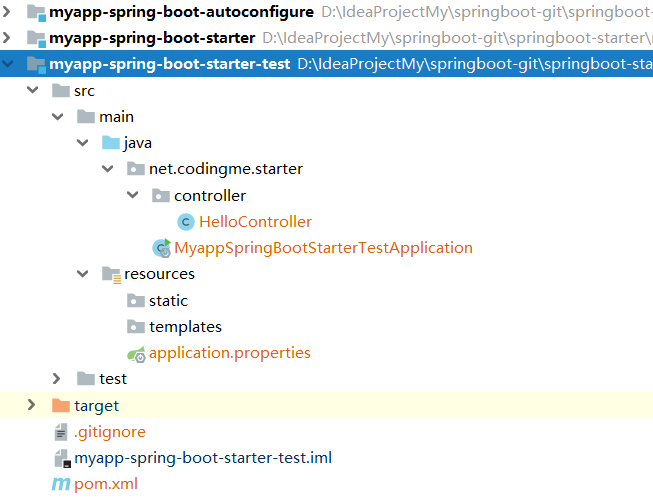
專案的總體結構看圖。

在 HelloProperties中通過註解 @ConfigurationProperties(prefix = "myapp.hello")讓類中的屬性與 myapp.hello開頭的配置進行繫結。
/**
 * <p>
 *
 * @Author niujinpeng
 * @Date 2019/10/29 23:51
 */
@ConfigurationProperties(prefix = "myapp.hello")
public class HelloProperties {

    private String suffix;

    public String getSuffix() {
        return suffix;
    }

    public void setSuffix(String suffix) {
        this.suffix = suffix;
    }
}
然後在 HelloService中的 sayHello方法使用 HelloProperties 中自動繫結的值。
public class HelloService {
    HelloProperties helloProperties;

    public String sayHello(String name) {
        return "Hello " + name + "," + helloProperties.getSuffix();
    }

    public HelloProperties getHelloProperties() {
        return helloProperties;
    }

    public void setHelloProperties(HelloProperties helloProperties) {
        this.helloProperties = helloProperties;
    }
}
為了讓 HelloService 可以自動注入且能正常使用 HelloProperties,所以我們在
HelloServiceAutoConfiguration 類中把 HelloProperties.class 引入,然後把 HelloService 注入到 Bean。
/**
 * web應用才生效
 */
@ConditionalOnWebApplication
/**
 * 讓屬性檔案生效
 */
@EnableConfigurationProperties(HelloProperties.class)
/***
 * 宣告是一個配置類
 */
@Configuration
public class HelloServiceAutoConfiguration {

    @Autowired
    private HelloProperties helloProperties;

    @Bean
    public HelloService helloService() {
        HelloService helloService = new HelloService();
        helloService.setHelloProperties(helloProperties);
        return helloService;
    }
}
最後在 spring.factories中只需要指定要自動配置的類即可。
# Auto Configure
org.springframework.boot.autoconfigure.EnableAutoConfiguration=\
net.codingme.starter.HelloServiceAutoConfiguration
到這裡,自動配置專案就完成了。可以在 myapp-spring-boot-autoconfigure專案執行 mvn install 把自動配置專案打包到本地倉庫,然後使用相同的命令把 myapp-spring-boot-starter 安裝到倉庫。因為後者依賴於前者專案,所以這裡前者需要先進 mvn install。
4.3 使用自定義的啟動器
建立一個 springboot專案myapp-spring-boot-starter-test。
引入 web 依賴,引入自己編寫的 myapp-spring-boot-starter.
<dependency>
    <groupId>org.springframework.boot</groupId>
    <artifactId>spring-boot-starter-web</artifactId>
</dependency>

<!-- 引入自己的 starter -->
<dependency>
    <groupId>net.codingme.starter</groupId>
    <artifactId>myapp-spring-boot-starter</artifactId>
    <version>1.0-SNAPSHOT</version>
</dependency>
編寫一個 HelloController 注入自動配置裡的 HelloService用於測試。
@RestController
public class HelloController {

    @Autowired
    HelloService helloService;

    @GetMapping("/hello")
    public String sayHello(String name) {
        return helloService.sayHello(name);
    }
}
由於 autoConfigure 專案中定義了 sayHello 方法會輸出“Hello”+傳入的 name + 配置的 hello.suffix,所以我們在 springboot 配置檔案中配置這個屬性。
myapp.hello.suffix=早上好執行測試專案,訪問 /hello 路徑傳入一個 name 看看自動配置有沒有生效。

從測試結果可以看到自動配置的早上好已經生效了。到這裡自己編寫的 starter也已經完工。
專案已經傳到 Github.
https://github.com/niumoo/springboot/tree/master/springboot-starter
<完>
本文作者:未讀程式碼我的微信:wn8398
個人主頁:www.codingme.net
本篇文章是博主原創文章,歡迎轉載,轉載時在明顯位置註明原文連結即可。
關注公眾號回覆資源可以獲取Java 核心知識整理&面試資料。