
【分散式鎖】01-使用Redisson實現可重入分散式鎖原理
前言
主流的分散式鎖一般有三種實現方式:
- 資料庫樂觀鎖
- 基於Redis的分散式鎖
- 基於ZooKeeper的分散式鎖
之前我在部落格上寫過關於mysql和redis實現分散式鎖的具體方案:
https://www.cnblogs.com/wang-meng/p/10226618.html
裡面主要是從實現原理出發。
這次【分散式鎖】系列文章主要是深入redis客戶端reddision原始碼和zk 這兩種分散式鎖的實現原理。
可靠性
首先,為了確保分散式鎖可用,我們至少要確保鎖的實現同時滿足以下四個條件:
- 互斥性。在任意時刻,只有一個客戶端能持有鎖。
- 不會發生死鎖。即使有一個客戶端在持有鎖的期間崩潰而沒有主動解鎖,也能保證後續其他客戶端能加鎖。
- 具有容錯性。只要大部分的Redis節點正常執行,客戶端就可以加鎖和解鎖。
- 解鈴還須繫鈴人。加鎖和解鎖必須是同一個客戶端,客戶端自己不能把別人加的鎖給解了。
Redisson加鎖原理
redisson是一個非常強大的開源的redis客戶端框架, 官方地址:
https://redisson.org/
使用起來很簡單,配置好maven和連線資訊,這裡直接看程式碼實現:
1RLock lock = redisson.getLock("anyLock");
2
3lock.lock();
4lock.unlock();
redisson具體的執行加鎖邏輯都是通過lua指令碼來完成的,lua指令碼能夠保證原子性。
先看下RLock初始化的程式碼:
1public class Redisson implements RedissonClient {
2
3 @Override
4 public RLock getLock(String name) {
5 return new RedissonLock(connectionManager.getCommandExecutor(), name);
7}
8
9public class RedissonLock extends RedissonExpirable implements RLock {
10 public RedissonLock(CommandAsyncExecutor commandExecutor, String name) {
11 super(commandExecutor, name);
12 this.commandExecutor = commandExecutor;
13 this.id = commandExecutor.getConnectionManager().getId();
14 this.internalLockLeaseTime = commandExecutor.getConnectionManager().getCfg().getLockWatchdogTimeout();
15 this.entryName = id + ":" + name;
16}
首先看下RedissonLock 的id返回的是一個UUID物件,每個機器都對應一個自己的id屬性,id 值就類似於:"8743c9c0-0795-4907-87fd-6c719a6b4586"
接著往後看lock()的程式碼實現:
 1public class RedissonLock extends RedissonExpirable implements RLock {
 2    @Override
 3    public void lock() {
 4        try {
 5            lockInterruptibly();
 6        } catch (InterruptedException e) {
 7            Thread.currentThread().interrupt();
 8        }
 9    }
10
11    @Override
12    public void lockInterruptibly() throws InterruptedException {
13        lockInterruptibly(-1, null);
14    }
15
16    @Override
17    public void lockInterruptibly(long leaseTime, TimeUnit unit) throws InterruptedException {
18        // 獲取當前執行緒id
19        long threadId = Thread.currentThread().getId();
20        Long ttl = tryAcquire(leaseTime, unit, threadId);
21        // lock acquired
22        if (ttl == null) {
23            return;
24        }
25
26        RFuture<RedissonLockEntry> future = subscribe(threadId);
27        commandExecutor.syncSubscription(future);
28
29        try {
30            while (true) {
31                ttl = tryAcquire(leaseTime, unit, threadId);
32                // lock acquired
33                if (ttl == null) {
34                    break;
35                }
36
37                // waiting for message
38                if (ttl >= 0) {
39                    getEntry(threadId).getLatch().tryAcquire(ttl, TimeUnit.MILLISECONDS);
40                } else {
41                    getEntry(threadId).getLatch().acquire();
42                }
43            }
44        } finally {
45            unsubscribe(future, threadId);
46        }
47    }
48
49    <T> RFuture<T> tryLockInnerAsync(long leaseTime, TimeUnit unit, long threadId, RedisStrictCommand<T> command) {
50        internalLockLeaseTime = unit.toMillis(leaseTime);
51
52        return commandExecutor.evalWriteAsync(getName(), LongCodec.INSTANCE, command,
53                  "if (redis.call('exists', KEYS[1]) == 0) then " +
54                      "redis.call('hset', KEYS[1], ARGV[2], 1); " +
55                      "redis.call('pexpire', KEYS[1], ARGV[1]); " +
56                      "return nil; " +
57                  "end; " +
58                  "if (redis.call('hexists', KEYS[1], ARGV[2]) == 1) then " +
59                      "redis.call('hincrby', KEYS[1], ARGV[2], 1); " +
60                      "redis.call('pexpire', KEYS[1], ARGV[1]); " +
61                      "return nil; " +
62                  "end; " +
63                  "return redis.call('pttl', KEYS[1]);",
64                    Collections.<Object>singletonList(getName()), internalLockLeaseTime, getLockName(threadId));
65    }
66}
這裡省略了一些中間程式碼,這裡主要看tryAcquire() 方法,這裡傳遞的過期時間為-1,然後就是當前的執行緒id,接著就是核心的lua指令碼執行流程,我們來一步步看看是如何執行的:
1"if (redis.call('exists', KEYS[1]) == 0) then " +
2  "redis.call('hset', KEYS[1], ARGV[2], 1); " +
3  "redis.call('pexpire', KEYS[1], ARGV[1]); " +
4  "return nil; " +
5"end; " +
KEYS[1] 引數是:“anyLock”ARGV[2] 是:“id + ":" + threadId”
首先用的exists 判斷redis中是否存在當前key,如果不存在就等於0,然後執行hset指令,將“anyLock id:threadId 1”儲存到redis中,最終redis儲存的資料類似於:
1{
2  "8743c9c0-0795-4907-87fd-6c719a6b4586:1":1
3}
偷偷說一句,最後面的一個1 是為了後面可重入做的計數統計,後面會有講解到。
接著往下看,然後使用pexpire設定過期時間,預設使用internalLockLeaseTime為30s。最後返回為null,即時加鎖成功。
Redisson 可重入原理
我們看下鎖key存在的情況下,同一個機器同一個執行緒如何加鎖的?
1"if (redis.call('hexists', KEYS[1], ARGV[2]) == 1) then " +
2  "redis.call('hincrby', KEYS[1], ARGV[2], 1); " +
3  "redis.call('pexpire', KEYS[1], ARGV[1]); " +
4  "return nil; " +
5"end; " +
6"return redis.call('pttl', KEYS[1]);",
ARGV[2] 是:“id + ":" + threadId”
如果同一個機器同一個執行緒再次來請求,這裡就會是1,然後執行hincrby, hset設定的value+1 變成了2,然後繼續設定過期時間。
同理,一個執行緒重入後,解鎖時value - 1
Redisson watchDog原理
如果一個場景:現在有A,B在執行業務,A加了分散式鎖,但是生產環境是各種變化的,如果萬一A鎖超時了,但是A的業務還在跑。而這時由於A鎖超時釋放,B拿到鎖,B執行業務邏輯。這樣分散式鎖就失去了意義?
所以Redisson 引入了watch dog的概念,當A獲取到鎖執行後,如果鎖沒過期,有個後臺執行緒會自動延長鎖的過期時間,防止因為業務沒有執行完而鎖過期的情況。
我們接著來看看具體實現:
 1private <T> RFuture<Long> tryAcquireAsync(long leaseTime, TimeUnit unit, final long threadId) {
 2    if (leaseTime != -1) {
 3        return tryLockInnerAsync(leaseTime, unit, threadId, RedisCommands.EVAL_LONG);
 4    }
 5    RFuture<Long> ttlRemainingFuture = tryLockInnerAsync(commandExecutor.getConnectionManager().getCfg().getLockWatchdogTimeout(), TimeUnit.MILLISECONDS, threadId, RedisCommands.EVAL_LONG);
 6    ttlRemainingFuture.addListener(new FutureListener<Long>() {
 7        @Override
 8        public void operationComplete(Future<Long> future) throws Exception {
 9            if (!future.isSuccess()) {
10                return;
11            }
12
13            Long ttlRemaining = future.getNow();
14            // lock acquired
15            if (ttlRemaining == null) {
16                scheduleExpirationRenewal(threadId);
17            }
18        }
19    });
20    return ttlRemainingFuture;
21}
當我們tryLockInnerAsync執行完之後,會新增一個監聽器,看看監聽器中的具體實現:
 1protected RFuture<Boolean> renewExpirationAsync(long threadId) {
 2    return commandExecutor.evalWriteAsync(getName(), LongCodec.INSTANCE, RedisCommands.EVAL_BOOLEAN,
 3            "if (redis.call('hexists', KEYS[1], ARGV[2]) == 1) then " +
 4                "redis.call('pexpire', KEYS[1], ARGV[1]); " +
 5                "return 1; " +
 6            "end; " +
 7            "return 0;",
 8        Collections.<Object>singletonList(getName()),
 9        internalLockLeaseTime, getLockName(threadId));
10}
這裡面排程任務每隔10s鍾執行一次,lua指令碼中是續約過期時間,使得當前執行緒持有的鎖不會因為過期時間到了而失效
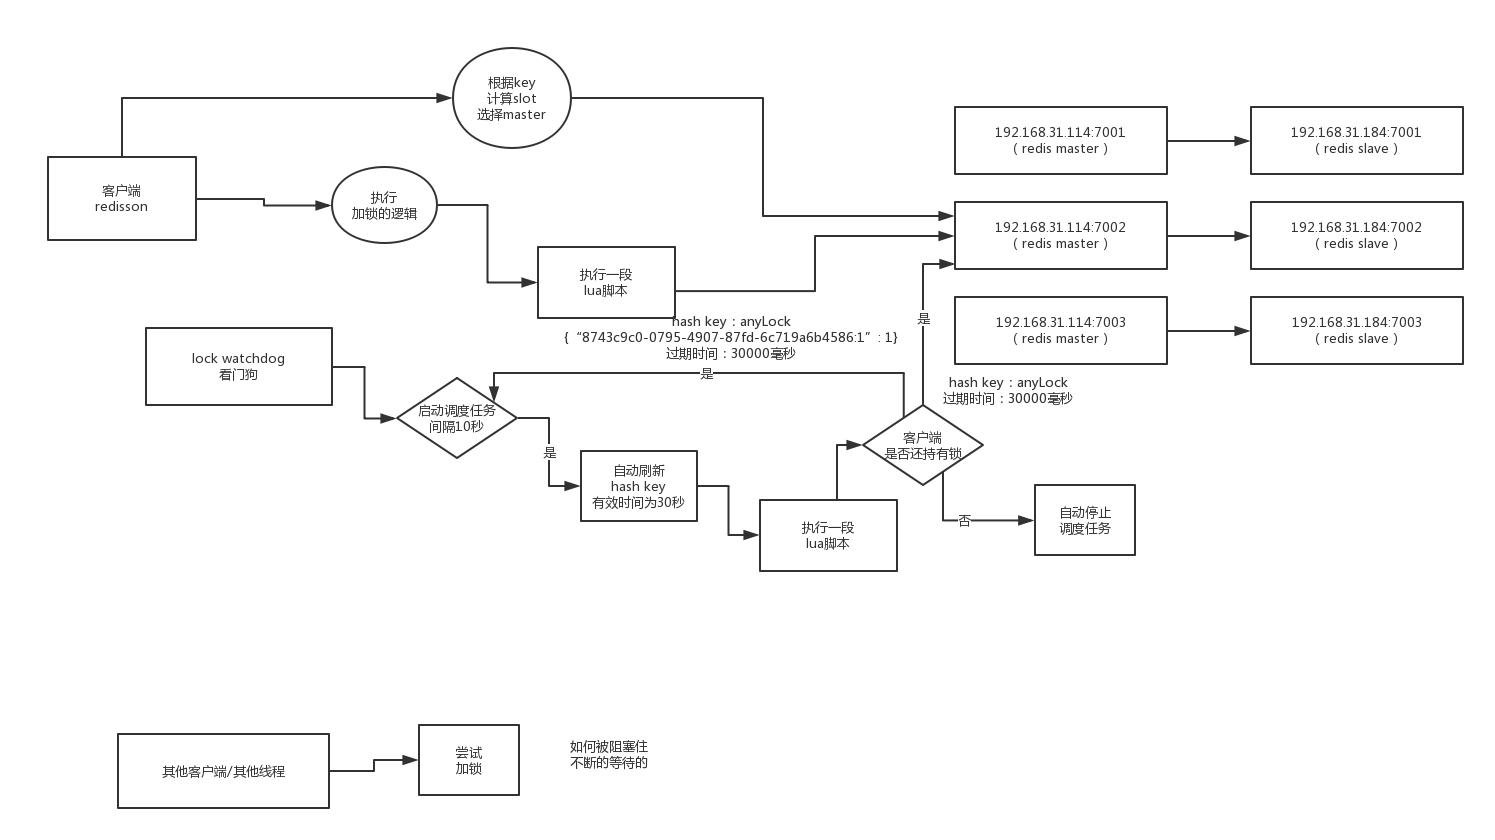 01_redisson watchdog_.png
Redisson 互斥性原理
還是看上面執行加鎖的lua指令碼,最後會執行到:
1"return redis.call('pttl', KEYS[1]);",
返回鎖還有多久時間過期,我們繼續接著看程式碼:
 1@Override
 2public void lockInterruptibly(long leaseTime, TimeUnit unit) throws InterruptedException {
 3    long threadId = Thread.currentThread().getId();
 4    Long ttl = tryAcquire(leaseTime, unit, threadId);
 5    // 返回ttl說明加鎖成功,不為空則是加鎖失敗
 6    if (ttl == null) {
 7        return;
 8    }
 9
10    RFuture<RedissonLockEntry> future = subscribe(threadId);
11    commandExecutor.syncSubscription(future);
12
13    try {
14        // 死迴圈去嘗試獲取鎖
15        while (true) {
16            // 再次嘗試加鎖
17            ttl = tryAcquire(leaseTime, unit, threadId);
18            // 如果ttl=null說明搶佔鎖成功
19            if (ttl == null) {
20                break;
21            }
22
23            // ttl 大於0,搶佔鎖失敗,這個裡面涉及到Semaphore,後續會講解
24            if (ttl >= 0) {
25                getEntry(threadId).getLatch().tryAcquire(ttl, TimeUnit.MILLISECONDS);
26            } else {
27                getEntry(threadId).getLatch().acquire();
28            }
29        }
30    } finally {
31        unsubscribe(future, threadId);
32    }
33}
Redisson鎖釋放原理
直接看lua程式碼:
 1protected RFuture<Boolean> unlockInnerAsync(long threadId) {
 2    return commandExecutor.evalWriteAsync(getName(), LongCodec.INSTANCE, RedisCommands.EVAL_BOOLEAN,
 3        // 判斷鎖key值是否存在
 4        "if (redis.call('exists', KEYS[1]) == 0) then " +
 5            "redis.call('publish', KEYS[2], ARGV[1]); " +
 6            "return 1; " +
 7        "end;" +
 8        // 判斷當前機器、當前執行緒id對應的key是否存在
 9        "if (redis.call('hexists', KEYS[1], ARGV[3]) == 0) then " +
10            "return nil;" +
11        "end; " +
12        // 計數器數量-1 可重入鎖
13        "local counter = redis.call('hincrby', KEYS[1], ARGV[3], -1); " +
14        // 如果計數器大於0,說明還在持有鎖
15        "if (counter > 0) then " +
16            "redis.call('pexpire', KEYS[1], ARGV[2]); " +
17            "return 0; " +
18        "else " +
19            // 使用del指令刪除key
20            "redis.call('del', KEYS[1]); " +
21            "redis.call('publish', KEYS[2], ARGV[1]); " +
22            "return 1; "+
23        "end; " +
24        "return nil;",
25        Arrays.<Object>asList(getName(), getChannelName()), LockPubSub.unlockMessage, internalLockLeaseTime, getLockName(threadId));
26}
總結
一圖總結:
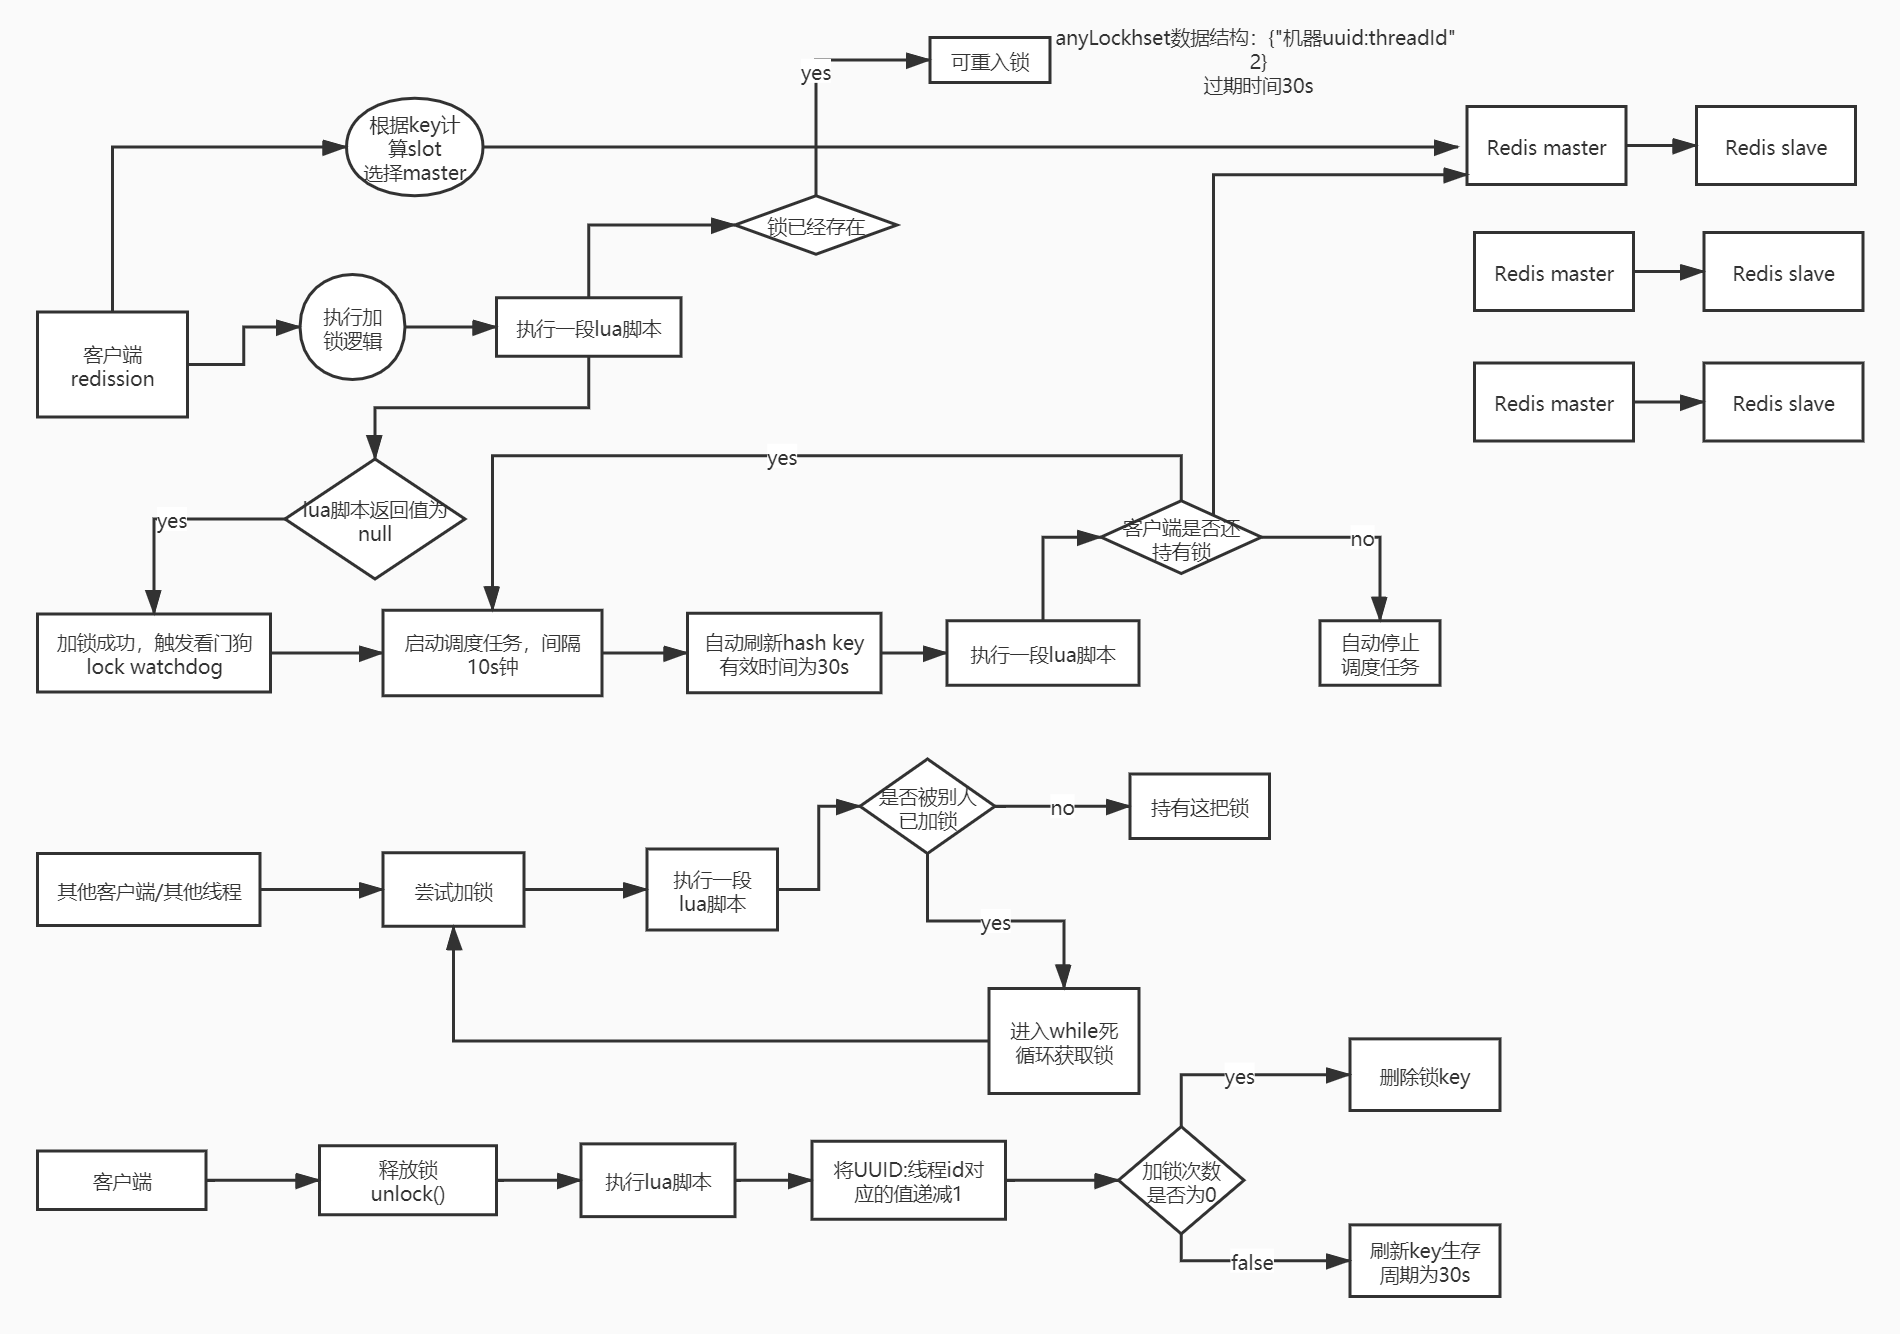 01_redission 可重入鎖實現原理