1. 程式人生 > >Angular 從入坑到挖坑 - Router 路由使用入門指北

Angular 從入坑到挖坑 - Router 路由使用入門指北

### 一、Overview Angular 入坑記錄的筆記第五篇,因為一直在加班的緣故拖了有一個多月,主要是介紹在 Angular 中如何配置路由,完成重定向以及引數傳遞。至於路由守衛、路由懶載入等“高階”特性,並不會在本篇文章中呈現 對應官方文件地址: - [路由與導航](https://angular.cn/guide/router#routing-and-navigation) 配套程式碼地址:[angular-practice/src/router-tutorial](https://github.com/Lanesra712/angular-practice/tree/master/src/router-tutorial "angular router tutorial") ### 二、Contents 1. [Angular 從入坑到棄坑 - Angular 使用入門](https://www.cnblogs.com/danvic712/p/getting-started-with-angular.html) 2. [Angular 從入坑到挖坑 - 元件食用指南](https://www.cnblogs.com/danvic712/p/angular-components-guide.html) 3. [Angular 從入坑到挖坑 - 表單控制元件概覽](https://www.cnblogs.com/danvic712/p/angular-forms-overview.html) 4. [Angular 從入坑到挖坑 - HTTP 請求概覽](https://www.cnblogs.com/danvic712/p/angular-http-guide.html) 5. [Angular 從入坑到挖坑 - Router 路由使用入門指北](https://www.cnblogs.com/danvic712/p/getting-started-with-angular-routing.html)
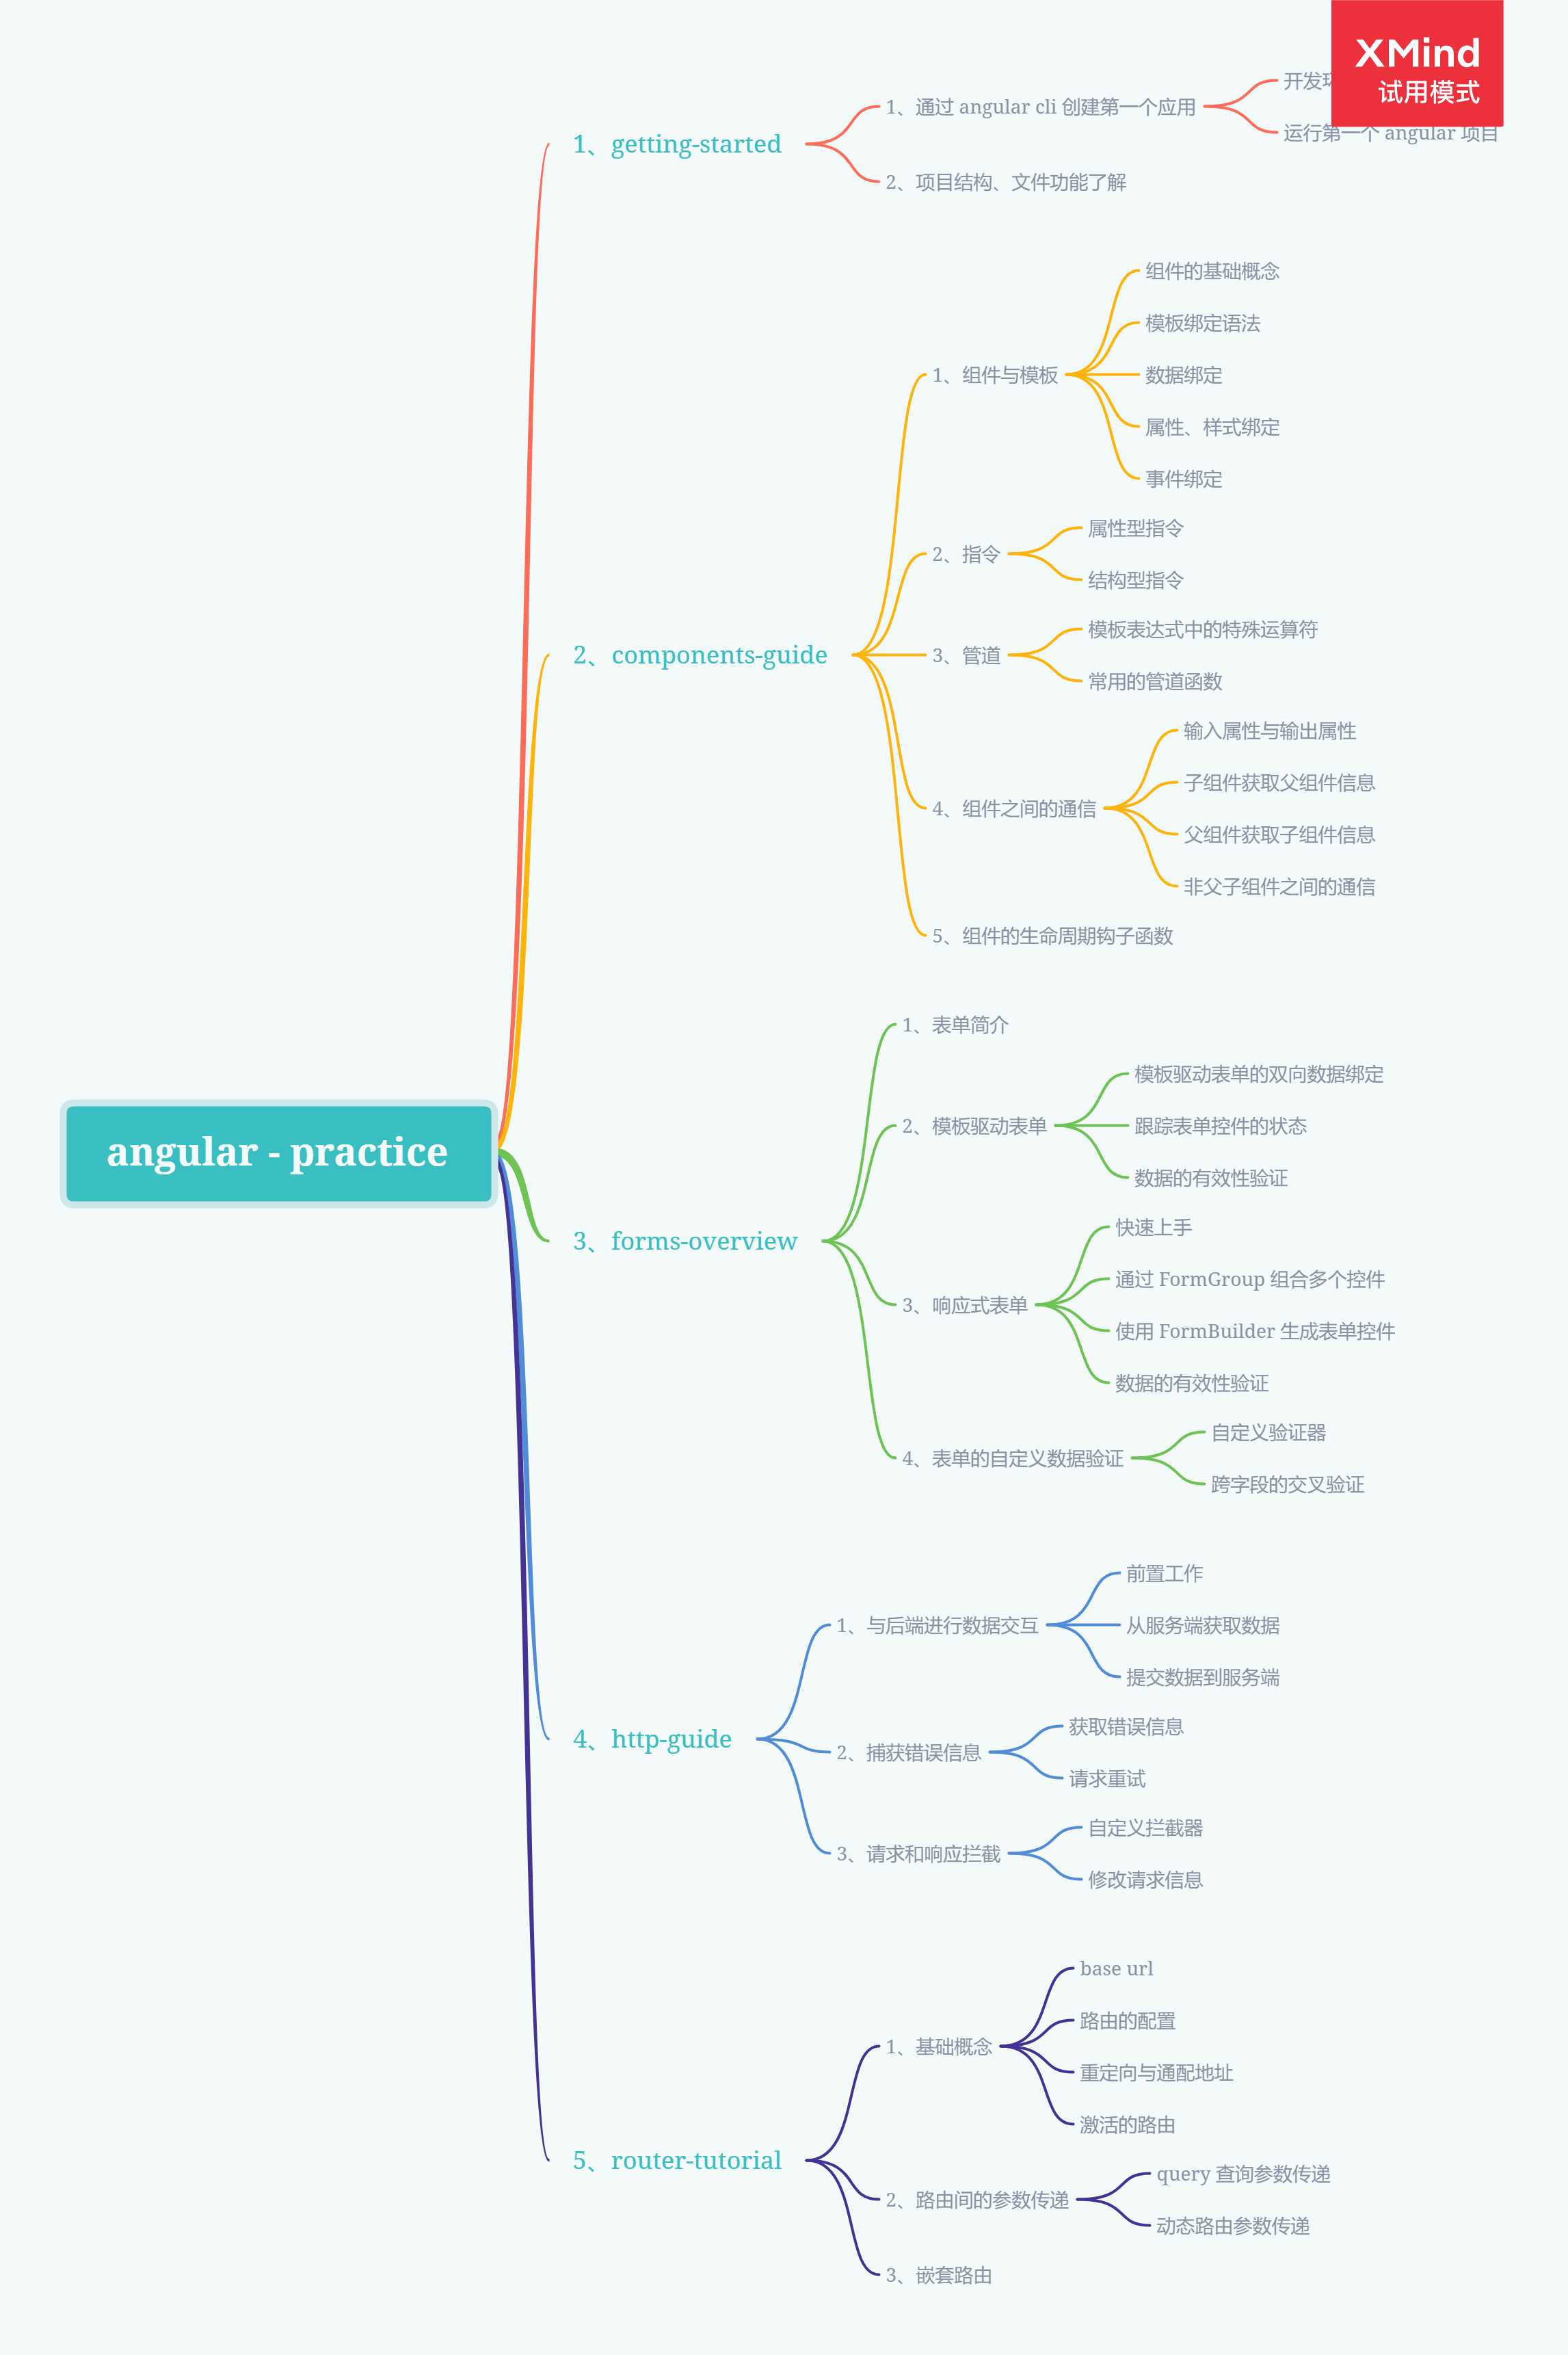
 ### 三、Knowledge Graph ![思維導圖](https://img2020.cnblogs.com/blog/1310859/202005/1310859-20200510150325994-741420644.png) ### 四、Step by Step #### 4.1、基礎概念 ##### 4.1.1、base url 在 Angular 應用中,框架會自動將 index.html 檔案中的 base url 配置作為元件、模板和模組檔案的基礎路徑地址。預設的情況下 app 資料夾是整個應用的根目錄,所以我們直接使用 index.html 中使用預設的 `` 即可 ```html RouterTutorial ``` ##### 4.1.2、路由的配置 在 Angular 專案中,系統的路由需要我們將一個 url 地址對映到一個展示的元件,因此需要手動的去設定 url 與元件之間的對映關係 因為我們在使用 Angular CLI 建立專案時,選擇了新增路由模組,因此我們可以直接在 app-routing.module.ts 檔案中完成路由的定義。最終我們定義的路由資訊,都會在根模組中被引入到整個專案 ```typescript import { NgModule } from '@angular/core'; import { Routes, RouterModule } from '@angular/router'; import { HomeComponent } from './components/home/home.component'; import { PagenotfoundComponent } from './components/pagenotfound/pagenotfound.component'; import { NewsComponent } from './components/news/news.component'; import { ProductComponent } from './components/product/product.component'; // 配置路由資訊 const routes: Routes = [ { path: 'home', component: HomeComponent }, { path: '', redirectTo: 'home', pathMatch: 'full' }, { path: 'news', component: NewsComponent }, { path: 'product', component: ProductComponent }, { path: '**', component: PagenotfoundComponent }, ]; @NgModule({ imports: [RouterModule.forRoot(routes)], exports: [RouterModule] }) export class AppRoutingModule { } ``` ```typescript import { BrowserModule } from '@angular/platform-browser'; import { NgModule } from '@angular/core'; import { AppRoutingModule } from './app-routing.module'; @NgModule({ declarations: [ AppComponent ], imports: [ BrowserModule, AppRoutingModule // 引入路由配置資訊 ], providers: [], bootstrap: [AppComponent] }) export class AppModule { } ``` ![路由配置](https://img2020.cnblogs.com/blog/1310859/202005/1310859-20200510150347175-1645034401.png) 當定義好路由資訊後,我們需要在頁面上使用 `` 標籤來告訴 Angular 在何處渲染出頁面。對於路由之間的跳轉,我們可以在 `a` 標籤上通過使用 `RouterLink` 指令來繫結具體的路由來完成地址的跳轉 ```html News Product
``` 當然,如果你非要自己給自己找事,就是要用 `a` 標籤的 `href` 屬性進行跳轉,當然也是可以的,不過在後面涉及到相關框架的功能時就會顯得有點不辣麼聰明的樣子了 ##### 4.1.3、重定向與通配地址 在普遍情況下,對於進入系統後的預設路徑,我們會選擇重定向到一個具體的地址上,這裡我們在定義路由資訊時,定義了一個空路徑用來表示系統的預設地址,當用戶請求時,重定向到 `/home` 路徑上,因為只有完整的 url 地址匹配空字串時才應該進行重定向操作,所以這裡需要指定匹配模式是全部匹配 ![預設地址重定向](https://img2020.cnblogs.com/blog/1310859/202005/1310859-20200510150403131-864582802.png) ```typescript const routes: Routes = [ { path: 'home', component: HomeComponent }, { path: '', redirectTo: 'home', pathMatch: 'full' } ]; ``` Angular 在解析路由時,是按照我們定義路由時的順序依次進行的,一旦匹配就會立即終止。因此,類似於 404 錯誤的這種通配的路由配置,因為可以匹配上每個 url 地址,所以應該在定義時放到最後 ```typescript const routes: Routes = [ { path: 'home', component: HomeComponent }, { path: '', redirectTo: 'home', pathMatch: 'full' }, { path: 'news', component: NewsComponent }, { path: 'product', component: ProductComponent }, { path: '**', component: PagenotfoundComponent }, ]; ``` ![路由示例](https://img2020.cnblogs.com/blog/1310859/202005/1310859-20200510150416607-1728548131.gif) 從截圖中可以看到,當我們開啟系統時,會自動跳轉到我們指定的 home 路徑,點選選單按鈕後,則會載入對應的元件頁面 ##### 4.1.4、啟用的路由 很多情況下,對於被選中的路由,我們可能會新增一個特定的樣式來進行提示使用者,因此,在我們定義 `router-link` 時,可以使用 `routerLinkActive` 屬性繫結一個 css 的樣式類,當該連結對應的路由處於啟用狀態時,則自動新增上指定的樣式類 ![啟用狀態的路由](https://img2020.cnblogs.com/blog/1310859/202005/1310859-20200510150432266-125976406.gif) #### 4.2、路由間的引數傳遞 在進行路由跳轉時,很常見的一種使用情況是我們需要將某些資料作為引數傳遞到下一個頁面中,例如從列表中選擇點選某一行資料,跳轉到對應的詳情頁面 常見的引數傳遞有如下的兩種方式 ##### 4.2.1、query 查詢引數傳遞 最常見的一種引數傳遞的方式,在需要跳轉的路由地址後面加上引數和對應的值,在跳轉後的頁面通過獲取引數 key 從而獲取到對應的引數值 ```html 跳轉 ``` 對於直接通過 a 標籤進行的路由跳轉,我們可以在 a 標籤上通過繫結 queryParams 屬性來新增查詢引數資訊 這裡通過 queryParams 屬性繫結的是一個物件,Angular 會自動的幫我們將這個引數物件與 url 進行拼接。對於引數物件中的屬性(key)對應的屬性值(value),我們可以繫結一個元件中的屬性進行動態的賦值,也可以通過新增單引號將引數值作為一個固定的數值,例如在下面程式碼中的兩個查詢引數就是固定的值 ```html News ``` ![query 引數傳值](https://img2020.cnblogs.com/blog/1310859/202005/1310859-20200510150446404-1137022671.png) 同樣的,我們也可以在 js 中完成路由的跳轉,對於這種使用場景,我們需要在進行 js 跳轉的元件類中通過建構函式依賴注入 Router 類,之後通過 Router 類的 navigate 方法完成路由的跳轉;對於可能存在的查詢引數,我們需要定義一個 NavigationExtras 型別的變數來進行設定 ```typescript import { Component, OnInit } from '@angular/core'; // 引入路由模組 import { Router, NavigationExtras } from '@angular/router'; @Component({ selector: 'app-home', templateUrl: './home.component.html', styleUrls: ['./home.component.scss'] }) export class HomeComponent implements OnInit { constructor(private router: Router) {} ngOnInit(): void {} /** * 使用 js 的方式通過 query 查詢字串的形式傳遞引數 */ queryNavigate() { // 查詢引數 let query: NavigationExtras = { queryParams: { category: 'social', date: '2020-05-04' } }; this.router.navigate(['/news' ], query); } } ``` 既然在進行跳轉時附加了引數資訊,在跳轉後的頁面我們肯定需要獲取到傳遞的引數值。在 Angular 中,需要在元件類中依賴注入 ActivatedRoute 來獲取傳遞的引數資訊 這裡的 queryParamMap 是一個 Observable 物件,所以這裡需要使用 subscribe 方法來獲取傳遞的引數值 ```typescript import { Component, OnInit } from '@angular/core'; // 引入路由模組 import { ActivatedRoute } from '@angular/router'; @Component({ selector: 'app-news', templateUrl: './news.component.html', styleUrls: ['./news.component.scss'] }) export class NewsComponent implements OnInit { constructor(private route: ActivatedRoute) { } ngOnInit(): void { this.route.queryParamMap.subscribe((data: any) =>
{ console.log(data.params); }); } } ``` ![獲取 query 查詢引數傳遞的引數值](https://img2020.cnblogs.com/blog/1310859/202005/1310859-20200510150506207-1141902432.png) ##### 4.2.2、動態路由傳遞 與使用查詢引數不同,使用動態路由進行引數傳值時,需要我們在定義路由時就提供引數的佔位符資訊,例如在下面定義路由的程式碼裡,對於元件所需的引數 newsId,我們需要在定義路由時就指明 ```typescript const routes: Routes = [ { path: 'news/detail/:newsId', component: NewsDetailComponent }, ]; ``` 對於採用動態路由進行的路由跳轉,在 a 標籤繫結的 routerLink 屬性陣列的第二個資料中,需要指定我們傳遞的引數值。例如這裡的 item.newsId 變數就是我們需要傳遞的引數值 ```html
  • {{item.title}}
``` 而採用 js 的方式進行跳轉時,我們同樣需要使用依賴注入的方式注入 Router 類,然後呼叫 navigate 方法進行跳轉。與使用 query 查詢引數傳遞資料不同,此時需要將跳轉的連結與對應的引數值組合成為一個數組引數進行傳遞 ```typescript import { Component, OnInit } from '@angular/core'; // 引入路由模組 import { Router, ActivatedRoute } from '@angular/router'; @Component({ selector: 'app-news', templateUrl: './news.component.html', styleUrls: ['./news.component.scss'] }) export class NewsComponent implements OnInit { newsList: any; constructor(private route: ActivatedRoute, private router: Router) { this.newsList = [{ newsId: 1111, title: 'lalalalalallaaa' }, { newsId: 2222, title: 'lalalalalallaaa' }, { newsId: 3333, title: 'lalalalalallaaa' }]; } ngOnInit(): void { this.route.queryParamMap.subscribe((data: any) => { console.log(data.params); }); } routerNavigate() { this.router.navigate(['/news/detail', 11111]); } } ``` 在獲取引數資料的元件類中,需要依賴注入 ActivatedRoute 類,因為是採用的動態路由的方式進行的引數傳遞,這裡需要通過 paramMap 屬性獲取到對應的引數值 ```typescript import { Component, OnInit } from '@angular/core'; // 引入路由模組 import { ActivatedRoute } from '@angular/router'; @Component({ selector: 'app-news-detail', templateUrl: './news-detail.component.html', styleUrls: ['./news-detail.component.scss'] }) export class NewsDetailComponent implements OnInit { constructor(private route: ActivatedRoute) { } ngOnInit(): void { this.route.paramMap.subscribe((data: any) => { console.log(data.params); }); } } ``` ![獲取動態路由傳遞的引數值](https://img2020.cnblogs.com/blog/1310859/202005/1310859-20200510150523527-121669730.png) #### 4.3、巢狀路由 在一些情況下,路由是存在巢狀關係的,例如下面這個頁面,只有當我們點選資源這個頂部的選單後,它才會顯示出左側的這些選單,也就是說這個頁面左側的選單的父級選單是頂部的資源選單 ![巢狀路由](https://img2020.cnblogs.com/blog/1310859/202005/1310859-20200510150535409-37074298.png) 針對這種具有巢狀關係的路由,在定義路由時,我們需要通過配置 children 屬性來指定路由之間的巢狀關係,例如這裡我定義 ProductDetailComponent 這個元件和 ProductComponent 元件形成的路由之間具有巢狀關係 ```typescript // 配置路由資訊 const routes: Routes = [ { path: 'product', component: ProductComponent, children: [{ path: 'detail', component: ProductDetailComponent }, { path: '', redirectTo: 'detail', pathMatch: 'full' }] } ]; ``` 因為子路由的渲染出口是在父路由的頁面上,因此當巢狀路由配置完成之後,在巢狀的父級頁面上,我們需要定義一個 `` 標籤用來指定子路由的渲染出口,最終的效果如下圖所示 ```html

我是父路由頁面顯示的內容

product works!

子路由元件渲染的出口

``` ![巢狀路由](https://img2020.cnblogs.com/blog/1310859/202005/1310859-20200510150548486-1404630